Image Source: i.ytimg.com
How To Set Clock On Kitchenaid Oven: Quick Steps Guide
Do you need to set the clock on your Kitchenaid oven? Yes, you can easily set the clock on your oven. This guide will walk you through the steps. Setting the correct time on your Kitchenaid oven helps you manage your cooking times better and use features like the oven timer accurately. Let’s make sure your oven display shows the right time.
Getting Started with Your Oven Clock
Setting the clock on your Kitchenaid oven is usually a simple task. Most Kitchenaid ovens have a control panel where you can change settings. This panel often has buttons or a touch screen. The oven digital display is where you see the current time and other information about your oven’s status. Keeping this clock correct is important. It helps you know when your food will be ready if you use the timer or delayed start features.
Finding the Control Area
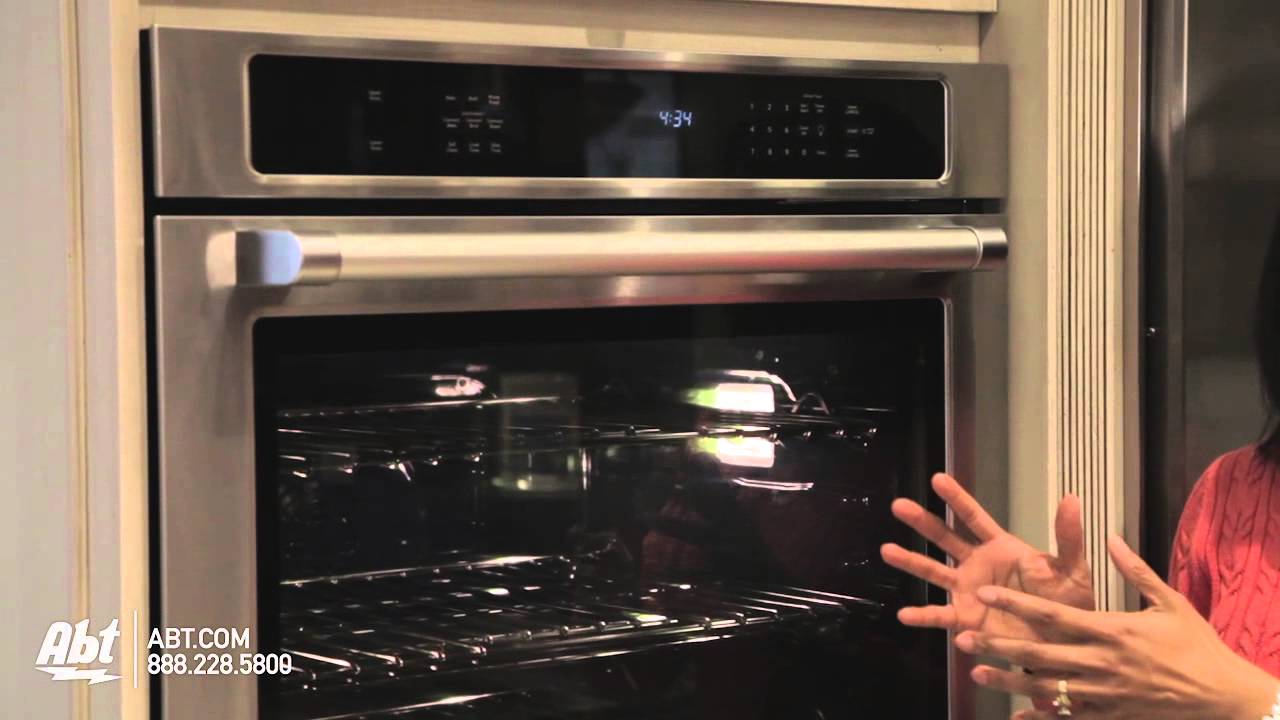
First, look at your Kitchenaid oven. Find the main control panel. This is usually at the top of the oven or range. It’s where you choose cooking modes and set temperatures. You will see buttons or a flat glass surface with words and numbers. This is where you will do the adjusting oven time.
On this control panel, you will see the oven digital display. This screen shows the time of day. It might also show the temperature when the oven is on. Right now, it might show the wrong time, or maybe it’s flashing after a power outage.
Simple Steps to Set the Time
Here are the basic steps for changing time on oven. The exact steps can be a little different depending on your specific Kitchenaid model. Always check your Kitchenaid oven user manual for the most accurate steps for your oven. But these general steps work for many models.
Step 1: Wake Up the Oven
Sometimes, the control panel goes dark to save energy. If the display is dark, you might need to touch it or press any button to wake it up. Just a quick tap or press should turn the display lights on. Now you can see the buttons and the display clearly.
Step 2: Find the Clock Button
Look closely at the control panel. You need to find the button that controls the clock. This button is often labeled “Clock.” It might also have a picture of a clock face. Sometimes, this function is part of a “Settings” menu.
- Check for a dedicated “Clock” button: Many models have one button just for setting the time.
- Look for a “Settings” or “Options” button: On some ovens, setting the clock is inside a menu. If you see a “Settings” button, press it first. Then look on the display for an option that says “Clock” or “Set Time.”
- Consult your manual: If you can’t find the button easily, your Kitchenaid oven user manual will show you exactly where it is and what it looks like.
Once you find the right button or menu option, press it.
Step 3: Tell the Oven You Want to Set the Time
After pressing the “Clock” button or selecting “Clock” from a menu, the oven knows you want to change the time. The oven digital display will likely change. It might show the current time flashing. Or it might show “12:00” flashing. This flashing means the oven is ready for you to enter the new time.
Step 4: Entering the Correct Time
Now you need to tell the oven what the correct time is. Kitchenaid ovens usually let you enter the hour and then the minute separately. You will use other buttons on the control panel for this.
- Use number buttons: Many ovens have a number pad (0-9). You just press the numbers for the time. For example, for 2:30, you might press “2”, then “3”, then “0”.
- Use + and – buttons: Some ovens have buttons labeled “+” and “-“. You press these buttons to move the time up or down. You might press “+” to increase the hour or minute, and “-” to decrease them. You might need to press a button to switch between setting the hour and setting the minute.
- Use up and down arrows: Similar to + and -, some models have arrow buttons. An up arrow increases the time, a down arrow decreases it.
You will typically set the hour first. The display might ask for the hour or show the hour flashing. Enter the correct hour. Remember to consider AM or PM if your oven uses a 12-hour clock. Some ovens have an AM/PM indicator or a button to switch between AM and PM. If your oven uses a 24-hour clock (like 14:30 for 2:30 PM), you just enter the numbers.
After setting the hour, you will set the minute. The display might automatically move to the minute part, or you might need to press another button (like “Clock” again or an “Enter” button) to move to setting the minutes. Enter the correct minutes using the number buttons or the +/- or arrow buttons.
Step 5: Saving the New Time
Once you have entered both the hour and the minutes, you need to tell the oven you are finished. This saves the new time. There is usually a button for this.
- Press the “Clock” button again: On many models, pressing the “Clock” button a second time after entering the numbers saves the time.
- Press “Start” or “Enter”: Some ovens use a “Start” or “Enter” button to confirm settings.
- Wait a few seconds: Some very simple models just need you to stop pressing buttons for a few seconds. The oven will automatically save the time you entered.
The oven digital display should stop flashing and show the new time steadily. Congratulations! You have just finished adjusting oven time on your Kitchenaid oven.
Step-by-Step Summary Table
Let’s put the main steps in a simple table. Remember, check your manual for exact button names.
| Step Number | What to Do | What to Look For on Display | Buttons You Might Press |
|---|---|---|---|
| 1 | Wake up the display | Dark display turns on | Any button or touch |
| 2 | Find the Clock button/setting | Look at the control panel | “Clock”, “Settings” |
| 3 | Tell oven to set clock | Time starts flashing | “Clock” or “Set Time” option |
| 4 | Enter the Hour | Hour flashing | Numbers, +/-, Arrows |
| 5 | Enter the Minute | Minute flashing | Numbers, +/-, Arrows |
| 6 | Save the new time | Time stops flashing | “Clock” again, “Start”, “Enter” |
This table gives you a quick guide to pressing oven buttons or touching the right spots on the panel.
More Details on Pressing Oven Buttons
Let’s talk more about pressing oven buttons. Older or basic Kitchenaid models often have physical buttons that you push in. You’ll feel a click. Newer or more advanced models often have a smooth glass panel with touch-sensitive areas. You just touch the picture or word on the glass.
- Physical Buttons: These are usually clearly labeled. You press the one that says “Clock”. Then you might use number buttons or separate hour/minute buttons. Make sure you press them firmly but not too hard.
- Touch Panels: These are flat. The labels and numbers light up. You gently touch the area that says “Clock” or shows the clock icon. When entering the time, you touch the numbers on a digital keypad that appears, or touch the areas for “+” and “-“. When pressing oven buttons (or touch areas), make sure your finger is clean and dry for the best response.
Sometimes, you might need to press and hold a button for a few seconds instead of just pressing it quickly. This is less common for setting the clock, but it’s good to keep in mind for other Kitchenaid oven settings. Your manual will tell you if you need to press and hold.
What About Setting the Clock After Power Outage?
A common reason you need to set the clock is after power outage. If your home loses power, even for a moment, your oven clock will likely reset. It will usually show “12:00” or “0:00” and the numbers will be flashing. This flashing is a clear sign that you need to set the clock again.
The process for setting the clock after power outage is exactly the same as setting it anytime else. You just follow the steps: find the clock button, press it, enter the time, and save it. The oven is designed to make it easy to reset after power interruptions.
When the Oven Clock Not Working Right
Sometimes, you might have trouble with the oven clock not working as expected. Here are a few things that can happen and what you can do.
- The display is blank: Make sure the oven has power. Check if other lights or appliances in your kitchen are working. If they are, try pressing any button on the oven control panel to wake it up. If it still doesn’t turn on, there might be a bigger issue requiring service.
- The time won’t set: You follow the steps, but the display doesn’t change or save the time. Make sure you are pressing the correct buttons in the right order. Are you pressing the ‘save’ or ‘enter’ button at the end? Refer back to your Kitchenaid oven user manual to ensure you aren’t missing a step for your specific model. Sometimes, simply unplugging the oven for a minute (if it’s electric and accessible) or turning off its circuit breaker for a minute can reset the control panel and fix minor glitches. Then restore power and try setting the clock again.
- The clock loses time: If you set the clock, but it keeps becoming wrong over time (losing minutes or hours), there might be an issue with the oven’s electronic control board. This is less common and usually requires a service technician to fix.
- Display is unreadable: If the oven digital display is too dim, has missing parts of numbers, or is flickering, the display itself or the control board might be failing. This also usually requires professional help.
Before assuming a serious problem, always try the basic steps again, check your manual, and try a power reset (unplugging or circuit breaker).
The Clock and Other Kitchenaid Oven Settings
Setting the correct time is also important for using other Kitchenaid oven settings.
- Setting Oven Timer: The basic kitchen timer counts down from a time you set (like 30 minutes). It doesn’t rely on the clock of the day. However, some timers might display alongside the clock.
- Delay Start Cooking: This feature lets you tell the oven to start cooking at a later time. For example, you can put food in the oven and tell it to start cooking at 5:00 PM. For this to work correctly, the oven clock must show the correct time of day. If the clock is wrong, the delay start will happen at the wrong time.
- Timed Cooking: Some ovens let you set a cook time (like 1 hour) and then the oven turns off after that time. The oven clock doesn’t directly control how long it cooks, but it does show the time of day while the cooking is happening, which is useful for monitoring.
So, keeping the clock set is key for these automatic features. It’s part of keeping all your Kitchenaid oven settings ready to use.
Tips for Easy Clock Setting
Here are a few simple tips to make setting your oven clock easy every time.
- Keep your manual handy: Store your Kitchenaid oven user manual in a kitchen drawer. If you move or lose it, you can often find a digital copy on the Kitchenaid website by searching for your oven’s model number.
- Know your model number: Your oven’s model number is usually on a sticker around the oven door frame or on the back of the oven. Write it down or take a picture. This helps you find the correct manual.
- Set it during daylight saving time changes: Twice a year (in many places), we change clocks for daylight saving time. Remember to adjust your oven clock along with your other clocks. You’ll either move it forward one hour in the spring or back one hour in the fall.
- Practice makes perfect: The first time might feel tricky, but after you do it once, it will be much easier the next time.
By following these simple tips and the steps outlined above, you can easily keep your Kitchenaid oven clock showing the correct time.
Interpreting Your Oven Display
The oven digital display on your Kitchenaid oven shows more than just the time. When the oven is on, it shows the set temperature. It might show the actual temperature as it heats up. If you are using the timer, it will show the time counting down.
When you are setting the clock, pay close attention to what the display is showing. Is it flashing? Is only the hour flashing? Is it asking for AM or PM? The display gives you clues about what the oven needs you to do next. If you are trying to set the clock and the display shows something else (like temperature), you probably haven’t pressed the clock button correctly yet.
Different models have different displays. Some are basic red or green numbers. Newer ones might be full color LCD screens that show more information. But the basic idea is the same: the oven digital display communicates with you. Learn to read it.
Adjusting Oven Time: Specifics by Model Type
While the general steps are similar, Kitchenaid has different oven models. Some are basic, some are high-tech.
- Basic Models: These usually have physical buttons. Look for a clear “Clock” button. You’ll likely use number buttons to enter the time.
- Models with Touch Control Panels: These have a smooth glass surface. The “buttons” are areas you touch. You might press a “Clock” icon or find “Clock” in a “Settings” menu accessed by touching a “Settings” icon. Entering the time might involve a number pad that appears on the screen.
- Models with Knobs and a Digital Display: Some models use knobs for temperature and cooking modes, but still have a digital display for the clock and timer. The clock setting buttons will be near this digital display.
No matter the model, the fundamental process involves telling the oven you want to set the clock, entering the time, and saving it. If you’re unsure, always return to your Kitchenaid oven user manual. It has pictures and steps specific to your appliance.
Deep Dive into Kitchenaid Oven User Manual
Your Kitchenaid oven user manual is your best friend for any questions about your appliance. It contains:
- Specific instructions: Step-by-step guides for your model.
- Button explanations: Pictures showing where each button is and what it does.
- Setting explanations: How to use all the features, including adjusting oven time, setting oven timer, delay start, etc.
- Troubleshooting: What to do if something isn’t working, like the oven clock not working.
- Cleaning and care instructions.
If you don’t have the physical copy, go to the Kitchenaid website. There’s usually a support section where you can enter your model number and download a PDF version of the manual for free. Looking up your specific model number is very important because Kitchenaid makes many different ovens, and the steps for one might be slightly different for another. The manual ensures you are pressing oven buttons or touch areas in the way your oven expects.
Summarizing Kitchenaid Oven Settings Control
Mastering how to set the clock is a great first step in getting comfortable with your Kitchenaid oven control panel. This panel is your command center.
It allows you to:
- Turn the oven on and off.
- Choose cooking modes (Bake, Broil, Convection, etc.).
- Set the cooking temperature.
- Set the timer.
- Use special features like Delay Start or Self-Clean.
- Adjust Kitchenaid oven settings, including the clock.
By practicing setting the clock, you become more familiar with pressing oven buttons or using the touch interface, which makes using all other features easier.
Getting the Time Right
Getting the time right on your oven is more than just neatness. It affects how you use the oven’s smart features. Imagine planning a meal to be ready right when you get home. You use the delay start, but the clock is an hour slow. Your food starts an hour late! Or you set the oven timer, and while the timer function works independently, seeing the correct time of day on the display helps you plan your overall cooking schedule.
Adjusting oven time is one of the simplest maintenance tasks for your oven, but it has real benefits for practical cooking.
Common Questions About Kitchenaid Oven Clock
Let’s answer some common questions people have about their Kitchenaid oven clock.
FAQ Section
Q: Why is my Kitchenaid oven clock flashing?
A: The clock usually flashes after a power outage or when the oven was first installed. It means the time is not set and needs you to enter the correct time. Just follow the steps in this guide to set it.
Q: Do I need to set the clock to use the oven?
A: No, you do not need to set the clock to use basic functions like baking or broiling. You can still turn the oven on and set the temperature. However, you need the clock set to use features like Delay Start or Timed Cooking, which rely on the time of day.
Q: How do I change from 12-hour to 24-hour time (or vice versa)?
A: This is usually an option within the clock setting menu. After you press the “Clock” button, look on the display for an option related to “Time Format” or “12/24 Hour.” You might need to press a specific button or use the +/- or arrow keys to toggle between the formats. Your Kitchenaid oven user manual will have exact instructions for this setting change.
Q: My oven clock is dim. Can I make it brighter?
A: Some Kitchenaid models allow you to adjust the brightness of the oven digital display. Look in the “Settings” menu on your control panel for an option like “Display,” “Brightness,” or “Contrast.” If you don’t see this option, your model might not have adjustable brightness, or the dimness could indicate a part is failing.
Q: The clock on my oven is wrong, but there wasn’t a power outage. Why?
A: If your oven clock isn’t keeping accurate time without a power interruption, there could be a minor electronic glitch or a problem with the control board. Try a simple power reset first: turn off the oven’s circuit breaker for a minute, then turn it back on. If the problem continues, you might need a service technician to look at the oven’s control board.
Q: Can I turn the oven clock display off?
A: Some Kitchenaid oven models have an option to turn off the clock display when the oven is not in use. Look in the “Settings” or “Display” menu on your control panel for an option like “Clock On/Off” or “Display Standby.” This is a power-saving feature.
Q: My touch control panel isn’t responding when I try pressing oven buttons (touch areas) to set the clock.
A: Make sure the panel is clean and your fingers are dry. Sometimes grease or moisture can prevent touch panels from working correctly. If cleaning doesn’t help, try a power reset (turn off the circuit breaker for a minute). If it still doesn’t respond, the touch panel or control board may have a problem needing repair.
Q: How do I set the oven timer? Is it the same as setting the clock?
A: No, setting oven timer is usually different from setting the clock. There is usually a separate “Timer” button. You press the “Timer” button, then enter the amount of time you want to count down (e.g., 30 minutes). The timer runs independently and will beep when the time is up. It doesn’t affect the time of day shown on the main clock display.
These answers should help you understand common issues and functions related to your Kitchenaid oven clock.
Conclusion
Setting the clock on your Kitchenaid oven is a straightforward process once you know which buttons to press or which areas to touch on the control panel. Whether you’re adjusting oven time after power outage, for daylight saving, or just because it’s wrong, the steps involve finding the clock function, entering the correct time, and saving it. Paying attention to the oven digital display helps guide you through the process. While different models vary slightly, the core method of pressing oven buttons or using the touch interface remains the same. If you ever get stuck, remember your Kitchenaid oven user manual is the most reliable source for specific instructions for your appliance, helping you master all your Kitchenaid oven settings. With a little practice, keeping your oven clock accurate will become a quick and easy task.