Image Source: prettyhandygirl.com
How To Remove Soffit In Kitchen: Step-by-Step
What is a kitchen soffit? A kitchen soffit is a decorative or functional structure built into the ceiling, often above cabinets or appliances, to conceal pipes, vents, electrical wiring, or simply to create a visual break. Can I remove a kitchen soffit myself? Yes, with the right tools, preparation, and safety precautions, you can remove a kitchen soffit yourself as a DIY project. Who is this guide for? This guide is for homeowners and DIY enthusiasts looking to undertake a kitchen renovation or simply alter the look of their kitchen ceiling.
Removing a soffit in your kitchen can dramatically change the feel of your space, making it feel larger, brighter, and more modern. This is a common step in many kitchen renovations, as soffits can often feel dated or obstructive. Whether you’re aiming for a sleeker look, want to install taller cabinets, or need to access something within the soffit structure, this in-depth guide will walk you through the entire process of soffit removal kitchen.
This guide is designed to be comprehensive, covering everything from the initial assessment to the final cleanup. We’ll cover kitchen ceiling soffit removal, including what to expect and how to tackle it safely. If you’re considering a kitchen renovation soffit update, this is your starting point. We’ll also touch upon alternatives like how to box in kitchen soffit if complete removal isn’t your goal, and even mention soffit installation kitchen for those looking to add one later. For those tackling this as a weekend project, we’ll focus on soffit removal DIY aspects.
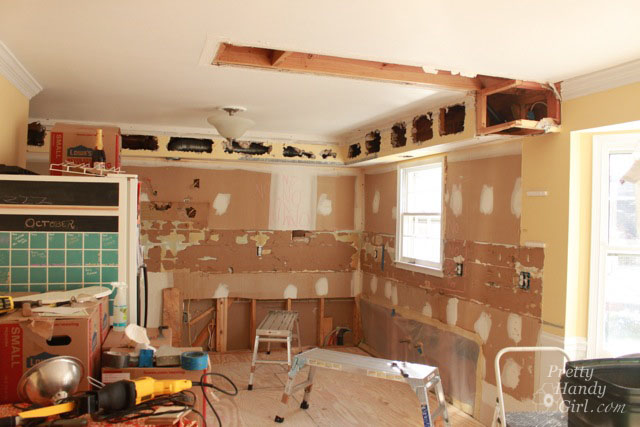
Fathoming the Soffit: What Are You Dealing With?
Before you grab a hammer, it’s crucial to identify what your kitchen soffit is made of and what it might be hiding. This step is vital for safety and planning.
Types of Kitchen Soffits
Kitchen soffits can vary greatly in their construction. Identifying the type will help you decide on the best removal method.
- Drywall Soffits: These are the most common. They are typically framed with wood studs and then covered with drywall, just like your walls. They are relatively straightforward to remove.
- Plywood or Wood Paneling Soffits: Some older homes might have soffits constructed entirely from plywood or covered in wood paneling. These can be a bit sturdier but are generally still manageable for DIY removal.
- Plaster and Lath Soffits: In older homes, you might encounter plaster over lath. This material is harder to work with and can create more dust and debris. Care is needed to avoid damaging the surrounding ceiling.
What’s Inside Your Soffit?
This is the most important question. Your soffit is likely hiding something.
- Ventilation Ducts: Kitchen soffits often house ventilation ducts for your range hood or bathroom fans. Removing these might impact your kitchen’s ventilation system.
- Plumbing: In some cases, pipes for upper floors might run through soffits. Be cautious of water damage or leaks.
- Electrical Wiring: Soffits can conceal electrical wiring for lights, switches, or outlets. Always assume there is live wiring and take appropriate safety measures.
- Structural Beams: While less common, some soffits might be built around small structural elements.
Safety First: Essential Precautions
Safety is paramount when undertaking any demolition or home improvement project.
- Electricity: ALWAYS turn off the power to the area around the soffit at the breaker box. Double-check with a voltage tester to ensure no electricity is flowing. This is non-negotiable for preventing electrocution.
- Water: If you suspect plumbing is present, locate the main water shut-off valve for your home before you start cutting.
- Dust and Debris: Soffit removal, especially with drywall or plaster, creates a lot of dust. Wear a dust mask (N95 recommended), safety glasses, and old clothes. Consider covering furniture and floors with drop cloths.
- Tools: Ensure you know how to use your tools safely. Wear work gloves for protection against splinters and sharp edges.
Gathering Your Arsenal: Tools and Materials
Having the right tools makes the job much easier and safer.
Essential Tools for Soffit Removal
- Safety Gear: Dust mask, safety glasses, work gloves.
- Utility Knife: For scoring drywall and cutting caulk.
- Pry Bar: For gently separating sections and removing nails. A flat bar or cat’s paw can be very useful.
- Hammer: For tapping pry bars and removing stubborn nails.
- Stud Finder: To locate wooden studs within the soffit structure.
- Drywall Saw or Jab Saw: For making precise cuts in drywall.
- Reciprocating Saw (Sawzall): For faster demolition of wood framing, but use with extreme caution to avoid cutting into unseen utilities.
- Putty Knife: For scraping away old caulk or paint.
- Screwdriver Set: For removing any visible screws.
- Voltage Tester: Crucial for confirming power is off.
- Drop Cloths or Plastic Sheeting: To protect your kitchen surfaces.
- Ladder or Step Stool: For safe access to the soffit.
Potential Materials Needed
- New Drywall: If you plan to patch or re-cover the area.
- Wood Studs: For framing any necessary repairs or modifications.
- Drywall Screws: For attaching new drywall.
- Joint Compound and Tape: For finishing drywall.
- Paint: To match the existing ceiling or for a fresh look.
The Demolition Dance: Step-by-Step Soffit Removal
Let’s get down to business! This section provides a detailed walkthrough of removing kitchen soffit.
Step 1: Preparation and Safety Checks
This is where we ensure a smooth and safe process for kitchen ceiling soffit removal.
- Clear the Area: Remove all items from countertops, tables, and the floor beneath and around the soffit. Cover remaining items with drop cloths or plastic sheeting.
- Turn Off Power: As mentioned, this is critical. Go to your electrical panel and switch off the breaker that controls the lights and outlets in your kitchen. Use your voltage tester on any visible wiring within the soffit area to confirm the power is off.
- Identify Utilities: If you are unsure about what is inside the soffit, consider taking a small exploratory hole first. A stud finder can help locate framing members, but it won’t detect pipes or wires. If you find anything concerning, it might be best to consult a professional electrician or plumber.
Step 2: Locating the Edges and Seams
Finding where the soffit meets the ceiling and walls is key to a clean removal.
- Caulk Lines: Soffits are usually caulked where they meet the ceiling and walls. Use your utility knife or putty knife to carefully score and cut through these caulk lines. This will help prevent paint from peeling off the walls or ceiling when you start to pull the soffit away.
- Wall and Ceiling Joins: Carefully examine the seams where the soffit structure attaches to the ceiling and adjacent walls. You’ll want to find the edges of the drywall or covering material.
Step 3: Beginning the Soffit Removal
This is the active demolition phase. Remember to work methodically and carefully.
For Drywall Soffits:
- Cut into the Drywall: Using your utility knife, score a line along the bottom edge of the soffit. Then, use a drywall saw or jab saw to cut a shallow line along the length of the soffit. You’re just trying to cut through the drywall, not the studs behind it.
- Pry Away Sections: Gently insert a pry bar into your initial cut. Apply steady pressure to pull the drywall away from the framing. Work your way along the length of the soffit, removing sections of drywall. If the drywall is stubborn, you might need to make additional cuts or use your hammer to tap the pry bar.
- Expose the Framing: Once the drywall is removed, you’ll see the wooden studs that form the soffit’s frame.
For Wood Paneling or Plywood Soffits:
- Locate Fasteners: Look for nails or screws securing the paneling to the framing.
- Pry Gently: Use a pry bar and hammer to carefully lift and remove the wood sections. Start at an edge and work your way across. Be mindful of how the wood is attached to avoid unnecessary damage to the ceiling or walls.
For Plaster and Lath Soffits:
- Score and Break: This material is brittle. Use a utility knife to score deeply around the edges. You may need to carefully tap the plaster with the hammer to break off small sections. This will create more dust, so be prepared.
- Reveal the Lath: Once the plaster is gone, you’ll see the lath (usually wood strips or metal mesh). You’ll then need to remove this to get to the framing.
Step 4: Dismantling the Soffit Frame
With the outer layer removed, you can now tackle the internal structure.
- Locate Studs: Use your stud finder to identify the wooden studs that make up the soffit frame.
- Cut or Pry the Framing:
- Cutting Method (Faster, More Dust): If you have a reciprocating saw, you can carefully cut through the studs. Crucially, be aware of any utilities running through the studs before cutting. Make slow, controlled cuts.
- Prying Method (Slower, Less Dust): Use a pry bar to detach the studs from the ceiling and walls. You may need to remove nails or screws first. This method is more controlled but can take longer.
- Work in Sections: Dismantle the soffit frame piece by piece. It’s often easier to remove the front face first, then the sides and bottom.
Step 5: Dealing with Utilities and Obstructions
This is where careful work is essential.
- Electrical Wiring: If you encounter electrical wires, DO NOT cut them. Ensure the power is off. You may need to reroute them or have an electrician do so if they are in the way of your renovation plans.
- Plumbing Pipes: If you find pipes, assess their purpose. If they are supply lines, you can temporarily cap them if necessary. If they are drain lines, extreme caution is needed as they might contain residual water. If you’re unsure, stop and consult a plumber.
- Ventilation Ducts: If the soffit housed ventilation, you’ll need to decide if you’re rerouting the ductwork or capping it off. This might require modifying your kitchen’s overall ventilation strategy.
Step 6: Cleaning Up and Patching
The demolition is done, but the work isn’t quite finished.
- Clear Debris: Carefully sweep or vacuum up all the dust and debris. Use a shop vac for best results.
- Inspect the Area: Examine the exposed ceiling and wall surfaces. Look for any damage that needs to be repaired.
- Prepare for Next Steps: If you are planning to install new cabinets, relocate lights, or simply patch the ceiling, prepare the area accordingly. This might involve installing new blocking with wood studs, running new wiring, or patching drywall.
What If I Want to Box In My Kitchen Soffit?
Sometimes, complete soffit removal isn’t the desired outcome. You might want to box in kitchen soffit for a cleaner look or to integrate it better with new cabinetry. This involves reframing the existing soffit to create a smooth, flat surface, often aligning perfectly with new upper cabinets. This typically involves adding new drywall over the existing structure or building a new frame and covering it.
What About Kitchen Soffit Repair?
If your goal isn’t full removal but rather kitchen soffit repair, the approach is different. This could involve patching holes, reinforcing weakened sections, or re-covering damaged areas with new drywall or paneling. The steps would focus on patching and finishing rather than demolition.
Can I Install a New Soffit?
Yes, if your goal is the opposite, and you’re interested in soffit installation kitchen, the process involves framing a new structure and covering it with drywall or other materials. This is often done to house lighting or to create a specific architectural look.
Post-Removal Considerations and Next Steps
Once the soffit is gone, you’ll have an open space. What do you do with it?
Options for the Newly Opened Space
- Install Taller Cabinets: This is a very popular choice for kitchen renovation soffit updates. Removing the soffit allows you to install cabinets that go all the way to the ceiling, maximizing storage and creating a more seamless, custom look.
- Recessed Lighting: The void left by the soffit can be an ideal location for installing new recessed lighting, improving the overall illumination of your kitchen.
- Open Shelving: If you prefer an open look, you can install open shelving in the newly created vertical space.
- Smooth Ceiling Finish: If you’re happy with the ceiling height, you can simply patch and paint the area, creating a clean, uninterrupted ceiling.
Patching and Finishing
If you plan to patch the ceiling or walls where the soffit was attached, you’ll need basic drywalling skills.
- Patching Small Holes: For minor damage, you can use drywall joint compound (spackle) and a putty knife. Apply thin coats, allowing each to dry and sanding smooth between coats.
- Patching Larger Areas: For more significant holes or to cover removed framing, you’ll need to cut a patch of drywall to fit. Secure it with drywall screws and then tape and mud the seams.
- Sanding and Painting: Once the patched areas are dry and smooth, sand them lightly. Apply a primer followed by one or two coats of paint that matches your ceiling or wall color.
Frequently Asked Questions (FAQ)
-
Q: How long does it take to remove a kitchen soffit?
A: For a DIYer, removing a standard drywall soffit can take anywhere from 2 to 8 hours, depending on its size, complexity, and the tools you use. The cleanup and patching will add more time. -
Q: Will removing my soffit damage my ceiling or walls?
A: It’s possible, especially if you’re not careful. Working slowly, using the right tools, and scoring caulk lines properly will minimize damage. Expect some minor drywall repair to be necessary. -
Q: What if I find a lot of pipes or wires in my soffit?
A: If you find more than you anticipated or anything you’re unsure how to handle, it’s best to stop and call a professional plumber or electrician. Safety is more important than saving money on this step. -
Q: Is it worth removing a kitchen soffit?
A: For many homeowners, the benefits of a more modern look, increased cabinet space, and improved lighting make removing a soffit a worthwhile renovation project. -
Q: Can I leave the soffit but update its look?
A: Yes, you can paint the soffit, add new trim, or even clad it with different materials if you don’t want to remove it entirely.
Removing a kitchen soffit can be a rewarding DIY project that transforms your kitchen’s appearance. By following these steps, prioritizing safety, and working methodically, you can successfully achieve a cleaner, more spacious kitchen. This process is a key step for many undertaking a kitchen renovation soffit upgrade, paving the way for new cabinets, improved lighting, or simply a more open feel. Remember, if you encounter unexpected complexities, don’t hesitate to seek professional help.