Image Source: abeautifulmess.com
DIY Guide: How To Make A Kitchen Countertop With Tile
Can you make a kitchen countertop with tile yourself? Yes, you absolutely can create a DIY tile countertop! This guide will show you how. Is it hard? It takes time and care, but many people finish this project successfully. What is the best tile for kitchen countertops? We will look at good choices like ceramic and porcelain. How much does it cost? The cost of tile countertop materials varies, but it is often less than other counter types. This project can give your kitchen a fresh look. It can be a rewarding challenge. Let’s get started!
Why Choose Tile for Your Kitchen Counter?
Tile is a popular choice for counters. It has been used for many years.
Here are some good things about tile counters:
- Looks: You can pick from many colors, sizes, and shapes. You can make a unique look for your kitchen.
- Cost: Tile and the things you need to set it can be cheaper than stone counters like granite or quartz.
- Durability: Tile itself is tough. It does not scratch easily. It can handle heat well.
- Repair: If a tile breaks, you can often change just that one tile.
Here are some things to think about:
- Grout Lines: The lines between tiles can trap dirt. They need regular cleaning.
- Grout Stains: Grout can stain if you do not seal it well.
- Uneven Surface: Tile counters are not perfectly flat like solid counters. Things might not slide smoothly.
- Breaking: While the tile is tough, a heavy pot dropped just right can break a tile.
Even with the downsides, a DIY tile countertop is a great option for many homes.
Getting Started: Planning Your Tile Countertop
Good planning is key for any project. This is very true for a tile countertop installation guide. Taking time now saves trouble later.
Explore Kitchen Tile Countertop Ideas
Think about the look you want. Look at photos online or in magazines.
What style is your kitchen? Modern? Country? Traditional?
Tile comes in many types.
- Ceramic Tile: This is common. It is easy to cut and set. It comes in many colors and sizes. Make sure it is floor tile or made for counters. Wall tile is often not strong enough.
- Porcelain Tile: This tile is very hard. It does not soak up much water. It is a very strong choice for counters. It costs a bit more than ceramic.
- Natural Stone Tile: Tiles like granite, marble, or slate look beautiful. They cost more. They need more care and sealing. Some can stain easily.
- Quarry Tile: This is a thick, tough tile. It is often used for floors. It gives a rustic look. It is durable.
- Glass Tile: Can add sparkle. It can scratch easier than ceramic or porcelain. It is often used as accent tiles or on edges.
Think about the size of the tiles.
* Small tiles (like mosaics) mean more grout lines. More grout lines mean more cleaning.
* Larger tiles mean fewer grout lines. But large tiles can be harder to lay flat.
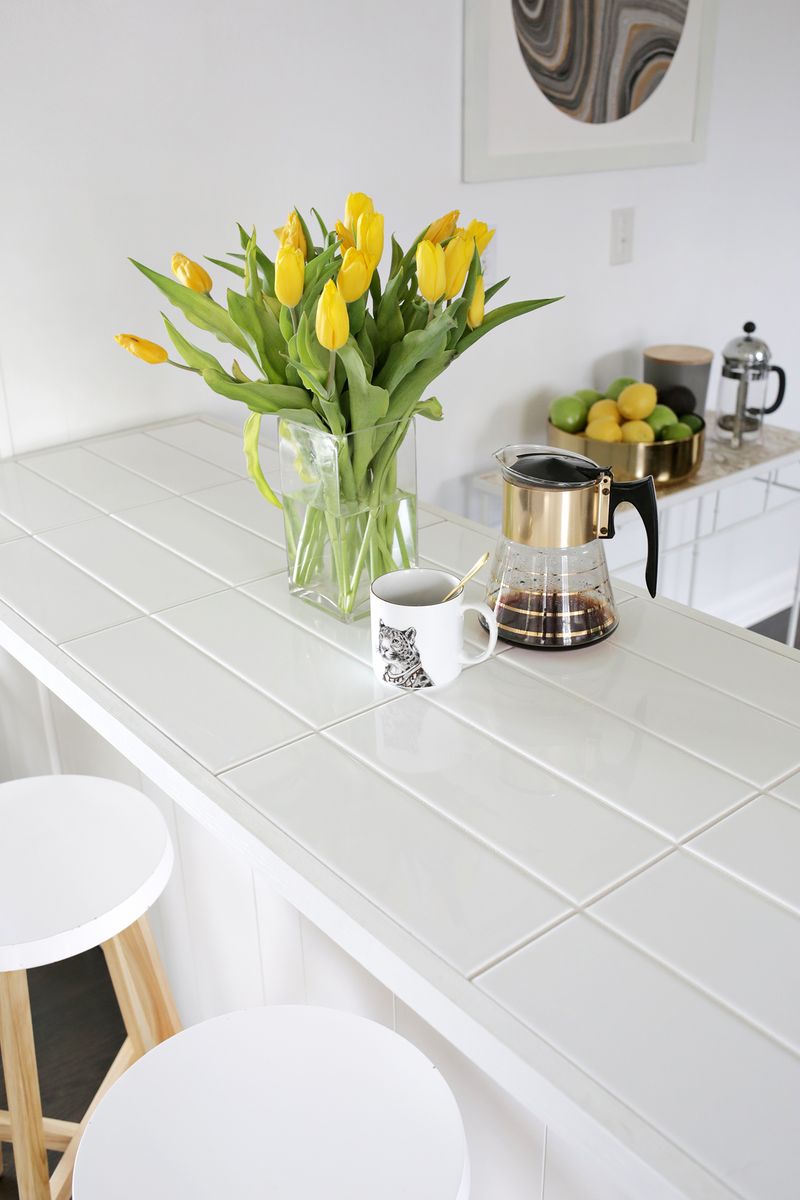
* A common size is 4×4 inch or 6×6 inch. Subway tiles (like 3×6 inch) also work well.
Think about the color.
* Dark colors can show dust and crumbs.
* Light colors can show stains.
* Medium colors might hide things best.
Picking the Best Tile for Kitchen Countertops
Choosing the right tile matters. You need tile strong enough for a counter.
Check the PEI rating. This is a scale (from 0 to 5) that shows how much wear and tear a tile can handle.
For a kitchen counter, aim for a PEI rating of 3 or higher.
Porcelain tile usually has a high PEI rating. It is very durable.
Glazed ceramic tile is a good choice if it has a PEI rating of 3 or 4.
Avoid wall tile (PEI 0 or 1). It will not last on a counter.
Consider the finish.
* Glossy tiles look nice. They are easy to wipe clean. But they can be slippery when wet. They can show scratches more.
* Matte tiles give more grip. They hide scratches better. But they can be harder to wipe clean perfectly.
Think about sample tiles. Take some home. See how they look in your kitchen light. Spill a little water or oil on them. See how they clean up.
Planning the Layout and Edges
How will the tiles fit? Where will cuts be needed?
Plan your layout on paper first. Measure your counter space.
Draw it out. Decide where you want full tiles to start.
Usually, you start laying tile from the front edge. Or you might start from the center of a large area.
Try to avoid very thin cuts of tile. They are hard to cut. They can break easily.
Plan where your tile countertop edges trim will go. The edge piece is very important. It protects the edge of the base and gives a finished look.
Common edge trim pieces are:
* Bullnose: This tile has one rounded edge. It is made for finished edges.
* Quarter Round: A small, rounded trim piece.
* Metal Edge Trim: A metal strip that gives a clean, modern edge. It is easy to install.
You need to decide on your edge type early. This affects how you build your base.
What You Need: Tools and Materials
Having everything ready saves time and trips to the store.
Essential Tools for the Job
You might have some of these tools already.
* Measuring tape
* Pencil
* Safety glasses
* Work gloves
* Dust mask
* Notched trowel (the size of the notches depends on the tile size, check the tile package)
* Margin trowel (a small trowel for mixing and applying mortar in tight spots)
* Rubber grout float (for pushing grout into the gaps)
* Large sponges (for cleaning excess grout)
* Buckets (for mixing mortar and grout, and for water)
* Tile cutter or wet saw (renting a wet saw is a good idea for many cuts)
* Nippers (for small, tricky cuts)
* Level (a long one is best)
* Rubber mallet
* Drill with mixing paddle attachment
* Caulk gun
* Utility knife
Key Materials for Your Project
These are the main things you will buy.
* Your chosen tiles
* Edge trim pieces (bullnose, etc.)
* Cement board (the right thickness, usually 1/2 inch or 1/4 inch)
* Cement board screws (special coated screws)
* Alkaline-resistant mesh tape (for taping cement board seams)
* Thin-set mortar (check the bag – you need mortar for setting tile, not just patch mix)
* Grout (sanded grout for gaps 1/8 inch or wider, unsanded grout for gaps less than 1/8 inch)
* Tile sealer and grout sealer (often sold together or separately)
* Silicone caulk (color to match grout, or clear)
* Wood for building a tile countertop base (if starting fresh)
Estimate Cost of Tile Countertop Materials
The cost changes based on many things.
* Tile Choice: Ceramic is cheapest. Porcelain costs more. Natural stone costs the most. Mosaic tiles can be expensive per square foot.
* Counter Size: Bigger counters need more materials.
* Trim: Special edge pieces cost extra.
* Other Materials: Mortar, grout, cement board, sealers add up.
* Tools: If you need to buy tools like a trowel or rent a wet saw, add that cost.
On average, the cost of tile countertop materials might be anywhere from $5 to $30 per square foot. This is often much less than solid surface materials ($25 – $75+ per square foot) or stone slabs ($40 – $100+ per square foot).
Get prices for your chosen tiles and other supplies. Add it up to get a good idea of the total cost.
Getting Ready: Building Your Tile Base
The base under the tile is very important. It needs to be strong and stable. It must not flex. Flexing will crack your grout and tiles. You need a solid, water-safe base. Cement board is the standard choice for this.
Preparing the Existing Counter
If you are tiling over an old counter, you need to prepare it.
* Remove the old surface: Take off old laminate, solid surface, or other materials. You want to get down to the bare wood (plywood or particle board).
* Clean well: Make sure the surface is clean and dry. Remove any old glue or debris.
* Check for levelness: Make sure the surface is flat and level. Fill any low spots. Sand down any high spots.
* Strengthen: If the counter feels weak or moves, add support from underneath. Screws can help tighten things up.
Building a Tile Countertop Base (If Needed)
If you are building new counters or replacing everything, you will build the base from wood first.
* Use thick plywood (at least 3/4 inch). Two layers of 3/4 inch plywood are even better for strength. Glue and screw the layers together.
* Make sure the base is well supported by cabinets.
* Plan for your edge treatment here. If using bullnose tile, the cement board and tile will sit flush with the cabinet edge. If using metal trim, the wood base might extend slightly.
Installing the Cement Board
Cement board (like Durock or HardieBacker) is the right surface for tile in wet areas like a kitchen counter. Wood changes size with water and heat, which makes grout and tile crack. Cement board does not.
* Cut the cement board: Measure your counter sections. Use a utility knife to score the board deeply along a straight line. Then snap it. You might need a saw for tricky cuts like sink holes.
* Lay the board: Place the cut pieces onto your wood base. Leave a small gap (like 1/8 inch) between pieces. Do not line up the seams of the cement board with the seams of the wood base below. Stagger them.
* Screw it down: Use special coated cement board screws. Screw patterns are usually marked on the board. Screws should be about 8 inches apart in the center of the board and 4 inches apart along edges. Sink the screw heads slightly below the surface.
* Tape the seams: Apply alkaline-resistant mesh tape over all the seams between cement board pieces.
* Apply thin-set to seams: Mix a small batch of thin-set mortar. Use your margin trowel to spread it over the mesh tape. Make the surface smooth. Let this mortar dry completely as the thin-set mortar installation guide often suggests.
Your base is now ready for tile. It is strong, stable, and ready for mortar.
Laying the Tile: Step-by-Step
This is where your DIY tile countertop starts to look like a counter! Take your time with this step.
Applying Thinset Mortar
Thinset is the glue that holds your tile to the base.
* Mix the thinset: Follow the directions on the bag. Use a drill with a mixing paddle. Mix until it looks like peanut butter or thick mud. Let it sit for 5-10 minutes (this is called “slaking”). Then mix it again briefly. Only mix as much as you can use in 20-30 minutes, as it dries fast.
* Spread the thinset: Use the flat side of your notched trowel to spread a thin, even layer of thinset on the cement board. Do a small area at a time (maybe 2×2 or 3×3 feet). Do not cover the whole counter at once!
* Make grooves: Hold the notched side of the trowel at about a 45-degree angle. Comb through the thinset to make straight, even lines (grooves). All the grooves should go the same way (e.g., straight from front to back). This lets air escape and helps the tile stick well.
Setting the Tiles
Now, place your tiles onto the fresh thinset.
* Place the first tile: Start in your planned spot (often the front edge). Place the tile onto the thinset. Give it a small twist or push it down gently.
* Check placement: Lift a tile back up sometimes (this is called a “butter check”). Is the back of the tile mostly covered in thinset? Are the grooves spreading out nicely? If not, you might need to change your trowel angle or use more thinset.
* Use spacers: Put tile spacers between each tile. This keeps the grout lines even. Spacers come in different sizes (like 1/8 inch, 1/4 inch). The size of the spacer is the width of your grout line. Make sure you have enough spacers!
* Lay tiles in rows: Continue laying tiles, working across the area you spread thinset on. Use your level to check that tiles are flat and even with each other. Tap gently with a rubber mallet if a tile sits too high.
* Cut tiles: When you reach an edge, obstacle (like a sink), or the end of a row, you will need to cut tiles. Use your tile cutter for straight cuts. Use a wet saw for L-cuts, curves, or harder tiles like porcelain. Nippers are good for small, tricky cuts or rounding edges. Always wear safety glasses when cutting tile!
* Apply thinset to cut tiles: For cut tiles, especially small ones or edge pieces, you might “back butter” them. This means applying a thin, flat layer of thinset to the back of the tile with your margin trowel before placing it on the grooved thinset on the counter. This helps ensure good coverage.
* Clean up as you go: Wipe any thinset that squeezes up between tiles right away with a wet sponge. Thinset is much harder to clean once it dries.
* Finish sections: Work section by section until all full tiles are laid.
Handling Tile Countertop Edges Trim
The edge pieces need special care.
* Use the right pieces: Bullnose or other trim tiles go here. Lay them at the same time as the main tiles for that section.
* Align carefully: Make sure the edge trim lines up well with the field tiles (the main tiles).
* Support overhang: If your counter has an overhang, make sure the edge trim and field tiles are well supported while the thinset dries. You might need temporary supports underneath.
* Use thinset: Apply thinset to the base and the back of the edge trim pieces. Set them in place just like the field tiles.
Letting the Tile Set
Once all the tiles are laid, you must let the thinset dry completely.
* Check the thinset bag directions. Drying time is usually 24 hours.
* Do not touch, walk on, or place anything heavy on the tiles during this time.
* Let the thinset cure fully before moving to the next step.
Finishing Up: Grouting Your Countertop
Grouting fills the spaces between the tiles. It locks them in place and protects the edges. This part covers how to grout tile countertop.
Mixing the Grout
Like thinset, mix grout according to the bag instructions.
* Use a clean bucket.
* Add the correct amount of water to the grout powder.
* Mix with a drill and mixing paddle, or by hand with a trowel.
* Mix until it is like thick toothpaste or peanut butter.
* Let it sit for 5-10 minutes (slaking).
* Mix again briefly.
* Again, only mix what you can use in about 20-30 minutes. Grout dries quickly.
* Make sure you use the correct type of grout (sanded for wide gaps, unsanded for narrow gaps). Using the wrong type can lead to cracks or a weak bond.
Applying the Grout
This is the messy but satisfying part.
* Spread the grout: Put a lump of grout onto the tile surface. Hold your rubber grout float at a low angle (about 45 degrees). Push the grout across the tiles, forcing it down into the gaps (grout lines).
* Work it in: Use the float to wipe across the tile corners and along the grout lines from different directions. This makes sure the grout fully fills the gaps.
* Scrape off excess: Once an area is filled, hold the float at a steeper angle (almost straight up, about 80-90 degrees). Drag it across the tiles to scrape off most of the excess grout. You want the grout to be pushed into the lines, not sitting on top of the tiles.
* Work in sections: Grout one section at a time. Do not grout the whole counter at once.
Cleaning Excess Grout
This step takes patience. You need to clean the tile surface without pulling grout out of the lines.
* First wipe (hazing): After about 15-30 minutes (check the grout bag for exact time), the grout will start to stiffen slightly in the lines, but the surface will look hazy. Use a large, damp (not dripping wet!) sponge. Wipe the tile surface in a circular motion. This loosens the haze.
* Rinse and wipe: Rinse your sponge often in a clean bucket of water. Wring it out well so it is just damp. Wipe the tile surface again with straight strokes. Try to keep the sponge flat. Do not dig into the grout lines. The goal is to clean the tile face, not the grout lines.
* Change water often: Keep your water clean! Dirty water will just smear grout haze back onto the tiles.
* Second cleaning: You will likely need to do this cleaning process multiple times. As the grout cures more, a second haze might appear. Use the damp sponge technique again.
* Final Buffing: After the grout is dry to the touch (check bag time, maybe 24 hours), a slight haze might still be there. You can often buff this off with a clean, dry, soft cloth or cheesecloth. If the haze is stubborn, you might need a special grout haze cleaner (follow product directions carefully).
Let the grout cure fully after cleaning. This usually takes at least 24-72 hours before sealing.
Protection: Sealing Your Tile Counter
Sealing is a very important step for sealing tile kitchen counter. It protects the grout from stains and makes it easier to clean. Some tiles also need sealing.
Why Sealing Matters
- Grout: Grout is porous. It has tiny holes. liquids like wine, oil, or juice can soak into it and cause stains that are very hard to remove. Sealer fills these holes.
- Tile: Ceramic and porcelain tiles are usually not porous. They do not need sealing. But natural stone tiles (granite, marble, slate) are porous. They need sealing to prevent stains. Unglazed quarry tile also needs sealing.
- Cleaning: Sealed surfaces are easier to wipe clean. Dirt and spills sit on top instead of soaking in.
How to Seal Your Countertop
- Make sure it is dry: The grout must be completely dry before sealing. Check the grout package for the required curing time (usually 24-72 hours). The countertop must also be clean and free of any grout haze or dust.
- Choose your sealer: There are different types of sealers.
- Penetrating Sealers: These soak into the grout and tile pores. They offer good protection and usually do not change the look of the surface. This is the most common type for grout and natural stone tiles.
- Topical Sealers: These form a layer on top of the surface. They might add shine or color but can wear away and change the feel of the surface. Less common for kitchen counters because they can show scratches.
- Get a sealer made for grout and tile, safe for kitchen use.
- Apply the sealer: Follow the product directions exactly.
- Often, you apply sealer with a small brush, foam applicator, or a spray bottle.
- Focus on the grout lines first. Make sure they are well covered.
- If your tile needs sealing (like natural stone), apply sealer to the tile surface too.
- Wipe away any excess sealer from the tile surface quickly before it dries and leaves a film. Use a clean cloth.
- Let it soak/dry: Let the sealer sit for the time stated on the product.
- Apply more coats: Many sealers need a second coat, or even a third, for good protection. Wait the recommended time between coats.
- Wipe off residue: After the last coat sits for the right time, wipe off any leftover sealer from the tile surface.
- Curing time: Let the sealer cure fully before using the counter or getting it wet. This might take 24-72 hours.
Your sealed counter is now better protected against spills!
Keeping It Clean: Caring for Your Tile
Taking care of your tile counter helps it look good for a long time.
Daily Cleaning Tips
- Wipe spills fast: Clean up food and liquid spills right away. Especially acidic things like lemon juice or dark liquids like coffee or wine. This stops stains.
- Use mild cleaners: Clean the surface with warm water and a mild dish soap.
- Avoid harsh chemicals: Do not use strong acids, bleach, or abrasive cleaners on your tile or grout, especially if sealed. They can damage the sealer and grout.
- Dry the surface: After cleaning, wipe the counter dry. This helps prevent water spots and keeps grout cleaner.
- Clean grout lines: Pay attention to the grout lines when cleaning. A small brush (like a stiff toothbrush) can help scrub grout lines if needed.
Quick Fixes: Repair Tile Countertop Cracks
Sometimes, things happen. A dropped item can crack a tile. Grout can crack over time.
* Cracked Grout: If a small section of grout is cracked or missing, you can chip it out carefully with a grout saw or utility knife. Clean the area well. Mix a small amount of new grout (try to match the color). Push the new grout into the gap with your finger or a margin trowel. Wipe clean with a damp sponge. Let dry and re-seal the repaired area.
* Cracked Tile: Replacing a cracked tile is possible but takes care.
* Carefully chip out the old grout around the damaged tile using a grout saw or utility knife. Be very careful not to damage nearby tiles.
* Break the damaged tile into small pieces using a hammer and chisel or old screwdriver. Work from the center outwards. Wear safety glasses!
* Chip out the old thinset under the tile. Make the base clean and flat.
* Mix a small amount of new thinset. Spread it on the base where the old tile was.
* Apply thinset to the back of the new tile (back buttering).
* Set the new tile into the space. Wiggle it gently to make good contact. Use spacers to match the grout lines of the surrounding tiles. Make sure it is level with the other tiles.
* Let the thinset dry completely (24 hours).
* Grout the new tile. Mix a small batch of grout. Push it into the gaps around the new tile. Clean the surface with a damp sponge.
* Let the grout dry (24-72 hours).
* Re-seal the new grout and tile.
These steps can help keep your tile counter looking its best.
Pros and Cons of DIY Tile Countertops
Let’s look back at the good and bad points.
Good Points:
* Lower cost: Often cheaper than solid surfaces or stone.
* Custom look: Endless choices in color, size, pattern.
* Durable tile: Tile itself is hard and resists heat and scratches.
* Repairable: Can replace single damaged tiles.
* Great DIY project: Achievable for many homeowners.
Things to Consider:
* Grout cleaning: Grout lines need regular cleaning and sealing.
* Uneven surface: Not perfectly flat.
* Potential for cracks: Dropped heavy objects can crack a tile. Grout can crack if the base is not stable or grout is not mixed/applied right.
* Requires effort: It is a multi-step process that takes time and care.
Frequently Asked Questions
Here are answers to common questions about tile counters.
- How long does it take to make a tile countertop?
It usually takes several days. There are drying times for thinset (24 hours), grout (24-72 hours), and sealer (24-72 hours) between steps. The actual work time might be 1-3 days, spread out over a week or so. - Is a tile countertop hard to keep clean?
Grout lines are the main challenge. If you seal the grout well and clean spills quickly, it is not too hard. Regular cleaning with mild soap and water helps a lot. - Can I tile over old laminate?
It is not the best idea. Tiling over the old surface can lead to problems later. The old surface might not be stable or waterproof enough. It is much better to remove the old surface and tile onto a proper cement board base. - Do I need sanded or unsanded grout?
Use sanded grout for grout lines that are 1/8 inch wide or more. The sand gives the grout strength and prevents shrinking in wider gaps. Use unsanded grout for grout lines less than 1/8 inch wide. Sanded grout can scratch delicate tiles in narrow gaps. - How often do I need to seal my tile counter?
This depends on the sealer type and how much you use the counter. Grout should usually be sealed once a year. Natural stone tiles might need sealing more often (every 6-12 months). You can test if the sealer is still working by putting a few drops of water on the grout lines. If the water beads up, the sealer is good. If it soaks in and darkens the grout, it is time to re-seal.
Conclusion
Making a kitchen countertop with tile is a project many can do themselves. It takes planning, patience, and attention to detail. By following a good tile countertop installation guide, preparing the base correctly, choosing the best tile for kitchen countertops, and sealing properly, you can create a durable and beautiful surface. You will save money compared to hiring someone or using more costly materials. A DIY tile countertop can update your kitchen and give you a great sense of accomplishment. Gather your tools and materials, take it step by step, and enjoy your new counter!