Have you ever spent hours tweaking settings on your Ender 3, only to end up with a print that’s wobbly or falls apart? It’s a common frustration for 3D printing fans. The magic behind turning your digital design into a physical object often depends on a crucial piece of software: the slicer.
Choosing the right slicer for your Ender 3 can feel like navigating a maze. There are so many choices, and each one promises better prints. But which one actually delivers? It’s tough to know where to start, and the wrong slicer can lead to wasted filament and disappointing results.
This post is here to help! We’ll dive into the world of Ender 3 slicers, breaking down what makes them tick. By the end, you’ll understand the top options and what features matter most for your printing projects. Get ready to level up your Ender 3 game and start printing with confidence!
Our Top 5 Slicer For Ender 3 Recommendations at a Glance
Top 5 Slicer For Ender 3 Detailed Reviews
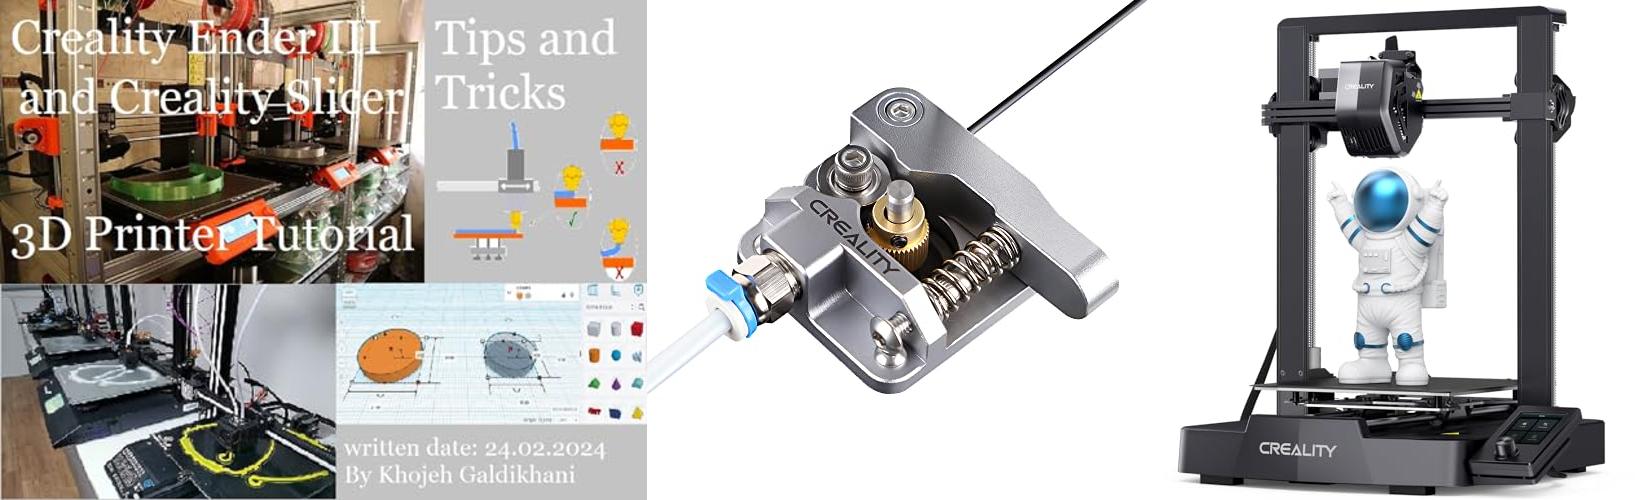
1. Creality Ender 3 and Creality Slicer Tutorial for 3D printers and tips and tricks.: 3D print Tutorial Tips and Tricks for Creality Ender 3 and Creality Slicer

Rating: 9.4/10
Dive into the exciting world of 3D printing with our comprehensive guide, “Creality Ender 3 and Creality Slicer Tutorial for 3D printers and tips and tricks.: 3D print Tutorial Tips and Tricks for Creality Ender 3 and Creality Slicer.” This resource is your key to unlocking the full potential of your Creality Ender 3 printer and mastering the Creality Slicer software. Whether you’re a beginner just starting out or looking to refine your printing skills, this tutorial offers valuable insights. You will learn how to set up your printer, prepare your models, and troubleshoot common issues. We cover everything you need to create amazing 3D prints.
What We Like:
- Clear, step-by-step instructions make learning easy.
- Covers both the hardware (Ender 3) and the software (Creality Slicer).
- Provides practical tips and tricks for better print quality.
- Helps users avoid common beginner mistakes.
- Empowers users to create a wide variety of 3D printed objects.
What Could Be Improved:
- Could offer more advanced troubleshooting scenarios.
- Might benefit from visual aids for complex steps.
- The “N/A” feature listing means we don’t have specific details on unique selling points beyond the tutorial content itself.
This tutorial will transform your 3D printing experience. Start creating your own designs with confidence and enjoy the satisfaction of bringing your ideas to life.
2. Creality Official Ender 3 Extruder Upgrade Metal Drive Feeder 3D Printer Parts for Ender-3 Pro/3S/3 V2/3 Max CR-10/10S Gray Aluminum 1.75mm Filament Extruder

Rating: 8.8/10
Upgrade your 3D printing experience with the Creality Official Ender 3 Extruder Upgrade Metal Drive Feeder. This part is made from strong aluminum alloy and has a special coating. It’s designed to work better than the plastic part that usually comes with your printer. It fits many popular Creality printers like the Ender-3 series and CR-10 models. This upgrade helps feed filament smoothly into your printer for better prints.
What We Like:
- It’s made of high-quality aluminum alloy for long-lasting use.
- The adjustable bolt lets you control the pressure on the filament.
- It pushes filament with more force, improving print quality.
- The beveled intake prevents filament from getting scraped.
- It’s compatible with many filament types like PLA, ABS, and TPU.
- Installation is easy with included parts and instructions.
- Creality offers excellent customer support and a warranty.
What Could Be Improved:
- This is a DIY kit, so you need to assemble it yourself.
This metal extruder upgrade is a fantastic way to get more reliable and higher-quality prints from your Creality 3D printer. It’s a worthwhile investment for any serious 3D printing enthusiast.
3. Creality Ender 3 V3 SE 3D Printer

Rating: 9.3/10
Get ready to create amazing things with the Creality Ender 3 V3 SE 3D Printer! This printer is a super upgrade for anyone who loves to make models, toys, or anything else you can imagine. It’s faster, smarter, and easier to use than ever before. Plus, it has a big printing area so you can make larger projects. This printer is great for beginners and experienced makers alike.
What We Like:
- Super Fast Printing: It prints at a speedy 250mm/s, saving you lots of time.
- Easy Setup: You can assemble it in just 3 steps and start printing in about 20 minutes.
- Automatic Leveling: The CR Touch sensor makes sure your print bed is always level, so your prints come out perfectly.
- Reliable Extruder: The powerful “Sprite” direct extruder handles different types of plastic filament smoothly.
- Stable Printing: Dual Z-axis screws and strong Y-axis shafts keep the printer steady for accurate prints.
- Simple Filament Changes: It automatically loads and unloads filament, making it easy to switch colors or materials.
- Great Support: Creality offers a 12-month warranty and helpful customer service.
What Could Be Improved:
- While it’s a great printer, some advanced users might want even more customization options.
The Creality Ender 3 V3 SE is a fantastic 3D printer that offers speed, ease of use, and reliability. It’s a smart choice for anyone looking to dive into the world of 3D printing or upgrade their current setup.
4. Creality Original Ultra Removable Magnetic 3D Printer Build Surface Heated Bed Cover for Ender 3/Ender 3 Pro/Ender 3 V2/Ender 3 V2 Neo/Ender 3 Neo/Ender 3 S1/3 S1 Pro/Ender 5 Pro 235X235mm
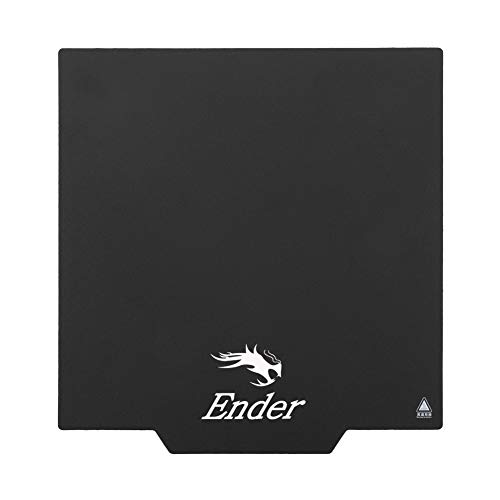
Rating: 8.5/10
Tired of struggling to get your 3D prints off the build plate? The Creality Original Ultra Removable Magnetic 3D Printer Build Surface is here to make your life easier. This 235x235mm magnetic sheet is designed for a variety of popular Creality printers, including the Ender 3 series and Ender 5 Pro. It offers a flexible and easy way to remove your finished models, saving you time and frustration.
What We Like:
- Easy Model Removal: Simply take off the magnetic top layer, bend it, and your print pops right off!
- Hassle-Free: No more scraping or damaging your prints or build surface.
- Works with Many Printers: It’s compatible with most FDM printers, heated or not.
- Customizable: You can cut it to fit different build sizes.
- Simple Installation: It comes with a magnetic adhesive base for easy attachment to your printer’s heated bed.
What Could Be Improved:
- Magnetic Alignment: You need to make sure the magnetic parts are aligned correctly before sticking them down. This might take a try or two.
- Heating Recommendation: It’s suggested to heat the bed for a few minutes before removing prints for the best results.
This magnetic build surface is a game-changer for 3D printing. It makes removing your prints incredibly simple and protects your printer bed.
5. Creality Upgrade Ender 3 Hot End

Rating: 8.6/10
Ready to take your 3D printing to the next level? This Creality Upgrade Hot End kit is here to help! It’s designed specifically for Creality Ender 3, Ender 3 Pro, and Ender 3 V2 printers. This kit includes everything you need to get smoother prints and better results.
What We Like:
- Perfect Fit: This kit is made to fit your Ender 3, Ender 3 Pro, and Ender 3 V2 printers like a glove.
- Smoother Filament Flow: The Capricorn Bowden PTFE tube is super smooth. This means less friction, so your filament feeds easily.
- Better Prints: Less friction leads to more accurate prints. You’ll see less retraction, which saves you time.
- Easy to Install: The parts come pre-assembled. You can swap them out quickly without needing special tools.
- High-Quality Parts: You get four silicone nozzle covers to keep things clean and four 0.4mm nozzles for precise printing.
- Great Value: This kit includes everything you need for an upgrade.
What Could Be Improved:
- Limited to Specific Printers: While it works great for Ender 3 series, it might not fit other 3D printer brands.
- Learning Curve for Advanced Filaments: While it handles tough filaments better, you might still need to experiment a bit with very unusual materials.
This upgrade kit is a fantastic way to improve your Ender 3’s printing performance. You’ll enjoy smoother filament feeding and more accurate prints with this easy-to-install package.
Choosing the Right Slicer for Your Ender 3: A Comprehensive Guide
Your Ender 3 3D printer is a fantastic tool. To get the best prints, you need good “slicer” software. A slicer takes your 3D model and turns it into tiny instructions your printer can understand. Think of it like a recipe for your printer. This guide will help you pick the best slicer for your Ender 3.
1. Key Features to Look For
When you’re picking a slicer, keep these important things in mind:
- Ease of Use: Some slicers are simple and easy to learn. Others are more complex with lots of settings. For beginners, a user-friendly slicer is best.
- Compatibility: Make sure the slicer works with your Ender 3. Most slicers support the Ender 3, but it’s always good to check.
- Print Settings: A good slicer lets you control many print settings. This includes layer height (how thick each plastic layer is), print speed, and temperature. More control means better prints.
- Support Generation: Sometimes, 3D models need extra support structures to print correctly. A slicer that can automatically add these supports is very helpful.
- Preview Function: You want to see what your sliced file will look like before you print. A preview lets you check for any problems.
- Customization: As you get better, you’ll want to tweak settings. A slicer that allows for lots of customization will grow with you.
2. Important Materials and Settings
The materials you print with affect your slicer settings.
- PLA: This is a common and easy-to-use plastic. Most slicers have good default settings for PLA.
- ABS: This plastic is stronger but harder to print. You might need to adjust temperature and cooling settings in your slicer.
- PETG: This is a good mix of strength and ease of use. Your slicer settings will be different from PLA.
Your slicer lets you set:
- Layer Height: Smaller numbers mean finer detail but longer print times.
- Print Speed: Faster speeds can save time, but too fast can hurt print quality.
- Nozzle Temperature: This needs to be right for the material you’re using.
- Bed Temperature: This helps the first layer stick to the print bed.
3. Factors That Improve or Reduce Quality
Several things in your slicer settings can make your prints better or worse.
- Good Settings: Using the right layer height, print speed, and temperatures for your filament will improve quality. Proper support placement is also key.
- Bad Settings: Printing too fast or at the wrong temperature can cause problems like stringing (fine strands of plastic) or poor layer adhesion. Incorrect support structures can be hard to remove or mess up the surface of your print.
4. User Experience and Use Cases
The best slicer for you depends on how you plan to use it.
- Beginners: Start with slicers that are easy to set up and use. Cura is a popular choice for beginners because it’s free and has a lot of helpful guides.
- Hobbyists: As you gain experience, you might want more control. Slicers like PrusaSlicer offer advanced features that can help you fine-tune your prints.
- Functional Parts: If you’re printing parts that need to be strong and precise, you’ll want a slicer with advanced settings for infill (the internal structure of your print) and wall thickness.
- Artistic Prints: For detailed models, you’ll focus on settings that give you a smooth surface finish and fine details, like smaller layer heights.
Frequently Asked Questions (FAQs)
Q: What is the most popular slicer for the Ender 3?
A: Cura is widely considered the most popular slicer for the Ender 3. It’s free, user-friendly, and has a large community for support.
Q: Do I need to pay for slicer software?
A: Many excellent slicers are free, like Cura and PrusaSlicer. Some professional slicers have a cost.
Q: How do I update my slicer?
A: Most slicers have an “Check for Updates” option in their settings menu. You can also download the latest version from the software’s official website.
Q: What is “layer height”?
A: Layer height is the thickness of each individual layer of plastic that your printer lays down. Smaller layer heights create smoother, more detailed prints but take longer.
Q: How do I fix stringing in my prints?
A: Stringing can often be fixed by adjusting retraction settings (how much filament is pulled back), print temperature, or print speed in your slicer.
Q: Can I use the same slicer settings for PLA and PETG?
A: No, different filament types need different settings. You will need to adjust temperatures and speeds for each material.
Q: What is “support material”?
A: Support material is a temporary structure printed by your 3D printer to hold up parts of your model that would otherwise overhang in mid-air. It’s removed after printing.
Q: Where can I find good slicer profiles for my Ender 3?
A: Many websites and online communities dedicated to 3D printing offer pre-made profiles for the Ender 3 and various filaments. You can also find them within some slicer software itself.
Q: How important is the slicer’s preview function?
A: The preview function is very important. It shows you exactly how the printer will build your model layer by layer, helping you catch potential issues before you start printing.
Q: Can I change settings mid-print?
A: Some advanced printers and slicer combinations allow for limited changes mid-print, like adjusting the print speed or temperature. However, it’s generally best to get your settings right before starting.
In conclusion, every product has unique features and benefits. We hope this review helps you decide if it meets your needs. An informed choice ensures the best experience.
If you have any questions or feedback, please share them in the comments. Your input helps everyone. Thank you for reading.