Yes, you can secure a kitchen island to the floor yourself, and doing so safely is important to prevent kitchen island tipping. This guide will walk you through the steps needed to attach kitchen island to floor, anchor kitchen island, and secure freestanding island units, making your kitchen safer and more stable. You’ll learn how to install kitchen island using common methods and kitchen island mounting hardware, whether you are securing island to wood floor or securing island to tile floor.
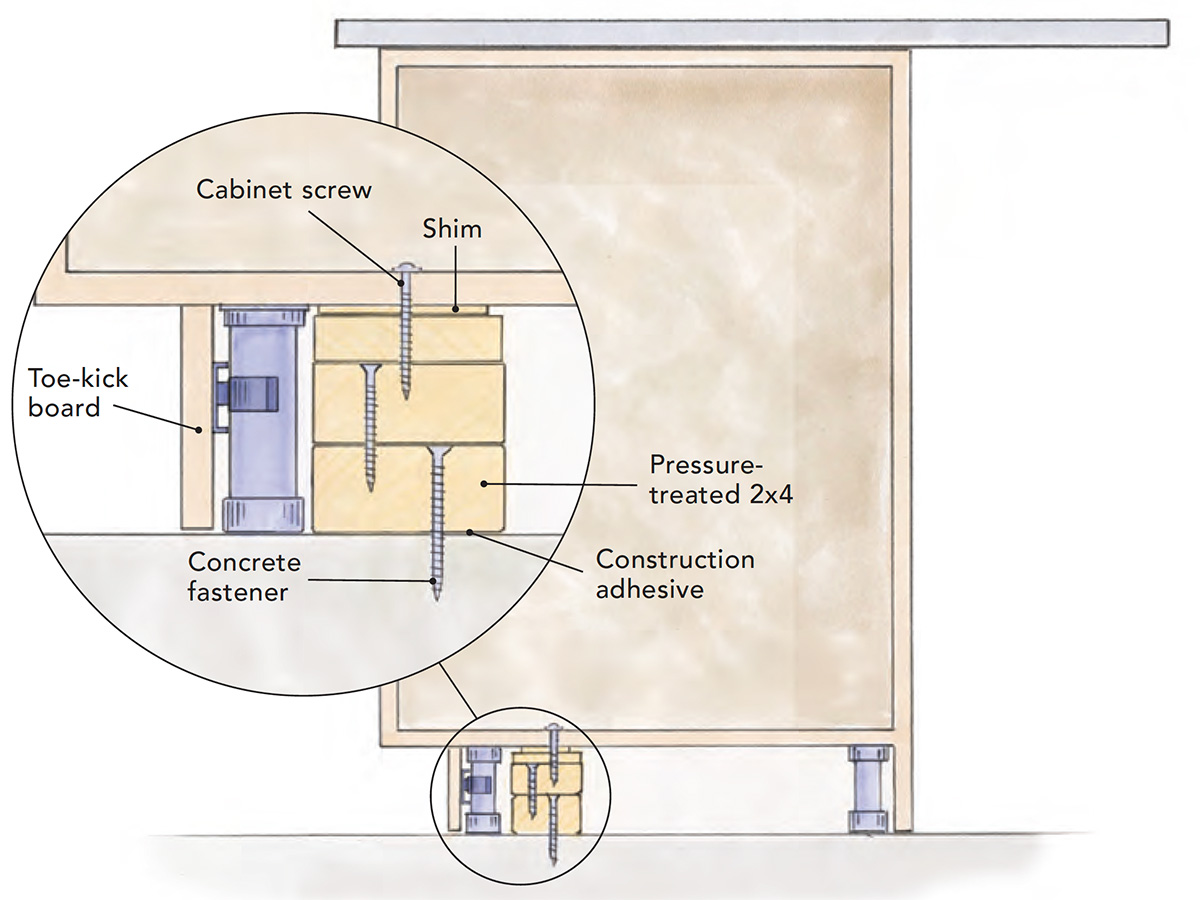
Image Source: images.finehomebuilding.com
Why Fix Your Island Down?
Think about your kitchen. It’s a busy place. People walk by the island. Kids might lean on it. Someone might pull open a heavy drawer.
An island that is not fixed down can move. It can wobble. In the worst case, it can fall over. This is very dangerous. It can hurt people. It can damage your floor and the island itself.
Fixing your island down makes it safe. It stops it from moving. It stops it from tipping over. This is especially true for tall or narrow islands. These are more likely to fall. Securing your island gives you peace of mind. It makes your kitchen safer for everyone.
Getting Ready to Secure Your Island
Before you start, you need a plan. This helps the job go smoothly. It also helps you stay safe.
Choosing the Right Spot
Where will your island go? Put it where it works best in your kitchen. Make sure you can walk around it easily. Check that drawers and doors on nearby cabinets or appliances can open.
Once you have the spot, mark it on the floor. Use masking tape. This shows you exactly where the island edges will be.
Checking What’s Under the Floor
This step is very important. You will be drilling into the floor. You must know what is under the floor first. Are there water pipes? Gas lines? Electric wires? Hitting one of these is very dangerous.
Use a stud finder that can detect pipes and wires. Scan the area where you plan to drill. If you find something, change where you will drill. Or, plan to use a different way to secure the island. If you are not sure, stop. Ask a professional for help. Do not guess.
Checking Your Island Type
Is your island like a cabinet with a solid base? Or does it have legs? How the island is built changes how you mount kitchen island to floor.
- Cabinet-style islands: These often have a toe kick area at the bottom. You can often drill through the base inside the cabinet. This hides the hardware.
- Freestanding islands with legs: You will need to use brackets. These will be seen. Pick brackets that look good with your island and kitchen style.
Getting the Right Stuff
You will need some tools and parts. Having everything ready saves time. It also makes the job easier.
Here is a list of things you might need. The exact list depends on your island and your floor.
| Item | Use | Notes |
|---|---|---|
| Safety Glasses | Protect your eyes | Always wear these when drilling or cutting. |
| Ear Protection | Protect your hearing | Drilling can be loud. |
| Measuring Tape | Measure distances | For marking the island spot. |
| Masking Tape or Pencil | Mark the floor | Shows where to drill. |
| Stud Finder (with pipe/wire detection) | Find things under the floor | Crucial safety step. |
| Drill | Make holes | Cordless is easiest. Needs enough power. |
| Drill Bits | Match your screws and floor type | Wood bits for wood, tile bits for tile, masonry bits for concrete. |
| Level | Check if the island is straight | Helps ensure the island sits flat on the floor. |
| Screwdriver or Drill Bits for Screws | Drive screws in | Match the screw head type (Phillips, square, etc.). |
| L-Brackets or Angle Brackets | Kitchen island mounting hardware | Used to attach kitchen island to floor. Choose heavy-duty ones. |
| Screws | Fasten the brackets to the island | Make sure they are not too long (don’t go through the island side). |
| Floor Screws or Anchors | Fasten the brackets to the floor | Screws for wood. Anchors for tile or concrete. |
| Shims | Fill small gaps | If the floor is not perfectly flat. |
| Utility Knife or Tile Scribe | Mark or start holes in tile | Helps prevent tile from cracking when drilling. |
| Shop Vacuum | Clean up dust and debris | Keep your work area clean and safe. |
| Pliers | Hold things firmly | Can be useful for small parts. |
Choosing Your Hardware
You need strong hardware to anchor kitchen island. L-brackets or angle brackets are common. They connect the base of the island to the floor.
- L-Brackets: Shaped like an ‘L’. One side screws to the island, the other to the floor.
- Angle Brackets: Can be wider than L-brackets. Offer more support.
Pick brackets made of strong metal, like steel. Make sure they are thick. Thin brackets can bend. Get screws that fit the holes in the brackets. Use screws that are made for building or decks. These are strong.
The screws or anchors you use for the floor must be right for your floor type.
- Wood Floor: Use wood screws. Make sure they are long enough to go through the floor and into a joist or added wood blocking under the floor if possible.
- Tile Floor: You will need special drill bits for tile. You will also need floor anchors. The screws go into these anchors.
- Concrete Floor: You will need special drill bits for concrete. You will use concrete anchors like Tapcons or expansion bolts.
Buy extra hardware. It is better to have too much than not enough.
Different Ways to Attach Your Island
There are a few main ways to attach kitchen island to floor. The best way depends on your island’s design.
Method 1: Fixing Through the Island Base (Cabinet Style)
This is often the cleanest look. The hardware is hidden inside the island cabinet.
- Inside the island: Look inside the base of the island cabinet. There might be a space in the toe kick area or a solid bottom panel.
- Add wood blocks: Sometimes, it helps to add small blocks of wood inside the base. Screw these blocks to the island frame. These blocks give you a solid spot to screw down to the floor.
- Drill down: You will drill holes through the base of the island (or through the added blocks). Then you will drill through the floor below.
- Screw down: Use long, strong screws to go through the island base, through the floor, and into the floor structure (joist or subfloor).
This method works well if your island is built like a cabinet. It makes the mount kitchen island to floor hardware invisible from the outside.
Method 2: Using L-Brackets or Angle Brackets (Freestanding or Cabinet Style)
This method works for almost any island type. It’s very common for secure freestanding island units.
- Attach brackets to island: Place brackets along the inside bottom edge of the island. Or, if the island has legs, attach brackets to the bottom of the legs. Use screws to fix the brackets to the island frame or legs. Make sure the screws are strong but don’t go through the outside of the island.
- Position island: Carefully move the island into its final spot.
- Mark floor: Use a pencil or marker to mark the floor through the holes in the brackets.
- Move island: Move the island out of the way.
- Drill floor: Drill holes in the floor at the marks you made. Use the right drill bit for your floor type.
- Position island again: Move the island back into place, lining up the bracket holes with the holes in the floor.
- Screw to floor: Use screws or anchors to fasten the brackets to the floor.
This method is strong. The brackets are visible, but you can choose ones that match your kitchen style. This is a great way to how to stabilize kitchen island when it doesn’t have a base you can easily drill through.
How to Anchor Kitchen Island to Different Floors
The type of floor you have changes how you drill and what hardware you use.
Securing Island to Wood Floor
Wood floors are often the easiest to work with.
- Find the joists: The strongest way to securing island to wood floor is to screw into the floor joists. These are the main wooden beams under your floor. Use a stud finder to find them. Mark their location on your floor.
- Position the island: Try to place your island so that your screw points line up with the joists.
- Drill pilot holes: Drill small pilot holes through the wood floor where you plan to screw. This makes it easier for the screws to go in. It also helps prevent kitchen island tipping by giving the screws a solid hold. If you are using brackets, drill pilot holes through the floor where the bracket holes will be.
- Screw it down: Use strong wood screws. Drive them through the island base (or brackets) and into the floor. If you hit a joist, the hold will be very strong. If you can’t hit joists, make sure your screws go through the subfloor (the wood layer under your finished floor). You might need to add blocking (pieces of wood) from underneath if possible, for screws to bite into securely, especially with heavier islands or thinner subfloors. This extra step makes the anchor kitchen island job much more secure.
Securing Island to Tile Floor
Tile floors need more care. You need to drill through the tile without breaking it.
- Mark carefully: Mark exactly where you need to drill on the tile surface.
- Prevent cracking: Tile drill bits can slip. To stop this, put a piece of masking tape over the spot you marked. This gives the drill bit a grip. Or, use a sharp punch or tile scribe to lightly tap or scratch the glaze on the tile surface at the mark. This creates a small starting point for the drill bit.
- Use the right bit: You need a drill bit made for tile or masonry. A carbide-tipped bit is good. A diamond-tipped bit is even better but costs more.
- Drill slowly: Drill slowly and with steady pressure. Do not push too hard. Let the drill bit do the work. Keep the drill speed low. High speed can cause heat and crack the tile.
- Keep it cool: Drilling tile creates heat. Keep the drill bit cool by dipping it in water often. You can also have someone drip water on the spot as you drill.
- Drill through tile and subfloor: Once you are through the tile, you will drill through the subfloor below. Use a regular wood bit for this part.
- Install anchors: For securing island to tile floor, you will need floor anchors. Plastic or metal expansion anchors work well. Push or tap the anchor into the hole you drilled. The anchor should sit flush with the top of the tile.
- Screw to anchors: Place your island (or brackets) over the holes. Use screws that are the right size for the anchors. As you screw into the anchor, it will expand in the hole, creating a tight grip on the floor. This is how you anchor kitchen island firmly into tile.
Securing Island to Concrete Floor
Concrete floors are very strong but need special tools.
- Mark the spot: Mark where you need to drill on the concrete surface.
- Use the right bit: You need a masonry drill bit. A hammer drill works best for drilling into concrete. It chips away at the concrete as it spins.
- Drill the hole: Drill a hole into the concrete. The depth and width of the hole depend on the concrete anchor you will use. Read the anchor package for the right size.
- Clean the hole: Use a shop vacuum to suck all the concrete dust out of the hole. The anchor needs a clean hole to grip properly.
- Install anchors: There are different types of concrete anchors.
- Tapcons: These are special screws that cut their own threads into the concrete. You just drill the right size hole and screw them in.
- Expansion anchors: These anchors expand when you screw into them, gripping the concrete.
- Sleeve anchors: These have a sleeve that expands.
Choose the right anchor for the weight of your island and read the instructions. Insert the anchor into the hole.
- Screw it down: Place your island (or brackets) over the holes. Screw into the concrete anchors. This will mount kitchen island to floor very securely.
Step-by-Step: How to Install Kitchen Island Securely
Here is a simple guide for how to stabilize kitchen island by fixing it to the floor. We will assume you are using L-brackets for this example.
Step 1: Plan and Prepare
- Decide exactly where the island will go. Mark the outline on the floor with tape.
- Check under the floor for pipes, wires, or ducts in the marked area using your detector. Adjust the position if needed.
- Make sure the floor surface is clean and clear.
- Gather all your tools and hardware (brackets, screws for island, screws/anchors for floor, drill, bits, level, safety gear).
Step 2: Prepare the Island
- Turn the island on its side carefully, or get help to lift it if it’s very heavy.
- Attach L-brackets to the bottom edge of the island. Place them where you marked the island’s position on the floor. Use screws that are strong enough but don’t go through the island sides. Put brackets on at least two sides, maybe more for a large island. Four brackets, one near each corner, is usually best for prevent kitchen island tipping.
- Make sure the brackets are facing the correct way to screw down to the floor.
Step 3: Position the Island and Mark the Floor
- Carefully move the island back into its marked spot on the floor.
- Use your level to check if the island is sitting flat. If the floor is uneven, use shims under the island base or legs to make it level. The island must sit flat and solid before you fix it down.
- Once the island is perfectly in place and level, use a pencil or marker to mark the floor through the screw holes in each bracket.
Step 4: Prepare the Floor
- Carefully move the island out of the way again.
- You will now drill holes in the floor at the marks you made. Use the correct drill bit for your floor type (wood, tile, concrete).
- If drilling into tile, remember to use tape or a scribe and keep the bit cool. Drill slowly.
- Drill the hole to the correct depth for your screw or anchor.
- Clean the dust and debris from the holes and the surrounding floor using a vacuum.
- If using anchors (for tile or concrete), insert them into the holes now. Tap them gently with a hammer if needed so they sit flush with the floor.
Step 5: Mount the Island to the Floor
- Carefully move the island back into its final position. Line up the holes in the brackets with the holes (or anchors) in the floor.
- Insert the correct screws for your floor type through the bracket holes and into the floor (or anchors).
- Use your drill or screwdriver to drive the screws in. Do not overtighten, especially on tile, as this can crack the tile or anchor. Tighten until the bracket is snug against the floor and the island feels secure.
- Work your way around to all the brackets, screwing them down one by one.
Step 6: Test and Finish
- Once all brackets are screwed down, gently push and pull on the island. It should not move or wobble at all. It should feel completely solid. This check confirms you have successfully managed to anchor kitchen island.
- If the island still moves, check if the screws are tight. Did you use the right anchors for your floor? Did the screws go into something solid like a joist or anchor? You might need bigger screws or different anchors.
- If you used shims to level the island, trim any parts sticking out with a utility knife.
- Clean up any dust from drilling.
- If your island has trim that covers the base, you might be able to add it now to hide the brackets.
This process effectively helps secure freestanding island units or any island, making it a fixed and safe part of your kitchen.
More Ways to Secure Freestanding Island Units
What if you can’t drill into your floor, or you want a less permanent option? While bolting to the floor is the safest way to prevent kitchen island tipping, especially for heavy use, here are some other ideas for how to stabilize kitchen island, though they offer less security than bolting:
- Heavy Base: Choose an island with a very wide and heavy base. Weight makes it harder to tip.
- Non-Slip Pads: Placing non-slip rubber pads under the island legs or base can stop it from sliding, but won’t prevent tipping.
- Connecting to Other Cabinets: If your island is next to another cabinet or wall, you might be able to connect it using screws. This makes it part of a larger, more stable unit. This is less common for a true “island” but works for a peninsula.
- Adding Weight: Sometimes people add weight inside the base of a light island (like sandbags or weights) to make it more stable. This helps but doesn’t anchor kitchen island to the structure.
Remember, these methods are less secure than actually fixing the island to the floor with kitchen island mounting hardware. If safety is your main concern, bolting it down is the best way to secure freestanding island.
Tools and Materials Summary
To make sure you have everything, here is a simplified list focusing on the main items for attaching kitchen island to floor:
| Item | Purpose | Notes |
|---|---|---|
| Safety Gear | Stay safe (glasses, hearing) | Always use them. |
| Measuring Tools | Get sizes right | Tape measure, level. |
| Finder Tool | Check under the floor | Detects wood, metal, wires, pipes. |
| Drill | Make holes, drive screws | Needs power for floor type. |
| Drill Bits | Match holes to screws and floor | For wood, tile, or concrete. |
| Kitchen Island Mounting Hardware | Connect island to floor | L-brackets, angle brackets. Choose strong ones. |
| Screws | Fix brackets to island and floor | Right length and type for both. |
| Floor Anchors | For tile or concrete floors | Plastic, metal, Tapcons, expansion anchors. |
| Shims | Make the island level | Fill small gaps. |
Having these ready will help you install kitchen island smoothly and safely.
Safety Reminders
Working with tools and drilling into floors has risks. Please follow these safety tips:
- Always wear safety glasses. Dust and bits can fly.
- Use hearing protection when drilling, especially concrete.
- Check for pipes and wires! We said it before, but it’s vital. Use your detector carefully. If unsure, call a pro.
- Use the right tools. Don’t force a wood drill bit into tile. Use the correct bit for the job.
- Don’t rush. Take your time with measuring, marking, and drilling. Mistakes can be costly or dangerous.
- Get help to move the island. Kitchen islands are heavy. Don’t try to lift or move it alone. You could hurt yourself or damage the island or floor.
- Keep your work area clean. Dust and tools on the floor can cause trips.
- Read hardware instructions. Follow the directions for the specific screws, anchors, and brackets you are using.
What if Things Go Wrong? (Troubleshooting)
Even with planning, sometimes you might have issues.
-
Island still wobbles:
- Are the screws tight?
- Are the brackets strong enough?
- Did you use enough brackets? Add more if needed.
- Are the screws or anchors holding in the floor? If a screw feels loose, it might not be properly anchored. You might need to drill a new hole nearby and use a better anchor or a longer screw if going into wood.
- Is the island sitting level? Use shims if needed before tightening the screws.
-
Drilling is difficult:
- Is your drill powerful enough?
- Are you using the right drill bit for the floor? Is the bit still sharp? Drill bits wear out, especially on tile or concrete.
- Are you drilling too fast or pushing too hard? Let the drill and bit do the work.
- If drilling tile, are you keeping the bit cool with water?
-
Hit something under the floor: STOP IMMEDIATELY. If you think you hit a pipe or wire, do not keep drilling. Turn off power or water to that area if you can. Call a plumber or electrician right away. This is a serious safety issue.
When to Get Professional Help
Most people can secure kitchen island to floor themselves with the right tools and information. But sometimes, it’s best to call a professional.
- If you are not comfortable using power tools.
- If you cannot identify what is under your floor.
- If your floor type is unusual or seems very difficult to drill.
- If the island is extremely heavy or awkward to move.
- If you tried to secure it and it still feels unstable.
A handyman or a kitchen installer can do this job quickly and safely. It might cost money, but it ensures the job is done right and safely.
Conclusion
Securing your kitchen island to the floor is a smart step for safety. It stops wobbling and prevents dangerous tipping. You can do this yourself by planning carefully, choosing the right kitchen island mounting hardware, and following the correct steps for your floor type. Whether you are securing island to wood floor or securing island to tile floor, the goal is to anchor kitchen island firmly. Taking the time to attach kitchen island to floor means you can use your island with confidence. You will have a safe and stable workspace that you install kitchen island yourself. This guide covered how to mount kitchen island to floor and secure freestanding island units, helping you prevent kitchen island tipping. Remember safety first, and enjoy your secure kitchen!
Frequently Asked Questions (FAQ)
How long does it take to secure a kitchen island?
For most DIYers, securing a kitchen island can take a few hours. This includes time for planning, gathering tools, positioning the island, drilling, and fastening the hardware. If you hit problems or have a difficult floor, it might take longer.
How many brackets do I need to secure my island?
For most islands, using four L-brackets is enough. Place one near each corner on the inside of the base. For very large or heavy islands, or islands that will see a lot of use (like with kids), you might want to add more brackets along the longer sides for extra strength and to better prevent kitchen island tipping.
Can I secure my island without drilling into the floor?
Yes, you can use methods like adding weight or connecting it to nearby cabinets (if possible). However, these methods do not truly anchor kitchen island to the building structure. Drilling and fixing it to the floor is the most secure way to prevent kitchen island tipping. It’s strongly recommended for safety.
Will securing the island damage my floor?
Yes, drilling holes in the floor is part of the process to attach kitchen island to floor. If you later remove the island, you will need to repair the holes. The damage is usually small (just the screw or anchor holes) and can be filled or covered. If you are using brackets, the area under the bracket is hidden.
What size screws should I use for a wood floor?
If screwing into floor joists, use screws long enough to go through the island base/bracket, the finished floor, the subfloor, and at least 1 to 1.5 inches into the joist. This might mean screws that are 2.5 to 3 inches long. If just screwing into the subfloor, use screws long enough to go through the island base/bracket and well into the subfloor (e.g., 1.5 to 2 inches). Make sure they are strong construction screws.
Do I need special tools for securing an island to tile?
Yes, you need special drill bits made for tile (like carbide-tipped or diamond bits). You also need floor anchors that work with tile and the subfloor underneath. A standard drill might work, but a hammer drill helps drill through tough tile or concrete faster.
Can I just use strong glue instead of screws?
No, glue is not a reliable way to secure kitchen island to floor for safety. Islands are heavy and experience sideways forces. Glue can fail over time, leading to the island becoming unstable. Always use mechanical fasteners like screws and anchors to prevent kitchen island tipping.