Image Source: i.ytimg.com
How To Replace Water Filter In Kitchenaid Refrigerator Easily
Wondering how to change water filter Kitchenaid refrigerator? Replacing your water filter is straightforward and essential for clean, great-tasting water and ice. This guide will walk you through the entire process, from locating the filter to proper installation and disposal. We’ll also cover when to change it and where to find the best replacement filters for your appliance.
A clean water filter is vital for the health and performance of your KitchenAid refrigerator. Over time, the filter traps impurities like sediment, chlorine, lead, and other contaminants. When the filter becomes clogged, it not only affects the taste and quality of your water but can also reduce water flow to your dispenser and ice maker. Fortunately, a Kitchenaid refrigerator filter change is a simple maintenance task that most homeowners can do themselves without needing a service professional.
Why Regularly Replace Your Kitchenaid Refrigerator Water Filter?
Your KitchenAid refrigerator is equipped with a sophisticated water filtration system designed to provide you with pure, refreshing water. However, like any filter, it has a limited lifespan. Here’s why keeping up with your Kitchenaid fridge water filter replacement schedule is so important:
- Improved Water Quality: The primary function of the filter is to remove impurities. Over time, these impurities accumulate, reducing the filter’s effectiveness. Regular replacement ensures you continue to receive the highest quality drinking water, free from unpleasant tastes and odors.
- Enhanced Ice Production: If your refrigerator has an ice maker, a clogged water filter can restrict water flow, leading to slower ice production or no ice at all. A fresh filter ensures a steady supply of water for your ice maker.
- Appliance Longevity: A properly functioning water filter protects the internal components of your refrigerator’s water system from sediment buildup. This can prevent strain on the pump and other parts, potentially extending the overall lifespan of your appliance.
- Health Benefits: By removing harmful contaminants like lead, mercury, and certain pesticides, your water filter contributes to healthier hydration for your family. Replacing it regularly ensures these contaminants are effectively captured.
- Better Taste: Chlorine, often used to disinfect municipal water supplies, can impart a distinct taste and smell. Your KitchenAid refrigerator water filter effectively reduces chlorine, resulting in water that tastes cleaner and fresher.
How Often to Change Kitchenaid Water Filter
The question of how often to change Kitchenaid water filter is a common one. While the exact frequency can vary slightly depending on your specific model and water usage, the general recommendation is every six months. Many KitchenAid refrigerators will have an indicator light on the control panel that illuminates when it’s time for a replacement.
However, it’s also important to consider your household’s water consumption and the quality of your local water supply.
- High Water Usage: If your family drinks a lot of water, uses the dispenser frequently, or fills large water bottles daily, you might need to replace the filter sooner than six months.
- Hard Water or High Sediment Content: If your tap water has a high mineral content or is prone to sediment, the filter will likely get clogged faster. You might notice a decrease in water flow or a change in taste as indicators that it’s time for a change.
- Filter Indicator Light: Always pay attention to the filter indicator light on your refrigerator’s control panel. This is the most reliable indicator of when to perform a Kitchenaid refrigerator filter change.
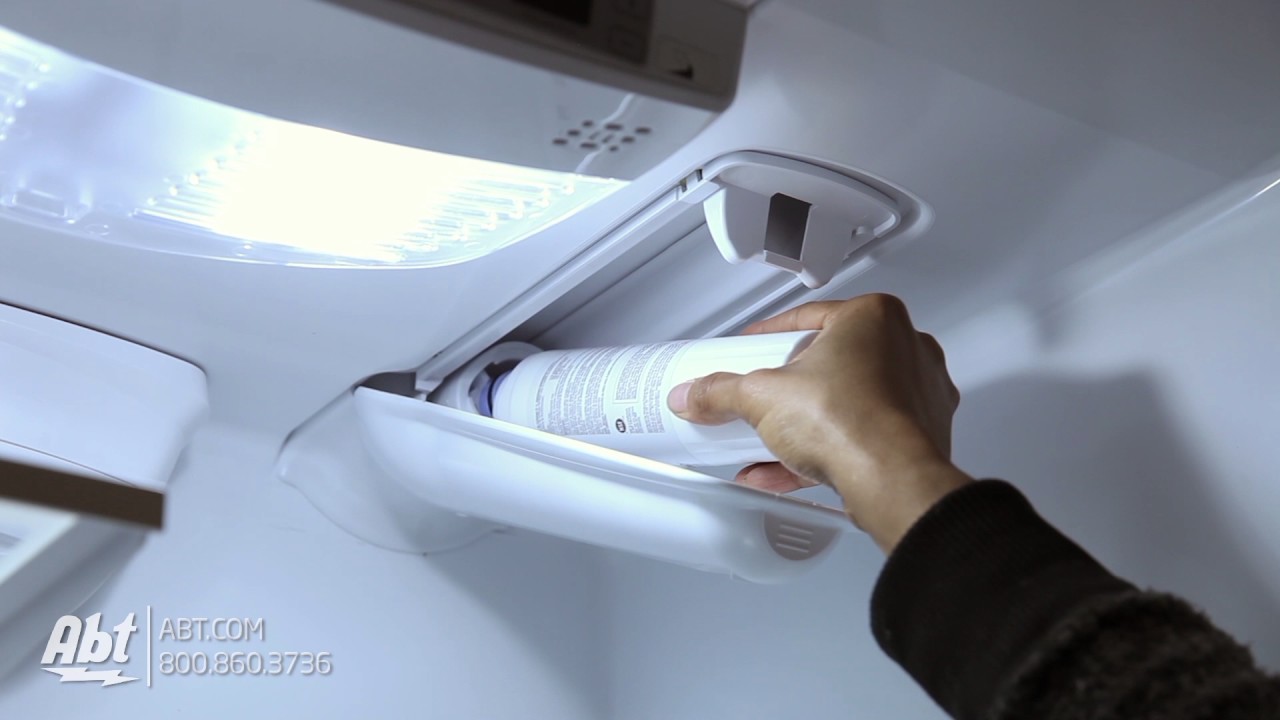
Kitchenaid Refrigerator Water Filter Location
Figuring out the Kitchenaid refrigerator water filter location is the first step in the replacement process. Fortunately, most KitchenAid refrigerators have designed the filter placement for easy access. Here are the most common locations:
-
Inside the Refrigerator Compartment:
- Upper Right Corner: Many models feature the water filter housed in a compartment at the top right of the refrigerator’s interior. You might see a small cover or a twist-off cap.
- Lower Right Corner: Some models place the filter behind a grille or access panel at the bottom right of the refrigerator’s interior.
-
In the Base Grille (Front Bottom):
- Some models have the filter located in the base grille at the very bottom front of the refrigerator. You’ll typically need to remove a small cover or panel to access it.
How to Find Your Specific Filter Location:
- Consult Your Owner’s Manual: This is always the most accurate resource. Your manual will detail the exact location of the water filter for your specific KitchenAid refrigerator model.
- Visual Inspection: Open your refrigerator and look for a filter housing, usually a cylindrical or elongated component, often with a push-button release or a twist-off mechanism. Check the interior corners, ceiling, and the base grille at the front.
Best Water Filter for Kitchenaid Refrigerator
When it comes to choosing the best water filter for Kitchenaid refrigerator, you have a few options, primarily between genuine KitchenAid brand filters and compatible aftermarket filters.
-
Genuine KitchenAid Filters: These are manufactured by KitchenAid and are guaranteed to be compatible with your refrigerator. They are designed to meet the specific performance standards of your appliance and typically offer excellent filtration.
- Pros: Guaranteed compatibility, OEM quality, often come with detailed installation instructions.
- Cons: Can be more expensive than aftermarket options.
-
Compatible Aftermarket Filters: Many reputable third-party manufacturers produce filters that are designed to fit and function in KitchenAid refrigerators. These can be a more budget-friendly option.
- Pros: Cost-effective, wide variety of brands available.
- Cons: Quality can vary significantly between brands; ensure you choose a reputable manufacturer that certifies their filters for your KitchenAid model. Look for certifications like NSF/ANSI.
Key Features to Look for in a Water Filter:
- NSF/ANSI Certifications: Look for filters certified by NSF International (National Sanitation Foundation) or the American National Standards Institute (ANSI). Certifications like NSF/ANSI Standard 42 (aesthetic effects like chlorine taste and odor) and NSF/ANSI Standard 53 (health effects like lead and VOCs) are important.
- Filter Capacity: Filters are rated for a certain capacity (e.g., gallons or months of use). Ensure the capacity matches or exceeds your needs.
- Flow Rate: A good filter should maintain an adequate water flow rate.
- Ease of Installation: Most KitchenAid filters are designed for tool-free installation.
Where to Buy Kitchenaid Refrigerator Water Filter:
You can find where to buy Kitchenaid refrigerator water filter from several reliable sources:
- Appliance Manufacturer Websites: Directly from the KitchenAid website or authorized appliance parts dealers.
- Online Retailers: Major online marketplaces like Amazon, Walmart, and specialized appliance parts websites offer a wide selection of both genuine and compatible filters.
- Appliance Parts Stores: Local appliance repair shops or dedicated appliance parts retailers often carry a range of filters.
Important Note: When purchasing a filter, always verify the model number against your refrigerator’s requirements to ensure compatibility. Your owner’s manual or the refrigerator itself will usually have the specific filter part number.
Step-by-Step Guide: How to Replace a Water Filter in a Kitchenaid Refrigerator
This guide will detail the Kitchenaid refrigerator water filter installation process. It’s designed to be clear and easy to follow, ensuring a successful replace refrigerator water filter experience.
Before You Begin:
- Identify Your Filter: Confirm the correct filter model for your KitchenAid refrigerator. Refer to your owner’s manual or search online using your refrigerator’s model number.
- Purchase Your Replacement Filter: Get your new filter from a trusted retailer.
- Gather Supplies: You won’t need many tools, but have a clean towel or cloth ready to wipe up any spills.
- Locate Your Current Filter: As described in the “Kitchenaid Refrigerator Water Filter Location” section.
The Replacement Process:
Step 1: Turn Off the Water Supply (Recommended but not always necessary for internal filters)
While most internal refrigerator filters are designed to self-seal, it’s a good practice to turn off the water supply to the refrigerator if you can easily access the shut-off valve (often located behind the refrigerator or under the sink). This minimizes the risk of leaks. If you can’t easily find or access a shut-off valve, don’t worry; most internal filter replacements are very clean.
Step 2: Prepare for Water Drainage
Even with the water supply off, some residual water may remain in the filter and lines. Have a towel or a shallow pan ready underneath the filter housing to catch any drips.
Step 3: Remove the Old Water Filter
The method for removing the old filter depends on its design:
-
Twist-Off Filters:
- Grip the filter housing or the filter itself.
- Turn the filter counter-clockwise (to the left) about a quarter turn. You may feel a slight resistance as it unlocks.
- Pull the filter straight out from its housing. Some water might drip out.
-
Push-Button Release Filters:
- Locate a button or tab near the filter housing.
- Press and hold the button firmly.
- While holding the button, pull the filter straight out.
-
Other Types (e.g., located in the base grille):
- You might need to remove a small access panel or grille cover first. This usually involves releasing clips or unscrewing a few small screws.
- Once exposed, follow the twist-off or push-button method as described above.
Step 4: Prepare the New Water Filter
- Remove Packaging: Take the new filter out of its packaging.
- Remove Protective Caps: Ensure any protective caps from the inlet and outlet ports of the new filter are removed. These are usually blue or clear plastic caps.
- Optional: Rinse the New Filter: Some manufacturers recommend rinsing the new filter under cold running water for about 10-15 seconds to remove any loose carbon fines. Check your filter’s instructions.
Step 5: Install the New Water Filter
- Align the Filter: Carefully align the new filter with the housing opening. Most filters have guide tabs or notches to ensure they are inserted correctly.
- Insert and Twist/Push:
- For Twist-Off Filters: Push the filter into the housing until it’s seated, then turn it clockwise (to the right) about a quarter turn until it locks into place. You should feel it click or stop turning.
- For Push-Button Release Filters: Push the filter straight into the housing until it clicks or stops. You should hear or feel it lock securely.
Step 6: Turn the Water Supply Back On (If you turned it off)
If you turned off the water supply at the valve, turn it back on slowly.
Step 7: Flush the New Filter
This is a crucial step to remove air from the system and any carbon particles from the new filter.
- Dispense Water: Place a large container or pitcher under the water dispenser.
- Run Water: Dispense at least 1-2 gallons (approximately 3-4 liters) of water. You’ll notice that the water may sputter or appear cloudy or discolored at first. This is normal as air and carbon fines are flushed out.
- Continue Flushing: Keep dispensing water until the flow is smooth and the water runs clear.
- Discard the Flushed Water: This initial water is not suitable for drinking.
Step 8: Reset the Filter Indicator Light
Most KitchenAid refrigerators have a filter indicator light that needs to be reset after replacement. The method varies by model, but here are common ways:
- Press and Hold Button: Often, you need to press and hold a specific button (like “Filter Reset,” “Ice Type,” “Auto Defrost,” or even the water dispenser lever) for 3-5 seconds.
- Control Panel Sequence: Some models require a sequence of button presses on the control panel.
- Consult Your Manual: Your owner’s manual will provide the exact instructions for resetting the indicator light for your model.
Step 9: Check for Leaks
After flushing and resetting, closely inspect the filter housing and surrounding area for any signs of leaks. If you notice any drips, ensure the filter is properly seated and locked.
Troubleshooting Common Issues During a Kitchenaid Refrigerator Filter Change
While the process is generally straightforward, you might encounter a few minor issues.
- Filter Won’t Twist/Remove:
- Cause: Mineral buildup or a tight seal.
- Solution: Try gently wiggling the filter while turning. If it’s still stuck, you might need to apply a bit more firm, steady pressure. Ensure you are turning it in the correct direction (counter-clockwise).
- New Filter Won’t Install/Lock:
- Cause: Incorrect filter model, misalignment of guide tabs, or debris in the housing.
- Solution: Double-check that you have the correct filter model. Ensure the filter is properly aligned with the housing and pushed in fully before attempting to twist or lock it. Check the housing for any obstructions.
- Water Pressure is Low After Replacement:
- Cause: Air trapped in the system, filter not fully flushed, or the new filter is faulty.
- Solution: Ensure you have flushed at least 1-2 gallons of water. If the pressure doesn’t improve after thorough flushing, the filter might be clogged or defective. Try re-flushing or consider replacing the filter again.
- Water is Cloudy or Has Black Particles:
- Cause: Carbon fines from the new filter.
- Solution: This is usually normal for the first few gallons flushed. Continue flushing until the water runs clear. If the problem persists after flushing several gallons, contact the filter manufacturer or consider a different brand.
- Filter Indicator Light Remains On:
- Cause: Reset procedure not performed correctly or not recognized by the refrigerator.
- Solution: Refer to your owner’s manual for the precise reset sequence for your model. Try repeating the reset process. If it still doesn’t turn off, there might be an issue with the refrigerator’s sensor.
Frequently Asked Questions (FAQ)
Q1: Can I use a generic water filter in my KitchenAid refrigerator?
A1: Yes, you can use compatible aftermarket filters, but it’s crucial to ensure they are specifically designed for your KitchenAid refrigerator model and have reputable certifications (like NSF/ANSI) for quality and safety. Always verify compatibility with your refrigerator’s model number.
Q2: My KitchenAid refrigerator doesn’t have a filter indicator light. How do I know when to change it?
A2: If your model lacks an indicator light, adhere to the general recommendation of changing the filter every six months. You can also monitor water flow and taste. A decrease in water pressure or a noticeable change in water taste or odor are signs that the filter needs replacement.
Q3: What happens if I don’t change my KitchenAid refrigerator water filter?
A3: If you don’t change the filter, it will become clogged with impurities. This can lead to reduced water flow to the dispenser and ice maker, poor-tasting water, and potentially strain on your refrigerator’s water system, shortening its lifespan.
Q4: How do I dispose of the old KitchenAid refrigerator water filter?
A4: Most water filters can be safely disposed of in your regular household trash. Check the packaging of your replacement filter for specific disposal instructions from the manufacturer.
Q5: Does the water filter also filter the water for the ice maker?
A5: Yes, in most KitchenAid refrigerators, the same water filter that serves the dispenser also filters the water supplied to the ice maker, ensuring clear and pure ice cubes.
By following these detailed steps, you can confidently perform a Kitchenaid refrigerator filter change and enjoy clean, fresh water for your household. Regular maintenance is key to keeping your KitchenAid refrigerator performing at its best.