A kitchen soffit is a box-like structure often found above your kitchen cabinets. Can you remove this structure? Yes, you can often remove a kitchen soffit yourself. Removing a kitchen soffit, sometimes called a bulkhead above cabinets, can make your kitchen look bigger and more modern. Getting rid of kitchen soffit is a popular home update project.
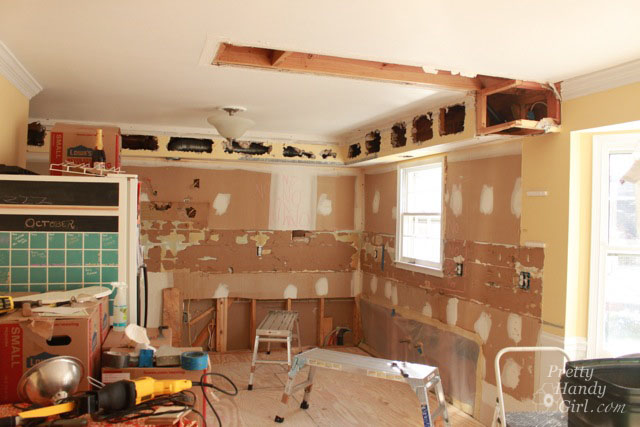
Image Source: prettyhandygirl.com
Why Change Your Kitchen Soffit?
Soffits were popular for many years. They fill the space between the top of your cabinets and the ceiling. Builders used them to hide things like pipes, wires, or heating ducts. They also made it easier to install shorter cabinets.
Today, many people want a more open look. Removing the soffit gives you more space. You can add taller cabinets that go to the ceiling. This adds storage. Or you can leave the space open for a clean, modern feel. Removing the soffit can really change how your kitchen feels.
Can You Do This Project Yourself?
Removing a kitchen soffit can be a DIY project. But it is not always easy. You need to know how to use tools. You need to be careful. Safety when removing soffit is very important.
Before you start, you must find out what is inside the soffit. Sometimes it holds important house systems. If it has many pipes, wires, or ducts, it might be a hard job. You might need a professional.
If the soffit only has framing and drywall, it is much easier for a DIY soffit demo. This guide will walk you through the steps.
Getting Ready to Start
Good planning makes the job easier and safer. Do these things before you start tearing down.
Look Closely at the Soffit
Check the soffit carefully. How is it built? Is it made of wood and drywall? Does it seem loose or strong? Look for any signs of electrical plates or vents on the soffit itself. This might give you clues about what’s inside kitchen soffit.
Empty Your Kitchen
This job makes a lot of dust and mess. Take everything out of your kitchen cabinets. Move your oven, fridge, and other appliances if you can. Cover anything you cannot move, like your counters and floor, with plastic sheeting or old sheets. Close off the kitchen doorway with plastic to stop dust from spreading.
Check What Might Be Inside
This is a very important step. Before you make any big cuts, try to figure out what might be hidden.
- Electrical: Look for light switches or outlets on the soffit or nearby walls that seem connected.
- Plumbing: Listen for water running in nearby rooms. Are there sinks or toilets above or next to the kitchen? Pipes might be in the soffit.
- HVAC: Feel for air blowing from vents on the soffit or close to it. Ducts could be inside.
- Structure: Is the soffit just attached to the wall and ceiling, or does it seem like it is holding something up? Most kitchen soffits are just boxes built for looks or to hide things, not to support the house structure. But it is always good to be sure.
You can make a small test hole in a corner of the drywall. Use a small drywall saw. Cut slowly. Look inside with a flashlight. Take pictures. If you see anything other than wood framing and empty space, stop and think. You might need help from an electrician, plumber, or HVAC expert.
Get Your Safety Gear Ready
Safety comes first. You must protect yourself.
- Safety Glasses: Protect your eyes from dust and falling pieces.
- Dust Mask or Respirator: Sawing drywall and wood makes fine dust. This dust is bad to breathe. A good mask is needed.
- Work Gloves: Protect your hands from cuts and scrapes.
- Hard Hat: Falling wood or tools can hurt your head. Wear a hard hat.
- Long Sleeves and Pants: Protect your skin from dust and sharp edges.
- Sturdy Shoes: Protect your feet from falling objects or nails.
Turn Off Power and Gas
This is CRITICAL. If you think there are electrical wires or gas pipes in the soffit, you must turn off the power and gas to the kitchen area.
- Electricity: Go to your home’s breaker box. Find the breakers that control the kitchen lights and outlets. Flip them to the “off” position. Put a note on the box saying you are working. Use a non-contact voltage tester to check wires inside the soffit before you touch them. Always assume wires are live until you test them.
- Gas: Kitchens often have gas lines for stoves. Gas lines in soffits are less common but possible. If you suspect a gas line, turn off the main gas valve to your house or call the gas company. Do not guess with gas.
Gathering Your Tools
You will need some basic tools for soffit removal. Having the right tools makes the job easier and safer.
Here are the tools for soffit removal you will likely need:
- Step Ladder or Work Platform: To reach the soffit safely.
- Utility Knife: To cut drywall tape or make small cuts.
- Drywall Saw: A hand saw or power saw for cutting drywall.
- Reciprocating Saw (Sawzall): Very useful for cutting wood framing. Make sure you have wood-cutting blades.
- Pry Bar (Crowbar): To pull apart wood pieces and pry drywall from studs. Different sizes can be helpful.
- Hammer: To help with the pry bar or knock pieces loose.
- Screwdriver or Drill with Screw Bits: Some framing might be held with screws.
- Stud Finder: To locate wall studs and ceiling joists. This helps when patching later.
- Tape Measure: For measuring cuts or the size of the area.
- Pencil: To mark cut lines.
- Trash Bags and Buckets: For carrying away debris.
- Shop Vacuum: To clean up dust and small pieces.
Optional Tools (Can Make it Easier):
- Oscillating Tool: Good for making controlled cuts in tight spots.
- Rotary Tool (like Dremel): Useful for small, detailed cuts if needed around pipes or wires.
- Metal Detector: Can help find pipes or wires hidden in the wall/ceiling near the soffit area.
The Removal Steps
Okay, you are ready. Safety gear is on. Power is off. Kitchen is covered. You have your tools. Let’s start the kitchen soffit removal process.
Step 1: Double-Check Safety
Seriously, check again. Are your safety glasses on? Mask? Is the power off (did you test the outlets)? Is the gas off if needed? Don’t skip this. Safety when removing soffit is the most important part.
Step 2: Protect Everything
Make sure your floor, counters, and appliances are well covered. Dust gets everywhere.
Step 3: Make Test Cuts and See What’s Inside
Before you start cutting big holes, make a few small cuts in the drywall. Use your utility knife or drywall saw. Make small squares, maybe 6×6 inches. Cut slowly and carefully.
Make cuts on the bottom and sides of the soffit. Cut near corners and in the middle. Pull the small drywall pieces off. Look inside with a flashlight. Take pictures.
This is when you really see what’s inside kitchen soffit.
* Only Wood Frame and Empty Space: Great! This is the easiest situation.
* Electrical Wires: See wires? Are they loose? Are they running somewhere important? Test them with your voltage tester again to be absolutely sure the power is off. Note where they go. You might need to move them later, or have an electrician move them.
* Plumbing Pipes: See copper, plastic (PEX or PVC), or old metal pipes? Are they water supply or drain pipes? Listen if anyone flushes a toilet or runs water in a nearby room. If they are active pipes, you cannot remove the soffit without a plumber moving them.
* Ductwork: See metal or flexible tubes? These are for heating or cooling air. You cannot easily move these. An HVAC expert would be needed.
* Vent Pipes: Black or white plastic pipes going upwards? These are often vent pipes for plumbing fixtures. They let sewer gas escape through the roof. You cannot remove or cut these.
* Old Insulation or Debris: Sometimes builders just put trash or extra insulation in soffits. Wear gloves and a mask if dealing with old or dusty material.
Stop and Assess: Based on what you find, decide if you can continue or if you need a professional. If you find active plumbing, HVAC ducts, or complex electrical wiring, it is wise to call an expert. If you only find framing and maybe some old, dead wires (always test them!), you can likely continue with your DIY soffit demo.
Step 4: Start the Drywall Tear Down
Now you can really start the drywall soffit tear down. Start on one end of the soffit.
- Cut Along the Edges: Use your utility knife to cut through the drywall tape and joint compound where the soffit meets the wall and ceiling. This helps the drywall come off cleanly.
- Cut Sections: Use your drywall saw or a reciprocating saw with a drywall blade. Cut the drywall into smaller, manageable sections. Cutting it into pieces (maybe 2×4 feet or smaller) makes it easier to handle and carry away.
- Carefully Pull Drywall: Once cut, grab an edge and pull the drywall away from the wood framing. It might be nailed or screwed on. Use your pry bar gently if it’s stuck.
- Watch for What’s Inside: As you pull off pieces, keep looking inside. Are there any unexpected wires, pipes, or other things attached to the drywall? Stop cutting or pulling if you hit something solid that isn’t the wood frame.
- Continue Until All Drywall is Off: Work your way along the soffit, cutting and removing drywall pieces until the entire wood frame is showing.
Put the drywall pieces right into trash bags or a bin. Drywall dust is messy.
Step 5: Remove the Wood Frame
Once all the drywall is gone, you will see the skeleton of the soffit. This is the wood framing. It is usually made of 2×2 or 2×4 lumber. These pieces are attached to the wall studs and ceiling joists, and to each other. This is how to remove framing above cabinets.
- Look at How It’s Attached: See if the wood pieces are held together with nails or screws. See where they connect to the wall and ceiling.
- Start from One End: Begin taking apart the frame from one end. It’s usually easier than starting in the middle.
- Use Your Pry Bar or Saw:
- Pry Bar: For nailed pieces, wedge your pry bar between the soffit frame piece and the wall/ceiling/other frame piece. Gently pry them apart. Wiggle the pry bar. Use a hammer to help tap the pry bar in. Be careful not to damage the wall or ceiling too much.
- Reciprocating Saw: For screwed pieces or stubborn nails you can’t pry, you can cut through the wood near the screw/nail with your reciprocating saw. Cut the pieces into smaller, easy-to-handle lengths as you go. Use a wood-cutting blade.
- Remove Top Pieces First (Sometimes): Often, there’s a horizontal piece of wood attached to the ceiling joists. This might be easier to remove after the vertical pieces coming down from it are gone.
- Remove Vertical Pieces Next: These often run from the ceiling frame piece down to a piece attached to the wall studs.
- Remove Wall Pieces Last: The pieces attached to the wall studs might be the last to come off. Find the nails or screws connecting them to the studs and pry them free.
- Check for Hidden Items Again: As you remove wood pieces, keep an eye out for anything still attached or hidden behind the wood. Wires might be stapled to the back of studs.
- Keep Clearing Debris: As you remove wood pieces, put them straight into your trash bin. Watch out for nails sticking out.
Removing bulkhead above cabinets means taking out all this wood structure. Keep working carefully until all the added framing is gone and you are left with the original wall and ceiling surfaces.
Step 6: Clean Up the Mess
You will have a big pile of drywall dust, chunks, and wood pieces.
- Remove Large Debris: Put all drywall and wood into heavy-duty trash bags or construction debris bins. Be careful of nails in the wood.
- Vacuum: Use a shop vacuum to clean up all the dust from the floor, counters, and cabinet tops. Vacuum the wall and ceiling surfaces where the soffit was. Drywall dust is very fine and gets everywhere. You might need to vacuum multiple times.
- Wipe Surfaces: After vacuuming, wipe down surfaces with a damp cloth to get the last of the dust.
A good cleanup now makes the next steps easier.
After the Soffit is Gone: The Finish Work
Now you have a gap above your cabinets. The wall and ceiling areas where the soffit was will not look finished. They will have cuts, nail holes, and bare spots. Patching wall after soffit removal is the next big step.
This part takes time and patience. It is about making the old soffit area blend in with the rest of your wall and ceiling.
Repairing the Walls and Ceiling
You might have holes or damaged spots where the soffit was attached.
- Assess Damage: Look at the original wall and ceiling drywall. Are there small holes from nails? Bigger tears? Sections of drywall paper pulled off?
- Trim Rough Edges: Use your utility knife to cut away any loose or torn paper from the drywall edges. Make the edges look as clean as possible.
Patching and Smoothing the Area
This involves using new drywall pieces, joint compound (mud), and drywall tape. The goal is a smooth, flat surface ready for paint.
- Small Holes (Nail/Screw Holes): Fill these directly with joint compound using a putty knife. Scrape smooth.
- Medium Holes or Damaged Areas (Up to a few inches): You can use mesh drywall tape or sticky drywall patches over the hole/damage. Press it firmly. Then apply a layer of joint compound over the tape/patch. Make it smooth.
- Larger Holes or Missing Sections:
- You will need to cut a new piece of drywall to fit the hole.
- You might need to add small wood pieces (backer boards) behind the existing drywall to screw the new patch onto.
- Screw the new drywall piece into the backer boards and the existing studs/joists if possible.
- Apply paper or mesh drywall tape over the seams around the new patch.
- Apply the first layer of joint compound over the tape and screws. Spread it smoothly, feathering the edges onto the old wall/ceiling. Let it dry completely (check the mud container for time, usually several hours).
- Second Layer of Mud: Once the first layer is dry, it will shrink a bit. Apply a second, thin layer of joint compound. Make it wider than the first layer. Try to make it very smooth. Let it dry completely.
- Third Layer (If Needed): Apply a third thin layer if you still see bumps or dips. This layer is often the widest and thinnest, meant to make the area perfectly flat. Let it dry completely.
- Sanding: Once the final layer of mud is completely dry and hard, sand the patched area smooth. Use fine-grit sandpaper (like 150 or 220 grit). Sand gently in circles or back and forth. The goal is to make the patched area level with the surrounding wall/ceiling. Wear your dust mask!
- Clean Dust: Vacuum all the sanding dust. Wipe down the area with a slightly damp cloth.
- Check Your Work: Look at the patched area from different angles, especially with a light shining across it (called “raking light”). Do you see bumps or dips? If yes, you might need to apply a little more mud and sand again. This mudding and sanding process is key to a smooth finish.
This patching and smoothing work is often the most time-consuming part of removing bulkhead above cabinets.
Priming and Painting the Area
Once your patching is smooth and dust-free:
- Apply Primer: Use a good quality drywall primer or a primer that blocks stains. Apply one coat over all the patched areas. Primer helps the new joint compound take paint the same way as the old wall/ceiling. Let it dry.
- Paint: Paint the area to match your existing wall and ceiling color. You will likely need at least two coats of paint. You might need to paint the entire wall or ceiling section edge-to-edge for the color to blend perfectly.
What Happens After Removing the Soffit?
With the soffit gone and the walls/ceiling patched and painted, you now have new space.
- Taller Cabinets: You can buy and install new kitchen cabinets that go all the way to the ceiling. This is a great way to add storage.
- Open Shelving: Install floating shelves or brackets for open storage and display.
- Leave it Open: Just leave the space empty. This gives a very open and airy feel to the kitchen. You might add crown molding where the cabinets meet the ceiling for a finished look.
Deciding what to do with the new space is part of getting rid of kitchen soffit.
Things That Can Go Wrong
Even with good planning, things can be unexpected during a DIY soffit demo.
- Finding Important Utilities: The biggest problem is finding active electrical wires, water pipes, or HVAC ducts that you cannot easily move or turn off.
- Solution: Stop immediately. Do not cut or move them. Call a professional (electrician, plumber, HVAC technician) to look. They can tell you if the utility can be moved and how much it will cost.
- Structural Walls: Very rarely, a soffit might be built into a wall that helps hold up the house. This is unlikely in a kitchen soffit above cabinets, but possible in other areas of the house.
- Solution: If you think the wall or soffit might be structural (for example, if it lines up with a main beam in the basement), get advice from a structural engineer or experienced contractor before touching it.
- Asbestos or Mold: Older homes might have asbestos in the drywall, joint compound, or insulation inside the soffit. You might also find mold if there was a water leak.
- Solution: If you suspect asbestos (common in homes built before the 1980s) or see mold, stop work. Asbestos dust is dangerous to breathe. Mold can be a health hazard. You might need to call professionals who know how to safely remove these materials.
- More Damage Than Expected: When removing framing, you might damage the original wall or ceiling drywall more than you thought.
- Solution: This just means more patching work. Be patient with the mudding and sanding process. You might need larger drywall patches or even replace a bigger section of drywall.
Having a plan for potential problems is part of the kitchen soffit removal process.
When to Get Professional Help
While a DIY soffit demo is possible, sometimes calling a pro is the best choice.
You should strongly consider hiring a professional if:
- You find active electrical wires, plumbing pipes, or HVAC ducts that are difficult to move.
- You are not comfortable working with tools or doing drywall patching.
- You suspect the soffit or wall might be structural.
- You find asbestos or mold.
- You do not have the time or patience for the cleanup and patching work.
- You want the job done quickly and perfectly.
A professional contractor has the tools, knowledge, and experience to handle surprises and complete the job safely and correctly. Getting rid of kitchen soffit might involve more than you first think.
How Much Does It Cost?
The cost of removing a kitchen soffit varies.
- DIY Cost: This is mostly the cost of materials and tools.
- Safety gear: $30 – $100
- Basic tools (if you don’t have them): $100 – $300 (utility knife, saws, pry bar, etc.)
- Patching materials (drywall pieces, tape, mud, sandpaper): $50 – $150
- Primer and paint: $30 – $100
- Debris disposal: $20 – $50 or more depending on local rules.
- Total DIY: $230 – $700 (less if you have most tools already).
- Professional Cost: This includes labor and materials.
- Basic soffit removal (no utilities inside): $500 – $1500+
- Soffit removal with electrical work: $1000 – $2500+ (Electrician costs vary greatly)
- Soffit removal with plumbing or HVAC work: $1500 – $4000+ (Plumber/HVAC costs are often higher)
- These are just estimates. Costs depend on where you live, the size of the soffit, what is inside, and how much patching is needed. Get several quotes from local contractors.
The cost for patching wall after soffit removal is included in these estimates, but complex repairs or replastering could add more.
Final Thoughts
Removing a kitchen soffit can make a big positive change in your kitchen. It is a project that most DIYers can do if the soffit is empty. The key is careful planning, finding out what is inside, putting safety first, and being patient with the cleanup and repair steps.
Taking your time during the drywall soffit tear down and the how to remove framing above cabinets steps will help prevent damage to the original walls and ceiling. The patching and painting work is where you make the space look finished.
Getting rid of kitchen soffit opens up new design possibilities. Whether you add tall cabinets, open shelves, or just enjoy the extra height, you will likely love the more open feel of your updated kitchen. Remember to be safe, check inside, and do not be afraid to call a professional if you find something you cannot handle. Good luck with your project!
Common Questions About Soffit Removal
Is a kitchen soffit always empty?
No, absolutely not. Kitchen soffits were often built specifically to hide things like plumbing pipes, electrical wires, or HVAC ducts. You must check carefully what is inside before removing it.
How can I tell if a soffit has electrical wires?
Look for light switches or outlets on the soffit or nearby walls that seem related to the area. Make a small test hole and look inside. Use a non-contact voltage tester to check any wires you see. Always turn off the power to the kitchen area at your breaker box before investigating inside the soffit.
What if I find a water pipe inside the soffit?
If it’s a working water pipe (supply or drain), you cannot just cut the soffit away. You will need a plumber to reroute the pipe. This can be a much bigger job. Listen for water sounds to see if the pipe is active.
How do I find the studs and joists when patching the wall/ceiling?
Use a stud finder. These electronic tools can locate the wood framing hidden behind the drywall. Mark their locations with a pencil. You will need to screw new drywall patches into this framing for a strong repair.
How messy is removing a kitchen soffit?
It is very messy. Cutting drywall creates a lot of fine dust that gets everywhere. Removing framing can also make dust and debris. Proper covering of your kitchen and sealing off the doorway is very important for controlling the mess. Wearing a dust mask is essential.
Can I just cover the soffit instead of removing it?
Yes, some people choose to update the look of the soffit instead of removing it. You could cover it with new drywall, beadboard, or decorative trim. You could also paint it to match the walls or ceiling. This is an option if removing it is too difficult due to hidden utilities.
How long does it take to remove a kitchen soffit?
The time varies greatly depending on size, what’s inside, and your skill level. The demolition (drywall and framing removal) might take a few hours to a full day. The cleanup takes more time. The patching, mudding, sanding, priming, and painting can take several days because you have to wait for the mud to dry between coats. So, the whole project could take a long weekend or spread out over a week.