Oak kitchen cabinets are strong and classic. But over time, their finish can look worn or dated. Refinishing them is a good way to make your kitchen look new without buying new cabinets. It saves money and lets you choose the exact color or look you want. This guide will tell you how to refinish oak kitchen cabinets from start to finish. It is a big job, but you can do it yourself with the right steps.
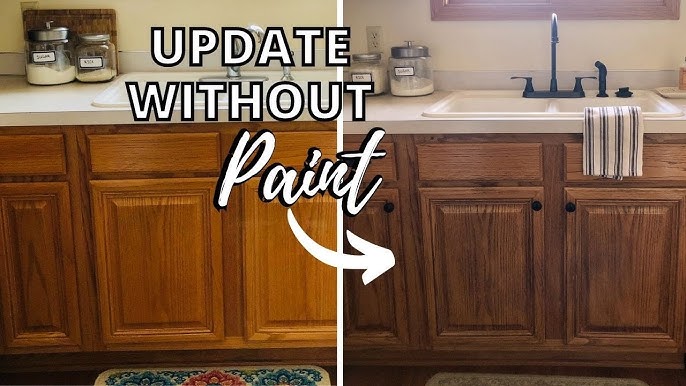
Image Source: i.ytimg.com
Why Make Your Oak Cabinets New?
Oak wood is very tough. It lasts a long time. This is why many kitchens have oak cabinets. But styles change. The finish might get scratched or faded. Maybe the color is just not what you like anymore.
Making them new gives your kitchen a fresh look. It can make your home feel more modern or brighter. It costs much less than putting in new cabinets. It also means you don’t have to tear out and rebuild. It is a way to reuse what you have. This is good for the earth too.
Is Refinishing the Right Choice?
Refinishing takes time and effort. It can make a big difference. But it’s not always the best plan for everyone.
Good Points About Refinishing
- Saves money: It costs much less than buying new cabinets.
- Keeps good wood: If your cabinets are well-made, you can keep the strong oak boxes.
- New look: You can change the color or look completely.
- Do it yourself: You can learn skills and feel proud of the work.
Bad Points About Refinishing
- Takes time: It is not a quick job. It can take a few days or weeks.
- Messy work: Sanding and stripping make dust and need good cleanup.
- Needs space: You need room to work on all the doors and drawers.
- Hard work: It needs effort, like sanding by hand in tight spots.
- Might not fix everything: If cabinets are truly broken or planned badly, refinishing won’t fix that.
Think about how much time you have. Think about the space you can use. Think about how much work you want to do. If you are ready for a project, refinishing is a great choice.
Pick Your New Style
Before you start, decide how you want your cabinets to look. Do you want a clear finish that shows the wood grain? Do you want a color that hides the wood?
Stain or Paint?
This is the main choice.
* Stain: Stain goes into the wood. It colors the wood but you can still see the grain. Oak has a strong grain pattern. Stain makes this grain stand out. You need a topcoat like polycrylic or polyurethane to protect the stain. Choosing the best stain for oak cabinets depends on the look you want. Some stains make oak look classic brown, others can give it a grey or even blue tint while showing the grain.
* Paint: Paint sits on top of the wood. It covers the grain completely. If you don’t like the oak grain, painting is a good option. Painting kitchen cabinets gives you endless color choices. You need a good primer first, then special cabinet paint for a smooth, tough finish.
Colors and Sheen
- Stain Colors: Light stains keep the kitchen feeling open. Dark stains give a rich, warm look. Medium tones are classic.
- Paint Colors: White or light colors make kitchens feel bigger and brighter. Greys and blues are popular modern choices. Dark colors like navy or black can look bold and stylish.
- Sheen: This is how shiny the finish is.
- Matte or Flat: Not shiny, hides small flaws but harder to clean.
- Satin or Eggshell: A little shine, easy to clean, common for cabinets.
- Semi-Gloss or Gloss: Shinier, very durable and easy to wipe clean, but shows flaws more. Satin or semi-gloss are usually best for cabinets.
Get Ready: Tools and Things You Need
Okay, time to gather your cabinet refinishing supplies. Having everything ready saves time later. Here is a list of things you will likely need:
Safety Gear
- Safety glasses or goggles
- Dust mask (N95 or better)
- Gloves (rubber for stripping, nitrile for staining/painting)
- Old clothes
- Fans for airflow
Taking Apart and Cleaning
- Screwdriver (manual or power drill)
- Labels or tape and pen
- Plastic bags (for hardware)
- Bucket
- Cleaner (degreaser like TSP or a strong kitchen cleaner)
- Sponges and rags
- Drop cloths or plastic sheeting
Stripping (If Needed)
- Chemical stripper (choose one for wood finish)
- Scrapers (plastic and metal)
- Wire brush (maybe an old toothbrush for corners)
- Steel wool (coarse and fine grades)
- Paint stripper wash or mineral spirits
Sanding (Including Sanding oak cabinets)
- Orbital sander (highly recommended)
- Sanding sponges
- Sandpaper sheets or discs (various grits: 80, 120, 150, 180, 220)
- Tack cloths or vacuum with brush attachment
Repairing (If Needed)
- Wood filler
- Putty knife
- Fine grit sandpaper
Applying Finish (Stain or Paint)
- Primer (if painting, choose a good bonding primer)
- Wood conditioner (if staining soft woods or areas that soaked up stripper unevenly)
- Stain (your chosen color, include best stain for oak cabinets)
- Paint (your chosen color, for painting kitchen cabinets, use cabinet-specific paint)
- Topcoat/Sealer (polycrylic, polyurethane, or lacquer – for sealing wood cabinets)
- Brushes (good quality synthetic for water-based, natural for oil-based)
- Rollers (small foam rollers for smooth finish)
- Paint trays
- Stir sticks
Other Useful Items
- Sawhorses or drying racks (to hold doors flat)
- Painter’s tape
- Sharp utility knife
- Paper towels
Step-by-Step: Making Cabinets New
Now for the work. Refinishing is a process. Each step is important for a good final look.
H3: Get Everything Ready
This is the first big step. How to prepare cabinets for refinishing starts with emptying everything. Take all dishes, food, and items out of the cabinets and drawers.
H4: Take Cabinets Apart
Take off all cabinet doors and drawer fronts. It is very important to label them. Put a small number inside the door or drawer front and on the cabinet frame where it goes. Use tape and a pen. This makes putting them back much easier. Also, label and remove all hinges and knobs/pulls. Put the screws and hardware for each door/drawer in a labeled plastic bag. Keep these bags safe.
H4: Clean Cabinets Really Well
Kitchen cabinets get greasy and dirty. You need to clean them very well. Use a strong degreaser cleaner like TSP (trisodium phosphate, follow safety warnings) or a good kitchen cabinet cleaner. Mix it with water in a bucket. Use a sponge or rag to wash down all surfaces: the door fronts and backs, the drawer fronts, and the cabinet frames still on the wall. Greasy spots will stop new finish from sticking right. Rinse with clean water. Let everything dry fully.
H4: Set Up Your Work Area
You need space to work on the doors and drawers flat. A garage, basement, or even outside on a nice day works. Lay down drop cloths or plastic sheeting to protect the floor. Set up sawhorses or build simple racks to hold the doors flat while you work on them and while they dry. Good light and airflow are key. Use fans to move air, but not so much they blow dust onto wet finishes.
H3: Take Off the Old Finish
This step is crucial if the old finish is chipped, worn unevenly, or if you are going from a dark stain to a light one, or want to paint over a shiny, tough finish. This is where you might need stripping kitchen cabinet finish.
H4: Choose Your Stripping Method
- Chemical Stripping: This uses chemicals to soften or dissolve the finish. It’s good for getting into corners and detailed areas.
- How to use stripper: Always read the instructions on the product. Work in a well-aired space. Wear gloves and safety glasses. Brush or pour the stripper onto a small area. Let it work for the time the can says (usually 15-30 minutes). You will see the finish bubble or wrinkle.
- Remove the finish: Use a plastic scraper (less likely to hurt the wood) or a metal scraper (be careful) to gently push off the soft finish. Scrape with the wood grain. Use steel wool or a wire brush for tight spots or stubborn bits.
- Clean up: Use a stripper wash or mineral spirits on a rag to wipe the area clean and get rid of any stripper left. Follow the product directions for cleanup.
- Heat Gun: You can sometimes use a heat gun to soften finish, but be careful not to burn the wood. This is often used on thicker paint layers. Follow up with scraping.
H4: Why Stripping Might Be Needed
If the old finish is strong and even, and you plan to paint, you might get away with just sanding well and using a good primer. But for stain, or if the finish is bad, stripping gives the best base for the new finish. It gets back to the bare wood.
H3: Smooth Things Out with Sanding
After stripping (or cleaning if not stripping), you must sand. This is the step for sanding oak cabinets. Sanding makes the surface smooth, removes any remaining old finish, and helps the new finish stick.
H4: Start with the Right Grit
You need different grits of sandpaper. Grit numbers tell you how fine the paper is. Lower numbers (like 80) are rough. Higher numbers (like 220) are smooth.
* If you stripped, start with 120 or 150 grit to smooth the wood fibers the stripper raised.
* If you didn’t strip but are painting, start with 120 grit to rough up the surface for primer.
* If you are staining bare wood, start with 120 or 150 grit.
H4: Sanding Process
- Power Sander: An orbital sander makes flat surfaces much faster and smoother. Use it on the main, flat parts of doors and drawer fronts. Move it in circles, overlapping slightly. Don’t push down too hard.
- Hand Sanding: You will need to sand by hand for edges, corners, and detailed areas. Use sandpaper or sanding sponges. Always sand with the wood grain. Sanding across the grain leaves scratches you will see later.
- Move to Finer Grits: After using the first grit, clean the dust, then sand again with the next finer grit (e.g., 180, then 220). Each grit removes the scratches from the grit before it. For painting, ending with 180 or 220 is fine. For staining, ending with 220 is usually best for a smooth feel, but don’t go too fine (like 320+) or the wood won’t take stain well. Sand the cabinet frames on the wall too, using the same steps.
H4: Dealing with Imperfections
Now is the time to fill small holes (like old hardware holes if you are using new pulls) or dents. Use wood filler that matches the wood color if you are staining, or any color if you are painting. Push the filler into the hole with a putty knife. Let it dry. Sand the filled spot smooth with fine grit sandpaper (like 220). You might need to do this a few times.
H4: Clean All the Dust
Sanding makes lots of dust. You must get rid of all of it before finishing. Use a vacuum with a brush tool to get dust out of corners and off surfaces. Then use a tack cloth (a sticky cloth from the hardware store) to wipe down every part. Tack cloths pick up fine dust you can’t see. Clean cabinet frames on the wall the same way. Dust is the enemy of a smooth finish.
H3: Add the New Color or Finish
Now comes the fun part: making them look new! You decided on stain or paint earlier. Now you apply it.
H4: Staining Your Oak Cabinets
If you chose stain, this is the staining oak cabinets step.
* Prep Wood: If you sanded to bare wood, especially if using a light stain or if the wood is uneven, using a wood conditioner first can help the stain go on more evenly. Follow product instructions.
* Choose the Right Stain: We talked about picking the best stain for oak cabinets. Make sure you have enough. Water-based stains dry faster but can raise the wood grain more. Oil-based stains take longer to dry but often go on smoother.
* Apply Stain: Stir the stain well (don’t shake). Use a brush or a clean rag to apply the stain in the direction of the wood grain. Apply it evenly. Let it sit for the time the can suggests (test on a scrap piece first) for the color depth you want. The longer it sits, the darker it gets.
* Wipe Off Excess: Use a clean rag to wipe off all the extra stain, still wiping with the grain. If you leave too much, it will be sticky and won’t dry right.
* Second Coat? If you want a deeper color, you can apply a second coat after the first is dry (check can for time). Wipe off excess again.
* Stain the Frames: Stain the cabinet frames on the wall using the same steps.
H4: Painting Your Kitchen Cabinets
If you chose to paint, this is the painting kitchen cabinets step.
* Prime First: Priming is key when painting cabinets, especially oak. Oak grain can show through paint (called “bleed-through”) if you don’t use the right primer. Use a good quality bonding primer, like a shellac-based or oil-based primer, or a water-based primer made to block stains. This primer sticks well to the prepped surface and blocks tannins from the oak wood. Apply a thin, even coat with a brush or small roller. Let it dry fully. Lightly sand any rough spots or raised grain with fine sandpaper (220 grit) and clean dust with a tack cloth. You might need a second coat of primer.
* Choose Cabinet Paint: Don’t use regular wall paint. Cabinet paint is tougher and dries harder, making it last longer in a kitchen. Alkyd (oil-based) paints are very durable but take longer to dry and smell strong. Water-based acrylic or hybrid paints are easier to use, clean up with water, and dry faster, but make sure they are specifically for cabinets or trim/furniture for hardness.
* Apply Paint: Stir paint well. Apply thin, even coats. Avoid thick coats which can drip and look bad. Use a good brush for edges and details. Use a small foam roller for flat areas to get a smooth finish.
* Paint the back of doors first, let dry completely, then paint the front.
* Paint cabinet frames on the wall.
* Let Dry Between Coats: Let each coat dry fully according to the can’s time. Usually, two thin coats of paint are better than one thick one. Lightly sand with 220 grit between coats if needed for smoothness, and clean dust.
H3: Protect Your Work
Once the stain or paint is fully dry, you need to add a protective topcoat or sealer. This is the sealing wood cabinets step. This coat protects the color from scratches, water, and wear.
H4: Types of Sealers
- Polycrylic: Water-based. Dries clear, doesn’t yellow (good for light stains or paint). Dries fast. Easy cleanup. Not as tough as polyurethane against heat or chemicals, but good for general cabinet use.
- Polyurethane: Oil-based. Very durable. Can add a slight amber tint, which can look nice on dark stains but might yellow light paint or stains over time. Strong smell, needs mineral spirits cleanup.
- Lacquer: Dries very fast to a hard, durable finish. Often sprayed on by pros, but brush-on types exist. Can be tricky to use for beginners.
H4: Apply the Topcoat
- Make sure stain or paint is completely dry.
- Stir the topcoat gently (don’t shake, that makes bubbles).
- Use a good quality brush (synthetic for polycrylic, natural for polyurethane).
- Apply thin, even coats, brushing with the grain.
- For doors, apply on one side, let dry, flip, apply on the other.
- Let each coat dry fully. Lightly sand with fine grit (320 or 400) between coats to make it smoother and help the next coat stick. Clean dust with a tack cloth.
- Most cabinets need 2-3 coats for good protection.
- Let the final coat cure (harden fully) before using the cabinets heavily. This can take several days or even a few weeks, depending on the product and humidity. Read the can!
H3: Put Everything Back
Once the finish is totally dry and cured, it’s time to reassemble.
* Put the hardware (hinges, knobs/pulls) back on the doors and drawers. Use your labeled bags to keep things straight.
* Hang the doors back on the cabinet frames. Use your labels to put each door back in its original spot.
* Put drawers back in their slides.
* Adjust hinges if needed so doors hang straight and close right.
H3: Tips for a Smooth DIY Job
Here are some tips for DIY cabinet refinishing that will help you get good results:
- Work in a Clean Place: Dust is your biggest enemy. Keep your work area clean. Sweep and vacuum often.
- Ventilation is Key: Use fans and open windows. This is important for safety (fumes) and helps finishes dry better.
- Thin Coats are Best: Whether stain, primer, paint, or topcoat, thin coats dry faster, harder, and smoother than thick ones.
- Sand Between Coats (Carefully): Light sanding between primer/paint/topcoat layers helps level the finish and makes the next coat stick better. Use very fine paper (220 for primer/paint, 320/400 for topcoat) and a gentle hand.
- Read Product Labels: Every can is different. Drying times, number of coats, and cleanup methods vary. Read and follow the instructions.
- Test Everything: Try your stripping, sanding, staining, and painting process on the back of a door or a scrap piece of oak first. This helps you get the feel and see how the finish will look.
- Be Patient: This job takes time. Rushing steps, especially drying times, will lead to problems.
H3: Make the Kitchen Look Even Better
Refinishing the cabinets makes a huge change. But you can do other things while you are at it to help with updating oak kitchen cabinets even more.
- New Hardware: Changing knobs and pulls is a quick, easy way to change the style.
- New Countertops: If your counters are old, new ones make a big difference.
- New Backsplash: A new tile backsplash brightens the space.
- New Sink or Faucet: Small changes that update the feel.
- Better Lighting: New light fixtures can make the kitchen brighter and more inviting.
Doing some of these other updates along with refinishing the cabinets makes the whole kitchen feel fresh and modern.
H3: Keeping Them Looking Good
Once your cabinets are refinished, take care of them. Clean spills quickly. Use mild soap and water for cleaning. Avoid harsh chemicals or abrasive scrubbers. With good care, your refinished oak cabinets will look great for many years.
Refinishing oak kitchen cabinets is a rewarding project. It saves money, lets you change the look, and gives you beautiful cabinets you did yourself. It takes effort, but the result is a refreshed kitchen you will love.
Frequently Asked Questions
H4: Can I just paint over my cabinets without sanding or stripping?
You can, but it is not recommended for a lasting finish. Paint needs a surface to stick to. If the old finish is smooth or greasy, paint won’t stick well and will chip easily. At least a good cleaning and sanding to rough up the surface is needed. Stripping is best if the old finish is uneven or damaged.
H4: How long does it take to refinish kitchen cabinets?
For an average-sized kitchen, it can take anywhere from 1 to 3 weeks, or even longer. This includes taking everything apart, cleaning, stripping (if needed), sanding, applying primer/stain, applying paint/sealer (with drying time between coats), and reassembling. Rushing the drying times will cause problems.
H4: What is the hardest part of refinishing oak cabinets?
Many people find the sanding the most difficult and time-consuming part. Getting into corners and detailed areas requires hand sanding, which is hard work. Also, dealing with dust is a challenge.
H4: How much does it cost to refinish cabinets yourself?
The cost varies based on kitchen size and materials chosen (stain vs. paint, quality of paint/sealer). But DIY refinishing is usually much less than hiring someone or buying new cabinets. Expect to spend a few hundred dollars on supplies for an average kitchen.
H4: Can I use spray paint on my cabinets?
Yes, special cabinet spray paints or using a paint sprayer can give a very smooth, factory-like finish. However, spray finishing requires practice, proper equipment (sprayer, spray booth or well-ventilated area, respirator), and careful prep to avoid drips and unevenness. It’s often best for people with some spraying experience. Brush and roller are good options for DIYers too.