Image Source: i.ytimg.com
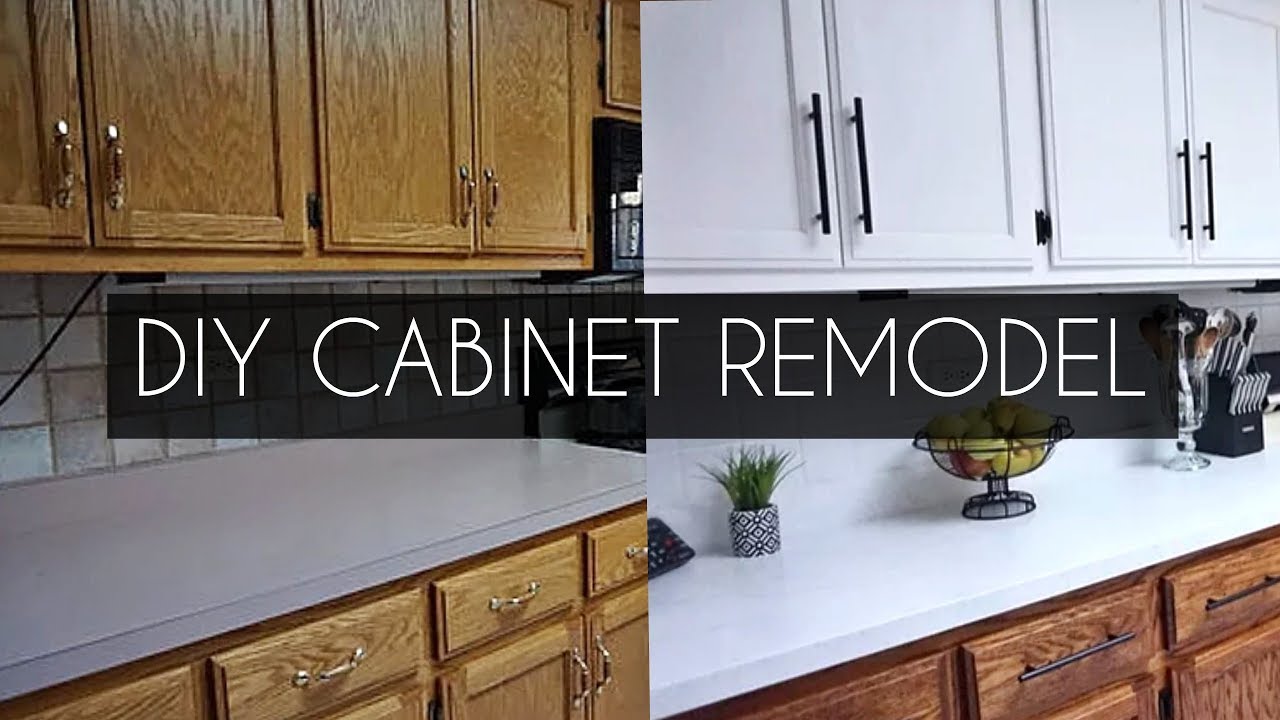
Easy Tips: How To Refinish Kitchen Cabinets Without Sanding
Want to paint kitchen cabinets without sanding? Yes, you absolutely can! Refinishing cabinets without sanding is a great way to update your kitchen with less mess and work. This method, often called no-sand cabinet refinishing, involves thorough cleaning, degreasing, using a special liquid to prep the surface, and then applying a good primer and paint designed for this process. It’s a popular refinishing cabinets alternative to sanding.
Why Skip the Sandpaper?
Sanding cabinets is a common way to get them ready for paint. It roughs up the surface so new paint sticks better. But sanding makes a huge mess. Fine dust gets everywhere. It gets into your air, onto everything in your kitchen, and even into other rooms. Breathing this dust is not good for you. Cleaning it up takes a lot of time and effort.
Choosing a no-sand method means you don’t deal with dust clouds. It’s cleaner, faster in some ways (no long cleanup), and easier on your lungs. It’s a smart choice if you want a fresh look without the hassle of sanding.
Getting Ready for No-Sand Cabinet Refinishing
Doing this job right means getting ready well. Good preparation is key when you refinish cabinets without sanding. Don’t rush this part. Taking your time here makes painting much easier and gives you a better finish.
Taking Everything Off
You need to take off all the doors from your cabinets. Also take off all the drawer fronts if they come off easily. Remove all the knobs, pulls, and hinges. Put them in small bags. Label the bags so you know where everything goes back. It helps to label the doors and drawers too. Use masking tape and a number or letter. Write the same number or letter inside the cabinet frame where the door or drawer goes. This makes putting them back simple.
Keeping Things Clean and Safe
Painting can be messy. Protect your kitchen. Cover your floors with drop cloths. Use old sheets or plastic sheeting. Cover your countertops too. Tape plastic sheeting over appliances like your stove and fridge. Use painter’s tape along the edges of walls, ceilings, and inside the cabinet frames. This tape keeps paint off areas you don’t want painted. Open windows or use fans to keep air moving. This is very important for safety, especially when using cleaning chemicals and deglosser.
The Most Important Step: Making Cabinets Super Clean
Paint does not stick to dirt, grease, or grime. Kitchen cabinets get a lot of grease and food bits on them. This is true even if they look clean. Before you paint kitchen cabinets without sanding, you must clean them perfectly. This is the absolute most important step in the whole process. You need to degrease cabinets before painting.
Why Cleaning is Not Enough
You might wipe down your cabinets often. That’s good! But painting needs a deeper clean. Kitchen grease is sticky and hard to see sometimes. It stops paint from sticking. If you paint over grease, the paint will peel or chip later. Cleaning kitchen cabinets before refinishing means getting all the grease off.
How to Really Degrease Cabinets
You need a strong cleaner to cut through kitchen grease. Normal dish soap is not strong enough. Look for a cleaner labeled as a “degreaser.” There are many kinds. Some are in spray bottles. Some you mix with water. Follow the directions on the cleaner bottle.
- Mix the cleaner if needed.
- Put on rubber gloves to protect your hands.
- Use a clean cloth or sponge.
- Wash one section of a cabinet at a time. Wash the fronts, sides, and inside edges of the cabinet frames. Wash the fronts, backs, and sides of the doors and drawer fronts.
- Scrub areas that feel sticky or look shiny with grime. Pay special attention to areas near the stove or oven.
- After scrubbing with the degreaser, wipe the area with a clean cloth dipped in clean water. This rinses off the cleaner and the grease it lifted.
- Wipe again with a dry cloth or paper towel.
- Check your cloth as you clean. If it gets dirty or greasy, switch to a clean one. You might use many cloths!
- Let the cabinets dry completely.
You must be sure there is zero grease left. Rub your finger on a spot. Does it feel slick or sticky at all? If yes, clean it again. This step takes time, but it’s non-negotiable for success. It’s the foundation for good no-sand cabinet refinishing.
The Sanding Alternative: Liquid Deglosser
After cleaning, cabinets usually have a smooth, shiny finish. Paint has a hard time sticking to shiny, smooth things. Sanding creates tiny scratches that paint can grip onto. When you don’t sand, you use something else to do this job. This is where liquid deglosser for cabinets comes in.
What Liquid Deglosser Does
Liquid deglosser is sometimes called a “chemical deglosser” or “liquid sander.” It’s a chemical product. When you wipe it on the cabinet surface, it slightly softens or roughens the existing finish. It doesn’t remove the finish like paint stripper. It just dulls the shine and creates a surface that primer can stick to much better than a perfectly smooth one. It’s a key part of how to paint cabinets no sanding needed.
How to Use Liquid Deglosser Safely
Liquid deglosser has strong fumes. You must have good airflow. Open windows and use fans to blow air out. Wear chemical-resistant gloves. Wear eye protection too. Read the instructions on the deglosser can carefully.
- Make sure the cabinets are fully dry after cleaning.
- Get a clean cloth (like an old t-shirt or rag).
- Pour a small amount of liquid deglosser onto the cloth. Don’t soak the cloth, just make it damp.
- Wipe the deglosser onto the cabinet surface in long, smooth strokes. Work in small areas.
- You will see the surface lose its shine. It will look dull or matte.
- As the cloth gets dirty or less effective, use a new spot on the cloth or a fresh cloth.
- Do this for all the cabinet frames, doors, and drawer fronts.
- The deglosser usually works fast. Follow the drying time on the can. It’s often only a few minutes.
- Do not touch the surface while it’s drying.
- After it’s dry, you should have a dull surface ready for primer. Do not wipe it down with water after deglossing.
Liquid deglosser is a powerful tool for cabinet resurfacing no sanding. It takes the place of physical sanding by changing the surface just enough for the primer to grab on.
Priming: Making Paint Stick to Anything
You’ve cleaned and deglossed. Now your cabinets are ready for primer. Do not skip primer. Primer is essential when you refinish cabinets without sanding. It does several important jobs.
Why Primer is So Important
- Sticking Power: Primer is made to stick very well to the prepared surface (cleaned and deglossed). It creates a new, perfect surface for the paint to stick to. This is why you need a good cabinet primer without sanding. Look for primers that say “high-adhesion” or “bonding primer.” These are designed to stick to tricky surfaces like old finished wood or laminate.
- Blocking Stains: If your old cabinets have stains, knots in the wood, or strong colors, primer helps block them. This stops them from showing through your new paint color.
- Even Color: Primer gives you a uniform color base for your paint. This makes the final paint color look true and keeps you from needing as many coats of paint.
- Durability: A good primer layer makes the final paint finish tougher and last longer.
Choosing the Right Primer
For painting cabinets without sanding, pick a primer that is made for slick surfaces.
* Oil-based primers: These offer excellent adhesion and stain-blocking. They dry hard and sand smoothly (though you aren’t sanding). They have strong fumes and clean up with mineral spirits.
* Water-based (Latex) bonding primers: Newer water-based primers are very good at sticking to tough surfaces. They are easier to clean up (with water) and have fewer fumes than oil-based ones. Look for ones specifically labeled as “bonding” or “high-adhesion.”
Check the primer label to make sure it works on previously finished wood or laminate surfaces without sanding. This is the correct cabinet primer without sanding for this project.
How to Apply Primer
Apply primer in thin, even coats. Two thin coats are better than one thick coat. A thick coat might drip or take too long to dry.
- Stir the primer well before you start.
- You can use a brush, foam roller, or paint sprayer.
- For cabinet frames: Use a brush for corners and detailed areas. Use a small foam roller on flat surfaces for a smooth finish.
- For doors and drawer fronts: Lay them flat on sawhorses or a covered surface. Use a brush for edges and a foam roller for the large flat areas. Rolling helps avoid brush strokes.
- Apply the first coat thinly. Let it dry completely. Check the can for drying times. It might take a few hours.
- After the first coat is dry, apply a second thin coat.
- Let the primer dry fully. The can will tell you how long to wait before painting. This is often 24 hours for the primer to fully cure and be ready for paint, even if it feels dry to the touch sooner. Waiting is important for good adhesion.
Once the primer is dry and ready, your cabinets will have a uniform, dull finish, perfect for painting.
Painting: Adding Your Color
Now for the fun part – adding the color! Choosing the right paint is key for a beautiful, durable finish on your kitchen cabinets.
Best Paint for Cabinets Without Sanding
Not all paints are good for cabinets, especially kitchen cabinets that see a lot of use, grease, and cleaning. You need a paint that is tough, washable, and dries to a hard finish. For how to paint cabinets no sanding needed, the paint also needs to work well over your chosen primer.
Look for these types of paint:
- Acrylic Enamel: These are durable and dry hard. They are water-based, so cleanup is easier. Many are self-leveling, meaning brush or roller marks tend to disappear as the paint dries, giving a smoother finish.
- Urethane Modified Acrylics (Hybrid Enamels): These are water-based but have some properties of oil-based paint, making them extra durable and hard. They are excellent for cabinets and often recommended as the best cabinet paint no sanding.
- Alkyd Enamels: These are oil-based. They are very durable and level out beautifully for a smooth finish. However, they have strong fumes, take longer to dry, and require mineral spirits for cleanup.
Avoid standard wall paint (latex paint). It’s too soft and won’t hold up well to the bumps and cleaning kitchen cabinets require.
Look for paint specifically labeled for cabinets or trim/doors. These paints are made to be tougher.
Choosing the Sheen
The sheen is how shiny the paint is when dry.
* Satin or Semi-Gloss: These are the most popular for cabinets. They are easier to clean than flat paint. Semi-gloss is shinier and very durable, but it shows imperfections more. Satin has less shine and hides small flaws better.
* Gloss: Very shiny and durable, but shows every single imperfection.
Satin and semi-gloss are generally the best choices for looks and function.
How to Apply Paint for a Smooth Finish
Like primer, apply paint in thin, even coats. Multiple thin coats are always better than one thick one.
- Stir the paint well.
- You can use a brush, foam roller, or sprayer. Foam rollers give the smoothest finish if you’re not using a sprayer. Use a good quality brush for cutting into corners and edges.
- For cabinet frames: Paint edges and inside corners with a brush. Roll flat areas with a foam roller.
- For doors and drawer fronts: Lay them flat. Brush edges first if needed, then immediately roll the flat surfaces. Roll in one direction. Don’t overwork the paint. Apply paint, then leave it alone to level out.
- Let the first coat dry completely. Check the can for drying times. Kitchen cabinet paints often need several hours or even overnight between coats.
- Apply a second coat. Most cabinets need at least two coats of paint. Darker colors or changing a dark color to a light one might need three coats.
- Let the final coat dry completely. This is called “drying time.” But cabinets need to “cure” too. Curing is when the paint reaches its full hardness and durability. This takes much longer than drying – often several days or even weeks! The can will give curing times. Be gentle with your cabinets during the curing period.
Putting It All Back Together
Once the final coat of paint is dry to the touch (check the can for when it’s safe to handle), you can put the hardware back on. Reattach hinges, knobs, and pulls. Remember those labels you made? Use them to put the right doors and drawers back in the right spots.
Be very careful when putting doors back on. Don’t bump the fresh paint. It’s best to have a helper for this part.
Taking Care of Your Newly Painted Cabinets
Your cabinets look great! To keep them looking good, clean them gently. Use mild soap and water on a soft cloth. Avoid harsh cleaners or abrasive scrubbers. Remember the curing time. Be extra careful for the first few weeks.
Comparing No-Sand to Sanding
| Feature | Sanding Method | No-Sand Method |
|---|---|---|
| Dust/Mess | High (fine dust everywhere) | Low (mostly from cleaning/painting) |
| Work Involved | Sanding is physically demanding | Cleaning/degreasing is key step |
| Time | Sanding & cleanup take time | Cleaning/degreasing takes time, no sanding cleanup |
| Surface Prep | Abrades surface with sandpaper | Uses strong cleaner & liquid deglosser |
| Required Products | Sandpaper, filler, primer, paint | Degreaser, liquid deglosser, bonding primer, cabinet paint |
| Adhesion | Good if done correctly | Good if prep steps are followed carefully |
Both methods can give you beautiful cabinets. The no-sand method is simply a different way to get the surface ready for paint. It relies heavily on strong cleaning chemicals and special primers to get paint to stick, instead of roughing up the surface with sandpaper.
What If Your Cabinets Are Not Wood?
Can you use the no-sand method on laminate or thermofoil cabinets? Yes, often you can. These materials are smooth. Sanding them down to bare material is difficult and can damage them. The no-sand method is often better for these types of cabinets.
- Laminate: Clean extremely well. Use a liquid deglosser suitable for laminate (check the product label). Use a bonding primer specifically for laminate or non-porous surfaces. Then paint with high-quality cabinet paint.
- Thermofoil: These are usually a plastic-like wrap over MDF board. If the wrap is peeling, this method won’t work well; the wrap needs to be removed. If the wrap is in good shape, clean very carefully. Deglossing might be tricky – test a small hidden spot first, as some deglossers can damage thermofoil. Some special primers are made for thermofoil without deglossing. Research products specifically for thermofoil if you have it.
Always test your cleaning products, deglosser, and primer in a hidden spot first to make sure they don’t damage your cabinet surface.
Cabinet Resurfacing No Sanding: Other Ideas
Besides painting, there are other ways to update cabinets without sanding that fall under cabinet resurfacing no sanding:
- Peel-and-Stick Veneers: You can buy thin sheets that look like wood grain or solid colors. These stick onto the cabinet boxes and doors. This completely covers the old surface. It requires careful measuring and cutting.
- Cabinet Wraps: Similar to car wraps, these are vinyl films applied to the cabinets. Professionals often do this. It gives a very smooth, modern look.
- New Doors: You can keep the cabinet boxes and just replace the doors and drawer fronts. This is easy but costs more than painting.
Painting with the no-sand method is generally the most budget-friendly way to get a totally new color and look for your kitchen cabinets without taking on a big, dusty sanding project.
Tips for a Professional Look
- Use Good Quality Products: Cheap paint or primer won’t stick as well or last as long. Invest in products designed for cabinets.
- Work in Good Light: Make sure you can see what you’re doing to avoid drips or missed spots.
- Check for Drips: Look for drips or runs right after you apply paint or primer. Smooth them out gently before they dry.
- Be Patient: Let each coat dry fully before applying the next. Waiting for proper cure time before heavy use is crucial.
- Cleanliness is Key: Any dust or dirt that lands on the wet paint will show. Keep your work area as clean as possible.
- Consider a Sprayer: If you want the smoothest possible finish with no brush or roller marks, consider renting or buying a paint sprayer. Using a sprayer takes practice, but it gives a factory-like finish. You’ll need to mask off surrounding areas very well to protect from overspray.
Refinishing kitchen cabinets without sanding is totally possible and can give you a beautiful result. The secret is in the preparation: extreme cleaning and using the right products like liquid deglosser, a good bonding primer, and durable cabinet paint. Follow the steps carefully, take your time, and you can give your kitchen a fresh new look!
Troubleshooting Common Issues
Sometimes things don’t go perfectly. Here are a few problems you might see and how to fix them.
- Paint won’t stick or is peeling: This almost always means the cabinets weren’t cleaned well enough. There is likely grease or grime stopping the paint (or primer) from sticking.
- Fix: Scrape off the peeling paint. Clean the area very thoroughly with degreaser again. Apply deglosser. Prime and paint again. You might need to do this for all cabinets if the problem is widespread.
- Brush strokes or roller marks are showing:
- Fix: You might be applying the paint too thick, or you might be overworking it (brushing/rolling back and forth too much). Use thinner coats. Apply the paint and leave it alone. Use a good quality brush and a smooth foam roller. Some paints are better at self-leveling than others; you might need a different paint.
- Dust or debris in the paint:
- Fix: This happens if your work area isn’t clean. Lightly sand the dried paint surface with very fine sandpaper (like 220 grit or higher) to remove the bump. Wipe clean with a slightly damp cloth (or a tack cloth if using oil paint). Apply another thin coat of paint. Clean your work area better before the next coat.
- Uneven finish: This can be from uneven application, or maybe the primer coat was uneven.
- Fix: Let the paint dry and cure fully. Lightly sand the uneven areas smooth. Clean the dust. Apply another thin, even coat of paint.
Patience is key with cabinet painting. Letting each coat dry completely and fixing mistakes as they happen will lead to a much better final result.
Frequently Asked Questions (FAQ)
Q: How long does no-sand cabinet refinishing take?
A: It takes several days. Cleaning and degreasing take a lot of time. Then you need to factor in drying times for the deglosser, two coats of primer, and two or three coats of paint. Each step needs time to dry correctly before the next one. Plus, the paint needs days or weeks to fully harden (cure).
Q: Is refinishing cabinets without sanding as durable as sanding?
A: Yes, if you use the right products and follow the prep steps carefully. Using a good bonding primer and high-quality cabinet paint is crucial for durability when you skip sanding.
Q: Can I just paint over my cabinets without any prep?
A: No. This is the biggest mistake people make. Paint will not stick to dirty, greasy, or shiny surfaces long-term. It will chip and peel quickly. Proper cleaning, degreasing, and priming are essential for success with paint kitchen cabinets without sanding.
Q: Do I really need liquid deglosser? Can’t I just clean well?
A: Cleaning well is the first step. But the deglosser helps the primer stick better to the original smooth finish. It creates a little bit of grip where sanding normally would. While some high-tech primers claim to stick to anything with just cleaning, using deglosser is an extra step that increases the chance of the primer and paint bonding correctly, especially on very slick surfaces. It’s a recommended part of the how to paint cabinets no sanding needed process for best results.
Q: What is the best cabinet paint no sanding needs?
A: Look for high-quality acrylic enamels or urethane modified acrylics (hybrid enamels) specifically made for cabinets, doors, and trim. Brands like Benjamin Moore Advance, Sherwin-Williams Emerald Urethane Trim Enamel, or Behr Cabinet and Trim Enamel are popular and perform well over a good bonding primer.
Q: Is using a cabinet primer without sanding different from regular primer?
A: Yes. Regular primers are often made for drywall or surfaces that have already been prepared (like sanded wood). A cabinet primer without sanding, also called a bonding primer or high-adhesion primer, is specially made to stick to tricky, smooth surfaces like old finished wood, laminate, or metal without needing to sand them first.
Q: What does cabinet resurfacing no sanding mean besides painting?
A: Cabinet resurfacing no sanding can also mean covering the old cabinets with new materials like stick-on wood veneers or vinyl wraps. It means giving the cabinets a new surface without the dusty process of sanding them down.
Q: How much does it cost to refinish cabinets this way?
A: It’s much cheaper than buying new cabinets or refacing with new doors. The cost depends on how many cabinets you have and the quality of the products you buy. Expect to spend money on a good degreaser, liquid deglosser, high-quality bonding primer, and durable cabinet paint, plus supplies like cloths, rollers, brushes, tape, and drop cloths. It’s usually a few hundred dollars for an average kitchen, much less than the thousands for new cabinets.
Q: Is this a beginner project?
A: It requires careful work and patience, especially the cleaning and application steps. If you can follow instructions closely and are willing to take your time, it’s a project a beginner can do. Don’t rush the preparation; that’s where success is made or broken.