Yes, you absolutely can paint laminate kitchen cupboards, and it’s a fantastic way to refresh your kitchen on a budget! Many people wonder if painting laminate is possible without it peeling or looking unfinished, and the answer is a resounding yes, with the right preparation and products. This comprehensive guide will walk you through the entire process, transforming your dated laminate cabinets into a stylish, updated look.
Laminate kitchen cupboards are a common feature in many homes, often installed for their durability and affordability. However, over time, their look can become dated or worn. Instead of a costly full kitchen renovation, a DIY laminate cupboard renovation can provide a dramatic visual upgrade. This process, often referred to as laminate cabinet resurfacing, is achievable for most DIY enthusiasts. Whether you’re aiming for a modern matte finish or a sleek semi-gloss, painting laminate is the key.
This guide will cover everything from the initial prep to the final coat, including the best paint choices, essential tools, and tips for achieving a professional-looking laminate cabinet finish. We’ll explore different techniques like spray painting laminate and using chalk paint laminate for a unique look. Get ready to revitalize your kitchen with these DIY laminate cupboards!
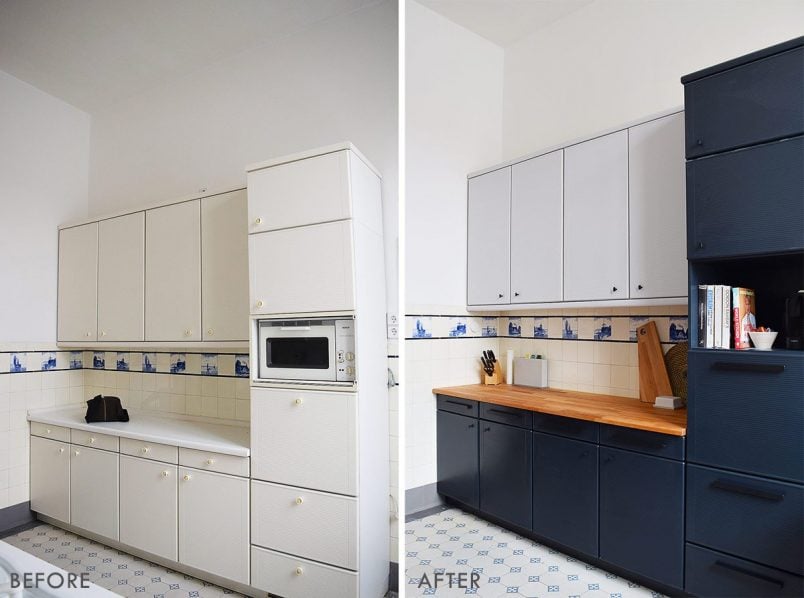
Image Source: www.littlehouseonthecorner.com
Getting Started: Planning Your Laminate Cupboard Painting Project
Before you even think about picking up a paintbrush, some thoughtful planning will ensure your laminate cupboard painting project goes smoothly. This stage is crucial for a successful and long-lasting finish on your diy laminate cupboards.
What You’ll Need: Tools and Materials
Gathering all your supplies beforehand will save you time and frustration. Here’s a comprehensive list:
Preparation:
* Screwdriver: To remove cabinet doors and hardware.
* Degreaser: A good quality kitchen degreaser or a mixture of white vinegar and water.
* TSP (Trisodium Phosphate) substitute: Or a heavy-duty cleaner for stubborn grease.
* Rubbing Alcohol (Isopropyl Alcohol): For a final wipe-down.
* Sandpaper: Medium-grit (120-150) and fine-grit (220-320).
* Sanding block or orbital sander: For even sanding.
* Painter’s tape: High-quality tape for crisp lines.
* Drop cloths or old sheets: To protect your floors and surrounding areas.
* Screwdrivers: For hardware removal and reattachment.
Painting:
* Primer: A high-adhesion bonding primer specifically designed for slick surfaces or laminate.
* Paint: High-quality cabinet paint (e.g., acrylic enamel, alkyd enamel).
* Paint rollers: High-density foam rollers for a smooth finish.
* Paintbrushes: Angled brushes for detail work and corners.
* Paint tray: For your paint.
* Optional: Spray gun: For a very smooth, factory-like finish (if spray painting laminate).
Finishing:
* Topcoat/Sealer (optional but recommended): A clear polyurethane or polycrylic for added durability, especially in high-traffic areas.
Choosing Your Paint: The Best Paint for Laminate
Selecting the right paint is paramount when you’re looking to achieve a durable and attractive laminate cabinet finish. Not all paints will adhere well to the smooth, non-porous surface of laminate.
- Acrylic Enamels: These are water-based and offer good durability, easy cleanup, and low VOCs. They dry quickly and are available in a wide range of colors. Look for paints specifically formulated for cabinets or trim for the best results.
- Alkyd Enamels (Oil-Based): These paints provide an extremely hard, durable finish that is resistant to chipping and scratching. However, they have a stronger odor, require mineral spirits for cleanup, and take longer to dry.
- Chalk Paint: While chalk paint laminate can offer a beautiful, matte, vintage look, it often requires a robust sealer to protect it from moisture and wear, especially in a kitchen environment. It’s a good option if you’re going for a specific aesthetic and are prepared for the extra sealing steps.
- Cabinet-Specific Paints: Many brands offer paints specifically designed for cabinetry, including formulations for laminate or other tricky surfaces. These often have excellent adhesion and a built-in primer or leveling agent.
Tip: Always check the paint manufacturer’s recommendations for suitability on laminate or melamine surfaces.
The Crucial First Step: Prep Laminate Cupboards
This is arguably the most important part of the entire process. Proper prep laminate cupboards is what separates a professional-looking finish from one that peels or chips. Rushing this stage will inevitably lead to problems down the line.
Step 1: Empty and Dismantle
- Empty the cupboards: Take everything out of your cabinets.
- Remove doors and drawers: Use a screwdriver to detach the cabinet doors and drawer fronts.
- Label everything: It’s essential to keep track of which door and drawer front belongs where. Use painter’s tape and a pen to label the inside of each door and drawer front, and a corresponding mark on the cabinet frame.
- Remove hardware: Take off hinges, knobs, and handles. Store them safely, perhaps in labelled plastic bags.
Step 2: Degrease Laminate Cabinets Thoroughly
Kitchen cabinets, especially laminate ones, are notorious for accumulating grease and grime. This layer acts as a barrier to paint adhesion.
- Initial Wash: Start with a good quality kitchen degreaser. Follow the product instructions. You might need a sponge or cloth to work it into the surface.
- Vinegar Solution: For a more natural approach, mix equal parts white vinegar and warm water in a spray bottle. Spray onto the cabinet surface and wipe clean with a microfiber cloth.
- TSP Substitute: For very stubborn grease, use a TSP substitute. Always wear gloves and eye protection when using cleaning chemicals.
- Rinse and Dry: After degreasing, wipe down all surfaces with a clean, damp cloth to remove any cleaning residue. Then, dry the surfaces thoroughly with a clean, dry cloth. Ensure there is no moisture left.
Step 3: Light Sanding for Adhesion
Laminate is smooth and non-porous, which means paint can struggle to grip. Light sanding creates a “tooth” for the primer and paint to adhere to.
- Sanding Grit: Use medium-grit sandpaper (around 120-150 grit) to lightly scuff the entire surface of the doors, drawer fronts, and cabinet frames. You are not trying to remove the laminate, just to dull the shine and create microscopic scratches.
- Even Pressure: Use a sanding block or an orbital sander on a low setting to ensure even pressure and avoid creating deep gouges. Pay attention to edges and corners.
- Clean Up Dust: After sanding, it’s crucial to remove all dust. Use a vacuum with a brush attachment, followed by a tack cloth or a damp microfiber cloth. The surface should be completely free of dust.
Step 4: Final Clean with Rubbing Alcohol
For an extra layer of assurance against any remaining oils or residues, give all surfaces a final wipe-down with rubbing alcohol.
- Apply Alcohol: Dampen a clean microfiber cloth with isopropyl alcohol.
- Wipe Surfaces: Wipe down all sanded areas. The alcohol evaporates quickly, leaving a clean, dry surface ready for priming.
The Foundation: Priming Your Laminate Kitchen Cabinets
Primer is your best friend when painting laminate. It bridges the gap between the slick laminate surface and your chosen paint, ensuring excellent adhesion and a smooth, even base. This is a vital step in laminate cabinet resurfacing.
Why Prime?
- Adhesion: The right primer will bond strongly to the laminate, preventing peeling and chipping.
- Coverage: Primer helps block any underlying colors or stains from showing through your new paint color.
- Smoothness: It provides a uniform surface for your paint, leading to a better finish.
Choosing the Right Primer
This is where you need to be specific. Not all primers are created equal, especially for laminate.
- Adhesion Promoters/Bonding Primers: Look for primers specifically labeled for slick surfaces, laminate, melamine, or high-gloss finishes. Brands like Zinsser B-I-N (shellac-based) or Kilz Adhesion (water-based) are excellent choices. Shellac-based primers offer superior adhesion but have a strong odor and require mineral spirits for cleanup. Water-based options are easier to work with.
- Stain-Blocking Primers: If your laminate has any dark colors or you’re concerned about wood undertones showing through (less common with laminate, but still possible), a stain-blocking primer is a good idea.
How to Prime
- Application: Apply the primer using a high-density foam roller for smooth surfaces and an angled paintbrush for edges and corners. Work in thin, even coats.
- Thin Coats are Key: Avoid applying the primer too thickly, as this can lead to drips and an uneven finish. Two thin coats are always better than one thick coat.
- Drying Time: Allow the primer to dry completely according to the manufacturer’s instructions. This usually takes at least a few hours. Some primers may recommend light sanding between coats with very fine-grit sandpaper (320 grit) for an ultra-smooth finish.
- Inspect: After the first coat, check for any missed spots or areas that need more attention. Apply a second coat if necessary.
Painting the Cabinets: Achieving Your Desired Laminate Cabinet Finish
With your cabinets properly primed, you’re ready for the color! This is where your vision for your diy laminate cupboards starts to come to life.
Selecting Your Paint Finish
Consider the look and durability you want:
- Satin: A popular choice for kitchens, offering a slight sheen that’s easy to clean but not too reflective.
- Semi-Gloss: Provides a higher sheen, excellent for durability and washability, but can highlight imperfections.
- Matte/Flat: Offers a sophisticated, modern look but can be slightly less durable and harder to clean. Chalk paint laminate typically falls into this category.
Application Methods
You have a few options for applying your paint:
1. Rolling and Brushing (The DIY Standard)
This is the most accessible method for most DIYers.
- Get Started: Ensure your primer is fully dry. Stir your paint well.
- Work in Sections: Paint one cabinet door or drawer front at a time.
- Rollers for Large Areas: Use a high-density foam roller for the main surfaces of the doors and drawer fronts. Apply thin, even coats.
- Brushes for Edges: Use an angled paintbrush to cut in along the edges and for any details.
- Drawer Fronts and Frames: Apply paint to drawer fronts and the cabinet frames.
- Thin Coats: Just like with the primer, thin coats are crucial. It’s better to apply two or three thin coats than one thick, streaky one.
- Drying Between Coats: Allow each coat of paint to dry completely according to the manufacturer’s instructions before applying the next. This might be several hours.
2. Spray Painting Laminate (For a Professional Finish)
If you’re aiming for a super smooth, factory-like finish, spray painting laminate is an excellent option. This requires a bit more setup and careful technique.
- Ventilation: Ensure you are in a well-ventilated area.
- Masking: Mask off EVERYTHING you do not want painted with painter’s tape and plastic sheeting. Spray paint can travel.
- Thinning Paint: You will likely need to thin your paint according to the spray gun manufacturer’s recommendations.
- Technique:
- Hold the spray gun at a consistent distance from the surface (usually 8-12 inches).
- Use smooth, sweeping motions, overlapping each pass by about 50%.
- Start and stop spraying off the surface to avoid puddles.
- Apply thin, even coats.
- Multiple Coats: You’ll likely need 2-3 thin coats, allowing adequate drying time between each.
- Cleanup: Clean your spray gun immediately after use according to the manufacturer’s instructions.
3. Chalk Paint Laminate Method
If you’re opting for chalk paint laminate, the process is slightly different, focusing on achieving a matte, textured finish.
- Prep: Follow the same thorough prep steps as above. While some chalk paint brands claim no prep is needed, for laminate, degreasing and light sanding are still highly recommended for longevity.
- Application: Apply chalk paint with a brush or roller. Chalk paint is forgiving and typically requires 2-3 thin coats.
- Distressing (Optional): Once dry, you can lightly distress the edges with sandpaper for a vintage look.
- Sealing is Crucial: Chalk paint is porous and needs protection, especially in a kitchen. Apply a durable topcoat like polycrylic or a wax specifically designed for chalk paint. Multiple coats of sealer are recommended for durability.
Drying and Curing Times
- Drying: This is when the paint is dry to the touch. Follow the paint can’s directions for recoating.
- Curing: This is when the paint reaches its maximum hardness and durability. This can take anywhere from 7 to 30 days. During the curing period, be gentle with your cabinets. Avoid harsh cleaning or placing heavy objects that could scratch or damage the finish.
The Finishing Touches: Reassembly and Hardware
Once your cabinet doors, drawer fronts, and frames are painted and fully cured, it’s time to bring it all back together.
Reattach Hardware
- Clean Hardware: While you have everything apart, it’s a great time to clean your existing hardware or even replace it with new knobs and pulls for an even bigger impact on your laminate cupboard renovation.
- Reinstall: Carefully reattach all the hardware to the doors and drawer fronts.
Rehang Doors and Reinsert Drawers
- Careful Alignment: Use your labels to rehang the doors and reinsert the drawer fronts onto their respective frames.
- Adjust Hinges: You may need to adjust the hinges slightly to ensure doors hang straight and close properly. Most cabinet hinges have adjustment screws for this purpose.
Final Inspection
- Check for Imperfections: Look over your freshly painted cabinets. Touch up any minor nicks or paint imperfections if needed.
- Enjoy! Step back and admire your beautifully transformed kitchen!
Tips for a Flawless Laminate Cabinet Finish
- Work in Good Lighting: This helps you spot any missed spots or imperfections during prep and painting.
- Ventilate Well: Especially if using oil-based paints or spray paint, ensure good airflow.
- Use Quality Tools: Cheap brushes and rollers can leave lint and an uneven finish. Investing in good quality tools makes a difference.
- Don’t Rush: Patience is key. Allow adequate drying and curing times between steps.
- Test a Small Area: If you’re unsure about a paint or primer, test it on the back of a cabinet door or an inconspicuous area first.
- Clean Up Spills Immediately: Paint can be difficult to remove once dry.
Frequently Asked Questions About Painting Laminate Kitchen Cupboards
Q1: Can I paint over laminate without sanding?
While some products claim you can paint over laminate without sanding, it’s highly recommended. Light sanding creates a crucial “tooth” for the primer and paint to adhere to, significantly increasing the longevity and durability of your finish. Skipping sanding is a common reason for paint failure on laminate.
Q2: What is the best type of paint for laminate cabinets?
The best paint for laminate cabinets is typically a high-adhesion acrylic enamel or a specialized cabinet paint formulated for slick surfaces. Alkyd (oil-based) enamels also offer excellent durability. Always opt for paints labeled for cabinets or for use on laminate/melamine.
Q3: How many coats of primer do I need on laminate?
Generally, two thin coats of a high-quality bonding primer are recommended for laminate cabinets. This ensures excellent adhesion and a uniform base for your topcoat.
Q4: Will chalk paint work on laminate kitchen cabinets?
Yes, chalk paint can work on laminate kitchen cabinets, but it requires thorough preparation and, most importantly, a durable topcoat (like polycrylic) to protect it from moisture and wear, which is essential in a kitchen environment.
Q5: How long does painted laminate last?
With proper preparation, priming, and painting, and by allowing full curing time, painted laminate cabinets can last many years (5-10 years or even more). Gentle cleaning and avoiding harsh abrasives will extend the life of the finish.
Q6: What grit sandpaper should I use to prep laminate?
For prepping laminate cupboards, start with a medium-grit sandpaper (120-150 grit) to scuff the surface. Follow up with fine-grit sandpaper (220-320 grit) for a smoother finish, especially if you plan to lightly sand between primer coats.
Q7: Can I spray paint laminate kitchen cabinets?
Yes, spray painting laminate kitchen cabinets is an excellent way to achieve a very smooth, professional finish. Ensure you have the proper equipment, ventilation, and masking techniques for this method.
Q8: What is the best degreaser for laminate cabinets?
A good quality kitchen degreaser, a solution of equal parts white vinegar and water, or a TSP substitute are all effective for degreasing laminate cabinets. Thoroughly cleaning to remove all grease and grime is essential for paint adhesion.
Q9: Do I need a topcoat on painted laminate cabinets?
While not strictly mandatory depending on the paint used, a topcoat (like a clear polycrylic or polyurethane) is highly recommended for painted laminate cabinets. It adds an extra layer of protection against scratches, moisture, and daily wear, significantly increasing the durability of your laminate cabinet finish.
By following these detailed steps, you can successfully transform your laminate kitchen cupboards into a beautiful and updated feature of your home, proving that a laminate cupboard renovation doesn’t have to be expensive to be impactful. Enjoy your refreshed kitchen!