Yes, you can paint kitchen floor tiles yourself! This project is a great way to give your kitchen a fresh new look without the high cost of replacing the tiles. Painting tiles takes work, but it’s a job most people can do. You need the right stuff and must follow steps carefully. The key is preparing floor tiles for painting the right way and choosing the best paint for kitchen floor tiles. This guide will walk you through everything. We’ll talk about cleaning, what primer for tile floors you need, using epoxy paint for tile floors, how long to wait for curing time for painted kitchen tiles, and how to protect your work by sealing painted floor tiles. This will help you understand the process and make your painted tiles last.
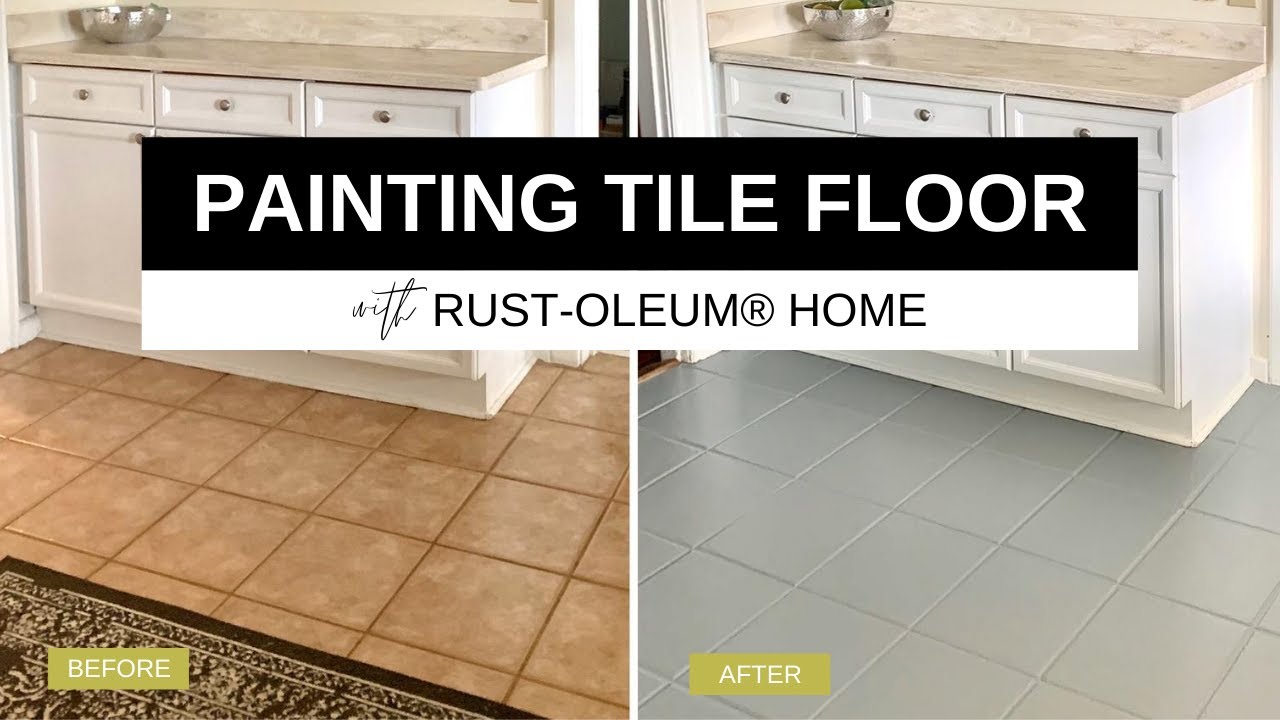
Image Source: i.ytimg.com
Grasping the Basics
Painting tiles is not the same as painting a wall. Floors get walked on a lot. They get wet and dirty. Kitchen floors see spills and dropped things. So, the paint and steps must be strong enough to handle all this. Painting ceramic floor tiles is very common for this job, as they are found in many kitchens. The paint has to stick well and be tough.
Getting Ready to Paint
The most important part of painting floor tiles is getting them ready. If the tiles are not clean and prepared the right way, the paint will not stick. It might peel or chip quickly. Taking your time here saves you problems later. This is all about preparing floor tiles for painting.
How to Clean Tiles Before Painting
You cannot just sweep the floor and start painting. The tiles must be very, very clean.
Dust, grease, food bits, and old cleaners can stop paint from sticking.
Here is how to get them clean:
- Sweep or vacuum well: Get up all loose dirt and dust. Pay extra care to the grout lines.
- Wash with a strong cleaner: Use a heavy-duty tile and grout cleaner. You can find these at hardware stores. Mix it with hot water.
- Scrub the tiles and grout: Use a stiff brush. Get into the grout lines. Scrub hard to lift all the dirt and grease. For tough grease spots, you might need a special degreaser cleaner.
- Rinse many times: This step is key! You must rinse the floor until there is no cleaner left. Any soap left behind will stop the paint from sticking. Use clean water and change the water often.
- Wipe down: After rinsing, wipe the floor with clean cloths or towels. Get up as much water as you can.
- Let it dry completely: The floor must be bone dry before you move on. This can take 24 hours or even more. Use fans to help dry the floor faster. Do not rush this step.
Make sure the kitchen is empty while you clean and paint. Remove furniture and anything else from the floor area.
Fixing the Tiles
Check your tiles closely after cleaning. Look for any problems.
- Loose tiles: If a tile is loose, you need to fix it. You might need to glue it back down with special tile glue. Loose tiles will cause problems later.
- Cracked or chipped tiles: Small cracks or chips can be filled. Use an epoxy filler made for tiles. Follow the filler instructions. Let it dry completely and sand it smooth so it is even with the tile surface.
- Bad grout: If the grout is crumbly or missing in spots, you should fix it. You can use new grout to fill in the gaps. Make sure the new grout dries fully before painting.
Fixing these issues makes the surface smooth and strong for the paint.
Making the Surface Ready for Paint
Tile has a smooth, often shiny surface. Paint does not stick well to smooth, shiny things. You need to make the surface rough so the primer for tile floors can grip onto it.
There are two main ways to do this:
- Sanding: Use a sander with medium-grit sandpaper (like 150-grit or 180-grit). Lightly sand the surface of every tile. Do not sand away the grout. Just rough up the tile surface itself. This creates tiny scratches the primer can hold onto.
- Liquid Deglosser/Etcher: Some products are made to “etch” or take the shine off surfaces like tile without sanding. You apply the liquid, it does the work, and then you clean it off. Read the product instructions carefully.
After sanding or etching, you will have dust or liquid left. You must clean this up perfectly.
- Vacuum again: Use a vacuum with a hose to get into corners and grout lines. Get every bit of dust if you sanded.
- Wipe with a tack cloth: If you sanded, a tack cloth can pick up fine dust the vacuum missed.
- Wipe with a damp cloth: If you used an etcher, wipe the floor down with a damp cloth (just water) to remove any leftover chemicals. Let it dry again.
The floor needs to be completely clean and dry after this step too. You are now ready for primer. This process is a big part of preparing floor tiles for painting.
Choosing and Using Primer
You cannot skip primer when painting floor tiles. Primer does two main jobs:
- It sticks really well to the tile surface you just prepared.
- It creates a surface that paint will stick to easily.
It also helps block stains and makes the final paint color look better.
Primer for Tile Floors
Not all primers work on tile. You need a primer made for non-porous surfaces or tile.
Good choices often include:
- Epoxy bonding primers: These are very strong and stick well to smooth surfaces like tile.
- Urethane primers: These also offer great grip and are very durable.
- Special bonding primers: Look for primers specifically marked for use on tile, glass, or glossy surfaces.
Ask for advice at the paint store if you are not sure. Tell them you are painting kitchen floor tiles.
Applying the Primer
- Mix the primer: Stir the primer well. If it is a two-part epoxy primer, mix the two parts following the can instructions exactly. Do not rush this.
- Plan your path: Start in a corner farthest from the door. You need to be able to leave the room without stepping on the wet primer.
- Use a brush for edges: Use a good-quality brush (like a 2-inch angled brush) to paint along the edges of the room, next to cabinets, and around anything you cannot move.
- Use a roller for the main area: Use a small foam roller or a roller with a very short nap (like 1/4 inch). A short nap or foam roller gives a smoother finish on the flat tiles. Pour primer into a roller tray. Dip the roller, get off extra primer, and roll it onto the tiles in even strokes. Work in small sections.
- Cover everything: Make sure you get the primer onto the tile surface and into the grout lines.
- Let it dry: Let the primer dry completely. Check the can for drying times. This can take several hours. Some primers need a second coat for best results. If the can says to, apply a second coat after the first one is dry enough.
The floor might look patchy or uneven after priming. This is okay. The primer’s job is just to stick to the tile and give the paint something to hold onto.
Picking the Right Paint
Choosing the best paint for kitchen floor tiles is super important. It needs to stand up to walking, cleaning, and the kitchen environment. Regular wall paint will not work on floors.
Best Paint for Kitchen Floor Tiles
Look for paints made for floors or high-traffic areas. The most recommended types for tile include:
- Epoxy Paint for Tile Floors: This is often the top choice for painting tiles, especially in kitchens or bathrooms. Epoxy paints are very strong. They are resistant to water, chemicals, stains, and wear. They create a very hard, durable surface. There are one-part and two-part epoxy paints. Two-part epoxies are usually tougher but need careful mixing and have a limited time you can use them after mixing.
- Latex or Acrylic Floor Paints: Some acrylic or latex paints are made specially for floors. They are easier to work with than epoxy (less smell, easier cleanup) but may not be as tough or last as long as epoxy in a busy kitchen. Look for ones marked as “porch and patio” paint or specifically for indoor floors.
- Urethane Paints: These are also durable and can be a good choice. They offer good resistance to scratches and chemicals.
When choosing paint, also think about the finish. A satin or semi-gloss finish is often best for floors. It is easier to clean than a matte finish and not as slippery or likely to show dirt as a high-gloss finish.
Consider the color carefully too. Lighter colors can make the room look bigger but show dirt more easily. Darker colors hide dirt but can make the room feel smaller.
This step is central to getting a good result and ensuring the durability of painted kitchen tiles.
Painting the Tiles
Now for the fun part! Applying the color.
Roller or Brush for Painting Tiles
Like with primer, you will likely use both a brush and a roller.
- Brush: Use a brush for the edges and cutting in around cabinets and walls.
- Roller: A small foam roller or a short-nap roller (1/4 inch) works best for the flat tile surfaces and grout lines. These give a smooth finish and help push the paint into the grout.
Applying the Paint
- Mix the paint: Stir the paint well. If using two-part epoxy, mix it exactly as the instructions say. Only mix what you can use within the product’s working time (pot life).
- Start in a corner: Again, plan your exit! Start farthest from the door.
- Cut in edges: Use your brush to paint along the edges of the room. Go about an inch or two into the main tile area.
- Roll the main area: Use your roller. Roll paint onto the tiles and into the grout lines. Work in small sections. Overlap your roller strokes slightly to avoid lines.
- Apply thin coats: It is much better to apply two thin coats than one thick coat. Thick coats take longer to dry and can hide the texture of the tile and grout too much. Thin coats dry harder and stick better.
- Let the first coat dry: Let the first coat of paint dry completely. Check the paint can for the recommended drying time between coats. This varies greatly depending on the paint type (epoxy takes longer). It could be several hours or even 24 hours. Do not rush this. The floor might look okay, but it might not be ready for another coat.
- Apply the second coat: Once the first coat is dry to the touch and ready according to the can, apply the second coat. Use the same technique.
- Think about a third coat: For some paints, especially if you are changing from a dark color to a light one, a third coat might be needed for full, even color.
Sealing the Painted Tiles
Once the paint is dry, adding a sealer is a very smart step, especially for painted ceramic floor tiles in a kitchen. While many floor paints (like epoxy) are tough on their own, a sealer adds an extra layer of protection. This boosts the durability of painted kitchen tiles.
Sealing Painted Floor Tiles
A clear sealer protects the paint from scratches, spills, dirt, and the wear and tear of foot traffic. It helps the paint last longer and makes cleaning easier.
- Choose a sealer: Use a clear sealer made for floors or for painted surfaces. Look for water-based clear sealers that are non-yellowing. Some are polyurethanes or epoxies. Make sure the sealer is compatible with the type of paint you used. Ask at the paint store if you are unsure.
- Wait for the paint to cure partly: Do not apply the sealer too soon after painting. The paint needs time to dry and start curing (getting hard). Check the paint can for the recommended time before sealing or allowing light traffic. This is different from just being dry to the touch. It might be 24-72 hours or more, depending on the paint.
- Apply thin coats of sealer: Just like with paint, thin coats are best. Use a clean roller (a foam roller works well for sealers) or a pad applicator. Work your way out of the room.
- Apply multiple coats: Two thin coats of sealer are usually better than one. This provides a stronger protective layer.
- Let each coat dry: Let the first coat of sealer dry completely before applying the second coat. Check the can instructions.
Curing Time
This is perhaps the most critical step after you finish painting and sealing. The floor might feel dry to the touch fairly quickly, but it is not fully hardened or “cured” for a long time.
Curing Time for Painted Kitchen Tiles
- Dry to the touch: This happens first. You can usually walk on it lightly (maybe with socks) after the time stated on the can (hours).
- Ready for light traffic: This means you can carefully walk on it. Check the can. This might be 24-72 hours after the last coat of paint or sealer.
- Fully cured: This is when the paint and sealer reach their maximum hardness and durability. This takes the longest time – often 7 days, but sometimes up to 30 days for some epoxy or urethane products.
During the full curing time, you need to be very careful with the floor.
- Avoid heavy furniture: Do not put heavy furniture back on the floor. The weight can mark the paint before it is fully hard.
- Avoid spills and standing water: Clean up any spills right away. Do not let water sit on the floor for long periods.
- No harsh cleaning: Do not use strong cleaners or scrub the floor hard until it is fully cured.
- Be gentle: Try not to drop things or scrape the floor during this time.
The longer you wait during the curing period before putting the floor to full use, the better the paint and sealer will hold up over time. This is key to the durability of painted kitchen tiles.
Keeping Your Painted Tiles Looking Good
Once your floor is fully cured, you can use your kitchen normally. Taking care of the painted tiles will help them last.
- Clean often: Sweep or vacuum regularly to remove dirt and grit. Grit can act like sandpaper and scratch the paint.
- Use gentle cleaners: Use mild, pH-neutral floor cleaners. Avoid harsh chemicals, bleach, ammonia, or abrasive cleaners.
- Wipe up spills quickly: Do not let acidic foods, oils, or colored liquids sit on the paint.
- Use mats: Place mats at doorways and in high-spill areas (like in front of the sink or stove). This protects the paint from extra wear and spills.
- Be careful with furniture: Use felt pads on the bottom of chairs and table legs to prevent scratches.
Even with the best care, painted floor tiles may show wear over many years, especially in very busy kitchens. You might need to touch up small spots or repaint the floor in the future.
Looking at the Ups and Downs
Deciding to paint your kitchen floor tiles has good points and bad points.
Positives of Painting Tiles
- Cost: Much cheaper than buying and installing new tiles.
- Look: Lets you change the color and style of your kitchen floor easily.
- DIY: It is a project many homeowners can do themselves.
- Speed: Faster than removing old tiles and putting in new ones.
Downsides of Painting Tiles
- Durability: While good paints and sealers help, painted tiles are usually not as tough or long-lasting as new, unpainted tiles or other floor types like vinyl or stone. They can chip or scratch, especially if not prepared or painted correctly. The durability of painted kitchen tiles depends a lot on the prep and materials used.
- Preparation is hard: Getting the floor perfectly clean and prepped takes a lot of effort and is crucial.
- Takes time: The cleaning, fixing, sanding/etching, priming, painting, and sealing, plus all the drying and curing time, means your kitchen floor might be out of use for several days, maybe even a week or two for full curing.
- Grout changes: Painted grout loses its texture and becomes smooth and the same color as the tile. You might not like this look.
Fixing Little Problems
Sometimes things do not go perfectly.
- Paint peeling: This usually happens if the floor was not cleaned or prepped right before priming. The primer could not stick to the tile, so the paint on top peels off. You might need to sand off the peeling paint and primer and start again in that area, focusing more on cleaning and roughing up the tile surface.
- Scratches or chips: For small spots, you can often clean the area gently, lightly sand the spot if needed, and touch it up with the same paint and sealer using a small brush.
- Uneven color: This can happen if the primer was not even or if the paint was applied too thinly or not mixed well. Applying another thin coat of paint might help.
- Roller marks: Using a short-nap or foam roller helps avoid these. If you see lines, you might need to lightly sand the dried paint surface and apply another thin coat carefully.
Summing It Up
Painting your kitchen floor tiles is a solid DIY project that can make a big difference in your kitchen’s look. It saves money compared to replacing the floor. But it takes real work. You must clean the floor perfectly (How to clean tiles before painting). You must prepare the surface so the primer can stick (Preparing floor tiles for painting). Choosing a good primer for tile floors is key. Then, picking the best paint for kitchen floor tiles, often epoxy paint for tile floors, is vital for strength. Applying the paint with the right roller or brush for painting tiles and letting it dry between coats is important. Do not forget sealing painted floor tiles for extra protection. The most patience is needed during the curing time for painted kitchen tiles – this is when the paint gets truly hard, which affects the durability of painted kitchen tiles. If you follow all these steps carefully, you can have a painted tile floor that looks great and lasts for a good while in your kitchen.
Questions People Often Ask
H5 Can I paint any type of kitchen floor tile?
Most ceramic and porcelain tiles can be painted. Tiles that are very smooth or have special coatings (like some polished or glazed tiles) might need extra steps for prep, like a strong etching product, to help the primer stick. Natural stone tiles (like marble or slate) usually are not painted, as paint hides their natural look and might not bond correctly.
H5 How long does the painted floor last?
The durability of painted kitchen tiles depends on many things: how well the floor was prepped, the quality of the primer, paint, and sealer used (like epoxy paint for tile floors), how much traffic the floor gets, and how well you take care of it. A well-done job in a less busy kitchen might last many years (5-10+). In a very busy kitchen, you might see wear and tear sooner, maybe needing touch-ups every few years or a full repaint sooner.
H5 Is epoxy paint the best choice?
For high-traffic areas like a kitchen, epoxy paint for tile floors is often seen as the best paint for kitchen floor tiles because it is very durable, waterproof, and stain-resistant once fully cured. However, it can be harder to work with than other floor paints (strong smell, fast drying once mixed, needs good ventilation). Other strong floor paints made for porches or indoor floors can also work, but epoxy usually gives the toughest finish.
H5 Does painting the tiles make them slippery?
The finish of the paint affects how slippery it is. A high-gloss finish can be slippery when wet. A satin or semi-gloss finish is usually less slippery and is recommended. You can also add a non-slip additive to the final coat of paint or sealer for extra grip.
H5 Can I paint over painted tiles?
Yes, you can usually paint over tiles that have already been painted. However, you must follow the same steps as painting over unpainted tiles: clean the surface very well, lightly sand or etch it to give the new paint something to stick to, prime it with a good bonding primer, and then paint and seal it. If the old paint is peeling or damaged, you will need to remove the bad areas and feather the edges before prepping and repainting.
H5 How do I paint the grout lines?
When you use a roller or brush for painting tiles, the paint will naturally get pushed into the grout lines. For the main area, rolling over the tiles will cover the grout too, making it the same color as the tile. You can use a small brush to make sure the paint gets fully into the grout lines around the edges of the room. Once painted, the grout will have the same finish and color as the tiles.
H5 How long does it take from start to finish?
This DIY project takes several days because of all the drying and curing time.
- Cleaning and fixing: 1 day (plus drying time for water or fillers)
- Sanding/Etching and cleaning dust: 1/2 to 1 day
- Priming (1-2 coats with drying): 1-2 days
- Painting (2-3 coats with drying): 2-3 days
- Sealing (1-2 coats with drying): 1-2 days
- Light foot traffic possible: 1-3 days after final coat
- Full cure (heavy use): 7-30 days after final coat
So, the active work might be done in 3-5 days, but the floor will be out of full use for at least a week, and you need to be careful for up to a month while it fully hardens (curing time for painted kitchen tiles).
H5 What kind of roller should I use?
When using a roller or brush for painting tiles, a small foam roller or a roller with a very short nap (like 1/4 inch) is best. These types of rollers apply the paint smoothly and help push it into the grout lines without leaving a thick texture or roller marks on the tile surface.
H5 How do I clean spills during the curing time?
During the curing time for painted kitchen tiles, be extra careful. If you have a spill, wipe it up right away with a soft cloth and plain water. Do not rub hard. Avoid using any cleaners until the floor is fully cured.
H5 What if I want the grout a different color?
If you want the grout lines to be a different color than the tiles, painting the tiles is usually not the best way to do this. Painting covers both the tile and the grout the same color. To change grout color, you would use a grout stain or grout paint pen after the tiles are painted, but this requires a lot of detail work and might not hold up as well on a painted surface. For a solid color change to the whole floor (tile and grout together), painting is a good option.