You want to measure your kitchen countertops. This is key when getting new ones. Measuring helps you know how much material you need. It also guides who makes your countertops. Accurate numbers mean fewer problems later. This guide will show you how to measure correctly. It’s the first step for new countertops. It’s important for getting templates made too. Learning how to template countertops yourself starts with good measurements. Or if a pro does it, your measurements help them get ready. This is your DIY countertop measurement guide.
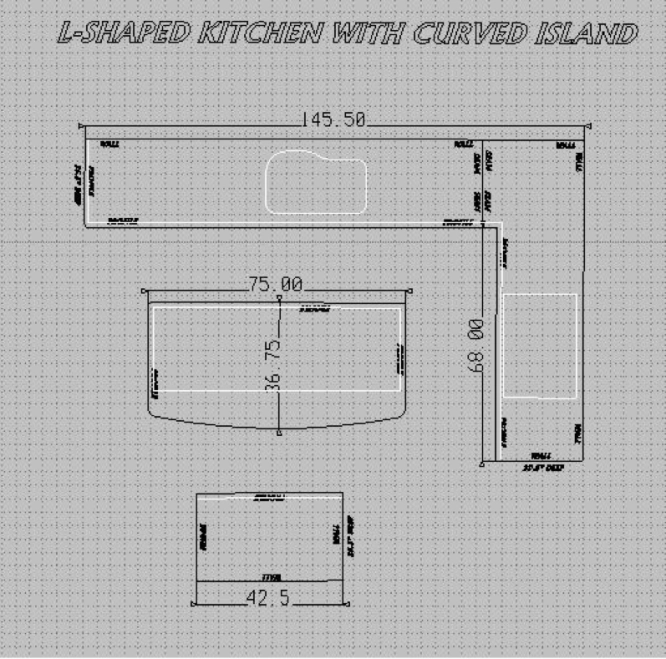
Image Source: www.archcitygranite.com
Get Ready to Measure
Before you start, get ready. Clear everything off your old countertops. Move small tools and appliances. Make sure you have room to work. You need a clear path along all edges.
Tools You Need
Get the right tools. This makes measuring easier. It also makes it more exact. Here are the tools you will need:
- Tape Measure: Get a long one. 25 feet or longer is good. It should be stiff so it stays straight.
- Paper or Graph Paper: You need paper to draw on. Graph paper helps keep lines straight. It helps you draw things to scale later.
- Pencils: Have a few sharp pencils ready. You will draw lines and write numbers.
- Eraser: You might need to fix mistakes on your drawing.
- Straight Edge or Ruler: A long ruler helps draw straight lines.
- Calculator: For adding numbers and figuring out area.
- Another Person (Helper): This is very helpful. One person can hold the tape measure. The other can write things down.
- Camera or Phone: Take pictures. Pictures help you remember details. They show where things like sinks are.
Grasping the Goal
Your main goal is simple. You need exact lengths for every edge. You also need the depth of each section. And you need to show how the pieces fit together. You will draw a picture of your kitchen layout. Then you will write the sizes on the picture. Accurate countertop measurements are a must.
Draw Your Kitchen Layout
The first big step is drawing your kitchen. This is your countertop measurement diagram. Do not worry if you are not an artist. This drawing is just for you and maybe the countertop maker.
Making a Simple Drawing
Start by drawing the shape of your countertops. Your counters probably follow your walls. So draw the walls where the counters are.
- Draw the layout from above. Imagine looking down at your kitchen floor and counters.
- Draw each section of countertop. Show where they turn corners. Show where there are gaps for stoves or fridges.
- Use a new piece of paper for complex shapes. L-shaped or U-shaped counters need care.
Adding Details to the Diagram
Your drawing needs more than just lines. It needs details.
- Mark where appliances are. Show the stove, fridge, and dishwasher. Write down their exact width. This shows where your counters stop and start.
- Mark where the sink is. Show its place on the counter. You will measure this carefully later. This is key for measuring for sink cutouts.
- Mark doorways and windows. Note how far they are from the counter edge. This helps avoid problems.
- Mark any bumps or jogs in the wall. Even small ones matter for accurate countertop measurements.
Your drawing should start to look like a map of your counter space. Keep it clear and easy to read.
Start Measuring Sections
Now you measure. Use your tape measure. Write every number on your drawing right away. Double check each number.
Measure Each Straight Section
Measure each straight piece of countertop.
- Place the end of your tape measure at one end of a straight section.
- Pull the tape measure tight to the other end. Keep it straight.
- Read the number at the other end. Write it down on your drawing.
- Measure along the back edge (against the wall).
- Measure along the front edge (the edge you stand at).
- These two numbers might be different if walls are not straight. Write down both. This is important for accurate countertop measurements.
Measure Depth (Front to Back)
Next, measure how deep your counters are.
- Measure from the wall (or backsplash) to the front edge of the counter.
- Do this in a few spots along each section. Walls are often not perfectly straight.
- Write these depth numbers on your drawing too. Note where you measured them.
Measuring Overhang
Countertops usually stick out a little past the cabinets below. This is called overhang.
- Measure how far the counter sticks out from the cabinet box.
- Do this in a few places. Note this number.
- Standard overhang is often 1 inch or 1.5 inches. But measure yours to be sure.
- Note if the overhang is different anywhere, like near a doorway.
Special Measuring Situations
Some kitchens have tricky parts. Like corners or islands. These need extra care.
Measuring L-Shaped Countertops
L-shaped counters are common. Measuring them takes a few steps. An L-shape is just two straight pieces joined at a corner.
- Measure the full length of one ‘leg’ of the L. Measure from the very end all the way into the corner.
- Measure the full length of the other ‘leg’. Measure from its very end all the way into the corner.
- Important: These lengths will overlap in the corner on your drawing.
- You also need to measure the return or the depth at the corner. Measure from the wall out along the edge of the counter that goes into the corner. Do this for both legs.
- A good way is to measure to the corner point. Then measure the depth of the counter going into the corner.
- Draw the L clearly. Write the lengths along each edge. Write the depths for each section.
- Think of the L as two rectangles. One might be longer than the other. Show how they meet.
- You need to tell the maker the size of the total shape. You also need to tell them about the part that overlaps in the corner. This is called the “corner overlap” or “true corner.”
- Measure from the corner point along the wall in one direction. Then measure from the corner point along the wall in the other direction.
- Measure from the corner point out towards the room along one counter edge. Then do it for the other edge. These numbers help define the corner shape.
Here is a simple way to measure an L:
1. Pick a point in the corner where the two pieces meet.
2. Measure from the far end of one side to this corner point (along the wall). Write this number (Length A).
3. Measure from the far end of the other side to this corner point (along the wall). Write this number (Length B).
4. Measure the depth of the first side (from wall out). Write this number (Depth 1).
5. Measure the depth of the second side (from wall out). Write this number (Depth 2).
6. On your drawing, show these lengths and depths.
Example L-shape drawing notes:
Side 1: Wall Length = 80 inches, Depth = 25 inches
Side 2: Wall Length = 100 inches, Depth = 25 inches
Corner type: L-shape meeting at 90 degrees.
Measuring Kitchen Island
Measuring kitchen island is often simpler. Islands are usually just rectangles or simple shapes.
- Measure the length of the island top. Measure the longest side.
- Measure the width (or depth) of the island top. Measure the shorter side.
- Measure these lengths and widths at a few points. Islands can be out of square too.
- Note if any side has a different overhang. Maybe one side is longer for seating.
- Draw the island shape on your diagram. Write its length and width on the drawing.
- Note the height of the island base. This is good extra info.
- If the island has a sink or cooktop, mark its place. You will measure that next.
Measuring for Sink and Cooktop Cutouts
Counters need holes for sinks and cooktops. Measuring for sink cutouts is critical. If this is wrong, the sink will not fit.
Get Information About Your Appliances
You need the exact size of your sink and cooktop.
- Find the model number for your sink and cooktop.
- Look up the “cutout dimensions” in the product guide or online.
- Cutout size is the size of the hole needed in the counter. It is not the size of the sink rim.
- If you do not have the guide, measure the sink or cooktop yourself. Measure the part that drops below the counter. Be very careful here. It is best to use the maker’s guide if you can.
Mark and Measure Placement on Counter
You must show where the hole goes on your counter drawing.
- Measure from the back wall to the center of the sink or cooktop area.
- Measure from the side wall (or nearest cabinet end) to the center of the sink or cooktop area.
- Write these center point measurements on your drawing.
- Measure the size of the actual hole needed (the cutout size). Write this down next to the sink/cooktop mark.
- Also, note if the sink is undermount (sits below the counter) or top mount (rim sits on top). This changes how the edge of the cutout is finished.
Example notes for a sink:
Sink Type: Undermount
Cutout Size: 30 inches wide x 18 inches deep
Center Point Location: 12 inches from back wall to center, 36 inches from left wall to center.
Take pictures of your sink and cooktop area from different angles. These pictures help show the location.
Check Your Measurements
You have measured everything and drawn it. Now, check your work. This is part of getting accurate countertop measurements.
Measure Again
Go back and measure everything one more time.
- Use your drawing. Follow the lines you drew.
- Measure each section length again.
- Measure each depth again.
- Check the appliance locations. Check the sink/cooktop location measures.
- Compare the new numbers to the old ones on your drawing. If they are different, measure a third time to be sure.
Use Overall Measurements
Measure the total length of walls where counters sit.
- If you have a straight counter along one wall, measure the whole wall length.
- If you have an L-shape, measure the length of wall on side A and wall on side B.
- Your individual counter section lengths should add up correctly based on the total wall lengths and any gaps (like for a stove).
Look for Square Corners
Most kitchen corners should be 90 degrees (square). But old houses or DIY work can mean walls are not square.
- Use a large square tool if you have one. Check the corners where counters meet.
- If a corner is not square, note this on your drawing. Write down if it is more or less than 90 degrees. This is advanced measuring. Countertop pros can deal with this if you alert them. Accurate notes here save big problems.
Calculate Countertop Square Footage
After all the measuring, you need to figure out the total size. This is where you calculate countertop square footage. This helps you estimate material cost. Countertop materials are often sold by the square foot.
Divide into Simple Shapes
Look at your drawing. Break down the counter shapes into rectangles.
- A straight section is a rectangle. Its area is Length x Depth.
- An L-shaped counter can be seen as two rectangles. Be careful not to count the overlapping part twice.
- An island is usually a rectangle. Length x Width.
Calculate Area for Each Shape
Calculate the area for each simple shape you found.
- Area = Length (in inches) x Depth (in inches). This gives you square inches.
- Do this for every section of counter.
Add Areas Together
Add the area of all your sections. This gives you the total square inches.
- Total Square Inches = Area of Section 1 + Area of Section 2 + …
Convert to Square Feet
Countertop material is sold in square feet. You need to change your total square inches to square feet.
- There are 144 square inches in 1 square foot (12 inches x 12 inches = 144 sq in).
- To get square feet, divide your total square inches by 144.
- Total Square Feet = Total Square Inches / 144.
Example Calculation:
You have one straight piece: 60 inches long, 25 inches deep.
Area = 60 inches * 25 inches = 1500 square inches.
You have an L-shape. Let’s break it into two rectangles for calculation:
Piece 1: 80 inches long (from wall end to corner), 25 inches deep. Area = 80 * 25 = 2000 sq in.
Piece 2: The part sticking out from the corner. If the total wall length was 100 inches and it meets the 80 inch piece, the second piece might be 100 – 25 (the depth of the first piece) = 75 inches long (this part gets tricky depending on how you drew it). Let’s use the overall dimensions.
Often, you measure the two outside lengths and the two inside lengths for an L.
Let’s say your L is 80″ along one wall and 100″ along the other wall. The depth is 25″.
You can see this as an 80″ x 25″ rectangle and a (100 – 25) = 75″ x 25″ rectangle.
Area 1 = 80 * 25 = 2000 sq in.
Area 2 = 75 * 25 = 1875 sq in.
Total L Area = 2000 + 1875 = 3875 sq in. (This method works if you break it down carefully)
Or, see it as a big rectangle with a smaller rectangle cut out.
Imagine a 100″ x 80″ rectangle. Area = 8000 sq in.
The “cutout” part is (100-25) = 75″ by (80-25) = 55″. Area = 75 * 55 = 4125 sq in.
This method does not work directly for simple area calculation because it includes walkways, etc.
Stick to the simple rectangle breakdown:
Draw your L. Measure the full length of each wall side the counter is on.
Side A wall length = 80 inches. Counter depth = 25 inches.
Side B wall length = 100 inches. Counter depth = 25 inches.
To calculate square footage, the easiest way is to measure along the centerline of the countertop shape, then multiply by the depth. But that is for advanced pros.
For DIY, use the rectangle method carefully:
Measure the main run: 80 inches long, 25 inches deep. Area = 80 * 25 = 2000 sq in.
Measure the second run from the inside corner point out to the end: (100 – 25 inches depth of first piece) = 75 inches long, 25 inches deep. Area = 75 * 25 = 1875 sq in.
Total L Area = 2000 + 1875 = 3875 sq in.
Let’s say you also have an island: 40 inches long, 30 inches wide.
Area = 40 inches * 30 inches = 1200 square inches.
Total Kitchen Area in Square Inches = 1500 (straight) + 3875 (L-shape) + 1200 (island) = 6575 square inches.
Now, convert to square feet:
Total Square Feet = 6575 / 144 = 45.66 square feet.
Round up slightly when ordering material. Maybe 46 or 47 square feet to be safe. Discuss waste with your supplier.
Interpreting Your Measurements
Your measurements and drawing tell a story about your kitchen.
What Your Drawing Shows
The diagram shows the layout. It shows where things are placed. It shows the lengths and depths. It shows corners and openings. This is the base for fabrication.
Importance of Accuracy
Why are accurate countertop measurements so important?
- Fit: If measurements are off, new counters will not fit. They will be too long or too short. They might not meet correctly in corners.
- Cutouts: Wrong measures for sinks or cooktops mean the holes are in the wrong place or are the wrong size. This is a big problem.
- Cost: Makers use your square footage to price the job. If your numbers are too low, the price will go up. If too high, you might pay for material you do not need.
- Templating: Even if a pro makes a template, your measurements guide them. They know roughly what to expect. If your measures are very different, it raises questions. Measuring helps you talk clearly with the maker. This is how to measure for new kitchen countertops the right way.
DIY Templating vs. Professional Templating
This guide focuses on measuring. But knowing how countertops are made helps. After measuring comes templating.
What is Templating?
Templating is making a exact copy of your countertop shape and size. It includes all angles, curves, and cutouts. Templates are used to cut the new countertop material.
How Professionals Template
Pros use special tools for templating.
- They might use thin plastic strips. They glue or tape these strips together on top of your old counters. This makes a physical copy of the exact shape.
- They might use laser devices. These tools scan the space and create a digital map.
- They note every detail: wall straightness, corner angles, sink location and type, edge style wanted.
Can You DIY Template?
Yes, but it is hard to get it perfect.
- You can use thin plywood or cardboard to make templates.
- You cut the wood or cardboard to match the counter shape exactly.
- You must be very careful with corners and cutouts.
- This is best for simple shapes or if you have good skills.
- For stone or quartz, pros almost always template because the material is expensive and unforgiving.
Your accurate measurements are the first step. They help you understand the project. They help the pro prepare. They are needed if you plan to template yourself.
Final Steps and Tips
You have measured. You have drawn. You have calculated. What next?
Review Everything
Look at your drawing and numbers again.
- Do the numbers make sense?
- Did you measure to the nearest 1/8 inch or 1/16 inch? This level of detail is good.
- Are all sections measured?
- Are sink and cooktop locations clear? Is the cutout size noted?
- Did you note anything tricky, like walls that are not straight?
Add Notes
Write notes on your drawing.
- Mention where walls are not square.
- Note the desired overhang amount.
- Note the edge style you want (e.g., straight, rounded).
- Note the thickness of the new countertop material if you know it.
Get a Second Opinion (Optional)
If you are unsure, ask someone else to look at your drawing and numbers. Or have them help you measure. A second pair of eyes helps catch mistakes.
Talk to the Countertop Supplier/Maker
Give your detailed drawing and measurements to the place making your counters.
- They will review your numbers.
- They might see things you missed.
- They will use your info for a price quote.
- If they do templating, your measures help them plan their visit.
This guide on how to measure for new kitchen countertops gives you the steps. Taking your time and being exact are the most important parts. Good measurements mean a smooth process and a good fit for your new counters. This DIY countertop measurement guide helps you start your kitchen update right.
Frequently Asked Questions (FAQ)
How close do my measurements need to be?
Try to measure to the nearest 1/8 inch. Small errors can cause big problems when cutting stone or other materials. Exact is always best.
Should I measure the old countertop or the cabinets?
Measure the old countertop. It shows the shape that is already there. If you are changing the layout, then measure the cabinets and the space they fill.
What if my walls are not straight?
This is common. Measure from the wall to the front edge in a few places along the counter. Write all these numbers on your drawing. Point out on the drawing that the wall is not straight. Countertop makers can deal with this, but they need to know about it.
Do I need to add for overhang?
When you measure the depth from the wall to the front edge of your old counter, you are measuring the old overhang. Note how much the old overhang is. Tell the maker how much overhang you want on the new counters. They will add it when they make the counter or the template. Measure the old overhang from the cabinet face frame out.
How is measuring for an undermount sink different?
For an undermount sink, the hole in the counter must be very exact. The edge of the counter around the hole is polished. You must have the exact cutout dimensions from the sink maker. Also, note the sink model number for the countertop maker. They need to know how to shape the edge around the sink opening. Measuring for sink cutouts is a critical step.
What is the typical countertop depth?
Kitchen countertops are typically 25 inches deep. This gives a standard 1-inch overhang past a 24-inch deep cabinet. But many kitchens have different depths. Always measure your actual space. Do not guess.
Can I just give the countertop maker my measurements?
Yes, you can. This guide shows you how to get those measurements. Some makers might ask for them to give you a first price quote. But many will require making their own template before they cut expensive materials. They want to be sure it fits perfectly. Providing your accurate measurements and diagram helps them, speeds things up, and makes sure you are both thinking the same way about the project. It is a good step even if a pro will template.