Yes, you can cover kitchen countertops to give them a fresh, new look without breaking the bank. Options range from decorative films and paints to more involved installations like laminate or even DIY butcher block alternatives. This guide will walk you through various methods to transform your kitchen’s heart on a budget.
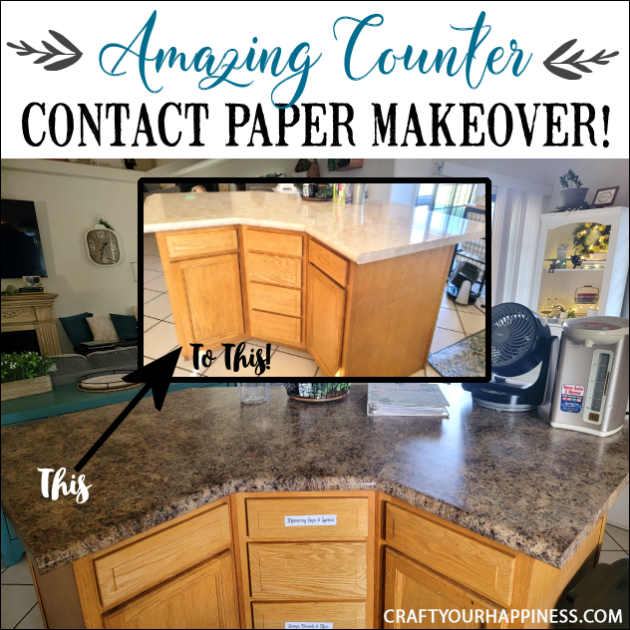
Image Source: craftyourhappiness.com
Breathing New Life into Old Surfaces
Your kitchen countertops see a lot of action. From chopping vegetables to holding coffee makers, they endure daily wear and tear. Over time, even the most beautiful surfaces can look worn, chipped, or simply outdated. The good news is that a complete replacement isn’t always necessary. There are many fantastic ways to refresh your kitchen without the hefty price tag of new slabs. Whether you’re looking for a quick fix or a more durable solution, this post explores how to cover kitchen countertops effectively and stylishly.
DIY Countertop Coverings: Your Budget-Friendly Arsenal
The world of DIY countertop coverings offers a treasure trove of possibilities for the budget-conscious homeowner. These methods allow for a high degree of customization and the satisfaction of doing it yourself.
1. Adhesive Countertop Wraps & Contact Paper for Countertops: The Quickest Transformation
What are they?
Adhesive countertop wraps, often referred to as contact paper for countertops, are essentially large, durable vinyl stickers designed to mimic various materials like granite, marble, wood, or concrete. They are the go-to for a rapid and dramatic visual change.
Pros:
* Speed: You can transform your countertops in a single weekend, sometimes even faster.
* Cost: Generally the most affordable option.
* Variety: Available in an immense range of patterns, colors, and textures.
* Removability: Many are designed to be removed without damaging the underlying surface, making them great for renters.
* Water Resistance: Most are waterproof and easy to clean.
Cons:
* Durability: Can be prone to scratching or tearing with heavy use, especially cheaper varieties.
* Bubbles and Seams: Achieving a perfectly smooth finish without bubbles or visible seams can be challenging.
* Heat Resistance: Not typically resistant to high heat, so trivets are essential.
How to Apply:
1. Clean Thoroughly: The surface must be spotless and dry. Use a degreaser and then wipe down with rubbing alcohol.
2. Measure Carefully: Measure your countertop, adding a few extra inches for overlap.
3. Peel and Stick: Slowly peel back the backing paper as you carefully align and apply the wrap.
4. Smooth Out: Use a squeegee or a credit card to push out air bubbles as you go. Work from the center outwards.
5. Trim Edges: Use a sharp craft knife or razor blade to trim excess material around the edges and sink.
6. Corners: For corners, you can either fold the material neatly or cut it to create a clean seam. Many tutorials show how to achieve a seamless look with heat or careful folding.
Cost Estimate: $30 – $100 per roll, depending on size and quality. One roll typically covers 15-25 square feet.
2. Peel and Stick Countertop Options: Beyond Vinyl Wraps
While similar to contact paper, peel and stick countertop options often refer to slightly thicker, more robust materials, sometimes with a textured finish that better mimics natural stone or wood grain. They might also include specialized edge pieces for a more finished look.
Pros:
* Enhanced Realism: Often designed to look and feel more like the material they imitate.
* Thicker Material: Can offer slightly better durability and resistance to minor damage.
* Integrated Kits: Some come with pre-cut pieces or specific edge treatments for easier installation.
Cons:
* Higher Cost: Generally more expensive than basic contact paper.
* Application Skill: Can be trickier to apply due to their thickness and less forgiving nature.
How to Apply: Similar to contact paper, but extra care is needed to avoid wrinkles and ensure proper adhesion. Using a hairdryer on a low setting can help the material stretch and conform to curves and edges more smoothly.
Cost Estimate: $50 – $150 per roll.
3. Countertop Paint Ideas: A Splash of Color
What is it?
Specialized countertop paints are designed to adhere to various countertop materials like laminate, tile, or solid surface, providing a durable, colored finish. They are a fantastic way to introduce color and a fresh look.
Pros:
* Color Customization: Offers endless color possibilities to match your kitchen decor.
* Affordable: A very cost-effective way to update.
* DIY Friendly: Relatively straightforward application process.
* Creates a Seamless Look: Unlike tile, painted countertops offer a smooth, grout-free surface.
Cons:
* Durability Concerns: While designed for this purpose, painted surfaces can be more prone to chipping or scratching than laminate or stone.
* Preparation is Key: Proper cleaning and priming are crucial for adhesion and longevity.
* Drying Time: Requires drying and curing time between coats, and before heavy use.
How to Apply:
1. Deep Clean: Clean countertops meticulously with a degreaser, then a mild abrasive cleaner, and finally wipe down with denatured alcohol or mineral spirits.
2. Light Sanding (if recommended): Lightly sand the surface to create a better grip for the paint. Wipe away dust thoroughly.
3. Prime: Apply a specialized bonding primer designed for countertops. Allow it to dry completely.
4. Paint: Apply thin, even coats of countertop paint. Most kits recommend 2-3 coats.
5. Seal: Use a durable, water-based polycrylic or a specialized countertop sealant for protection.
6. Cure: Allow the paint to cure fully according to the manufacturer’s instructions before using the countertops.
Cost Estimate: $50 – $150 for a kit that typically covers 20-30 square feet.
4. Epoxy Countertop Kits: The Seamless, Durable Finish
What are they?
Epoxy countertop kits involve mixing a two-part resin and hardener system that, when applied to a surface, creates an incredibly hard, durable, and often glossy finish. They can be poured over existing countertops, creating a seamless, custom look.
Pros:
* Exceptional Durability: Epoxy is highly resistant to scratches, heat, and stains.
* Seamless Finish: Creates a smooth, non-porous surface with no grout lines.
* Stunning Visuals: Can achieve dramatic effects with metallic pigments, color swirls, and stone-like appearances.
* Waterproof: Inherently waterproof and very easy to clean.
Cons:
* Application Complexity: Requires careful mixing, precise timing, and a steady hand to avoid drips and bubbles.
* Surface Preparation: Crucial for adhesion; the surface must be perfectly clean and smooth.
* VOCs: Some epoxy products contain strong fumes, requiring good ventilation and personal protective equipment.
* Cost: Can be more expensive upfront than paints or vinyl wraps.
How to Apply:
1. Preparation is Paramount: Clean, degrease, and lightly sand the countertop. Wipe clean with alcohol. Ensure the surface is level.
2. Mix Components: Carefully measure and mix the resin and hardener according to the kit’s instructions. This step is critical for proper curing.
3. Add Color/Effects: Incorporate pigments, mica powders, or other additives at this stage.
4. Pour and Spread: Pour the mixed epoxy onto the countertop, spreading it evenly with a spreader.
5. Torch Out Bubbles: Use a small propane torch held at an angle to quickly pass over the surface, popping any air bubbles.
6. Cure: Allow the epoxy to cure undisturbed for the time specified by the manufacturer, usually 24-72 hours.
Cost Estimate: $100 – $300 for a kit, depending on the size and type of epoxy.
Refinishing Kitchen Counters: Restoring What You Have
Sometimes, your countertops aren’t in bad shape, just in need of a refresh. Refinishing kitchen counters focuses on repairing minor damage and applying a protective topcoat.
1. Laminate Countertop Installation: A Classic Budget-Friendly Option
What is it?
While often thought of as a full replacement, you can actually update existing laminate countertops by applying new laminate sheets. This is a more involved DIY project but offers excellent durability and a wide range of aesthetic choices.
Pros:
* Durability: Laminate is known for its resistance to stains, heat, and scratches.
* Cost-Effective: Significantly cheaper than granite, quartz, or solid surface.
* Variety: Comes in countless patterns and colors.
* Easy to Clean: Smooth surface is simple to maintain.
Cons:
* Application Skill: Requires precision with contact cement, a router or laminate trimmer, and a jigsaw for sink cutouts. Mistakes can be costly.
* Edge Treatment: Achieving a perfect seam at the edges can be tricky.
* Heat/Scratch Limitations: While durable, it can still be damaged by very hot pans or sharp knives.
How to Install:
1. Remove Old Laminate (if necessary): If the old laminate is damaged or you want a completely new look, carefully remove the old sheets.
2. Cut New Laminate: Measure and cut the new laminate sheets using a sharp utility knife and a straight edge.
3. Apply Contact Cement: Apply contact cement to both the countertop substrate and the back of the laminate sheet. Allow it to become tacky.
4. Bond Carefully: Carefully lay the laminate onto the substrate, starting from one edge and smoothing it down with a roller or hard block to eliminate air bubbles.
5. Trim Edges: Use a router with a flush trim bit or a sharp utility knife to trim excess laminate from the edges.
6. Sink Cutouts: Precisely cut out openings for sinks and faucets.
Cost Estimate: $30 – $70 per sheet (approx. 5×12 ft), so a typical kitchen might cost $150 – $300 for materials.
2. Butcher Block Countertop Alternatives: The Warmth of Wood
What are they?
If you love the look of butcher block but find it too high-maintenance or expensive, there are alternatives that offer a similar warm, natural aesthetic. These might include wood-look laminate, vinyl planks designed for countertops, or even DIY projects using stained and sealed plywood or affordable wood species.
Pros:
* Warm Aesthetics: Mimics the inviting look of natural wood.
* Cost Savings: Can be significantly cheaper than real butcher block.
* DIY Friendly: Some options are very easy to install.
Cons:
* Durability Varies: The lifespan and resistance to scratches and moisture depend heavily on the specific material and finish.
* Maintenance: Some wood-look options may require periodic sealing or special cleaning.
Applying Wood-Look Laminate: Similar to traditional laminate installation, requiring careful cutting, gluing, and trimming.
Applying Wood-Look Vinyl: Often involves a strong adhesive and precise cutting. Some high-end options mimic wood grain effectively and are quite durable.
Cost Estimate: Varies widely. Wood-look vinyl plank can be $2-$5 per square foot. Laminate sheets are similar to standard laminate pricing.
3. Kitchen Countertop Resurfacing: A Mid-Range Option
What is it?
Kitchen countertop resurfacing is a broad term that can encompass various techniques, including applying a new coating over the existing surface. This is more durable than simple paint but less complex than a full epoxy pour. Specialty countertop resurfacing kits often involve a multi-step process with primers, color coats, and clear protective topcoats.
Pros:
* Improved Durability: Offers better scratch and stain resistance than paint alone.
* Customizable Look: Can be tinted or patterned to achieve a specific aesthetic.
* Seamless Finish: Can cover up imperfections and create a uniform surface.
Cons:
* Application Technique: Requires attention to detail and following specific product instructions.
* Curing Time: Needs adequate time to harden and cure before use.
* Cost: Generally more expensive than basic paint or vinyl wraps.
How to Resurface:
1. Clean and Prep: Thoroughly clean the countertops, removing any old sealants or wax. Sand lightly if recommended by the product.
2. Apply Primer: Use a high-adhesion primer designed for countertops.
3. Apply Color Coat(s): Apply the color coat in thin, even layers. Some systems allow for marbling or speckling effects.
4. Apply Topcoat: Apply a durable, clear topcoat for protection. This is often a polycrylic or a specialized acrylic sealant.
5. Cure: Allow sufficient curing time.
Cost Estimate: $100 – $250 for a comprehensive kit.
Considering Different Countertop Materials for Your Budget Makeover
When you’re looking to cover kitchen countertops, the material you choose will dictate the process, durability, and final look.
Granite-Look Contact Paper
For an ultra-budget, quick update, granite-look contact paper offers a surprising amount of realism. High-quality versions have textured finishes and intricate patterns that mimic natural stone quite effectively. It’s a great way to experiment with a bolder look without a long-term commitment.
Marble-Effect Adhesive Wraps
Similarly, marble-effect wraps can instantly elevate the look of your kitchen. White or grey marble patterns with subtle veining are particularly popular and can make a small kitchen feel more spacious and luxurious.
Concrete-Look DIY Kits
If you’re after a modern, industrial vibe, concrete-look finishes are a fantastic choice. Kits are available that allow you to achieve a realistic concrete appearance, often with a smooth, matte finish. These can be applied over existing laminate or even tile.
Wood-Grain Laminate Sheets
For those who love the warmth of wood but want the durability of laminate, wood-grain sheets are ideal. From light oak to dark walnut, the options are vast, and the installation process, while requiring some skill, is manageable for a dedicated DIYer.
Preparing Your Workspace for a Successful Countertop Cover
No matter which method you choose, proper preparation is the cornerstone of a successful DIY countertop project.
Essential Tools and Supplies
- Cleaning Agents: Degreaser, rubbing alcohol, mild abrasive cleaner.
- Application Tools: Squeegee, craft knife/razor blade, painter’s tape, measuring tape, scissors, roller (for laminate adhesive).
- Safety Gear: Gloves, safety glasses, dust mask (if sanding).
- Optional: Heat gun/hairdryer (for wraps), propane torch (for epoxy), sandpaper, primer, sealant.
Surface Preparation: The Foundation of Your Makeover
- Clear Everything: Remove all items from the countertops.
- Deep Clean: This is non-negotiable. Grease, grime, and dust will prevent adhesion.
- Repair Imperfections: Fill any chips or cracks with appropriate filler before applying your chosen covering.
- Protect Surrounding Areas: Use painter’s tape to protect walls, cabinets, and backsplashes.
Tips for Achieving a Professional Finish
- Work in Good Light: Natural light is best to spot imperfections.
- Patience is Key: Rushing the process will lead to mistakes. Take your time with each step.
- Read Instructions Carefully: Always follow the manufacturer’s guidelines for the specific product you are using.
- Test a Small Area: If unsure about adhesion or appearance, test your chosen material in an inconspicuous spot first.
- Handle Seams with Care: For wraps and laminate, overlapping edges neatly or using a specialized seam sealer can make a big difference. For paint and epoxy, ensure smooth transitions.
Frequently Asked Questions (FAQ)
Q1: Can I put new countertops over old countertops?
Yes, many of the methods discussed, such as adhesive wraps, contact paper, specialized paints, epoxy, and even new laminate, can be applied directly over existing countertops, provided the old surface is clean, stable, and in decent condition.
Q2: How long do budget countertop makeovers last?
The lifespan varies greatly depending on the method and quality of materials used.
* Contact Paper/Vinyl Wraps: Typically 1-5 years, depending on wear and tear.
* Countertop Paint: 2-5 years, with proper care and sealing.
* Epoxy/Laminate: Can last 5-15 years or even longer with good maintenance.
Q3: Are DIY countertop coverings heat resistant?
Most vinyl wraps and paints are NOT highly heat resistant. It’s crucial to use trivets for hot pots and pans. Epoxy and laminate generally offer better heat resistance, but checking the specific product’s specifications is always recommended.
Q4: Can I cover my existing tile countertops?
Yes, but it can be more challenging due to the grout lines. For vinyl wraps or contact paper, you might need to fill the grout lines first or accept that the texture may show through. Epoxy and specialized resurfacing kits can often create a smooth, grout-free finish over tile if applied correctly.
Q5: What is the easiest way to cover kitchen countertops?
Applying contact paper for countertops or adhesive countertop wraps is generally considered the easiest and quickest DIY method for a dramatic visual change.
By exploring these various methods for how to cover kitchen countertops, you can achieve a beautiful and functional upgrade for your kitchen without the high cost of a full renovation. Choose the option that best suits your budget, skill level, and desired aesthetic, and enjoy your revitalized kitchen space!