Image Source: www.kitchenaid.com
How To Clean A KitchenAid Dishwasher Filter Easily
Yes, you can easily clean your KitchenAid dishwasher filter. This essential maintenance task helps your dishwasher run efficiently and prevents odors. This guide will walk you through every step to remove, clean, and reinsert your KitchenAid dishwasher filter for optimal performance.
Why Your KitchenAid Dishwasher Filter Needs Regular Cleaning
Your KitchenAid dishwasher filter is the unsung hero of your dishwashing routine. It’s designed to catch food particles, debris, and other gunk that might otherwise clog your dishwasher’s spray arms, pump, and drain. Neglecting this small but mighty component can lead to a host of problems, from dirty dishes to potential appliance malfunctions.
Regular KitchenAid dishwasher maintenance, including cleaning the filter, is crucial for several reasons:
- Improved Cleaning Performance: A clogged filter restricts water flow. This means less water reaches the spray arms, and the water that does gets through might be laden with trapped debris, leading to less effective dish cleaning.
- Odor Prevention: Trapped food particles in the filter can decompose, creating unpleasant odors that can permeate your kitchen. A clean filter means a fresh-smelling dishwasher.
- Extended Appliance Lifespan: By preventing debris from reaching sensitive internal parts like the pump and motor, a clean filter helps protect your dishwasher from damage and premature wear. This is a key aspect of overall KitchenAid dishwasher maintenance.
- Reduced Risk of Clogs and Repairs: A blocked filter can cause water to back up, potentially leading to leaks or damage to the drain system. Regular cleaning is a simple way to avoid costly repairs and unnecessary KitchenAid dishwasher troubleshooting.
- Water Efficiency: A clean filter allows water to flow freely, meaning your dishwasher uses water more efficiently for each cycle.
Decoding Your KitchenAid Dishwasher Filter System
Most KitchenAid dishwashers utilize a multi-part filter system. While the exact design might vary slightly between models, you’ll typically find these components:
- The Coarse Filter: This is the first line of defense, designed to catch larger food particles and debris. It often looks like a mesh basket or a cylindrical component.
- The Fine Filter: Located beneath the coarse filter, this component catches smaller particles that might have passed through the initial screen. It’s usually a finer mesh or a disc-shaped element.
- The Micro-filter (Optional): Some advanced models may have an additional micro-filter for even finer particle capture.
Table 1: Common KitchenAid Dishwasher Filter Components
| Component | Function | Appearance Example |
|---|---|---|
| Coarse Filter | Catches large food scraps and debris. | Cylindrical mesh basket or cup-shaped. |
| Fine Filter | Traps smaller food particles and grit. | Finer mesh screen, often cylindrical or flat. |
| Micro-filter | Captures very small particles for extra purity. | Ultra-fine mesh, typically disc-shaped. |
When to Clean Your KitchenAid Dishwasher Filter
The frequency of KitchenAid dishwasher filter cleaning depends on several factors:
- Usage: If you run your dishwasher daily, you’ll need to clean the filter more often than if you use it weekly.
- Dish Habits: Do you rinse your dishes before loading? If you frequently load dishes with large amounts of food residue, your filter will get dirty faster.
- Food Types: Certain foods, like fibrous vegetables or seeds, can clog filters more quickly.
As a general guideline, aim to clean your KitchenAid dishwasher filter at least once a month. However, if you notice any of the following signs, it’s time for an immediate cleaning:
- Dishes aren’t coming out clean: This is a primary indicator of a restricted filter.
- Standing water in the bottom of the dishwasher after a cycle: This suggests the drain is blocked.
- Unpleasant odors: A sure sign of trapped food debris.
- Unusual noises during operation: Clogged filters can sometimes affect the pump.
Step-by-Step Guide to KitchenAid Dishwasher Filter Cleaning
The process to remove dishwasher filter components from your KitchenAid appliance is generally straightforward. Always consult your owner’s manual for specific instructions related to your model.
Step 1: Gather Your Supplies
Before you begin, make sure you have the following on hand:
- Soft brush (an old toothbrush works well)
- Mild dish soap
- Warm running water
- A clean towel or cloth
- Gloves (optional, if you prefer)
Step 2: Locate and Remove the Filter Assembly
This is the most crucial part of KitchenAid dishwasher filter cleaning.
- Open the Dishwasher Door: Fully extend the lower rack of your dishwasher to get a clear view of the bottom.
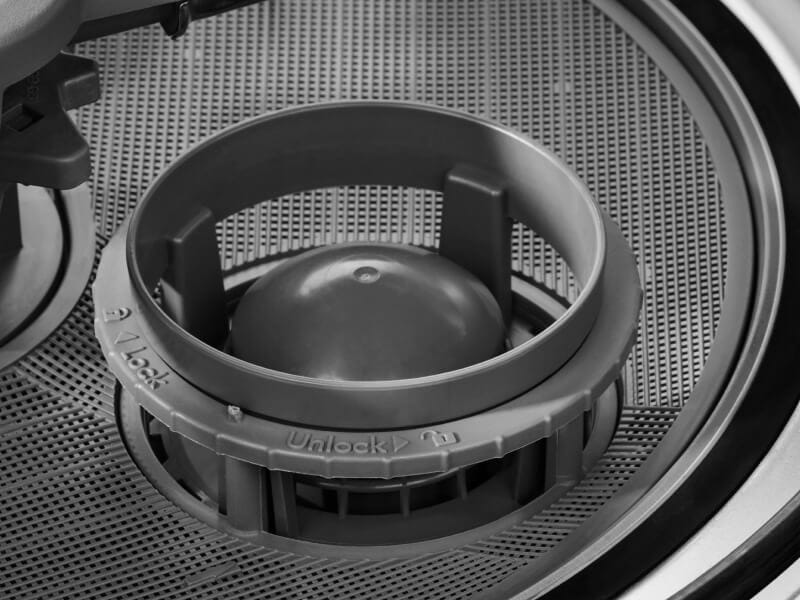
- Identify the Filter: In most KitchenAid models, the filter assembly is located at the very bottom center of the dishwasher tub, often directly beneath the lower spray arm. It typically resembles a cylindrical cup or a basket.
- Unlock and Remove:
- Most KitchenAid dishwasher filter systems have a twist-and-lock mechanism. You’ll usually see markings indicating “unlock” or an arrow showing the direction to turn.
- Grip the filter assembly firmly and twist it counter-clockwise. You might need to apply a bit of pressure.
- Once unlocked, carefully lift the entire filter assembly out of its housing. It might be a single unit, or you may need to separate the coarse and fine filters.
Tip: Take a moment to look at how the filter is positioned before removing it. This will make reassembly much easier. Some models might have a small retaining clip or tab to release.
Step 3: Separate the Filter Components (If Applicable)
If your KitchenAid dishwasher filter assembly consists of multiple parts, separate them now.
- The coarse filter is usually the outer component.
- The fine filter is often nested inside or screws into the coarse filter. Look for a threaded base or a simple pull-apart connection.
Step 4: Thoroughly Clean Each Filter Component
This is where the actual dishwasher debris removal happens.
- Rinse Under Running Water: Take each filter component to the sink and rinse them under warm, running water. This will wash away most of the loose debris.
- Use a Soft Brush and Mild Soap: For stubborn grime, food particles, or any greasy buildup, use your soft brush and a small amount of mild dish soap. Gently scrub all surfaces of the filters, paying attention to the mesh areas.
- Address Stubborn Debris: If you encounter tough residue, soaking the filters in warm, soapy water for a few minutes can help loosen it. For very hard-to-remove bits, you might use a toothpick or a soft brush to dislodge them, but be careful not to damage the mesh.
- Rinse Again: After scrubbing, rinse each component thoroughly under warm water to ensure all soap residue and dislodged debris are gone.
Important Note: Never use abrasive cleaners, steel wool, or harsh chemicals on your dishwasher filters. These can damage the filter material and reduce its effectiveness. This also applies to cleaning other dishwasher parts.
Step 5: Clean the Filter Housing
While the filters are out, it’s a good opportunity to clean the area where they sit.
- Use a damp cloth or sponge to wipe away any accumulated food particles or residue from the filter housing at the bottom of the dishwasher tub.
- You can use your soft brush to gently clean any nooks and crannies within the housing.
Step 6: Reassemble and Reinsert the Filter
Proper reassembly is key for your KitchenAid dishwasher filter cleaning to be effective.
- Reassemble Filters: If you separated your filters, put them back together. Ensure they are securely connected.
- Position the Filter: Carefully place the reassembled filter unit back into its housing at the bottom of the dishwasher tub.
- Lock in Place: Align the filter assembly correctly with the housing. Twist it clockwise until it locks securely. You should feel or hear a click, and the filter should feel firmly seated. Ensure it doesn’t wobble.
Tip: Referencing your owner’s manual or a quick online search for your specific KitchenAid dishwasher model’s filter diagram can be very helpful during reassembly.
Step 7: Replace the Lower Rack and Run a Test Cycle
- Slide the Lower Rack Back In: Gently push the lower rack back into the dishwasher.
- Run a Short Cycle: To confirm everything is working correctly and to rinse away any residual cleaning soap or loosened debris, run your dishwasher on a short rinse cycle.
Advanced Tips for KitchenAid Dishwasher Maintenance
Beyond regular filter cleaning, here are some tips for optimal KitchenAid dishwasher maintenance:
- Scrape, Don’t Rinse (Mostly): While you should scrape off large food chunks, modern dishwashers and detergents are designed to handle some residue. Over-rinsing can actually make detergent less effective, as it needs something to cling to. However, for very sticky or baked-on foods, a quick rinse is still beneficial.
- Load Properly: Don’t overcrowd the dishwasher. Ensure items are not blocking the spray arms.
- Use the Right Detergent: Opt for a good quality dishwasher detergent.
- Check Spray Arms: Periodically check that the holes in your spray arms are not clogged. If they are, you can often remove them and soak them in warm water or use a toothpick to clear them. This is another aspect of dishwasher parts cleaning.
- Clean the Exterior: Don’t forget to wipe down the exterior of your appliance with a damp cloth and mild soap to keep your clean kitchen appliance looking its best.
Troubleshooting Common Issues Related to the Filter
If you’re experiencing problems, your filter might be the culprit. Here are some common KitchenAid dishwasher troubleshooting tips related to the filter:
- Dishwasher Not Draining: This is almost always a sign of a clogged filter or drain hose. Ensure the filter is clean and properly seated. If the problem persists, the drain hose might be kinked or blocked.
- Dishes Still Dirty: Re-clean the filter, ensuring all debris is removed. Check that the spray arms are free to spin and not blocked by dishes.
- Leaking Water: A loosely installed filter can cause leaks. Make sure it’s locked in place securely.
- Bad Odors: As mentioned, this is a direct result of trapped food. Regular filter cleaning is the best solution.
When to Consider Dishwasher Filter Replacement
While filters are designed to be cleaned, they can eventually wear out or become damaged. You might need to consider dishwasher filter replacement if:
- The mesh is torn or damaged: This will allow debris to pass through.
- The plastic housing is cracked: This can compromise the seal and lead to leaks.
- The filter is excessively stained or worn: Even after thorough cleaning, some filters can become permanently discolored or develop a persistent odor, indicating it’s time for a new one.
When it’s time for replacement, be sure to purchase the correct filter part number for your specific KitchenAid dishwasher model. You can usually find this information in your owner’s manual or by searching online using your appliance’s model number.
Sanitize Dishwasher Filter: Beyond Basic Cleaning
While regular washing with soap and water is usually sufficient, you might want to sanitize your dishwasher filter periodically, especially if you’re concerned about lingering odors or bacteria.
Here’s how you can sanitize your KitchenAid dishwasher filter:
- Soak in Vinegar Solution: After cleaning the filter components with soap and water, soak them in a solution of one part white vinegar to two parts warm water for about 30 minutes. Vinegar is a natural disinfectant and deodorizer.
- Rinse Thoroughly: After soaking, rinse the filters thoroughly under clean running water to remove any vinegar residue.
- Air Dry: Allow the filters to air dry completely before reassembling them into the dishwasher.
Note: Avoid using bleach, as it can be too harsh for the filter materials and potentially react with other dishwasher components.
Frequently Asked Questions (FAQ)
Q1: How often should I clean my KitchenAid dishwasher filter?
A1: It’s recommended to clean your KitchenAid dishwasher filter at least once a month. However, if you notice reduced cleaning performance, odors, or standing water, clean it immediately.
Q2: Can I run my dishwasher without the filter?
A2: No, you should never run your dishwasher without the filter in place. The filter is essential for trapping debris and protecting the pump and drain system. Running it without a filter can cause significant damage and costly repairs.
Q3: What kind of brush should I use to clean the filter?
A3: Use a soft-bristled brush, such as an old toothbrush or a dedicated dishwashing brush. Avoid abrasive scrubbers or steel wool, as they can damage the filter mesh.
Q4: My KitchenAid dishwasher filter is stuck. What should I do?
A4: If the filter is difficult to remove, ensure you are twisting it in the correct direction (usually counter-clockwise) as indicated by markings on the filter housing. Sometimes, a bit of gentle wiggling can help. If it’s still stuck, check your owner’s manual for specific instructions or contact KitchenAid support. Avoid forcing it, as you could break the component.
Q5: Can I put my dishwasher filter in the dishwasher to clean it?
A5: Most KitchenAid dishwasher filters are designed to be hand-washed. While some might be dishwasher-safe, it’s generally best to wash them manually to ensure all debris is removed from the fine mesh and to avoid potential damage from the dishwasher’s high heat and pressure. Always check your owner’s manual.
By following these detailed steps and tips, you can ensure your KitchenAid dishwasher filter is always clean and your appliance runs at its best, providing sparkling clean dishes with every cycle. Regular KitchenAid dishwasher maintenance, starting with the filter, is key to a long-lasting and efficient appliance.