Caulking your kitchen backsplash is a simple task that makes a big difference. It seals gaps, stops water damage, and makes your kitchen look finished and clean. This guide will walk you through exactly how to caulk kitchen backsplash, from start to finish, making the job easy for anyone.
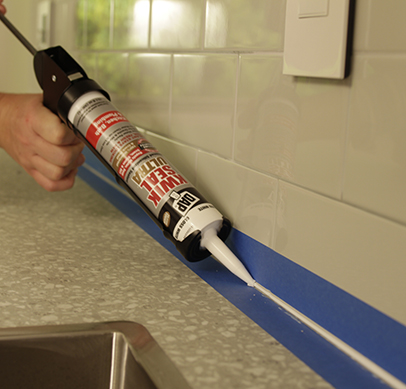
Image Source: www.dap.com
Why Your Kitchen Backsplash Needs Caulk
Caulk might seem like a small detail, but it plays a very important role in your kitchen.
Stopping Water Damage
Water is the biggest enemy of kitchen materials. Splashes from the sink, spills on the counter, or steam from cooking can all get into small gaps.
When water gets behind your backsplash, it can cause problems. It might rot the drywall, damage the cabinets, or even lead to mold growth.
Applying caulk helps create a seal. This seal stops water from getting into the gaps. This is especially important for waterproofing kitchen backsplash edge areas, like where the backsplash meets the countertop. This joint, where the backsplash sits on the counter, needs a flexible, waterproof seal because counters can shift slightly. Learning how to seal gap between backsplash and countertop properly is key to stopping water damage there.
Keeping Pests Out
Tiny bugs and pests look for small cracks and openings to get into your walls. Caulk closes off these entry points. Sealing the edges of your backsplash means fewer places for pests to hide or enter your home.
Making it Look Good
Even the nicest backsplash won’t look right if it has unfinished gaps around the edges. Caulk fills these spaces. It gives the backsplash a clean, finished look against the walls, cabinets, and countertop. A neat line of caulk makes your whole kitchen look more polished and professional.
Choosing the Right Caulk
Not all caulk is the same. For a kitchen backsplash, you need a caulk that can handle moisture and is easy to clean.
Types of Caulk for Kitchens
There are two main types of caulk people use in kitchens:
- Acrylic Latex Caulk:
- Pros: Easy to use, cleans up with water, can be painted over, less smelly than silicone. It’s good for general sealing tasks that don’t see a lot of water. Acrylic latex caulk kitchen products are common and budget-friendly.
- Cons: Less flexible than silicone, not as waterproof for areas with lots of water contact, can shrink or crack over time.
- Silicone Caulk:
- Pros: Very flexible, excellent at waterproofing, lasts a long time, resists mold and mildew well (look for ones with added mildew protection). Silicone caulk kitchen backsplash is a great choice for areas right next to the sink or cooktop where water is frequent.
- Cons: Harder to work with than acrylic latex, smells strong while curing, requires mineral spirits or special removers to clean up, cannot be painted over.
Best Caulk for Tile Backsplash
For most tile backsplashes, especially in a kitchen environment, a good quality silicone caulk or a hybrid sealant (combining properties of both) is often the best choice. Silicone provides the flexibility and waterproofing needed at the joint between the backsplash and the countertop. Acrylic latex caulk kitchen products can work for areas away from heavy water, like along the top edge against cabinets or the wall, if you need to paint it. However, for the crucial bottom edge and corners, silicone or a hybrid offers superior protection against water damage.
Caulk Color for Backsplash
Caulk comes in many colors. White is a very common choice because it looks clean and bright. Clear caulk is also popular; it lets the color of your backsplash or counter show through, which can make the seal nearly invisible. Some caulk is colored to match grout lines.
Think about your backsplash and counter colors. Do you want the caulk line to blend in (clear or matched color) or stand out slightly (white)? White caulk can make a clean line against a dark counter or backsplash, highlighting the edge. Clear is good if you want the seal to disappear.
Getting Ready: Tools and Materials
Before you start, gather everything you’ll need. Having your tools ready makes the job go smoothly.
Tools You Will Need
- Caulk gun (a basic one is fine for small jobs, but a dripless one is cleaner)
- Utility knife or sharp razor knife
- Scraper or putty knife (for removing old caulk)
- Needle-nose pliers or a caulk-removal tool (optional, but helpful)
- Vacuum cleaner or brush
- Cleaning supplies (all-purpose cleaner, rags, paper towels)
- Rubbing alcohol or mineral spirits (depending on the type of caulk you removed or are cleaning up)
- Painter’s tape (optional, but highly recommended for clean lines)
- Caulk smoothing tool kit or an old credit card/plastic spoon
- Small container of water (for smoothing)
- Wet rags and dry rags
Materials You Will Need
- Your chosen caulk tube(s) (Silicone caulk kitchen backsplash or Acrylic latex caulk kitchen, in your chosen caulk color for backsplash)
| Item | Purpose | Notes |
|---|---|---|
| Caulk Gun | To push caulk out of the tube | Get one that fits your tube size. Dripless is nice. |
| Utility Knife/Razor | To cut the caulk tube tip and remove old caulk | Make sure it’s sharp. Be careful! |
| Scraper/Putty Knife | To scrape away old caulk | Different sizes can help. |
| Cleaner | To clean the area before caulking | An all-purpose kitchen cleaner works. |
| Rubbing Alcohol/Spirits | To remove residue or prep surface | Use alcohol before acrylic, spirits before silicone. |
| Painter’s Tape | To create straight caulk lines | Low-tack tape is best. |
| Smoothing Tool | To shape and clean the caulk bead | Many options exist, or use a wet finger. |
| Rags/Paper Towels | For cleaning up messes and spills | Have plenty handy. |
| Caulk Tube | The sealant itself | Make sure it’s the right type and color. |
Having all these things ready means you won’t have to stop mid-job.
Step-by-Step: How To Caulk Your Kitchen Backsplash
Now that you have everything, it’s time to get started. This is the process for applying a fresh bead of caulk.
Step 1: Preparing the Backsplash for Caulking
This is a very important step. Good prep makes for a good result. Preparing backsplash for caulking involves cleaning the area completely.
You need a clean, dry surface for the new caulk to stick well. If there is old caulk, you must take it out first. If the backsplash is new, just clean it well.
Step 2: Removing Old Caulk Backsplash
If you are replacing old caulk, this step is necessary. Removing old caulk backsplash can take some time, especially if it’s stubborn silicone.
- Score the Edges: Use your utility knife or razor blade to cut along both sides of the old caulk bead. Cut where the caulk meets the backsplash and where it meets the counter or wall. This breaks the seal. Be careful not to cut into the backsplash, counter, or cabinets.
- Scrape it Away: Use a scraper or putty knife to lift and scrape away the old caulk. Work carefully. For hard-to-reach spots, a specialized caulk removal tool or even needle-nose pliers can help grip and pull out pieces.
- Get the Residue: Once the bulk of the old caulk is gone, you might have small bits or a film left. For silicone caulk, you might need mineral spirits or a silicone caulk remover product. For acrylic latex caulk, hot water and soap, or rubbing alcohol, often works. Use a rag and some elbow grease to clean the area completely.
- Vacuum: Use a vacuum cleaner with a brush attachment to suck up all the scraped pieces and dust. You want the gap to be totally clear.
Make sure all the old caulk is gone. New caulk will not stick well to old caulk or leftover residue.
Step 3: Cleaning and Drying the Area
After removing old caulk or if starting with a new backsplash, clean the entire area where you will apply caulk.
Use an all-purpose kitchen cleaner and a rag to wipe down the joint. Get rid of any grease, food splatters, or dirt.
Rinse the area with clean water using a damp rag.
Finally, dry the area completely. Use a clean, dry rag. You can even use a hairdryer on a low setting to make sure the gap is bone dry. Caulk needs a dry surface to cure properly.
Step 4: Taping (Optional but Recommended)
This step helps create super straight, clean caulk lines. It takes a little extra time but is worth it, especially if you are new to caulking or using tricky silicone caulk.
- Apply painter’s tape along the edge of the backsplash, just above where you want the caulk line to end.
- Apply another strip of tape along the edge of the countertop (or wall/cabinet), just below where you want the caulk line to end.
- The space between the two pieces of tape is where your caulk will go. Make sure the tape edges are crisp and form the exact width of caulk bead you want. Press the tape down firmly to prevent caulk from seeping under.
Step 5: Loading the Caulk Gun
Get your caulk tube ready.
- Cut the Tip: Use your utility knife to cut the tip of the caulk tube. Cut it at a slight angle (about 45 degrees). Start with a small opening. You can always cut more off to make the bead wider, but you can’t put it back. The size of the hole controls the width of your caulk line. A general rule for backsplash edges is to cut it just wide enough to cover the gap.
- Puncture the Inner Seal: Most caulk tubes have an inner seal inside the nozzle, down in the tube. You must break this seal, or no caulk will come out. Many caulk guns have a long metal rod or a poker attached, usually near the trigger or handle. Stick this rod into the cut tip and push it all the way down to puncture the seal. If your gun doesn’t have one, you can use a long nail or wire.
- Load the Tube: Pull the plunger rod on the back of the caulk gun all the way back. Insert the back of the caulk tube into the gun. Push the plunger rod forward until it is snug against the back of the tube.
Your caulk gun is now ready for applying caulk gun technique.
Step 6: Applying the Caulk Gun
Now for the main part: applying the caulk.
- Positioning the Gun: Hold the caulk gun at a slight angle (around 45 degrees) to the joint you are filling. The angled cut tip of the caulk tube should be flat against the surface, guiding the caulk into the gap.
- Starting the Bead: Place the tip at one end of the joint you want to caulk. Slowly squeeze the trigger of the caulk gun with steady, even pressure. Caulk will start to come out.
- Moving Along the Joint: Once caulk starts flowing, move the gun smoothly along the joint. Try to apply caulk in one continuous motion if possible. Keep the pressure on the trigger steady and the gun moving at a consistent speed. Aim for a consistent bead of caulk that fills the gap completely.
- Filling the Gap: Make sure the caulk is pushed down into the gap, not just sitting on top. The goal is to seal the space between the backsplash and countertop (or other edges).
- Corners: When you get to a corner, you might need to release pressure on the trigger slightly, pivot the gun, and start the next section. Try to make the corner transition smooth.
- Stopping and Starting: To stop the flow of caulk, release the trigger. If your gun is not dripless, you might need to pull the plunger rod back a little to stop caulk from continuing to ooze out. If you need to start a new bead next to a finished one, overlap slightly to make a continuous seal.
Don’t worry about making it look perfect right now. The next step is for making it look clean.
Step 7: Smoothing the Caulk Bead
This is where you shape the bead and make it look professional. This step is often called “tooling” the caulk.
- Timing is Key: Start smoothing the caulk bead shortly after applying it, but don’t wait too long, especially with fast-drying caulk.
- Choose Your Tool: You can use a specialized smoothing caulk tool (these often come in kits with different shapes), an old credit card with the edge slightly rounded, or even your finger. If using your finger, wet it slightly with water (for acrylic latex) or mineral spirits (for silicone). Some people use a small cup of soapy water when using silicone, as the soap helps the finger glide smoothly.
- The Technique: Start at one end of the bead. Place your chosen smoothing tool (or wet finger) lightly on the caulk bead. Drag the tool or finger smoothly along the joint in one continuous motion. The goal is to press the caulk into the gap and remove the excess, creating a smooth, slightly curved surface that sheds water.
- Wiping Excess: As you smooth, excess caulk will build up on your tool or finger. Have rags or paper towels ready to wipe this excess off frequently. If using painter’s tape, the excess will build up on the tape, which is great.
- Second Pass (if needed): If your first pass isn’t perfect, you might be able to do a quick second pass, but generally, fewer passes are better to avoid making a mess.
- Corners and Joins: For corners, smooth into the corner from both directions. For starting/stopping points, try to blend the new bead smoothly into the old (or previous) one.
Practice on a piece of scrap material if you are new to this. Mastering the smoothing technique is crucial for a good-looking caulk line.
Step 8: Removing the Painter’s Tape (If Used)
If you used painter’s tape, removing it at the right time is important.
- Remove the tape immediately after you have finished smoothing the caulk bead in that section. Don’t wait for the caulk to start drying or skinning over.
- Pull the tape off slowly and at an angle (away from the fresh caulk line). Pulling it straight up or waiting too long can lift the caulk bead and ruin your clean line.
- If any small bits of caulk got under the tape, you can carefully clean them with a damp rag or a cotton swab dipped in water (for acrylic) or mineral spirits (for silicone) before the caulk starts to skin.
Step 9: Allowing the Caulk to Cure
Caulk needs time to dry and fully harden. This is called curing.
- Drying Time: Most caulk will form a skin within 30 minutes to a few hours. This means it’s dry to the touch, but not fully cured.
- Curing Time: Full curing takes much longer. Acrylic latex caulk kitchen products might cure in 24 hours. Silicone caulk kitchen backsplash products can take 24-72 hours, sometimes even longer in humid or cold conditions. Check the specific caulk tube for the manufacturer’s recommended curing time.
- Avoid Water: Do not let the newly caulked area get wet during the curing time. This is very important for creating a waterproof seal. Try not to use your sink or cooking area heavily right after caulking.
- Ventilation: Good airflow helps caulk cure faster. Open a window if possible.
Be patient during the curing process. The caulk isn’t providing full waterproofing protection until it is fully cured.
Step 10: Final Inspection
Once the caulk is fully cured, take a close look at your work.
- Check for any small gaps or areas you might have missed.
- Look for areas where the caulk might have pulled away slightly while curing.
- Inspect the corners and ends to make sure they are sealed.
- If you find any small imperfections or missed spots, you can often apply a tiny bit more caulk and smooth it carefully, but it’s best to try to get it right the first time. For larger issues, you might need to remove that section and redo it.
Tips for a Better Caulking Job
- Practice: If you’ve never caulked before, buy an extra cheap tube of caulk and practice on some scrap wood or cardboard. Get a feel for the gun pressure and smoothing technique.
- Work in Sections: Don’t try to caulk a huge, long section at once. Work in manageable lengths (2-3 feet). Apply, smooth, and remove tape (if used) in one section before moving to the next. This prevents the caulk from skinning over before you can smooth it.
- Good Lighting: Make sure you have bright light directed at the area you are working on. This helps you see the gap clearly and ensure you are applying and smoothing the caulk correctly.
- Steady Hand: Take your time and try to keep your hand steady as you move the caulk gun. A steady speed and pressure lead to a more even bead.
Troubleshooting Common Caulking Problems
Even with practice, things can go wrong. Here are some common issues and how to fix them:
Messy or Uneven Line
- Cause: Inconsistent pressure on the caulk gun, shaky hand, not using tape, poor smoothing technique.
- Fix: If the caulk is still wet, wipe it away completely with a rag and the appropriate cleaner (water for acrylic, mineral spirits for silicone) and try again. If it has started to skin or dry, you might need to wait until it cures and then carefully cut away the bad section and redo it. Using painter’s tape is the best way to avoid this issue.
Gaps or Holes in the Bead
- Cause: Moving too fast, not applying enough pressure, air bubbles in the caulk tube, or the tip opening was too small for the gap.
- Fix: If the caulk is still wet, you can try to fill the gap by applying a small amount of caulk directly into the hole and smoothing it in. If the caulk is cured, you’ll need to clean out the problem area and re-caulk that section. Ensure your caulk tip is cut wide enough for the gap size.
Caulk Won’t Stick
- Cause: Surface was not clean, surface was wet, old caulk residue was left behind, using the wrong type of caulk for the material or environment.
- Fix: You must remove the caulk that isn’t sticking. Clean the area very thoroughly, making sure it is completely dry and free of any residue (old caulk, soap scum, grease). Then, apply new caulk. Ensure you are using a suitable caulk type for a kitchen environment, like silicone caulk kitchen backsplash products, known for good adhesion and water resistance.
Caulk Oozing After Releasing Trigger
- Cause: Your caulk gun is not dripless, or you forgot to pull the plunger rod back.
- Fix: Have a rag handy to quickly wipe the tip of the gun after each stop. Get into the habit of pulling the plunger rod back slightly (about half an inch) every time you release the trigger.
Keeping Your Caulk Clean and Sealed
Once your caulk is done and cured, a little care will keep it looking good and working properly for years.
Cleaning the Caulk
Clean your caulk lines regularly as part of your normal kitchen cleaning routine. Mild soap and water are usually enough. Avoid harsh chemicals or abrasive scrubbers, as these can damage the caulk or the seal. If you used caulk with mildew protection, it will resist mold and mildew, but cleaning helps it stay fresh.
Checking for Wear and Tear
Periodically inspect the caulk around your backsplash. Look for:
- Cracks or splits
- Areas pulling away from the backsplash or countertop
- Discoloration that won’t clean off
- Signs of mold or mildew (even with resistant caulk, poor ventilation can sometimes lead to growth)
If you see any of these issues, it’s time to plan for removing old caulk backsplash again and applying a fresh bead. Catching small problems early can prevent water damage.
Frequently Asked Questions (FAQ)
How often should I re-caulk my kitchen backsplash?
There’s no set rule, but check it every year or so. If the caulk looks cracked, stained, or is pulling away, it’s time to replace it. High-traffic areas or places with lots of water might need it more often. Silicone caulk tends to last longer than acrylic latex.
Can I caulk over old caulk?
No, you should never caulk over old caulk. The new caulk will not stick properly to the old caulk, and the seal will fail quickly. You must follow the steps for removing old caulk backsplash completely before applying new caulk.
What’s the difference between caulk and grout?
Grout is used to fill the spaces between tiles. It’s rigid and porous (though it can be sealed). Caulk is used in corners and where different surfaces meet (like tile to countertop). It’s flexible and waterproof, designed to handle slight movements between these surfaces. You might use grout between your backsplash tiles but caulk around the edges.
Can I paint the caulk?
It depends on the type of caulk. Acrylic latex caulk kitchen products are usually paintable. Silicone caulk kitchen backsplash products are generally not paintable. If you need to paint over the seal, make sure you choose a paintable caulk.
Is clear caulk truly invisible?
Clear caulk is translucent and less visible than colored caulk. However, you will still see the bead itself, and over time, it can sometimes become slightly cloudy or pick up dirt, making it more noticeable. It’s a good choice if you want the caulk to blend in as much as possible.
What if the gap is very large?
Standard caulk is designed for gaps up to about 1/4 inch. For larger gaps, you might need a backer rod (a foam material inserted into the gap before caulking) to provide support and reduce the amount of caulk needed. Check the caulk tube for the maximum gap width it can fill.
Wrapping Up
Caulking your kitchen backsplash is a job you can definitely do yourself. By taking the time to prepare the area, choose the right caulk, and follow these steps carefully, you can create a durable, waterproof seal that protects your kitchen and looks great. Learning how to seal gap between backsplash and countertop is a basic home skill that saves you from potential water damage down the road. So gather your tools, pick your caulk color for backsplash, and get ready to make your kitchen look its best!