Can you build a kitchen counter frame yourself? Yes, absolutely! Building a DIY kitchen counter frame is a rewarding project for any homeowner looking to create custom kitchen counters or upgrade their existing kitchen island frame. This guide will walk you through the process of wood frame construction for your countertop support structure, ensuring a solid foundation for your chosen countertop material.
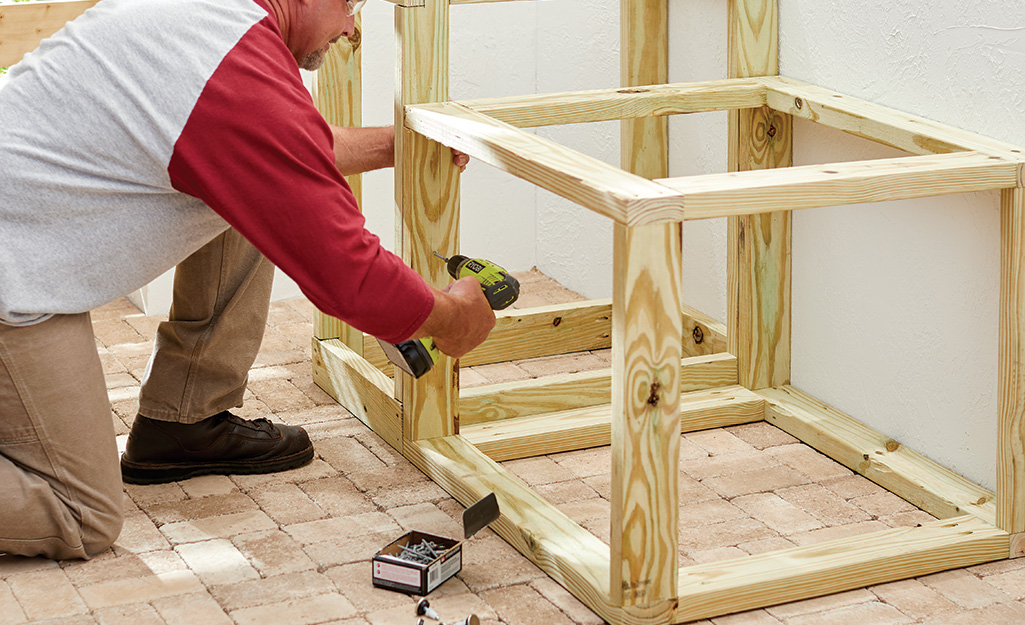
Image Source: contentgrid.homedepot-static.com
Why Build Your Own Kitchen Counter Frame?
Building your own kitchen counter frame offers a unique blend of cost savings and personalization. When you opt for a DIY approach, you gain complete control over the design, dimensions, and materials used. This allows you to tailor your custom kitchen counters precisely to your kitchen’s layout and your aesthetic preferences. You can create a kitchen island frame that perfectly fits your space or design a unique U-shaped counter that maximizes your workflow.
Beyond aesthetics, a well-built frame is crucial for the longevity and functionality of your countertops. A robust countertop support structure prevents sagging, cracking, and other issues that can arise from inadequate support, especially with heavier materials like granite or quartz. By mastering the art of framing a countertop, you not only save money on labor but also ensure a high-quality, durable foundation for your kitchen workspace. This guide focuses on DIY kitchen counter frame construction, providing step-by-step instructions for a successful build.
Planning Your Kitchen Counter Frame
Proper planning is the cornerstone of any successful DIY project. Before you pick up a saw, take time to map out your design and gather the necessary materials. This phase will save you headaches and potential mistakes down the line.
Measuring Your Space
The first step is to accurately measure the area where your new counter will go.
* Length: Measure the total length of the counter run.
* Depth: Determine the desired depth. Standard kitchen counter depth is typically 24 inches, but you might want more for a seating area or less for a specific layout.
* Height: Decide on the counter height. The standard height is 36 inches, but this can be adjusted for bar seating or accessibility needs. Remember to factor in the thickness of your countertop material when calculating the frame height.
* Obstructions: Note the location of sinks, cooktops, cabinets, appliances, electrical outlets, and plumbing. These will influence your framing design.
Sketching Your Design
Create a detailed sketch of your counter frame. This doesn’t need to be a professional blueprint, but it should clearly show:
* The overall dimensions (length, width, height).
* The placement of any support beams or knee walls.
* The locations of sink cutouts or appliance openings.
* How the frame will connect to existing walls or cabinets.
This sketch will be your roadmap throughout the construction process. It’s also helpful for calculating the amount of lumber you’ll need.
Material Selection
The primary material for your wood frame construction will be lumber.
* Framing Lumber: Typically, you’ll use 2×4 or 2×6 dimensional lumber. The size you choose will depend on the desired strength and the weight of your countertop. For standard laminate or butcher block countertops, 2x4s are usually sufficient. For heavier materials like granite or quartz, 2x6s provide a more robust countertop support structure.
* Plywood or OSB: You’ll use plywood or OSB (Oriented Strand Board) as the countertop substrate, providing a smooth, stable surface for your final countertop material. A ¾-inch thickness is recommended for most applications.
* Screws: Use appropriate wood screws for framing. 2 ½-inch and 3-inch screws are commonly used for joining 2x lumber.
* Adhesive: Wood glue can add extra strength to your joints.
Tool Checklist
Before you begin, ensure you have the following tools:
* Tape Measure
* Pencil
* Safety Glasses
* Circular Saw or Miter Saw
* Drill/Driver with assorted bits
* Level (4-foot is ideal)
* Speed Square or Combination Square
* Clamps
* Optional: Stud Finder (if attaching to existing walls)
Building the Base Frame
The base frame forms the foundation of your counter. This is where you’ll create the main structure that supports the weight and defines the shape of your counter.
Step 1: Cutting Your Lumber
Based on your design sketch and measurements, cut your lumber to the required lengths. Precision is key here; ensure your cuts are square for strong, stable joints.
- Longer Pieces: These will form the front, back, and any parallel support runs.
- Shorter Pieces: These will create the ends and any internal bracing.
Step 2: Assembling the Base Walls
You’ll typically build your frame in sections, often resembling short walls.
- Lay out your pieces: Arrange the top and bottom plates and the vertical studs for one section of your frame on a flat surface.
- Attach the top and bottom plates: Use screws to attach the studs to the top and bottom plates. A common framing technique is to place studs every 16 inches on center, but for counter framing, you might place them closer together (e.g., every 8 or 12 inches) for extra strength.
- Secure the corners: Ensure your corners are square using a speed square. Drive screws through the plates into the ends of the studs.
If you are building a longer counter run, you might create multiple wall sections and then connect them. For a kitchen island frame, you’ll be building a freestanding box-like structure.
Step 3: Connecting Frame Sections
If your counter is longer than a single section, you’ll need to connect them.
- Position sections: Place your assembled frame sections in their intended location.
- Join them: Use screws to join the end studs of adjacent sections together. Ensure they are flush and square.
Step 4: Adding Internal Supports and Bracing
This is where you reinforce the structure for your countertop support structure.
- Mid-Span Supports: For longer spans, add intermediate vertical supports between the front and back plates. These help prevent the top from sagging under the weight of the countertop substrate.
- Horizontal Bracing: Install horizontal braces between vertical studs, especially in areas where the countertop will be supported or where you need to attach the countertop substrate securely.
- Corner Braces: Add diagonal braces in the corners for added rigidity, particularly for a freestanding kitchen island frame.
Table 1: Common Lumber Sizes and Their Uses in Counter Framing
| Lumber Size | Typical Use in Counter Framing | Notes |
|---|---|---|
| 2×4 | Base frame, internal bracing, standard counter support | Suitable for laminate, butcher block, and some engineered stone. |
| 2×6 | Heavily reinforced base frame, support for heavy stone countertops | Provides superior strength and rigidity for granite, quartz, and concrete countertops. |
| ¾-inch Plywood/OSB | Countertop substrate, surface for attaching countertop | Essential for a smooth, stable surface for the final countertop material. |
Incorporating Specific Features
Your kitchen counter might need to accommodate sinks, cooktops, or seating areas. These require specific framing considerations.
Sink and Cooktop Cutouts
If you’re installing a sink or cooktop, you’ll need to frame openings for them.
- Measure precisely: Use the template provided with your sink or cooktop to mark the exact cutout dimensions on your frame’s top plate.
- Create header and cripples: Frame the opening with a “header” beam (a doubled-up piece of lumber, usually 2×4 or 2×6) across the top of the opening, supported by short vertical studs called “cripples” on either side. This header carries the load that would normally be supported by the studs within the opening.
- Reinforce edges: Add extra blocking around the perimeter of the opening to provide support for the sink or cooktop and to allow for secure attachment of the countertop substrate.
Seating Overhangs
If your counter design includes an overhang for bar seating, you’ll need to strengthen the frame in that area.
- Extended Supports: Run longer pieces of lumber from the main counter frame out to the edge of the overhang.
- Double Up: For significant overhangs, double up these support beams or use 2×6 lumber.
- Knee Bracing: Consider adding angled knee braces from the vertical supports to the underside of the overhang supports for maximum stability. The longer the overhang, the more robust the support needs to be.
Attaching to Existing Walls
If your counter is a straight run against a wall, you’ll need to secure it to the wall studs.
- Locate Studs: Use a stud finder to locate the wall studs behind where your counter frame will sit.
- Secure Front Plate: Screw the front plate of your counter frame directly into the wall studs. Use long, sturdy screws that will penetrate the drywall and securely anchor into the studs.
- Leveling: Ensure your frame is perfectly level as you attach it to the wall. Shims can be used if the wall is not perfectly plumb.
Installing the Countertop Substrate
Once the base frame is complete and sturdy, it’s time to install the countertop substrate. This is the layer that your actual countertop material will sit on.
Step 1: Cutting the Plywood or OSB
Measure the dimensions of your frame. Cut your ¾-inch plywood or OSB to fit snugly over the entire frame.
- Precision is Key: Ensure your cuts are accurate. If you have sink or cooktop openings, cut those out of the substrate as well.
- Grain Direction: For plywood, running the grain of the top layer perpendicular to the main supporting joists can add stiffness.
Step 2: Attaching the Substrate
- Position the Sheet: Lay the cut plywood or OSB over the frame. Ensure it’s flush with the edges of the frame.
- Apply Adhesive (Optional but Recommended): Spread a bead of wood glue along the top edges of all the framing members. This adds strength and prevents squeaks.
- Secure with Screws: Use 1 ¼-inch or 1 ½-inch wood screws to attach the substrate to the frame. Place screws every 6-8 inches along the edges and every 10-12 inches in the field (across the surface) to ensure a solid connection.
- Sink/Cooktop Openings: Make sure to screw securely around the edges of any cutouts for sinks or cooktops. This provides a solid lip for these fixtures.
Final Checks and Considerations
Before your frame is ready for the countertop, perform a few final checks.
Level and Square
Use your level to check that the entire frame is level in all directions. Ensure that corners are still square. Make any necessary adjustments by adding shims or slightly adjusting screw connections. A level and square frame is critical for a professional-looking finished product.
Stability Test
Gently push and pull on the frame. It should feel solid and rigid, with no wobbling or excessive flex. If you find any areas that feel weak, add more bracing or screws.
Countertop Weight
Always consider the weight of your chosen countertop material.
* Laminate: Relatively light.
* Butcher Block: Moderate weight.
* Quartz/Granite: Very heavy and require robust framing.
* Concrete: Can be extremely heavy.
If you’re using heavy materials, consider using 2×6 lumber for your framing and increasing the density of your internal supports to ensure adequate countertop support structure.
Plumbing and Electrical Access
Plan for any plumbing or electrical work that needs to run through or under your counter. You might need to leave gaps in the framing or install access panels. It’s often easier to do this during the framing stage rather than trying to retrofit later.
Building Kitchen Cabinets as Part of Your Frame
Sometimes, the counter frame is integrated with building kitchen cabinets. In this scenario, the cabinets themselves provide the primary support, and the counter frame is essentially the top structure that holds the countertop substrate and the final countertop.
If your design involves building cabinets from scratch as part of your counter project, the process will be more involved:
- Cabinet Box Construction: Build sturdy cabinet boxes using plywood or MDF. These boxes will be the main structural elements.
- Placement and Leveling: Position and level your cabinet boxes precisely where they will go. Secure them to the floor and any adjacent cabinets.
- Countertop Support Beams: Install horizontal support beams (often 2x4s) on top of the cabinet boxes, spanning from front to back. These beams are crucial for providing even support across the entire length of the countertop.
- Overlapping Support: Ensure these support beams overlap the front and back edges of the cabinet boxes to distribute weight effectively.
- Securing the Substrate: Attach the plywood or OSB substrate to these top support beams using glue and screws, just as described earlier.
This integrated approach creates a cohesive and highly durable kitchen workspace. The cabinet frame becomes an integral part of the overall counter support structure.
Frequently Asked Questions (FAQ)
Q: What is the best type of wood for framing a kitchen counter?
A: For most kitchen counter frames, standard construction-grade lumber like pine or fir in 2×4 or 2×6 dimensions is suitable. The specific choice depends on the weight of your countertop material and the span of your counter.
Q: How far apart should studs be in a kitchen counter frame?
A: While standard wall framing uses studs 16 inches on center, for a kitchen counter frame, it’s often recommended to place studs closer, around 8 to 12 inches on center, especially for heavier countertops, to ensure robust support.
Q: Do I need a sub-countertop if I’m using a butcher block countertop?
A: Yes, it’s highly recommended. While butcher block is strong, a plywood or OSB countertop substrate provides a perfectly flat and stable surface, preventing any potential warping of the butcher block due to uneven support from the frame.
Q: Can I build a kitchen counter frame directly on a concrete floor?
A: Yes, you can. You would still build your wood frame as described and then secure it to the concrete floor using concrete anchors and appropriate screws. Ensure the concrete floor is clean and level before starting.
Q: How do I ensure my DIY kitchen counter frame is strong enough for granite?
A: For granite or other heavy stone countertops, use 2×6 lumber for your framing. Increase the density of your internal supports, placing them closer together (e.g., every 8 inches). Ensure all joints are well-secured with screws and consider adding diagonal bracing for extra rigidity. The countertop support structure must be exceptionally sturdy.
Q: What is the standard height for a kitchen counter?
A: The standard kitchen counter height is 36 inches from the finished floor to the top surface of the countertop. However, this can be customized based on your needs, such as creating a breakfast bar or accommodating specific appliance heights.
Building your own kitchen counter frame is a manageable and cost-effective way to achieve the kitchen of your dreams. By following these detailed steps, planning carefully, and taking your time, you can create a durable and beautiful foundation for your custom kitchen counters.