Can you paint laminate kitchen cabinets? Yes, you absolutely can! With the right preparation and materials, painting laminate cabinets is a fantastic way to give your kitchen a fresh, updated look without the high cost of replacing them. This comprehensive DIY guide will walk you through every step, ensuring a beautiful and durable finish for your laminate kitchen cabinet update. Get ready for a significant laminate cabinet refinishing project that will transform your space.
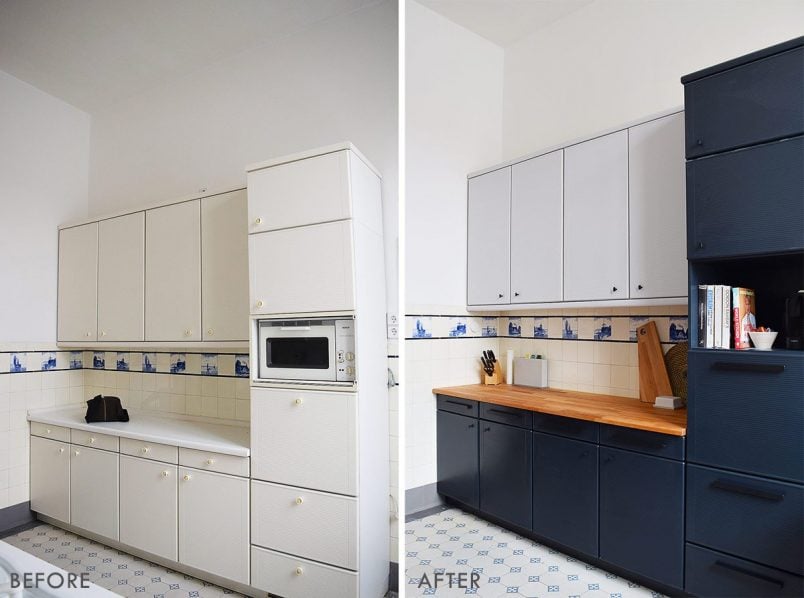
Image Source: www.littlehouseonthecorner.com
Why Paint Your Laminate Cabinets?
Laminate cabinets, while often budget-friendly, can sometimes feel dated or lack the charm of solid wood. They might have a faux wood grain that doesn’t quite match your style, or the finish could be worn from years of use. Painting offers a simple yet impactful solution.
- Cost-Effective: Replacing kitchen cabinets is a major expense. Painting is a fraction of the cost.
- Customization: You can choose any color to perfectly match your kitchen decor.
- Modernization: A new coat of paint can instantly make older cabinets look brand new and stylish.
- Durability: With proper techniques, painted laminate cabinets can be as durable as their original finish.
This project is a classic example of DIY cabinet painting that yields impressive results, bringing a whole new life to your laminate kitchen cabinet update.
Fathoming the Project Scope
Before you dive in, it’s important to grasp the effort involved. Laminate cabinet refinishing requires patience and attention to detail, especially during the preparation phase. Rushing this process can lead to peeling or chipping paint down the line. Think of it as a marathon, not a sprint.
Essential Materials for Painting Laminate Cabinets
Gathering the right supplies is crucial for a successful laminate cabinet makeover. Here’s a breakdown of what you’ll need:
For Preparation:
- Screwdrivers or Drill: To remove cabinet doors and hardware.
- Degreaser/All-Purpose Cleaner: For thorough cleaning.
- TSP (Trisodium Phosphate) or a TSP Substitute: For deep cleaning and degreasing.
- Sanding Sponges or Fine-Grit Sandpaper (150-220 grit): For scuff-sanding.
- Orbital Sander (Optional): Speeds up the sanding process.
- Tack Cloths: To remove dust after sanding.
- Painter’s Tape: To protect surrounding areas.
- Drop Cloths or Plastic Sheeting: To protect floors and countertops.
- Safety Glasses and Gloves: For protection.
- Denatured Alcohol or Mineral Spirits: For final cleaning.
For Painting:
- Primer: Specifically formulated for laminate or slick surfaces.
- Paint: High-quality paint suitable for cabinets.
- Paint Rollers: Small foam rollers for smooth surfaces.
- Paint Brushes: High-quality angled brushes for cutting in and detail work.
- Paint Tray: For rollers.
- Paint Sprayer (Optional): For the smoothest finish, but requires more practice and setup.
- Stir Sticks: To mix paint.
Deciphering the Preparation Steps: The Key to Success
This is arguably the most important phase of how to paint laminate. Proper prepping laminate for paint ensures adhesion and longevity. Skip or rush these steps, and your beautiful paint job won’t last.
Step 1: Remove Doors, Drawers, and Hardware
- Start by removing all cabinet doors and drawer fronts.
- Keep track of which door belongs to which cabinet opening. You can use painter’s tape and a numbering system (e.g., label the back of the door and the inside of the cabinet frame with the same number).
- Remove all hinges, handles, and knobs. Store them in a safe place, perhaps in a labeled bag.
Step 2: Thorough Cleaning is Paramount
Laminate surfaces can accumulate grease and grime, especially in a kitchen.
- Initial Wash: Use a good degreaser or all-purpose cleaner mixed with warm water. Scrub all surfaces of the doors, drawer fronts, and the cabinet frames.
- Deep Clean with TSP: For a truly deep clean, use TSP or a TSP substitute. Follow the manufacturer’s instructions carefully, wear gloves and eye protection. TSP is excellent at removing stubborn grease and residues that can prevent paint from adhering. Rinse thoroughly with clean water and allow everything to dry completely.
- Final Wipe-Down: After drying, wipe down all surfaces with denatured alcohol or mineral spirits on a clean cloth. This removes any lingering oils or residues.
Why is this cleaning so important? Think of it like trying to stick tape to a greasy surface – it won’t hold well. The same principle applies to paint. Any oil or dirt left behind will create a barrier, causing the paint to peel or chip. This meticulous cleaning is the first vital step in laminate cabinet preparation.
Step 3: Scuff-Sanding for Adhesion
Laminate has a smooth, non-porous surface, which makes it difficult for paint to grip. Scuff-sanding creates a microscopic profile that the primer and paint can adhere to.
- Choose Your Grit: Use a fine-grit sandpaper or sanding sponge, typically between 150 and 220 grit. You’re not trying to remove the laminate finish, just to create a dull, matte surface.
- Gentle Sanding: Lightly sand all surfaces that will be painted. Go over the entire surface of each door, drawer front, and cabinet frame. Apply even pressure.
- Work in Sections: This makes the process less overwhelming.
- Dust Removal: After sanding each section, immediately use a tack cloth or a vacuum with a brush attachment to remove all the dust. Dust left on the surface will also hinder adhesion.
Tip: Test the sanding on an inconspicuous area first to ensure you’re not damaging the laminate too aggressively. The goal is to create “tooth” for the primer, not to remove the laminate itself. This step is crucial for laminate cabinet refinishing to ensure the new finish bonds properly.
Step 4: Repairing Imperfections
While you’re in the prep stage, take a moment to look for any chips, dents, or deep scratches in the laminate.
- Small Chips/Dents: You can often fill these with a good quality wood filler that can be sanded smooth. Apply the filler, let it dry completely, and then sand it flush with the surface.
- Deep Scratches: For deeper scratches, you might need to build up the filler in thin layers, allowing each to dry and sanding in between.
Ensure all repaired areas are completely dry and sanded smooth before proceeding.
Step 5: Masking Off Unpainted Areas
Protect any areas you don’t want to paint.
- Hardware Holes: If you plan to reuse your existing hardware in the same locations, you can leave the screws slightly in the holes or cover them with painter’s tape to prevent paint from filling them.
- Cabinet Interiors: Unless you’re painting the inside of your cabinets, carefully tape off the edges of the cabinet frames.
- Countertops and Appliances: Cover countertops, backsplashes, and appliances with drop cloths or plastic sheeting, securing them with painter’s tape.
Priming: The Foundation of a Lasting Finish
Primer is non-negotiable when painting laminate cabinets. It acts as a bonding agent, ensuring your paint adheres securely to the slick laminate surface. Without it, your paint job is likely to chip and peel.
Choosing the Right Primer
Not all primers are created equal, especially for laminate.
- Adhesion Primer: Look for a high-quality adhesion primer specifically designed for slick surfaces, melamine, or laminate. Brands like Kilz Adhesion, Zinsser B-I-N Shellac-Based Primer, or Sherwin-Williams Extreme Bond™ Primer are excellent choices. Shellac-based primers are known for their superior adhesion and stain-blocking properties.
- Water-Based vs. Oil-Based: While water-based options exist, oil-based or shellac-based primers generally offer better adhesion on challenging surfaces like laminate.
Applying the Primer
- Stir Thoroughly: Always stir your primer well before and during use.
- Apply Thin, Even Coats: Use a high-quality synthetic bristle brush for edges and tight spots, and a foam roller for flat surfaces. Apply the primer in thin, even coats. Avoid overloading the brush or roller, as this can lead to drips and an uneven finish.
- Coverage: Two thin coats of primer are usually better than one thick coat. Ensure you achieve full coverage without any shiny spots.
- Drying Time: Allow each coat of primer to dry completely according to the manufacturer’s instructions. This is crucial for proper adhesion. Typically, this can range from 1 to 4 hours, but some primers may require longer.
- Light Sanding Between Coats (Optional but Recommended): Once the first coat of primer is completely dry, lightly scuff-sand the surface with a fine-grit sanding sponge (220-320 grit). This smooths out any imperfections and helps the second coat adhere better. Wipe away dust with a tack cloth before applying the second coat.
This prepping laminate for paint stage, including priming, is what makes or breaks your laminate cabinet makeover.
Selecting the Best Paint for Laminate Cabinets
Choosing the best paint for laminate is just as important as the primer. You need a durable, scuff-resistant paint that can withstand kitchen wear and tear.
Paint Types to Consider:
- Cabinet Paint: Many paint brands offer “cabinet paint” formulas. These are typically acrylic or alkyd (oil-based) enamels that are designed for durability and a smooth finish.
- Acrylic Enamel (Water-Based): High-quality acrylic enamels are a popular choice for DIYers. They offer good durability, are easy to clean up with soap and water, and have lower VOCs (volatile organic compounds) than oil-based paints. Look for “cabinet and trim” or “furniture” paints.
- Alkyd Enamel (Oil-Based): Oil-based paints offer exceptional hardness and durability, making them very resistant to chipping and scratching. However, they require mineral spirits for cleanup, have stronger fumes, and can yellow over time, especially in lighter colors.
- Hybrid Enamels (Waterborne Alkyds): These paints combine the benefits of both water-based and oil-based paints. They offer excellent adhesion, durability, and a smooth finish, with easier cleanup. They are often a fantastic choice for painting laminate cabinets.
Sheen Options:
- Satin: A popular choice for cabinets. It has a slight sheen, is easy to clean, and hides minor imperfections better than higher gloss levels.
- Semi-Gloss: Offers good durability and is very easy to wipe down. It has a noticeable shine.
- Gloss: The most durable and easiest to clean, but it will highlight every single imperfection on the surface.
For most laminate cupboard painting projects, a satin or semi-gloss finish is recommended.
The Painting Process: Achieving a Smooth Finish
With your prep work done and primer dry, it’s time for the main event: how to paint laminate.
Step 1: Stir Your Paint
Never shake your paint can; always stir it thoroughly with a stir stick. Stir from the bottom up to ensure all the pigment is mixed in.
Step 2: Apply the First Coat of Paint
- Rollers: Use a high-quality foam roller designed for smooth surfaces. Load the roller evenly with paint, avoiding too much pressure. Roll in a consistent direction. For doors and drawer fronts, work from top to bottom or side to side in long, even strokes.
- Brushes: Use a good quality angled brush for cutting in around edges and for any details. Load the brush with paint and apply in smooth, even strokes. For cabinet frames, use the brush to get into corners and edges, then use the roller to fill in the larger flat areas.
- Work in Sections: Paint one door or drawer front at a time, or work on one section of the cabinet frame at a time.
Step 3: Drying Between Coats
Allow the first coat of paint to dry completely according to the manufacturer’s instructions. This is crucial for proper adhesion between layers. Don’t rush this step.
Step 4: Light Sanding Between Coats (Optional but Recommended)
For an ultra-smooth finish, lightly scuff-sand the dried paint with a fine-grit sanding sponge (220-320 grit). This knocks down any dust nibs or minor imperfections. Use a tack cloth to remove all dust.
Step 5: Apply Subsequent Coats
Apply a second coat of paint, following the same technique as the first. Depending on the paint color and coverage, you may need a third coat. Two to three thin coats are usually ideal for achieving a durable and professional-looking finish.
Tip for Spraying: If you’re using a paint sprayer, ensure you follow the manufacturer’s instructions for setup and application. Practice on scrap material first. Spraying offers the smoothest finish but requires practice to avoid drips and uneven coverage.
Reassembling and Enjoying Your Renewed Cabinets
Once the final coat of paint is dry, you can reassemble your kitchen.
Step 1: Reattach Hardware
Carefully reattach your hinges, handles, and knobs. If you opted for new hardware, now is the time to install it.
Step 2: Rehang Doors and Reinsert Drawers
- Use your numbering system to put each door back on its original cabinet.
- Reinsert the drawers.
- Adjust hinges as needed to ensure doors hang straight and close properly.
Step 3: Clean Up
Remove all painter’s tape and drop cloths. Clean your brushes and rollers thoroughly with the appropriate cleaner (water for latex, mineral spirits for oil-based).
Step 4: Curing Time
While your cabinets will feel dry to the touch within hours, paint needs time to fully cure and harden. This can take anywhere from 7 to 30 days, depending on the paint type. During this curing period, be extra gentle with your cabinets. Avoid abrasive cleaners or heavy scrubbing.
Congratulations! You’ve successfully completed your laminate cabinet makeover and achieved a beautiful laminate kitchen cabinet update. This entire process, from prepping laminate for paint to the final coat, has transformed your kitchen.
Tips for a Flawless Laminate Cabinet Painting Project
- Good Lighting: Ensure you have excellent lighting in your workspace. This helps you see imperfections and apply paint evenly.
- Ventilation: Work in a well-ventilated area, especially when using oil-based products or spraying. Open windows and doors, or use fans.
- Patience is Key: Don’t rush any step, especially drying times between coats of primer and paint.
- Test Color Samples: Before committing to a color, paint swatches on scrap wood or the back of a cabinet door to see how the color looks in your kitchen’s lighting.
- Invest in Quality Tools: Cheap brushes and rollers can leave streaks and an uneven finish. Opt for high-quality tools for a professional look.
- Clean Up Spills Immediately: Paint is much harder to remove once it has dried.
Frequently Asked Questions (FAQ)
Q1: Will paint adhere to laminate cabinets without sanding?
While some “no-sand” primers claim to work, the consensus among professionals and experienced DIYers is that sanding laminate for paint is essential for long-term adhesion. Laminate is a non-porous surface, and scuff-sanding creates the necessary texture for primer and paint to grip effectively. Skipping this step significantly increases the risk of peeling.
Q2: What is the best type of paint for laminate cabinets?
The best paint for laminate is typically a high-quality acrylic enamel, a hybrid enamel (waterborne alkyd), or a durable cabinet enamel. These offer good adhesion, durability, and are resistant to chipping and wear. A satin or semi-gloss sheen is generally recommended for practicality and ease of cleaning in a kitchen environment.
Q3: How many coats of primer do I need for laminate cabinets?
It is generally recommended to apply at least two thin, even coats of a high-quality adhesion primer specifically designed for slick surfaces. This ensures complete coverage and creates a solid base for your paint.
Q4: Can I paint over laminate without removing the doors?
While you could technically paint the cabinet boxes with the doors attached, it’s highly recommended to remove them. Removing the doors allows for a much more thorough and even application of primer and paint on all surfaces. It also prevents paint from getting on hinges and creates a much cleaner, professional finish. This is crucial for successful DIY cabinet painting.
Q5: How long do painted laminate cabinets last?
With proper prepping laminate for paint, the use of a good adhesion primer, and high-quality cabinet paint, your painted laminate cabinets can last for many years. The lifespan depends on the quality of materials used, the thoroughness of the prep work, and how the cabinets are cared for (e.g., using gentle cleaning methods).
Q6: What grit sandpaper should I use for prepping laminate?
For laminate cabinet preparation, a fine-grit sandpaper or sanding sponge in the range of 150-220 grit is ideal. You are scuff-sanding to create a matte surface for adhesion, not to remove the laminate itself. After priming and between paint coats, 220-320 grit is suitable for a smooth finish.
Q7: Is it hard to paint laminate kitchen cabinets?
Painting laminate cabinets is a moderately challenging DIY project. The most critical and time-consuming part is the preparation – thorough cleaning and scuff-sanding. The actual painting process is more straightforward, but requires patience to apply thin, even coats. With careful attention to detail, most DIYers can achieve excellent results in their laminate cupboard painting.
By following these detailed steps, you can confidently transform your laminate kitchen cabinets into a beautiful, updated feature of your home. Enjoy your fresh new look!