Image Source: www.cedars-sinai.org
How Do You Make A Kitchen Kosher: Step-by-Step Process
To make a kitchen kosher, you need to clean it thoroughly and perform a special process called kashering kitchen. This process removes any non-kosher absorbed flavors from surfaces and appliances. Once kashered, the kitchen must follow strict kosher kitchen rules, especially separating meat and dairy kitchen items and foods.
Setting up a kosher kitchen and keeping a kosher home follows Jewish dietary laws, known as kashrut. These laws cover which foods can be eaten and how food must be prepared. For a kitchen to be kosher, it cannot mix meat and dairy, and items used for one type of food cannot be used for the other unless specifically kashered or if they are neutral (parve). This means kitchens often have separate sets of dishes, pots, pans, and utensils for meat meals and dairy meals. Some people also have a third set for parve foods, or use their meat or dairy dishes for parve.
This guide walks you through the steps needed for kashering kitchen and then how to maintain it by following the kosher kitchen rules and the principles of separating meat and dairy kitchen.
Getting Ready to Kasher
Before you can kasher a kitchen, you must clean everything completely. This is a crucial first step. No food residue, dirt, or grease can remain on any surface, appliance, or utensil you plan to kasher.
Deep Cleaning Your Kitchen
Think of this as the most thorough cleaning your kitchen has ever had.
* Empty all cabinets and the refrigerator.
* Clean inside cabinets, drawers, and the pantry.
* Wash walls, floors, and countertops.
* Clean the sink, faucet, and drain.
* Scrub the stovetop and oven.
* Clean the microwave inside and out.
* Clean the refrigerator and freezer.
* Wash all utensils, pots, pans, and dishes you might keep and kasher (or set aside those you won’t kasher).
Any item that is not clean cannot be kashered. Leftover food or grease stops the kashering process from working. Use strong cleaners if needed to get everything spotless.
Clearing Out Non-Kosher Items
Jewish law says certain foods are not kosher. These include pork, shellfish, and mixtures of meat and milk. Food items that were cooked or prepared with non-kosher ingredients or non-kosher methods cannot be used in a kosher kitchen.
Before you kasher, you must remove all non-kosher food from your kitchen.
* Check labels carefully. Look for a kosher certification mark (hechsher).
* Discard any food without a reliable kosher certification.
* Give away unopened non-kosher food if you prefer not to waste it.
* Remember that even kosher ingredients cooked together in a non-kosher pot become non-kosher if the pot absorbed non-kosher flavor.
You also need to decide what kitchenware (pots, pans, dishes, utensils) you will keep and make kosher. Some items, like certain types of plastic or ceramic dishes, cannot be kashered if they have been used with hot non-kosher food. Metal, glass (in some cases), and some types of plastic can often be kashered.
Learning About Kashering Methods
The way you kasher something depends on how it was used with non-kosher food. The rule is: the way it absorbed non-kosher taste is the way you get that taste out.
There are a few main methods for kashering appliances and utensils:
- Hagalah (Boiling): This is used for items that absorbed non-kosher flavor through hot liquids, like pots, pans, and utensils used in boiling or simmering. The item is cleaned and then dipped into a pot of rolling boiling water.
- Libbun Gamur (Intense Heating/Blowtorching): This method uses direct fire or very high heat until the surface glows. It’s needed for things that absorbed non-kosher flavors directly from fire, like grill grates or oven racks that had food baked directly on them.
- Libbun Kal (Lighter Heating/Self-Cleaning Oven): This involves heating the item until paper would burn on contact. It’s used for things that absorbed flavor through dry heat, like oven interiors or stovetop grates. A self-cleaning oven cycle often achieves this.
- Irui Kal Bo Revach (Pouring Boiling Water): This is used for countertops and sinks where hot non-kosher liquids might have been poured or spilled. Boiling water is poured over the clean surface. For sinks, a hot stone or piece of metal is often put in the drain while pouring.
- Wiping Down/Cleaning: For items only used with cold non-kosher food, or surfaces like refrigerator interiors, a thorough cleaning is usually enough, though some opinions require waiting 24 hours after cleaning before use.
You need to figure out which method applies to each part of your kitchen.
Kashering Specific Kitchen Areas
Now, let’s go through kashering kitchen areas step by step. Remember, everything must be spotlessly clean first.
Kashering the Stovetop
The stovetop absorbs flavors mainly through spills and heat.
- Cleaning: Remove grates and burners. Clean the surface thoroughly, removing all spills and grease. Clean the grates and burner caps too.
- Method: The grates and burner caps, which get very hot, need Libbun Kal. You can put them in a self-cleaning oven cycle (if they are safe for that) or heat them with a blowtorch until they are hot enough to burn paper on contact. The stovetop surface itself usually needs Irui Kal Bo Revach. Pour boiling water over the entire cleaned surface. If it’s a gas stove, run the burners on high for a while. If it’s electric, heat the elements until they glow.
Koshering Oven
Ovens absorb flavors through baking and broiling.
- Cleaning: Clean the oven interior completely. Remove racks and side panels if possible and clean behind them. Scrape off all baked-on food and grease. Clean the door and the glass.
- Method: The most common and effective way to koshering oven is using the self-cleaning cycle. This cycle reaches very high temperatures (Libbun Kal) which purify the oven cavity and racks. If your oven does not have a self-cleaning cycle, you would need to heat it to its highest temperature for a significant amount of time (e.g., an hour) and kasher the racks separately with Libbun Gamur (blowtorching) if food baked directly on them, or Libbun Kal if they were just under food in pans. Libbun Gamur is intense; Libbun Kal is usually sufficient for oven interiors and racks unless food touched the rack directly under intense heat (like broiling). For standard baking, Libbun Kal (self-cleaning or highest heat) for the oven interior and racks is common practice.
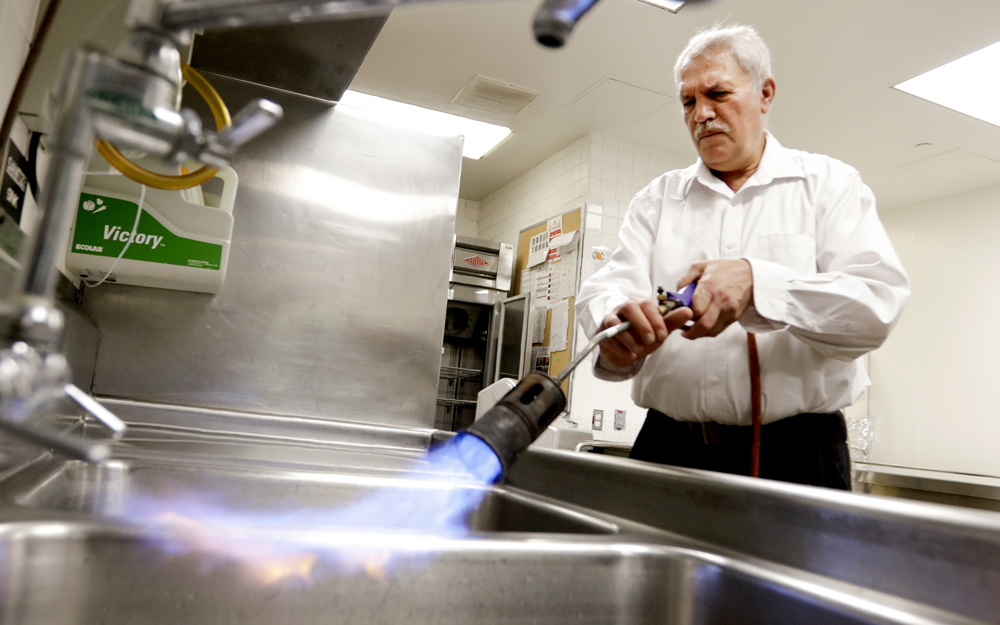
Koshering Sink
The sink is tricky because both hot and cold non-kosher food and water go into it.
- Cleaning: Clean the sink thoroughly. Scrub the basin, sides, and faucet. Clean the drain and disposal (if you have one).
- Method: The most accepted method for koshering sink is Irui Kal Bo Revach. Pour rolling boiling water over every surface of the sink. To make it more effective, heat a clean stone or piece of metal on the stovetop until it’s very hot, then place it in the sink basin (especially near the drain) while pouring the boiling water. The heat from the stone helps draw out absorbed flavors. The faucet also needs boiling water poured over it. After kashering, many people only use a basin insert or rack in the sink to avoid direct contact of dishes with the sink surface when using hot water.
Kashering Countertops and Tables
Countertops and tables come into contact with food directly, both hot and cold.
- Cleaning: Clean all surfaces completely. Remove crumbs, spills, and grease.
- Method: If hot non-kosher food or liquids touched the surface, you need Irui Kal Bo Revach. Pour rolling boiling water over the entire surface. Some people pour, wait a bit, and pour again. For edges and areas boiling water might not reach well, you might need to use a heated stone/metal or even a blowtorch lightly (be very careful depending on the material!). If the surface only ever had cold non-kosher food on it, a thorough cleaning might be enough, but Irui Kal Bo Revach is safer and often required. Formica and some other materials can be kashered this way. Wood surfaces can sometimes be kashered by sanding away a layer. Stone countertops are often kashered with boiling water.
Kashering Microwave
Microwaves heat food through radiation, not direct heat or liquid contact in the same way as an oven or stovetop.
- Cleaning: Clean the interior thoroughly, including the turntable and support. Remove all food splatters.
- Method: The common method for kashering appliances like a microwave involves cleaning, waiting 24 hours, and then heating water inside it. Place a cup of water in the microwave and heat it until the water boils and the microwave cavity fills with steam. Let the steam sit for a few minutes. The turntable and support should also be cleaned and then heated in this steamy environment or kashered with boiling water (Hagalah) if they are materials that allow it.
Kashering Refrigerator and Freezer
Refrigerators and freezers are typically only used for cold food.
- Cleaning: Empty completely. Clean all shelves, walls, doors, and drawers thoroughly. Use a strong cleaner.
- Method: Since these appliances are only used with cold food, the method is simply a very thorough cleaning. Some people follow the cleaning with a 24-hour waiting period before putting kosher food inside.
Kashering Dishwasher
Dishwashers are complicated because they mix water, heat, and potentially both meat and dairy dishes.
- Cleaning: Clean the dishwasher thoroughly, including filters, spray arms, and the interior walls and door. Run a cycle with a dishwasher cleaner.
- Method: Opinions vary greatly on kashering appliances like dishwashers, and some say it’s not possible to truly kasher one that was used for both meat and dairy. If it was only used for one type (e.g., non-kosher but parve, or only non-kosher meat or dairy), it might be kashered. One method involves cleaning, waiting 24 hours, and then running three empty cycles on the hottest setting with detergent. However, many simply designate the dishwasher as meat or dairy after kashering, or use separate racks/times for meat and dairy dishes (though this last method has many complexities and is often not recommended). Often, it’s simpler to have separate dishwashers if you want to use one for both meat and dairy dishes.
Purging Utensils Kosher
Purging utensils kosher is a key part of kashering kitchen. Utensils absorb taste from the food they touch, especially when hot.
Metal Utensils (Pots, Pans, Flatware, Knives)
Most metal items can be kashered using Hagalah.
- Cleaning: Clean each item thoroughly, removing all food residue, stickers, and rust. Pay special attention to seams, handles, and rivets.
- Method: Find a very large pot (a new one, or one that is already kosher) that is big enough to fit the items you want to kasher, or kasher items one by one. Fill the large pot with water and bring it to a rolling boil. The water must be boiling vigorously. Dip each clean metal item completely into the boiling water. The water must cover the entire item. For forks or items with crevices, some shake them slightly in the water. After dipping, rinse the item immediately in cold water. If an item is too large to fit in any pot, you can sometimes kasher it by pouring boiling water over it while it’s hot from being heated separately (Libbun Kal or Irui combination), but dipping is the preferred method.
Glassware
Opinions on kashering kitchen glassware vary. Some hold that glass does not absorb flavor and only needs cleaning. Others say it does absorb and needs kashering like metal (Hagalah). A common practice is to clean glassware thoroughly, and for extra caution, immerse it in cold water for 72 hours, changing the water every 24 hours. Check with the rabbinic authority you follow for their guidance on glassware.
Ceramic, Pottery, and Certain Plastics
Generally, ceramic dishes, pottery, and many types of plastic items that have been used with hot non-kosher food cannot be kashered. Their porous nature is considered to absorb flavor too deeply to be removed. Items made of pure melamine or certain hard plastics might be kasherable by Hagalah, but this depends on the specific material and rabbinic opinion. It is often easiest to buy new dishes and many plastic items for your kosher kitchen.
Kashering Items Used with Fire
Items that came into direct contact with fire while cooking non-kosher food, like barbecue grates or skewers, need Libbun Gamur. This means heating them until they glow red hot. This intense heat burns away any absorbed flavors. This is a more difficult process and requires caution.
Setting Up Your Kosher Kitchen
Once everything is kashered or you have acquired new kosher items, the process of keeping a kosher home truly begins. The main rule is separating meat and dairy kitchen.
Creating Separate Zones
You need a clear division between meat and dairy. This applies to food, dishes, utensils, pots, pans, and even cleaning supplies used for them.
- Designated Storage: Have separate cabinets or shelves for meat dishes, pots, and utensils, and separate ones for dairy. Parve items can sometimes be stored with either, but ideally have their own space or are clearly marked.
- Separate Utensils and Dishes: You need two complete sets of everything – one for meat (often colored red or marked) and one for dairy (often colored blue or marked). This includes plates, bowls, cups, flatware, serving spoons, cutting boards, strainers, mixers, etc.
- Separate Pots and Pans: Have distinct sets of cookware for meat and dairy.
- Separate Dish Racks/Towels: Many people have separate dish drying racks, dish towels, and even sponges for meat and dairy dishes to avoid cross-contamination.
- Separate Sink Use: If you only kashered your sink with Irui, you might need dedicated basins or racks for washing meat and dairy dishes separately within the sink to avoid direct contact with the sink surface when washing with hot water. Some homes have two sinks.
Labeling and Color-Coding
To avoid mistakes, it’s very helpful to label cabinets, drawers, and shelves. Color-coding your dishes and utensils is also common. Red is often used for meat, and blue for dairy. You can find kitchenware specifically made with these colors.
Separate Food Storage
While meat and dairy foods can be in the same refrigerator or pantry, they should be stored in a way that prevents them from touching or spilling on each other. Keep meat on lower shelves than dairy in the fridge, for example.
Maintaining a Kosher Kitchen
Keeping a kosher home is an ongoing process that requires care and attention to detail.
Constant Awareness
Always be mindful of whether you are preparing a meat meal or a dairy meal. Use the correct set of dishes, utensils, and pots.
Preventing Mix-Ups
Accidents happen. If you accidentally use a dairy spoon in a meat pot, or vice versa, you need to know the rules for what to do. This often depends on whether the food was hot, whether the utensil was clean, and the amount of food. These situations are called ta’aruvos (mixtures) and have specific rules for resolution, sometimes requiring kashering the pot or utensil again, or rendering the food non-kosher.
Using Parve Items
Parve (neutral) foods like fruits, vegetables, grains, pasta, and fish can be eaten with both meat and dairy meals. However, if a parve food is cooked in a meat pot, it becomes “meat” for kosher purposes (it cannot be eaten with dairy). If it’s cooked in a dairy pot, it becomes “dairy” (it cannot be eaten with meat). Parve items cooked in a dedicated parve pot remain parve. Utensils used for hot parve food that will be served with meat should be the meat set; if served with dairy, use the dairy set.
Shopping Kosher
Shopping requires checking for kosher certification on packaged foods. Fresh produce is generally kosher, but needs washing. Fish must have fins and scales to be kosher. Meat must be from a kosher animal slaughtered according to Jewish law and properly processed (koshered).
Cleaning Practices
Use separate sponges, dish towels, and drying racks for meat and dairy dishes. Clean meat dishes and dairy dishes separately.
Wait Times
Jewish law requires waiting a specific amount of time between eating meat and eating dairy. The exact time varies depending on community custom, but is typically between one and six hours. There is no waiting time required between eating dairy and meat for most people, though some have the custom to rinse their mouth and eat a solid food in between.
Step-by-Step Process for Kashering a Kitchen
Here is a summary of the steps involved in kashering kitchen:
- Plan Ahead: Learn the specific rules for your community. Understand which materials can be kashered. Decide which items you will kasher and which you will replace.
- Remove Non-Kosher Food: Clear out all food items that are not kosher certified or will not be used.
- Deep Clean Everything: Clean every surface, appliance, utensil, pot, and pan thoroughly. This is non-negotiable.
- Gather Kashering Supplies: You might need a large pot for Hagalah, a blowtorch for Libbun, and lots of water for boiling.
- Kasher Utensils and Pots: Perform Hagalah (boiling) on all clean metal items. For items used directly over fire, use Libbun Gamur. Clean glass or plastic items according to specific rules you follow.
- Kasher Major Appliances:
- Oven: Run a self-cleaning cycle (Libbun Kal). If no self-clean, heat to highest temperature for an hour. Kasher racks appropriately.
- Stovetop: Clean thoroughly. Heat grates/caps (Libbun Kal or Libbun Gamur depending on usage). Pour boiling water over the surface (Irui Kal Bo Revach). Run burners on high.
- Sink: Clean thoroughly. Pour boiling water over all surfaces (Irui Kal Bo Revach), possibly using a hot stone near the drain. Kasher faucets.
- Microwave: Clean, wait 24 hours, heat water until steamy.
- Refrigerator/Freezer: Clean thoroughly. Wait 24 hours.
- Dishwasher: Clean, run hot cycles (check specific rules).
- Kasher Countertops/Tables: Clean thoroughly. Pour boiling water over surfaces used with hot food (Irui Kal Bo Revach).
- Wait 24 Hours (Optional but Recommended): After cleaning and before kashering for many things, waiting 24 hours ensures the items have not been used recently. Some opinions also require waiting 24 hours after kashering before first use.
- Designate Meat and Dairy Areas: Clearly mark cabinets, drawers, and storage areas for meat, dairy, and parve items.
- Acquire New Items: Purchase new kosher dishes, pots, utensils, and cleaning supplies for each category (meat/dairy) if you didn’t kasher your old ones, or to complete your sets.
- Begin Keeping Kosher: Start using your separate sets and following all the rules for separating meat and dairy kitchen, preparing food, and shopping kosher.
Table: Summary of Kashering Methods
Here is a simple table summarizing the main kashering methods:
| Method | What it is | Used For | Key Requirement |
|---|---|---|---|
| Hagalah | Dipping in rolling boiling water | Metal pots, pans, utensils (used in liquid) | Item must be spotlessly clean |
| Libbun Gamur | Heating until glowing red hot | Items used directly over fire (grills, skewers) | Surface must reach extreme heat |
| Libbun Kal | Heating until paper would burn on contact | Oven interiors, stovetop grates (dry heat) | High heat throughout the material |
| Irui Kal Bo Revach | Pouring rolling boiling water | Countertops, sinks (where hot liquids were) | Water must cover surface; often with hot stone |
| Cleaning Only | Thorough washing | Refrigerator, freezer (used only with cold) | No food residue left |
Jewish Dietary Laws Kitchen
Jewish dietary laws kitchen follow the rules of Kashrut. These rules come from the Torah and later rabbinic explanations. The main ideas are:
- Kosher Animals: Eating only animals specified as kosher (like cows, sheep, chickens, fish with fins and scales). Animals must be slaughtered in a specific way (shechita) and prepared to remove blood (kashering meat).
- No Forbidden Mixtures: The most well-known rule is not mixing meat and milk products. This means not cooking them together, eating them together, or even using the same dishes for them.
- Specific Preparations: Some foods require special preparation, like removing certain fats or veins from meat.
- Kosher Certification: Processed foods need reliable kosher certification to ensure all ingredients and preparation methods are kosher.
Keeping a kosher home means applying these laws to everything done in the kitchen, from buying groceries to cleaning up after a meal.
Grasping the Rules of Separation
The rule of separating meat and dairy kitchen is central to kashrut. It comes from the Torah’s command “Do not cook a young goat in its mother’s milk” (Exodus 23:19, 34:26, Deuteronomy 14:21). Rabbinic law expanded this to include not eating meat and dairy together or cooking them together, and maintaining separate utensils and dishes for each.
Why separate?
* Biblical Command: It is a direct instruction from the Torah.
* Preventing Mixing: Having separate items is the practical way to ensure no accidental mixing of meat and dairy occurs during cooking, eating, or cleaning.
* Absorption: Pots and pans absorb flavor. A pot used for hot meat soup will absorb meat flavor. If dairy is then cooked in that pot, the flavors mix within the pot’s walls, even if no actual meat or milk is added.
This is why having two sets of everything, distinct by color or marking, is so important in a kosher kitchen.
Frequently Asked Questions
Q: Can I kasher all my old dishes?
A: It depends on the material. Metal and glass are often kasherable (Hagalah or soaking). Ceramic, porcelain, earthenware, and many plastics used with hot food generally cannot be kashered and need to be replaced.
Q: How long does kashering take?
A: The actual process of kashering items (boiling, heating) is relatively quick per item or section. However, the deep cleaning beforehand takes a lot of time. Kashering an entire kitchen is a significant project that can take several hours or even a day or two, depending on the size of the kitchen and how much needs to be kashered.
Q: Do I need a Rabbi to kasher my kitchen?
A: While you can perform kashering kitchen yourself if you understand the rules, it is highly recommended to consult with a Rabbi familiar with these laws. They can guide you through the specific methods needed for your kitchen materials and answer questions, especially for complex items like dishwashers or specific countertop materials. In many communities, a Rabbi or someone they designate supervises or helps with the kashering process.
Q: What happens if I make a mistake after kashering, like using a meat spoon in a dairy pot?
A: This is called a mixture (ta’aruvos). The result depends on several factors: was the food hot? Was the spoon clean? What is the amount of food? In some cases, the utensil or pot might need to be kashered again. In other cases, the food might become non-kosher. You need to ask a knowledgeable person or Rabbi immediately when a mistake happens to know how to fix it.
Q: Can I use the same oven for meat and dairy after kashering?
A: Yes, generally after koshering oven (usually by self-cleaning), you can use it for both meat and dairy, but not at the same time. You should also use separate pans and racks, or kasher the racks in between uses if meat dripped directly onto a dairy rack while hot (or vice versa), or use separate dedicated racks. Many people also use a wait time or cover food to prevent flavors from transferring in the oven.
Q: Do appliances like toasters or blenders need kashering?
A: Yes, any appliance that comes into contact with food, especially hot food, needs to be kashered if it was used with non-kosher food or used for both meat and dairy without proper separation. A toaster used for non-kosher bread or both kosher meat and dairy bread needs kashering (often Libbun Kal through intense heating) or separate use. Blenders need cleaning and Hagalah for parts that were used with hot non-kosher food. Kashering appliances follows the general rules based on how they were used.
Making a kitchen kosher is a big job, but it is a rewarding part of keeping a kosher home and living according to Jewish dietary laws kitchen. With careful cleaning, correct kashering kitchen methods, and commitment to kosher kitchen rules and separating meat and dairy kitchen, you can create a kosher space for your family.