How are kitchen sinks measured? Kitchen sinks are typically measured by their length (left to right), width (front to back), and depth (top to bottom of the bowl). These sink dimensions are crucial for ensuring a proper fit within your countertop and cabinetry. This comprehensive guide will walk you through everything you need to know about deciphering and utilizing these important measurements.
When embarking on a kitchen renovation or simply replacing your sink, accurate measurement is paramount. A sink that’s too large won’t fit, and one that’s too small might leave unsightly gaps or compromise functionality. This sink size guide will equip you with the knowledge to confidently select and install the perfect sink for your kitchen. We’ll cover everything from basic kitchen sink specifications to the nuances of countertop sink measurements, undermount sink measurements, and top mount sink measurements, along with the vital sink cutout size considerations for a seamless sink installation measurements.
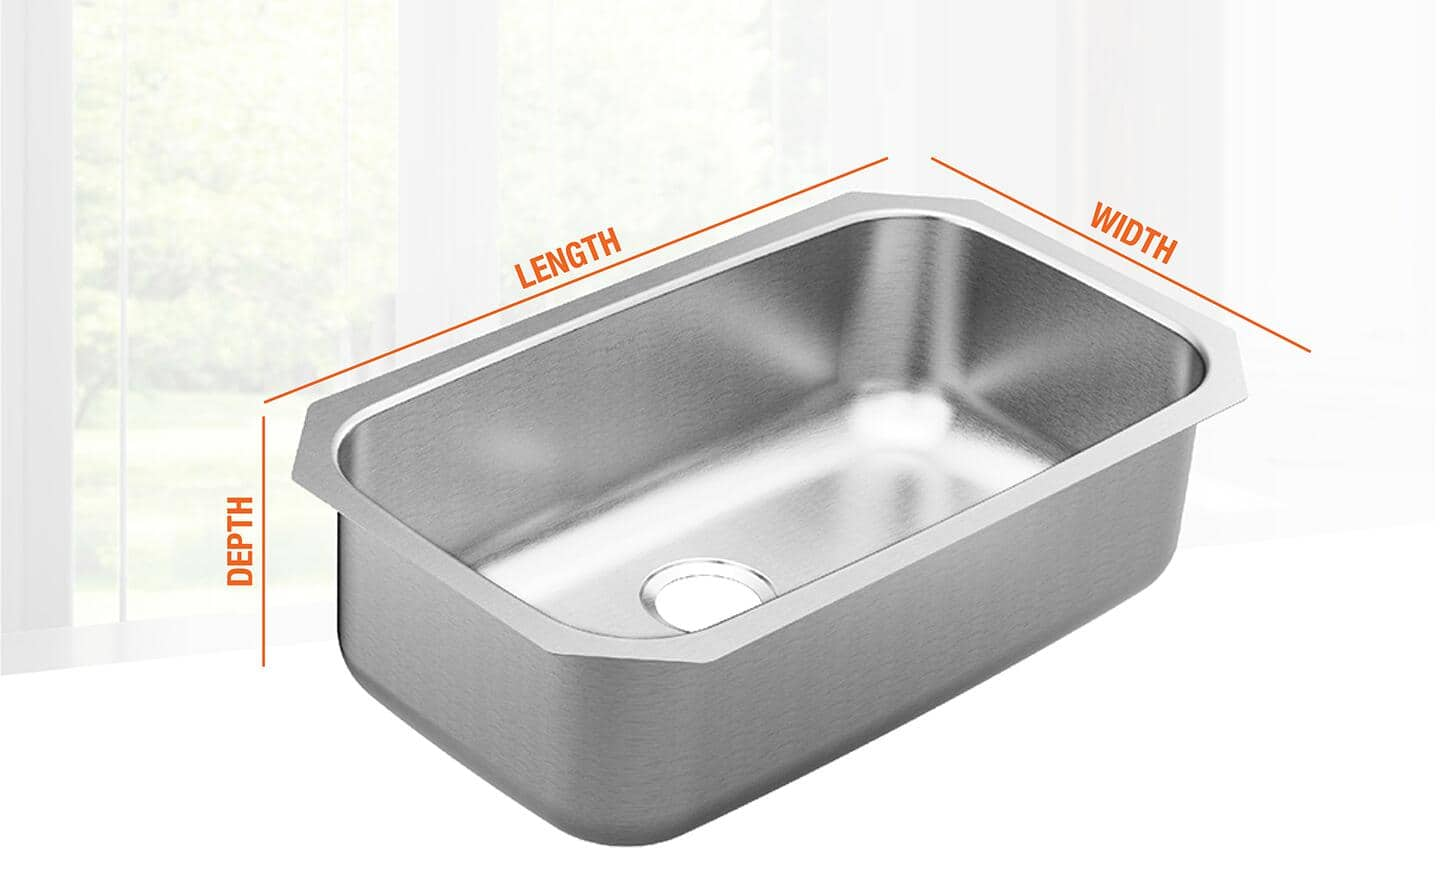
Image Source: dam.thdstatic.com
Deciphering Sink Dimensions: The Key to a Perfect Fit
The primary measurements for any kitchen sink revolve around its three-dimensional footprint. These numbers dictate whether a sink will fit in your existing countertop opening, beneath your cabinetry, and even if it can be installed at all.
Length, Width, and Depth: The Essential Trio
1. Length (Left to Right):
This is the measurement of the sink from its leftmost edge to its rightmost edge. It’s often the most critical dimension when considering if a sink will fit into a pre-existing countertop opening or the overall width of your cabinet base.
2. Width (Front to Back):
This measurement spans the sink from its front edge to its back edge. It’s important for ensuring the sink doesn’t interfere with your countertop’s backsplash or cabinet construction.
3. Depth (Top to Bottom):
This refers to how deep the sink bowl is, measured from the top rim down to the bottom of the basin. Depth impacts how much you can fit into the sink and can also affect plumbing clearances underneath. Deeper sinks are great for washing large pots and pans, while shallower sinks might be preferred for aesthetic reasons or if under-sink cabinet space is limited.
Standard kitchen sink sizes often fall within a range, but custom or specialized sinks can vary significantly. Always refer to the manufacturer’s specifications for the most accurate kitchen sink specifications.
Navigating Sink Measurement Methods: From Old to New
The way you measure your sink will depend on whether you are replacing an existing sink or installing a new one into a completely new countertop. Each scenario requires a slightly different approach.
Measuring an Existing Sink
If you’re replacing a sink, measuring the current one is a good starting point, but remember that you’ll also need to account for the countertop opening.
1. Measuring the Sink Itself:
- Tools Needed: A flexible tape measure is ideal for this.
- Process:
- Measure the overall length from the outer edge of one side to the outer edge of the other.
- Measure the overall width from the outer edge of the front to the outer edge of the back.
- Measure the depth of the bowl from the rim to the drain.
2. Measuring the Countertop Opening (Crucial for Replacement):
This is arguably the most important measurement when replacing a sink. You need to measure the hole that is already cut into your countertop.
- Tools Needed: A rigid tape measure.
- Process:
- Length of Opening: Measure from the inside edge of the countertop cutout on the left to the inside edge of the cutout on the right.
- Width of Opening: Measure from the inside edge of the countertop cutout at the front to the inside edge of the cutout at the back.
- Rim Overhang: For top mount sink measurements, you’ll also want to note the amount of countertop material visible around the sink rim. This “deck” space is important for the sink’s lip to rest on.
Important Note: For undermount sink measurements, you will be measuring the opening from the underside of the countertop. This is critical as undermount sinks are installed from below, and the opening is typically smaller than the overall sink dimensions.
Measuring for a New Sink Installation
When installing a sink into a new countertop, you have more flexibility, but you still need to consider the cabinet base and the desired aesthetic.
1. Considering Cabinet Base Size:
Kitchen cabinets come in standard widths, and your sink choice should complement this.
-
Common Cabinet Widths:
- 24 inches
- 30 inches
- 36 inches
- 48 inches
-
Sink Compatibility: Most manufacturers provide a minimum cabinet base requirement for each sink model. A general rule of thumb is that the sink should be about 3-6 inches narrower than the cabinet base to allow for mounting clips and ease of installation. For example, a 36-inch sink typically requires at least a 36-inch base, but a 33-inch sink might fit comfortably in a 36-inch cabinet.
2. Determining the Countertop Cutout Size:
This is directly related to the type of sink you choose.
- Top Mount (Drop-in) Sinks: The sink cutout size for a top mount sink is usually slightly smaller than the overall sink dimensions, as the rim of the sink will sit on top of the countertop. You’ll want enough lip to rest securely.
- Undermount Sinks: The undermount sink measurements for the cutout are typically very precise, matching the outer dimensions of the sink itself. The sink is then mounted from below, providing a seamless transition from countertop to sink.
- Flush-mount Sinks: These are installed so the sink rim is flush with the countertop surface. The cutout dimensions will be very close to the sink’s overall size.
Always consult the manufacturer’s template or cut sheet for precise sink cutout size recommendations. This document will provide exact dimensions for the opening needed in your countertop.
Understanding Different Sink Mounting Types and Their Measurement Implications
The mounting style of your kitchen sink significantly impacts how it’s measured and installed. Each type has specific requirements for countertop sink measurements.
Top Mount Sinks (Drop-in Sinks)
These are the most common and generally the easiest to install. The sink has a rim that rests on top of the countertop.
Key Measurement Considerations:
- Overall Sink Dimensions: You’ll measure the entire sink from edge to edge, including the rim.
- Countertop Opening: The cutout in the countertop will be slightly smaller than the overall sink dimensions. The difference allows the sink’s rim to sit on the countertop surface.
- Rim Width: The width of the rim is important for determining how much of the countertop will be visible around the sink. This also influences the minimum cabinet size needed.
Top Mount Sink Measurements Example:
| Dimension | Measurement Type | Notes |
|---|---|---|
| Length | Outer edge to outer edge | Includes the rim on both sides. |
| Width | Outer edge to outer edge | Includes the rim at the front and back. |
| Bowl Length | Inner edge to inner edge | The usable basin space. |
| Bowl Width | Inner edge to inner edge | The usable basin space. |
| Bowl Depth | Top of basin to bottom | From the rim down to the lowest point. |
| Countertop Cutout Length | Inside edge to inside edge | Slightly smaller than overall sink length. |
| Countertop Cutout Width | Inside edge to inside edge | Slightly smaller than overall sink width. |
Undermount Sinks
Undermount sinks are installed from beneath the countertop, creating a clean, seamless look with no rim visible.
Key Measurement Considerations:
- Sink Bowl Dimensions: For undermount sinks, the most critical measurements are the dimensions of the sink bowl itself, as these will directly determine the countertop cutout.
- Countertop Cutout: The sink cutout size for an undermount sink typically matches the outer dimensions of the sink’s bowl. Precision is key here.
- Rim Thickness and Radius: The thickness of the sink’s edge and the radius of its corners are important for the fabrication of the countertop opening.
- Cabinet Clearance: Ensure there’s enough space beneath the countertop for the sink bowl and any mounting hardware. The overall depth of the sink, combined with countertop thickness, must fit within your cabinet.
Undermount Sink Measurements Example:
| Dimension | Measurement Type | Notes |
|---|---|---|
| Bowl Length | Outer edge to outer edge | Determines the countertop cutout length. |
| Bowl Width | Outer edge to outer edge | Determines the countertop cutout width. |
| Bowl Depth | Top of bowl to bottom | From the edge where it meets the countertop to the basin bottom. |
| Faucet Deck Width | If applicable | For sinks with integrated faucet ledges. |
| Countertop Cutout Length | Inside edge to inside edge | Precise match to the bowl’s outer length. |
| Countertop Cutout Width | Inside edge to inside edge | Precise match to the bowl’s outer width. |
Farmhouse/Apron Sinks
These sinks feature a distinctive exposed front panel (the “apron”). Their measurements can be a bit more complex due to their design.
Key Measurement Considerations:
- Overall Width: The total width of the sink, including the apron.
- Height: The height of the apron is a significant measurement, as it determines how much of the cabinet front is visible and if it aligns with your cabinet doors.
- Depth: The depth of the sink bowl, and also the depth from the front of the apron to the back of the sink.
- Cabinet Modification: Farmhouse sinks often require modifications to the existing cabinetry to accommodate their size and shape, particularly the front apron.
Integrated Sinks
These sinks are made from the same material as the countertop and are seamlessly bonded, creating a single continuous surface.
Key Measurement Considerations:
- Sink Bowl Dimensions: Similar to undermount sinks, the bowl dimensions dictate the opening, but the bonding process is key.
- Edge Profile: The way the sink edge transitions to the countertop material is a design and measurement factor.
Beyond the Basics: Other Important Sink Specifications
While length, width, and depth are the primary sink dimensions, other specifications are vital for a successful purchase and installation.
Bowl Configuration
- Single Bowl: A large, undivided basin.
- Double Bowl: Divided into two basins, which can be equal or unequal in size. If you have a double bowl, you’ll need to consider the dimensions of each bowl, as well as the dividing partition.
- Triple Bowl: Less common, but with three distinct basins.
When measuring a double or triple bowl sink, remember to measure the length and width of each individual bowl, as well as the overall external dimensions of the sink.
Material and Thickness
While not a measurement in the traditional sense, the material (stainless steel, granite composite, fireclay, etc.) can influence the sink’s durability, weight, and the thickness of its walls. Thicker materials might require slightly different mounting hardware or considerations for plumbing.
Faucet Hole Configuration
- Number of Holes: Sinks come pre-drilled with a specific number of holes for faucets, soap dispensers, sprayers, etc. Ensure this matches your faucet choice.
- Hole Spacing: The distance between these holes is crucial for faucet installation. Manufacturers provide this information in their kitchen sink specifications.
Drain Placement and Size
- Drain Position: Is the drain in the center, rear, or offset? This can affect plumbing configurations.
- Drain Opening Size: Standard drains are usually 3.5 or 4 inches in diameter. This is important for selecting compatible strainers and garbage disposals.
Radius of Corners
The tightness of the internal corners of the sink bowl can affect how easy it is to clean and the overall aesthetic.
- Tight Radius (e.g., 0-10 mm): Offers a more modern, geometric look but can be harder to clean.
- Ramped/Rounded Radius (e.g., 15 mm+): Easier to clean and provides a softer appearance.
Tools for Accurate Measurement
Having the right tools makes all the difference in getting precise sink installation measurements.
- Flexible Tape Measure: Ideal for measuring the sink itself, especially curved edges.
- Rigid Tape Measure: Essential for measuring countertop openings and cabinet widths accurately.
- Pencil and Paper: For jotting down all your measurements.
- Manufacturer’s Template: If available, use the template provided by the sink manufacturer for the most accurate countertop cutout.
- Smartphone with a Measuring App: While not as precise as a physical tape measure, some apps can be helpful for quick estimations.
Common Pitfalls to Avoid
Even with careful planning, measurement errors can happen. Be aware of these common mistakes:
- Measuring the Old Countertop Hole Instead of the Actual Sink: When replacing a sink, the countertop opening is often the most critical measurement, not necessarily the dimensions of the old sink itself.
- Not Accounting for Rim or Undermount Overhang: For top mount sinks, the rim needs a lip to rest on. For undermount sinks, the countertop fabricator needs to know the precise edge of the sink for the cutout.
- Forgetting Cabinet Clearance: Ensure the sink you choose will fit within your cabinet base, considering not only the width but also the depth and height.
- Ignoring Faucet Hole Compatibility: Double-check the number and spacing of faucet holes to match your chosen faucet.
- Relying on Visual Estimates: Always use a tape measure; don’t guess or estimate dimensions.
FAQ: Frequently Asked Questions About Sink Measurements
What is the standard kitchen sink size?
While there’s no single “standard,” common sink lengths range from 20 to 33 inches, and widths can vary from 18 to 30 inches. Bowl depths typically fall between 6 and 10 inches. The most important factor is matching the sink to your cabinet base and countertop opening.
Can I install a larger sink than my current one?
Yes, but only if your cabinet base is wide enough to accommodate it and if you are willing to have your countertop professionally cut to a larger size. If you’re simply replacing a sink and don’t want to alter the countertop, you must choose a sink with similar or smaller sink dimensions that fits the existing cutout.
Do undermount sink measurements differ from top mount sink measurements?
Yes, significantly. For top mount sink measurements, you’re concerned with the overall sink dimensions and ensuring the rim has adequate countertop surface to sit on. For undermount sink measurements, the critical factor is the exact bowl dimension, which dictates the countertop cutout.
What is a sink cutout size?
The sink cutout size is the specific dimension of the hole that needs to be cut into your countertop to accommodate the sink. For top mount sinks, this is typically slightly smaller than the overall sink; for undermount sinks, it’s usually the exact size of the sink’s bowl. Always refer to the manufacturer’s cut sheet for precise cutout dimensions.
How do I measure my cabinet base for a sink?
Measure the interior width of the cabinet opening where the sink will sit. This is crucial for determining which sink sizes will fit without modification. Most manufacturers will specify the minimum cabinet base size required for their sinks in their kitchen sink specifications.
How deep should a kitchen sink be?
Sink depth and width are personal preferences, but most sinks are between 6 and 10 inches deep. Deeper sinks (8-10 inches) are practical for washing large pots and pans, while shallower sinks (6-7 inches) might be chosen for aesthetic reasons or to avoid stooping.
What are countertop sink measurements?
Countertop sink measurements refer to how a sink’s dimensions relate to the countertop. This includes the size of the cutout needed, the amount of countertop overhang the sink rim will sit on (for top mount), or the precise fit required for an undermount sink.
By carefully deciphering these measurements and understanding the different types of sinks and their installation requirements, you can confidently select a kitchen sink that is both beautiful and functional, ensuring a perfect fit for your home. Always refer to the manufacturer’s detailed specifications for precise measurements and installation guidance.