Yes, you can absolutely paint laminate kitchen cabinets! This is a fantastic way to give your kitchen a fresh new look without the expense of replacing your cabinets entirely. It’s a popular DIY project for a good reason: it’s achievable, affordable, and can dramatically transform your space.
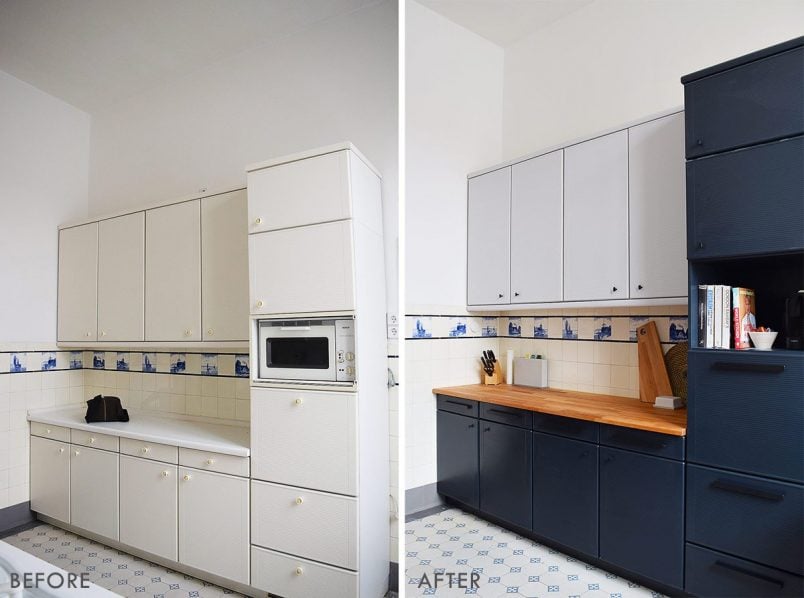
Image Source: www.littlehouseonthecorner.com
Breathe New Life into Your Kitchen: A Comprehensive Guide to Painting Laminate Cabinets
Are your laminate kitchen cabinets looking a bit tired, dated, or just not your style anymore? You’re not alone. Many homeowners find themselves in this exact situation. The good news is that you don’t need to tear them out and start from scratch. A well-executed paint job can completely revitalize your cabinetry and give your kitchen a modern makeover. This in-depth guide will walk you through everything you need to know about painting kitchen cabinets, specifically focusing on the unique challenges and triumphs of laminate cabinet refinishing. Get ready for a rewarding DIY cabinet makeover that will make your kitchen shine!
Why Paint Laminate Cabinets?
Laminate cabinets, while durable and often cost-effective, can sometimes lack the aesthetic appeal of solid wood. Over time, the laminate can also show wear and tear. Painting offers a multitude of benefits:
- Cost-Effective Solution: Compared to replacing cabinets, painting is significantly cheaper.
- Customization: You can choose any color to perfectly match your kitchen’s decor.
- Updated Look: Instantly modernize a dated kitchen.
- Durability: With the right preparation and paint, a painted finish can be very durable.
- Satisfying DIY Project: The transformation is incredibly rewarding.
Fathoming the Process: Laminate Cabinet Prep is Key
This is arguably the most crucial step for a successful and long-lasting paint job on laminate. Laminate surfaces can be smooth and non-porous, which means paint might not adhere well if proper steps aren’t taken. Skimping on prep is the number one reason why painted laminate cabinets fail.
Step 1: Remove Doors and Hardware
Start by removing all cabinet doors, drawer fronts, and any visible hardware like knobs and hinges. This allows you to work on a flat surface and ensures a more even paint application. Keep all hardware organized; you might want to replace it or spray paint it.
Step 2: Thorough Cleaning
This isn’t just a quick wipe down. You need to remove all grease, grime, and residues. Kitchen cabinets are notorious for accumulating cooking grease, especially near the stovetop.
- Degreaser: Use a good quality degreaser. A solution of TSP (trisodium phosphate) and water is highly effective, but ensure you follow safety instructions and wear gloves. Alternatively, a mixture of warm water and a few drops of dish soap can work for less stubborn grease.
- Clean Cloths: Use clean microfiber cloths to wipe down every surface. Rinse with clean water and dry thoroughly.
Step 3: Sanding for Adhesion
This step is vital for laminate cabinet prep. Even though laminate is smooth, you need to create a slight “tooth” for the primer and paint to grip.
- Type of Sandpaper: Use fine-grit sandpaper, typically 150-220 grit. You don’t need to aggressively sand down to the core material; you’re just scuffing the surface.
- Sanding Technique: Sand all surfaces that will be painted. Be gentle; you’re not trying to remove the laminate, just dull the sheen.
- Dust Removal: After sanding, it’s imperative to remove all dust. Use a vacuum with a brush attachment, followed by a tack cloth. A tack cloth is a sticky cloth designed to pick up fine dust particles.
Step 4: Repairing Imperfections
Inspect your cabinets for any chips, dings, or peeling laminate.
- Fillers: Use a good quality wood filler or a filler specifically designed for laminate for any small gouges.
- Sanding Repairs: Once the filler is dry, gently sand it smooth to be flush with the cabinet surface. Again, clean thoroughly afterward.
Priming: The Unsung Hero of Laminate Cabinet Painting
Priming is non-negotiable when painting kitchen cabinets, especially laminate ones. A good primer acts as a bridge between the laminate surface and your topcoat, ensuring adhesion and preventing the laminate’s original color or grain from showing through.
Choosing the Best Primer for Laminate
The key is to select a high-adhesion, oil-based or shellac-based primer. These are designed to stick to difficult surfaces like laminate and metal.
- Oil-Based Primers: Excellent adhesion, good durability, and often have a leveling agent that helps create a smooth finish. They typically have a strong odor and require mineral spirits for cleanup.
- Shellac-Based Primers: Known for their superior adhesion and stain-blocking capabilities. They dry very quickly and have a strong odor but clean up with denatured alcohol. They are excellent for sealing in any potential bleed-through from the laminate.
- Bonding Primers: Some water-based bonding primers are formulated for slick surfaces. Always check the product label to ensure it’s suitable for laminate.
Applying the Laminate Cabinet Primer
- Thin Coats: Apply thin, even coats of primer. Avoid overloading your brush or roller, as this can lead to drips and an uneven finish.
- Coverage: Ensure complete coverage of all surfaces you intend to paint.
- Drying Time: Allow each coat of primer to dry completely according to the manufacturer’s instructions. Rushing this step can compromise adhesion.
- Light Sanding: After the primer has dried, lightly sand the entire surface with very fine-grit sandpaper (220-320 grit). This will smooth out any minor imperfections and provide an even better surface for the paint. Clean off all dust with a tack cloth.
Selecting the Best Paint for Laminate Cabinets
The choice of paint is critical for a durable and beautiful finish. You need a paint that is specifically designed for cabinets or high-traffic furniture, offering excellent adhesion, durability, and a smooth finish.
Top Paint Choices for Laminate
- Alkyd Enamels (Oil-Based): These have traditionally been the go-to for cabinets due to their hardness, durability, and smooth finish. However, they have a strong odor, require mineral spirits for cleanup, and can have longer drying times.
- Water-Based Enamels (Acrylic Latex with Enamel Additives): Modern water-based acrylic or latex paints formulated with enamel properties are excellent choices. They offer good durability, are easier to clean up (with soap and water), have low VOCs, and dry faster than oil-based paints. Look for “cabinet & trim enamel” or paints specifically designed for high-use surfaces.
- Mineral-Based Paints: Some high-quality mineral paints can also adhere well to properly prepped laminate, offering a durable, often matte finish.
Sheen Matters
- Satin: A popular choice for cabinets as it offers a nice balance of durability and a subtle sheen, which helps hide imperfections better than high gloss.
- Semi-Gloss: Very durable and easy to clean, but it can highlight surface imperfections.
- Eggshell: Offers a more matte finish but is less durable and harder to clean than satin or semi-gloss.
Applying Your Topcoat
This is where your cabinet painting tutorial comes to life!
- Thin, Even Coats: Just like the primer, apply thin, even coats of your chosen paint. This prevents drips and ensures a smooth, professional-looking finish.
- Tools:
- High-Quality Paint Brushes: Use synthetic bristle brushes for water-based paints and natural bristles for oil-based paints.
- Foam Rollers: Foam rollers, particularly high-density ones, are excellent for achieving a smooth, brush-stroke-free finish on larger cabinet surfaces.
- Brush vs. Roller: Use a brush for the detailed edges, corners, and any trim. Use a roller for the flat surfaces of the doors and drawer fronts.
- Drying Between Coats: Allow adequate drying time between coats as recommended by the paint manufacturer. This is crucial for durability.
- Light Sanding Between Coats: For an ultra-smooth finish, you can lightly sand between coats with very fine-grit sandpaper (320-400 grit) and then wipe down with a tack cloth. This removes any dust nibs and creates a smooth surface for the next coat.
- Number of Coats: Most projects will require at least two, and often three, thin coats of paint for full coverage and durability.
Reassembling Your Transformed Cabinets
Once your cabinet doors and drawer fronts are completely dry and cured (this can take several days to a week for maximum hardness, even if they feel dry to the touch), it’s time to reassemble.
- Reattach Hardware: Carefully reattach your knobs and pulls. If you decided to spray paint your hardware, ensure it’s completely dry and cured before handling.
- Rehang Doors: Rehang the cabinet doors and reinsert the drawers. You may need to adjust the hinges to ensure doors hang straight and close properly.
Updating Laminate: The Art of Spray Painting vs. Brush/Roller
You have two primary methods for applying paint to your laminate cabinets: spray painting or using a brush and roller. Each has its pros and cons.
Spray Painting for a Professional Finish
Spray painting offers the most professional and smoothest finish, free of brush strokes. However, it requires specific equipment and careful preparation.
- Equipment Needed:
- Paint Sprayer: HVLP (High Volume Low Pressure) sprayers are ideal for cabinets as they provide a fine, even mist.
- Ventilation: Ensure you are in a well-ventilated area, ideally outdoors or in a spray booth.
- Masking: Meticulous masking of surrounding areas (walls, floors, countertops) is essential. Use painter’s tape and plastic sheeting.
- Respirator: Always wear a respirator rated for paint fumes.
- Pros:
- Ultra-smooth, professional finish.
- Fast application once set up.
- Even coverage.
- Cons:
- Requires specialized equipment.
- Steep learning curve.
- Messy if not done properly; extensive masking is required.
- Paint overspray can travel.
Brush and Roller: The DIY-Friendly Approach
This is the more accessible method for most DIYers and can yield excellent results with patience and the right tools.
- Tools:
- High-Quality Paint Brushes: Angled brushes are great for corners and edges.
- Foam Rollers: Choose high-density foam rollers for a smooth finish.
- Paint Tray: For rolling.
- Pros:
- No special equipment needed beyond basic painting supplies.
- More control over application.
- Less overspray and mess.
- Cons:
- Can be more time-consuming.
- Risk of brush strokes or roller marks if not applied carefully.
- May require more sanding between coats for a truly smooth finish.
Cabinet Painting Tips for Success
Here are some additional tips to ensure your kitchen cabinet renovation project is a resounding success:
- Work in Good Lighting: Ensure you have ample light to see what you’re doing and spot any missed spots or drips.
- Test Your Paint: Before painting all your cabinets, test your chosen paint on a scrap piece of laminate or an inconspicuous area to ensure you like the color and finish.
- Don’t Rush: Patience is a virtue in painting. Allow proper drying times between coats and take breaks when needed.
- Ventilation is Key: Even if not spray painting, ensure good ventilation when using primers and paints, especially oil-based ones. Open windows and use fans.
- Clean as You Go: Wipe up any spills immediately. Keep your workspace tidy.
- Consider a Topcoat/Sealer: For extra durability, especially in high-moisture areas like kitchens, you might consider a clear polycrylic topcoat over your painted finish. Ensure it’s compatible with your chosen paint.
What’s the Best Finish for Laminate Cabinets?
The best finish for laminate cabinets depends on your aesthetic preferences and how much maintenance you’re willing to do. For most people, a satin or eggshell finish is ideal. These finishes offer a good balance of durability and a pleasing appearance that doesn’t show every fingerprint or minor imperfection like a high-gloss finish would. However, if you prioritize extreme ease of cleaning and don’t mind a shinier look, a semi-gloss finish is also a very durable option. Always ensure the paint is formulated for cabinets and high-traffic areas.
How Long Does Painted Laminate Take to Cure?
While your cabinets might feel dry to the touch within a few hours, paint generally takes 7 to 30 days to fully cure. Curing is the process where the paint hardens completely and reaches its maximum durability. During the curing period, treat your cabinets gently. Avoid harsh cleaning, banging them, or placing heavy objects on them, as this can damage the fresh paint job.
Can I Skip the Primer on Laminate Cabinets?
No, you absolutely should not skip the primer on laminate cabinets. Laminate is a notoriously slick and non-porous surface. Skipping the primer is a common mistake that leads to paint peeling, chipping, and poor adhesion. A good quality, high-adhesion primer is essential to create a surface that your topcoat can adhere to properly and durably. Think of primer as the foundation of your paint job; without a strong foundation, the entire structure is at risk.
Common Mistakes to Avoid When Painting Laminate
- Insufficient Cleaning: Not degreasing properly will lead to adhesion problems.
- Skipping or Inadequate Sanding: Not creating a “tooth” for the primer to adhere to.
- Using the Wrong Primer: Not using a high-adhesion primer suitable for slick surfaces.
- Applying Paint Too Thickly: This causes drips, runs, and an uneven finish.
- Not Allowing Proper Drying/Curing Time: Rushing between coats or reassembling too soon can damage the paint.
- Using Low-Quality Paint: Investing in good quality paint and supplies makes a significant difference in the final outcome.
Frequently Asked Questions About Painting Laminate Kitchen Cabinets
Q1: Will the paint chip or peel off laminate cabinets?
With proper preparation (cleaning, sanding, and priming with the right products) and the use of high-quality paint, the risk of chipping or peeling is significantly minimized. Following these steps is crucial for a durable finish.
Q2: What is the best way to clean laminate cabinets before painting?
Thoroughly degrease the cabinets using a degreaser like TSP (trisodium phosphate) mixed with water, or a strong dish soap solution. Rinse well with clean water and dry completely.
Q3: Can I paint over the existing laminate finish?
Yes, that’s the goal! The entire process is about painting over the existing laminate to achieve a new look. However, you must prep the surface correctly for the paint to adhere.
Q4: What kind of sandpaper should I use for laminate prep?
For scuff sanding the laminate, use a fine-grit sandpaper, typically 150-220 grit. After priming and between coats of paint, use very fine grit sandpaper, like 320-400 grit, for a smooth finish.
Q5: Do I need a special type of paint for laminate?
You need a paint that adheres well to slick surfaces. Look for high-quality cabinet and trim enamels. Oil-based alkyd enamels or premium water-based acrylic/latex enamels with excellent adhesion properties are recommended. Always check product labels for suitability on laminate.
Q6: Is it better to spray paint or brush and roll laminate cabinets?
Spray painting offers the smoothest, most professional finish but requires equipment and skill. Brushing and rolling are more accessible for DIYers and can yield great results with patience and the right tools.
Q7: How many coats of primer and paint do I need?
Generally, one to two coats of primer are sufficient, followed by two to three thin coats of your chosen paint color for full coverage and durability.
Q8: How long will the painted laminate cabinets last?
With proper prep, high-quality materials, and careful application, your painted laminate cabinets can last for many years, often 5-10 years or even longer, with reasonable care. Regular cleaning with mild soap and water will help maintain the finish.
This comprehensive guide should equip you with the knowledge and confidence to embark on your DIY cabinet makeover of laminate kitchen cabinets. With meticulous laminate cabinet prep, the right laminate cabinet primer, and careful application of the best paint for laminate, you can achieve a stunning kitchen cabinet renovation that transforms your kitchen’s aesthetic. Enjoy your beautiful, freshly painted cabinets!