Yes, you can absolutely paint floor tiles in a kitchen! It’s a fantastic and often budget-friendly way to achieve a completely new look without the hassle and expense of a full tile replacement. Whether you’re looking to update outdated colors, cover up worn grout, or simply give your kitchen a fresh, modern feel, painting kitchen floor tiles is a viable and rewarding DIY project.
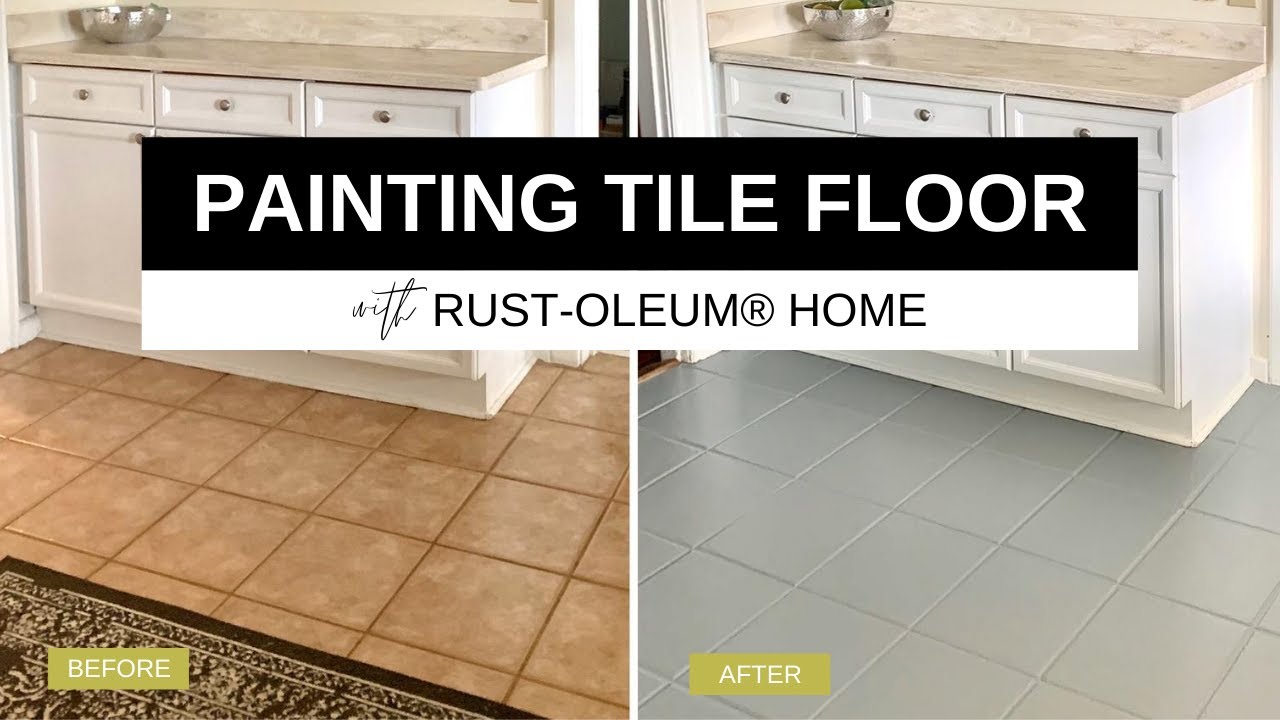
Image Source: i.ytimg.com
Revitalizing Your Kitchen with a Splash of Color
Is your kitchen floor looking a little tired? Perhaps the color is no longer to your taste, or the grout lines are stained beyond repair. Before you start thinking about the cost and mess of ripping up old tiles and laying new ones, consider the magic of paint. Painting kitchen floor tiles is a popular and effective way to transform your culinary space. It’s a DIY project that can bring about a dramatic kitchen floor tile makeover, breathing new life into an often-overlooked part of your home.
Why Consider Painting Your Kitchen Floor Tiles?
There are several compelling reasons why painting ceramic floor tiles kitchen is a great option:
- Cost-Effective: Compared to retiling, paint is significantly cheaper. This makes it an ideal solution for those on a budget.
- Time-Saving: While prep work is crucial, the actual painting process is much faster than removing and replacing tiles.
- DIY Friendly: With the right approach and materials, this is a project most homeowners can tackle themselves.
- Versatile Aesthetics: Paint offers endless possibilities for color, patterns, and finishes, allowing for a truly custom look.
- Temporary Solution: If you’re renting or plan a larger renovation down the line, painted tiles offer a good temporary fix.
What Kind of Tiles Can Be Painted?
Most hard, non-porous surfaces can be painted, including:
- Ceramic tiles
- Porcelain tiles
- Glazed tiles
- Vinyl tiles (ensure they are well-adhered and clean)
Unsuitable surfaces include:
- Unsealed natural stone (granite, marble) as they are too porous.
- Soft or damaged tiles.
- Flooring that is actively peeling or lifting.
Preparing for Your Kitchen Floor Tile Painting Project
Proper preparation is the absolute key to a long-lasting and beautiful finish when painting kitchen floor tiles. Skipping these steps will lead to paint peeling and chipping, no matter how good your tile floor paint kitchen is.
Essential Tools and Materials
Gathering everything you need before you start is crucial for a smooth process. Here’s a comprehensive list:
- Cleaning Supplies: Degreaser, all-purpose cleaner, sponges, scrub brushes, microfiber cloths, mop.
- Repair Supplies: Grout cleaner, grout pen or caulk (for any cracked grout or caulking).
- Adhesion Promoter/Primer: A high-quality primer specifically designed for tile or slick surfaces.
- Tile Paint: Specialty floor paint formulated for durability and high traffic.
- Applicators: High-density foam rollers (for smooth finishes), good quality synthetic brushes (for edges and details), paint tray.
- Masking: Painter’s tape (for edges and areas you don’t want to paint).
- Protective Gear: Gloves, safety glasses, mask.
- Optional: Stencils (for patterns), clear topcoat/sealer (for extra protection).
Step-by-Step Preparation Guide
Let’s get your kitchen floor ready for its transformation. This is where we lay the groundwork for a successful refinishing kitchen floor tiles job.
1. Thorough Cleaning
This is the most critical step. Any dirt, grease, or residue will prevent the paint from adhering properly.
- Remove Everything: Clear the entire kitchen floor of furniture, rugs, and any other items.
- Sweep and Vacuum: Remove all loose debris.
- Degrease: Use a strong degreasing cleaner to tackle any kitchen grease buildup. Mop the floor thoroughly, ensuring you rinse well to remove all cleaning product residue.
- Deep Clean Grout: Grout can harbor a lot of dirt. Use a dedicated grout cleaner and a stiff brush or an old toothbrush to scrub the grout lines.
- Rinse and Dry: Rinse the floor multiple times with clean water to remove all cleaning solutions. Allow the floor to dry completely. You might even want to let it air out for 24 hours to ensure all moisture is gone, especially from the grout.
2. Inspect and Repair
Before painting, check your tiles and grout for any damage.
- Cracked Tiles: If you have cracked tiles, they will need to be replaced or filled with a suitable epoxy filler before painting.
- Damaged Grout: If grout is crumbling or missing, remove the loose material with a grout rake or utility knife. Clean the area thoroughly. You can then either re-grout the sections or fill them with a flexible caulk designed for floors. Allow any repairs to cure fully according to the product instructions.
3. Sanding (Optional but Recommended)
For maximum adhesion, a light scuff sanding can make a big difference.
- Lightly Sand: Use a fine-grit sandpaper (around 150-220 grit) or a sanding sponge. The goal isn’t to remove the glaze, but to create a slightly rough surface for the primer to grip.
- Clean Dust: After sanding, vacuum the floor meticulously to remove all dust. Then, wipe the floor down with a damp cloth or tack cloth.
4. Priming for Durability
A good primer is essential for ensuring your painted tiles last. It acts as a bridge between the tile and the paint, promoting adhesion and preventing the paint from chipping.
- Choose the Right Primer: Select a high-quality primer specifically designed for slick surfaces or tiles. Look for products that offer excellent adhesion and are moisture-resistant.
- Apply Thin Coats: Apply the primer in thin, even coats using a foam roller or a synthetic brush. Avoid applying too much, as this can lead to drips and an uneven finish.
- Allow Drying Time: Let the primer dry completely according to the manufacturer’s instructions. This usually takes several hours, and some primers may require overnight drying.
Selecting the Best Paint for Kitchen Floor Tiles
Choosing the right paint is paramount for achieving a durable and attractive finish for your kitchen floor tile painting project. You need something that can withstand foot traffic, moisture, and potential spills.
Key Features to Look For
When searching for the best paint for kitchen floor tiles, prioritize these qualities:
- Durability: The paint must be able to withstand constant wear and tear.
- Adhesion: It needs to bond well to the tile surface.
- Water Resistance: Kitchens are prone to spills, so water resistance is crucial.
- Scrubbability: You’ll want to be able to clean the floor without damaging the paint.
- Low VOCs (Volatile Organic Compounds): For a healthier indoor environment.
Types of Paint Suitable for Floors
Here are the most common and effective types of paint for painting kitchen floor tiles:
- Epoxy Floor Paint: This is often considered the gold standard for durability. Epoxy paints are typically two-part systems that create a very hard, chemical-resistant, and long-lasting coating. They are excellent for high-traffic areas and offer superior protection.
- Urethane-Based Floor Paints: Urethane coatings are also very durable and offer good resistance to abrasion and chemicals. They can be water-based or solvent-based, with water-based options being more user-friendly.
- Latex/Acrylic Floor Paints: While less durable than epoxy or urethane, specially formulated acrylic or latex floor paints can be a good option for lighter traffic areas or if you’re looking for a more budget-friendly choice. Look for “enamel” or “hard-wearing” formulations.
Understanding Tile Floor Paint Options
Let’s break down some specific considerations for your tile floor paint kitchen choice:
- Sheen: Satin or semi-gloss finishes are generally recommended for kitchen floors. They are easier to clean and more resistant to staining than matte finishes.
- Color: Consider the overall aesthetic of your kitchen. Lighter colors can make the space feel larger and brighter, while darker colors can hide dirt more effectively.
- Brands: Popular and reputable brands known for durable floor coatings include Rust-Oleum, Behr, Benjamin Moore, and Sherwin-Williams. Always check product specifications to ensure they are suitable for floor tile application.
Table 1: Paint Type Comparison for Kitchen Floors
| Paint Type | Durability | Water Resistance | Ease of Application | Cost | Best For |
|---|---|---|---|---|---|
| Epoxy Floor Paint | Excellent | Excellent | Moderate | High | High traffic, maximum durability |
| Urethane Floor Paint | Very Good | Very Good | Good | Moderate | High traffic, good all-around performance |
| Acrylic/Latex Floor Paint | Good | Good | Easy | Low to Moderate | Lighter traffic, budget-conscious |
The Art of Painting Your Kitchen Floor Tiles
Now that your floor is prepped and you have your materials, it’s time to bring your kitchen floor tile makeover to life. This is where the transformation truly happens.
Applying the Tile Paint
Remember to work in a well-ventilated area.
- Stir the Paint: Thoroughly stir your chosen tile floor paint. If using a two-part epoxy, mix according to the manufacturer’s instructions.
- Start with Edges: Use a good quality synthetic brush to carefully paint the edges of the tiles and around any obstacles like cabinets or appliances. Use painter’s tape along baseboards and cabinets to protect them from paint.
- Roll the Main Areas: Pour the paint into a paint tray. Use a high-density foam roller to apply the paint in thin, even coats to the tile surfaces. Work in small sections, maintaining a wet edge to avoid lap marks.
- Achieve Even Coverage: Roll in consistent strokes, ensuring you don’t apply too much pressure, which can cause drips or roller marks.
- Multiple Coats: Most projects will require at least two coats of paint for full coverage and durability. Allow each coat to dry completely according to the manufacturer’s recommendations before applying the next. Drying times can vary significantly between products.
- Consider Patterns: If you want to add a pattern, now is the time. Use stencils and a smaller roller or brush for your design. Ensure the base coat is fully dry before stenciling.
Applying a Protective Topcoat (Highly Recommended)
For extra protection and to extend the life of your painted floor, applying a clear topcoat is a wise decision. This is especially true for your DIY kitchen floor tile painting project.
- Choose the Right Topcoat: Select a durable, water-based polyurethane or a clear epoxy sealer designed for floors. A satin or semi-gloss finish will provide the best balance of protection and appearance.
- Apply Thinly: Apply the topcoat in thin, even coats using a clean foam roller or a good quality brush. Avoid overworking the product.
- Multiple Layers: Two to three thin coats are usually sufficient. Allow each coat to dry and cure thoroughly as per the product instructions. Proper curing is essential for maximum hardness.
Drying and Curing Times
This is where patience is key.
- Drying: This refers to the time it takes for the paint to be dry to the touch.
- Curing: This is the time it takes for the paint to reach its maximum hardness and durability. This can take several days or even weeks depending on the product and environmental conditions (temperature, humidity).
- Foot Traffic: You can usually walk on the floor with socks after 24-48 hours, but avoid heavy traffic, shoes, and placing furniture back for at least 7 days, or as recommended by the paint manufacturer.
Maintaining Your Newly Painted Kitchen Floor
Proper maintenance will ensure your painted tiles continue to look great for years to come.
Cleaning and Care Tips
- Gentle Cleaning: Use a soft mop or cloth with a mild, pH-neutral cleaner. Avoid abrasive scrubbers, steel wool, or harsh chemicals like bleach or ammonia, as these can damage the paint.
- Wipe Spills Immediately: Clean up spills, especially acidic ones like tomato sauce or wine, as soon as possible to prevent staining.
- Use Furniture Pads: Place felt pads under the legs of chairs and tables to prevent scratching or scuffing the painted surface.
- Avoid Dragging Furniture: Always lift furniture when moving it, rather than dragging it across the floor.
- Consider a Rug: Placing a rug in high-traffic areas like in front of the sink can help protect the painted surface.
Touch-Ups and Longevity
Even with the best care, some minor wear and tear is inevitable over time.
- Keep Extra Paint: Always store a small amount of your paint and topcoat for future touch-ups.
- Spot Repairs: If you notice minor chips or scratches, you can carefully sand the affected area, clean it, and reapply a thin coat of paint and topcoat.
Potential Pitfalls and How to Avoid Them
While painting kitchen floor tiles is rewarding, there are a few common mistakes that can derail your project.
Common Mistakes to Watch Out For
- Inadequate Cleaning: This is the number one reason for paint failure. Ensure the floor is spotless.
- Skipping Primer: Not using a suitable primer will lead to poor adhesion and peeling.
- Using the Wrong Paint: Standard wall paint or interior paint will not withstand floor traffic. Always use a dedicated floor paint.
- Applying Paint Too Thickly: Thick coats lead to drips, poor adhesion, and a less durable finish.
- Not Allowing Proper Drying/Curing Times: Rushing the process by walking on the floor too soon will cause damage.
- Poor Ventilation: Working in an unventilated space can be unhealthy and affect paint drying.
Troubleshooting Common Issues
- Peeling Paint: Usually caused by poor surface preparation or lack of primer. The affected areas will need to be stripped and redone with proper prep.
- Scuff Marks: Can occur with softer paints or if the floor hasn’t fully cured. Consider a more durable topcoat.
- Uneven Finish: Often due to inconsistent roller application or applying paint too thickly.
- Paint Wearing Off Quickly: This is a sign of insufficient coats or a lack of a protective topcoat.
Frequently Asked Questions (FAQ)
Q1: How long does painted kitchen floor tile typically last?
A1: With proper preparation, the use of durable floor paint, and good maintenance, painted kitchen floor tiles can last anywhere from 3 to 7 years, sometimes even longer. Factors like the amount of foot traffic, the quality of the paint used, and how well the floor is cared for will influence its lifespan.
Q2: Can I paint over old, peeling paint on kitchen floor tiles?
A2: No, you cannot paint over peeling paint. You must remove all loose and peeling paint completely. This often involves scraping, sanding, and thorough cleaning before you can even think about applying a new coat of primer and paint.
Q3: What is the best way to clean a painted tile floor?
A3: The best way to clean a painted tile floor is with a soft mop or cloth and a mild, pH-neutral cleaner. Avoid abrasive cleaners, harsh chemicals, and excessive water. Always wipe up spills promptly.
Q4: Is it worth the effort to paint kitchen floor tiles?
A4: For many homeowners, the effort is absolutely worth it. It’s a cost-effective and less disruptive way to update the look of a kitchen compared to retiling. The visual impact can be significant, and it’s a very satisfying DIY project.
Q5: Can I use regular latex paint for this project?
A5: It is highly recommended to use specialized floor paint designed for durability and high traffic. Regular latex wall paint is not formulated to withstand the wear and tear of a kitchen floor and will likely chip and scratch very quickly.
Q6: Do I need to seal painted kitchen floor tiles?
A6: Yes, applying a durable clear topcoat or sealer is highly recommended. It adds an extra layer of protection against scuffs, scratches, and moisture, significantly extending the life and appearance of your painted floor.
Q7: What if my kitchen floor tiles are textured?
A7: Textured tiles can be painted, but preparation is even more critical. Ensure you thoroughly clean out all the crevices. A slightly stiffer brush might be needed for cleaning. For painting, a high-density foam roller is usually best to get into the texture. Some texture may show through the paint, which can be a desired effect, but avoid paints that are too thick as they can obscure the tile detail.
Q8: Can I paint the grout lines separately?
A8: Yes, you can paint grout lines separately using a grout pen or a small artist’s brush. This is a great way to refresh stained grout without painting the entire tile surface, or to add a contrasting color to your design. Ensure the grout is clean and dry before applying any grout paint.
Conclusion: A Fresh Foundation for Your Kitchen
Painting floor tiles in a kitchen is a viable and often spectacular way to refresh your space. By following these detailed steps, selecting the right materials like a durable floor tile paint kitchen, and dedicating time to proper preparation, you can achieve a beautiful and long-lasting finish. This DIY kitchen floor tile painting endeavor can transform your kitchen, offering a fresh canvas and a renewed sense of style without breaking the bank. So, if you’re looking for a budget-friendly and impactful way to update your home, refinishing kitchen floor tiles with paint is an excellent option to consider. Your kitchen floor tile makeover awaits!