Image Source: img.proremodeler.com
Guide: Choosing the Right Can Lighting In Kitchen
Are you wondering, “What is can lighting in a kitchen?” Can lighting, also known as recessed lighting, refers to light fixtures installed directly into the ceiling. They create a clean look by hiding the light bulb and fixture parts above the ceiling line. Choosing the right can lighting for your kitchen helps make the space bright, useful, and nice to look at. This guide will help you pick the best lights for your cooking and gathering area.
Grasping Can Lights for Your Kitchen
Can lights are popular for many homes. They are also called pot lights or downlights. They sit inside the ceiling. Only a small trim piece and the light bulb show below the ceiling. This design makes the ceiling look smooth and clean.
Why do people like can lights in the kitchen?
* They save space. No hanging lights to bump your head on.
* They give a lot of light. You can place many lights to make the whole room bright.
* They look modern. They fit many kitchen styles.
* They offer different types of light. You can mix and match where lights go. This helps with kitchen lighting design.
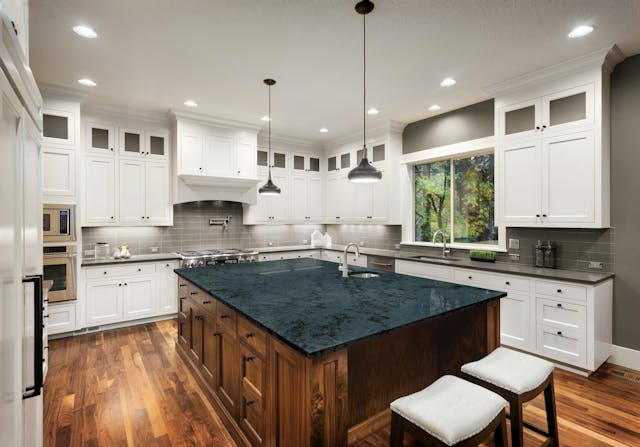
Can lights are a key part of many kitchen lighting plans. They work well with other kitchen ceiling light fixtures like pendants or chandeliers.
Fathoming Kitchen Lighting Design Goals
Good lighting in a kitchen is very important. It helps you see what you are doing. It also makes the room feel good. A good kitchen lighting design uses different layers of light.
There are three main types of lighting you need:
* Ambient lighting: This is the main light for the whole room. It fills the space with general brightness. Can lights are great for this.
* Task lighting: This light helps you do specific jobs. Think about cutting food, reading recipes, or washing dishes. Lights under cabinets or can lights aimed at counters work well here. Task lighting kitchen is very important for safety and doing things right.
* Accent lighting: This light makes certain things stand out. Maybe you have a nice backsplash or artwork. Small can lights or track lights can be used here.
When you plan your kitchen lighting design, think about all these types. You want to have enough light for everything you do in the kitchen.
Deciphering Recessed Lighting Kitchen Layout
Where you put your can lights matters a lot. A good recessed lighting kitchen layout makes sure light goes where you need it. It also avoids dark spots or harsh shadows.
How to plan your layout:
1. Draw your kitchen: Make a simple map of your kitchen. Show counters, island, sink, stove, and tables.
2. Mark work areas: Circle the spots where you cook, prep food, and wash up. These need task lighting.
3. Plan general light: Think about how to light the whole room for ambient lighting kitchen. Place lights so they spread light evenly.
4. Consider spacing: Lights should not be too close or too far apart. If they are too close, you waste light. If too far, you get dark spots. A common rule is to space them half the distance of your ceiling height. For a 9-foot ceiling, space lights about 4.5 feet apart.
5. Position for task light: Place lights above the front edge of counters. This way, your body does not block the light when you stand there. For an island, place lights over the center or slightly towards the work side.
6. Avoid glare: Don’t put lights directly over where someone might sit, like a breakfast bar, without careful thought. The light might shine right in their eyes.
Let’s look at specific areas:
* Counters: Place can lights to shine on the counter surface. This is key for task lighting kitchen. Lights under cabinets also help here.
* Sink: Needs good, bright light for washing dishes. A can light directly over the sink is a good idea.
* Stove/Cooktop: Usually has a light in the hood. But extra can lights nearby can help. Make sure lights are suitable for kitchen use and safe near heat/steam.
* Island/Peninsula: If you prep food or eat here, you need good light. Use multiple lights spaced evenly. Recessed lighting kitchen layout for islands is often a line of lights.
* Walkways: Make sure main paths through the kitchen are well lit so you can walk safely.
Getting the layout right is a crucial step in kitchen lighting design. It makes a big difference in how your kitchen looks and works.
Interpreting Types of LED Kitchen Can Lights
Today, most people choose LED lights for their kitchen can lights. LED stands for Light Emitting Diode. These lights are very popular for good reasons.
Why choose LED kitchen can lights?
* Save energy: They use much less power than old-style bulbs. This saves you money on your electric bill.
* Last a long time: LED lights can last for many, many years. You don’t have to change bulbs often.
* Bright light: LEDs give off strong, clear light.
* Less heat: They don’t get as hot as older bulbs. This is safer and keeps your kitchen cooler.
* Different colors of light: LEDs come in various color temperatures. You can pick warm, soft light (like old bulbs) or cooler, bright light. This affects the feel of your kitchen. Color temperature is measured in Kelvins (K). Lower numbers (2700K-3000K) are warmer. Higher numbers (4000K-5000K) are cooler, like daylight. For kitchens, many people like something in the middle or slightly cooler (3000K-4000K) for good task lighting.
When picking LED kitchen can lights, think about:
* Brightness (Lumens): This tells you how much light the bulb gives off. More lumens mean brighter light. Task areas need more lumens than general ambient lighting.
* Color Temperature (Kelvin): Choose the light color you like. Warm for cozy, cool for bright and clean.
* Color Rendering Index (CRI): This number tells you how well the light shows true colors. A higher CRI (80 or above) means colors look more natural. This is important in a kitchen where you are dealing with food colors.
* Dimming ability: Do you want to make the lights brighter or darker? Many LED lights are dimmable, but you need the right switch. More on this later.
LED kitchen can lights are a smart choice for their performance and long life. They are a key part of modern kitchen remodel lighting plans.
Comprehending Dimmable Kitchen Can Lights
Being able to change how bright your lights are is a great feature. Dimmable kitchen can lights let you set the mood. Bright for cooking, softer for eating or relaxing.
How do dimmable lights work?
* You need special light bulbs or LED fixtures that say they are dimmable.
* You also need a special dimmer switch on the wall. A regular switch is just on or off. A dimmer switch lets you slide or press to change the brightness.
Why would you want dimmable kitchen can lights?
* Control the mood: Make the kitchen feel warm and cozy in the evening.
* Save energy: Dimming lights uses less power.
* Flexibility: Adjust the light for different tasks. Maybe you need full brightness for chopping veggies but less for loading the dishwasher.
When choosing dimmable kitchen can lights, make sure both the light fixture/bulb and the switch are made for dimming. Not all LEDs dim well, and some may flicker or hum with the wrong dimmer switch. It is best to check the product details or ask for help to match them correctly.
Dimmable can lights add a lot of function and comfort to your kitchen lighting design.
Grasping Can Light Trim Styles Kitchen
The “trim” is the part of the can light you see from the room. It finishes the look of the light fixture where it meets the ceiling. Can light trim styles kitchen come in many shapes, sizes, and finishes. The trim affects how the light looks and how it performs.
Here are some common trim styles:
* Baffle trim: This is a popular type. It has rings inside the cone shape. These rings help soak up extra light. This reduces glare, which means the light is less likely to shine harshly in your eyes. It’s good for general and task lighting. Often comes in black or white inside.
* Reflector trim: This trim is shiny inside. It helps bounce light downwards. This makes the light brighter. It is good for areas that need a lot of task lighting. It can sometimes cause more glare than baffle trim.
* Gimbal trim: This trim lets you angle the light bulb. It is often called an adjustable trim. You can point the light at a wall, artwork, or a specific work area like a counter. This is useful for accent lighting or focused task lighting.
* Open trim: This is just an open hole with a simple ring around it. It is very basic. It doesn’t control glare or direct light much.
* Wall Wash trim: This trim has a scoop shape inside. It pushes light towards one side. It is used to light up a wall evenly, like for accent lighting on a backsplash or art.
* Decorative trim: Some trims have more style, like frosted glass lenses, or different shapes. These are less common in purely functional kitchen lighting but can add a design touch.
| Trim Style | Look | How it works | Best Use Cases in Kitchen | Glare Control |
|---|---|---|---|---|
| Baffle | Ringed cone | Absorbs light, reduces glare | General, Task (Counters, Walkways) | Good |
| Reflector | Shiny cone | Bounces light down, brighter | Task (High light areas) | Less |
| Gimbal | Adjustable cone | Light can be angled | Task (Counters, Island), Accent | Varies |
| Open | Simple ring | Basic light | Utility areas, less critical spots | Poor |
| Wall Wash | Scooped cone | Directs light to one side | Accent (Walls, Cabinets, Backsplash) | N/A (Aims away) |
Choosing the right trim helps you get the light where you need it and makes the lights look good in your kitchen ceiling light fixtures plan.
Fathoming Kitchen Lighting Installation
Putting in can lights is not a simple job. It involves cutting holes in the ceiling, running wires, and connecting them to your home’s power. This work should ideally be done by a qualified electrician. Kitchen lighting installation involves working with electricity, which can be dangerous if you don’t know what you are doing.
Steps an electrician might take:
1. Planning: Decide where each light goes based on the recessed lighting kitchen layout you designed.
2. Cutting holes: Use a special tool to cut neat, round holes in the ceiling.
3. Running wires: Pull electrical wires from the power source (like a junction box or switch) to each light location. This might involve going through walls or the ceiling space.
4. Connecting fixtures: Attach the can light housing to the ceiling structure. Connect the wires to the fixture.
5. Installing trim: Push the trim piece into the can housing.
6. Installing bulbs: Put in the chosen LED kitchen can lights or bulbs.
7. Connecting switches: Wire the lights to the wall switch, including a dimmer switch if using dimmable kitchen can lights.
8. Testing: Turn on the power and test all the lights and the dimmer function.
For a kitchen remodel lighting project, it’s often easier to install recessed lights because the ceiling might be open. In an existing kitchen with a finished ceiling, the electrician will need to be more careful and might have to make small holes to run wires.
Even if you are handy, working with kitchen ceiling light fixtures, especially new wiring, is best left to a professional. They make sure the work is safe and meets local building rules. Proper kitchen lighting installation is key for safety and the lights working correctly.
Interpreting Kitchen Remodel Lighting
If you are planning a kitchen remodel, it is the perfect time to update your lighting. Kitchen remodel lighting is a chance to fix old problems, add more light, and improve the look and feel of your kitchen. Can lights are a very common part of a kitchen remodel lighting plan.
When planning remodel lighting:
* Think about the new layout: Will the sink, stove, or island move? Your lighting layout needs to match the new kitchen design. The recessed lighting kitchen layout will change.
* Add more lights: Older kitchens often don’t have enough light. A remodel lets you add more can lights for better ambient lighting kitchen and task lighting kitchen.
* Update technology: Switch from old incandescent or halogen bulbs to energy-saving LED kitchen can lights.
* Include different layers: Make sure you have planned for ambient, task, and maybe accent lighting using can lights and other kitchen ceiling light fixtures.
* Consider dimmers: Add dimmable kitchen can lights and switches for flexibility.
* Pick new trims: Choose can light trim styles kitchen that match your new kitchen’s look.
Working with a lighting designer or your contractor during a kitchen remodel lighting project can help you get the best result. They can help with the recessed lighting kitchen layout and suggest the right types of lights. Updating your lighting during a remodel makes a big difference in how you use and enjoy your new kitchen.
Comprehending How Can Lights Fit with Other Kitchen Ceiling Light Fixtures
While can lights are great for general and task lighting, they are often used with other kitchen ceiling light fixtures. Combining different types of lights creates a complete and layered lighting plan.
How can lights work with other fixtures:
* Can lights + Pendants: This is a very common pairing. Can lights provide the main ambient lighting. Pendant lights hang down, often over an island or sink. They add style and focused task or accent light.
* Can lights + Chandeliers: In larger or more formal kitchens, a chandelier might be used over a dining area or island. Can lights provide general light around the room, while the chandelier is a central feature and light source.
* Can lights + Track Lighting: Track lighting has multiple lights on a track. Like gimbal trims on can lights, track lights can be aimed. They are good for task or accent lighting. Can lights can provide ambient light while track lights focus on specific areas.
* Can lights + Under-Cabinet Lights: Can lights often provide overhead task lighting on counters. But under-cabinet lights are even better for lighting the space directly below cabinets. They work together to make sure counter surfaces are well lit without shadows from cabinets. Can lights handle the general counter area, while under-cabinet lights light the very back of the counter.
Using can lights as the main layer of light, combined with other kitchen ceiling light fixtures for specific jobs or style, creates a powerful and flexible kitchen lighting design.
Detailed Guide to Can Lighting in Specific Kitchen Areas
Let’s break down using can lights in different parts of your kitchen to achieve great ambient lighting kitchen and task lighting kitchen.
Ambient Lighting Kitchen with Can Lights
The goal of ambient lighting is to give the whole kitchen a comfortable level of brightness. Can lights are excellent for this because they spread light evenly.
- Placement: Space can lights evenly across the main ceiling area. Follow the rule of spacing them about half your ceiling height apart. Avoid placing them right against walls, as this can create shadows. Pull them a foot or two away from walls.
- Brightness: The total lumens from all your ambient lights should be enough for the size of the room. There are guidelines for how many lumens per square foot you need, but simply put, make sure it feels bright enough for general movement and seeing things around the room.
- Trim Style: Baffle trims are often used for ambient lighting as they control glare, making the overall light more comfortable.
- Dimmable Control: Having dimmable kitchen can lights for your ambient lighting is very useful. You can turn them up for cleaning or down for a relaxed evening.
Task Lighting Kitchen with Can Lights
Task lighting focuses light on work surfaces. Can lights can be used for this, often combined with other fixtures.
- Placement: Place can lights over the front edge of countertops, islands, and sinks. This ensures the light hits the workspace and your body doesn’t cast a shadow.
- Brightness: Task areas need brighter light than ambient areas. Use lights with higher lumen output here, or space the lights closer together over work zones.
- Trim Style: Reflector trims can provide brighter light downwards, useful for task areas. Gimbal trims are also great as you can aim the light exactly where you need it on the counter or island.
- Layering: Remember that can lights are just one option for task lighting kitchen. Combine them with under-cabinet lighting for the best results on counters.
Accent Lighting with Can Lights
Accent lighting draws attention to features. While not the primary use of can lights in kitchens, it’s possible.
- Placement: Use adjustable (gimbal) can lights pointed directly at artwork, open shelving with nice dishes, or a stone backsplash.
- Trim Style: Gimbal or Wall Wash trims are designed for accent lighting.
- Brightness: Accent lights should be brighter than the surrounding ambient light to make the feature stand out.
By planning the recessed lighting kitchen layout carefully for each type of lighting, you create a kitchen that is both functional and beautiful.
Evaluating Size and Type for Can Lights
Can lights come in different sizes. The most common sizes in homes are 4-inch, 5-inch, and 6-inch in diameter (this refers to the opening size).
- 6-inch: This was the standard for many years. They give a good amount of light and are good for general ambient lighting in larger areas.
- 4-inch: These are becoming very popular, especially with LED technology which allows smaller fixtures to give off a lot of light. 4-inch lights are less visible in the ceiling and can be spaced closer together. They work well for task lighting and in smaller kitchens or areas.
- 5-inch: A middle size, less common than 4-inch or 6-inch but available.
Choosing the size depends on:
* Ceiling height: For very high ceilings, larger cans (6-inch) might be needed to get light to the floor, but modern powerful LEDs mean 4-inch can work well too.
* Desired look: Smaller 4-inch lights offer a cleaner, less noticeable look on the ceiling.
* Amount of light needed: While size is less important now with LED power, placing more smaller lights often gives a more even spread than fewer larger lights.
Most modern kitchen remodel lighting plans lean towards 4-inch or 5-inch LED kitchen can lights for a clean look and efficient, bright light.
Beyond size, consider the type of housing:
* New Construction Housing: Used when the ceiling is open (like in a remodel). The housing is attached directly to the joists or framing.
* Remodel Housing: Used when the ceiling is closed. These have clips that hold onto the drywall. They are pushed up into the hole from below.
Make sure you get the right type of housing for your kitchen lighting installation situation.
Interpreting Color Temperature and CRI in Kitchen Can Lights
We touched on color temperature (Kelvin) and CRI (Color Rendering Index) when talking about LED kitchen can lights. These are very important for a kitchen.
- Color Temperature (K):
- 2700K: Very warm, yellowish light, like old incandescent bulbs. Creates a cozy feel but might not be best for seeing true food colors.
- 3000K: Warm white. Still comfortable and inviting, a bit less yellow than 2700K. A popular choice for general kitchen light.
- 3500K: Neutral white. Not too warm, not too cool. Good balance for both tasks and general ambient light.
- 4000K: Cool white. Whiter light, closer to daylight. Makes things look very clean and can be great for task lighting where you need to see clearly (like prepping food). Some find it a bit stark for the whole kitchen.
- 5000K+: Very cool white, almost bluish. Like bright daylight. Usually too harsh for a home kitchen, maybe for commercial spaces.
For kitchen ambient lighting kitchen, 3000K or 3500K are common choices. For task lighting kitchen over counters or islands, some prefer 3500K or 4000K for better visibility. You can even mix them, using warmer lights for general areas and cooler lights for task zones, controlled by different switches.
- CRI (Color Rendering Index):
- A number from 0 to 100.
- 100 is like natural sunlight – shows colors perfectly.
- An old-style incandescent bulb has a CRI of 100.
- Many standard LEDs have a CRI of 80. This is acceptable.
- For a kitchen, a CRI of 90 or higher is much better. It makes food (like red tomatoes, green vegetables, cooked meats) look their true colors. This is not just for looks; it can help you judge if food is cooked properly.
When buying LED kitchen can lights, always check the Kelvin and CRI numbers. Don’t just buy whatever is cheapest. Look for LEDs with a CRI of 90+ for the best kitchen lighting design.
Planning for Switches and Controls
How you turn your lights on and off is part of the design. For kitchen can lights, especially if you have different layers (ambient, task), you’ll want separate switches.
- Separate Controls: Put ambient lights on one switch, task lights (over counters, island) on another. This lets you turn on just the light you need.
- Dimmer Switches: As discussed, dimmable kitchen can lights require dimmer switches. Use dimmers for ambient lights to set the mood. You might also want a dimmer for task lights over an island if it’s also used for eating or gathering.
- Smart Lighting: Modern kitchen remodel lighting often includes smart lighting systems. These let you control lights with your phone, voice, or set schedules. You can group different lights together (e.g., all counter lights on one “scene”) and control their brightness.
Think about switch placement too. Put switches near the entrances to the kitchen. Place task light switches near the work areas they control.
Putting it Together: Creating an Effective Lighting Plan
Designing your kitchen lighting using can lights involves bringing all these points together.
- Start with Function: What do you do in your kitchen? Cooking, cleaning, eating, homework, entertaining? This tells you where you need task lighting kitchen.
- Plan the Layers: Map out where ambient lighting kitchen, task lighting, and any accent lighting will go on your kitchen layout.
- Choose the Lights: Select the right size can lights (likely 4-inch or 5-inch LED kitchen can lights). Pick LEDs with the desired brightness (lumens), color temperature (K), and high CRI (90+). Ensure they are dimmable if you want that feature.
- Select the Trims: Choose can light trim styles kitchen that work for each location (baffle for general, gimbal for task/accent, wall wash for walls). Make sure the finish matches your kitchen style.
- Plan the Switches: Decide where switches will go and which lights each switch will control. Plan for dimmer switches where needed for dimmable kitchen can lights.
- Consider Installation: Think about how the kitchen lighting installation will happen, especially if it’s a kitchen remodel lighting project or in an existing ceiling. Budget for professional help.
A well-planned recessed lighting kitchen layout, using the right types of LED kitchen can lights, trims, and controls, will make your kitchen a much nicer place to be and work in. Don’t underestimate the power of good lighting in your kitchen design. It’s just as important as the cabinets and countertops.
Maintaining Your Can Lighting
Once your kitchen ceiling light fixtures, including your new can lights, are installed, maintenance is usually simple, especially with LED kitchen can lights.
- LEDs: Since they last a very long time, you won’t change bulbs often. If an LED fixture fails, the whole unit might need replacing, but this is rare for quality products within their lifespan.
- Trims: Keep the trims clean. Dust and grease can build up in a kitchen. Wipe them gently with a damp cloth (make sure the power is off first!).
- Dimmer Switches: If you have issues with flickering or humming with dimmable kitchen can lights, the dimmer switch might be the problem. Ensure it’s compatible with your specific LED lights. An electrician can help troubleshoot this.
Compared to older lighting types, modern can lighting requires very little upkeep.
Conclusion: Making the Right Choice
Choosing the right can lighting in your kitchen is a key step in creating a functional, beautiful space. Start by understanding what can lights are and why they work well for kitchen lighting design. Plan your recessed lighting kitchen layout carefully, thinking about ambient lighting kitchen and task lighting kitchen needs in different zones.
Select modern LED kitchen can lights for energy saving and long life. Pay attention to brightness, color temperature, and especially CRI for seeing true colors. Decide if you want dimmable kitchen can lights and plan for the right switches. Don’t forget the visual impact and function of can light trim styles kitchen.
Whether you are doing a full kitchen remodel lighting project or just updating your existing lighting, investing time in planning your can lights will pay off every time you use your kitchen. Consider professional kitchen lighting installation to ensure safety and proper function. With the right choices, your can lighting will provide bright, effective light for years to come.
FAQ: Can Lighting In Kitchen
Q: How many can lights do I need in my kitchen?
A: The number of lights depends on the size of your kitchen and ceiling height. A common guide is to space 4-inch or 6-inch lights about 4-6 feet apart for general lighting. Task areas over counters or islands need more focused light, potentially spaced closer (2-4 feet apart). It’s best to plan based on your specific kitchen layout and lighting needs, aiming for enough lumens per square foot.
Q: Can I mix different sizes of can lights in my kitchen?
A: Yes, you can. Some people use larger 6-inch lights for general ambient lighting and smaller 4-inch lights over task areas like counters or islands for a different look or more focused light. Just make sure the style and finish of the trims are consistent if you want a uniform look.
Q: Are all LED can lights dimmable?
A: No. While many LED lights are designed to be dimmable, not all are. You must specifically choose LED kitchen can lights that state they are dimmable. You also need a compatible LED dimmer switch. Using a standard dimmer or a non-dimmable LED can cause flickering, buzzing, or damage the light.
Q: Can I put can lights in a sloped ceiling?
A: Yes. You need special can light housings designed for sloped ceilings. These fixtures have an adjustable part that allows the light to hang straight down even though the can housing is angled in the ceiling.
Q: How far should can lights be from the wall in a kitchen?
A: For general ambient lighting, pull the lights away from the wall. A common distance is 2-3 feet from the wall. This helps the light spread into the room and avoids strong shadows on the walls or the edges of counters. For wall wash accent lighting, the distance might be different, planned specifically to light the wall surface evenly.
Q: What is the difference between remodel and new construction can lights?
A: Remodel can lights are made to be installed in existing ceilings with drywall. They use special clips that hold onto the drywall. New construction can lights are for use when the ceiling is open and you can attach the housing directly to the ceiling joists or framing. Make sure you buy the correct type for your kitchen lighting installation.
Q: Is it better to have more small can lights or fewer large ones?
A: Having more smaller (e.g., 4-inch) can lights spaced closer together often provides more even light and reduces harsh shadows compared to fewer larger (e.g., 6-inch) lights spaced farther apart. Smaller lights also have a cleaner look in the ceiling. With modern powerful LED kitchen can lights, smaller sizes can provide plenty of brightness.
Q: How important is the CRI for kitchen lighting?
A: CRI (Color Rendering Index) is quite important in a kitchen. A high CRI (90+) ensures that colors, especially food colors, look natural and true under the light. This is helpful for food prep, cooking, and just making your kitchen look its best. Aim for a CRI of 90 or higher for your LED kitchen can lights.