Removing a KitchenAid dishwasher is a job you can do yourself if you are careful. It takes time and patience. This guide shows you how to do it safely, step by step. You will learn how to disconnect dishwasher parts, handle the water line disconnect, perform drain hose removal, manage the electrical hookup disconnection, find mounting bracket screws, finish removing kickplate, and follow general appliance removal steps. We will also list the tools needed to remove dishwasher units and touch on dishwasher installation steps in the context of replacing your old one. After reading, you will know the steps for pulling out dishwasher safely.
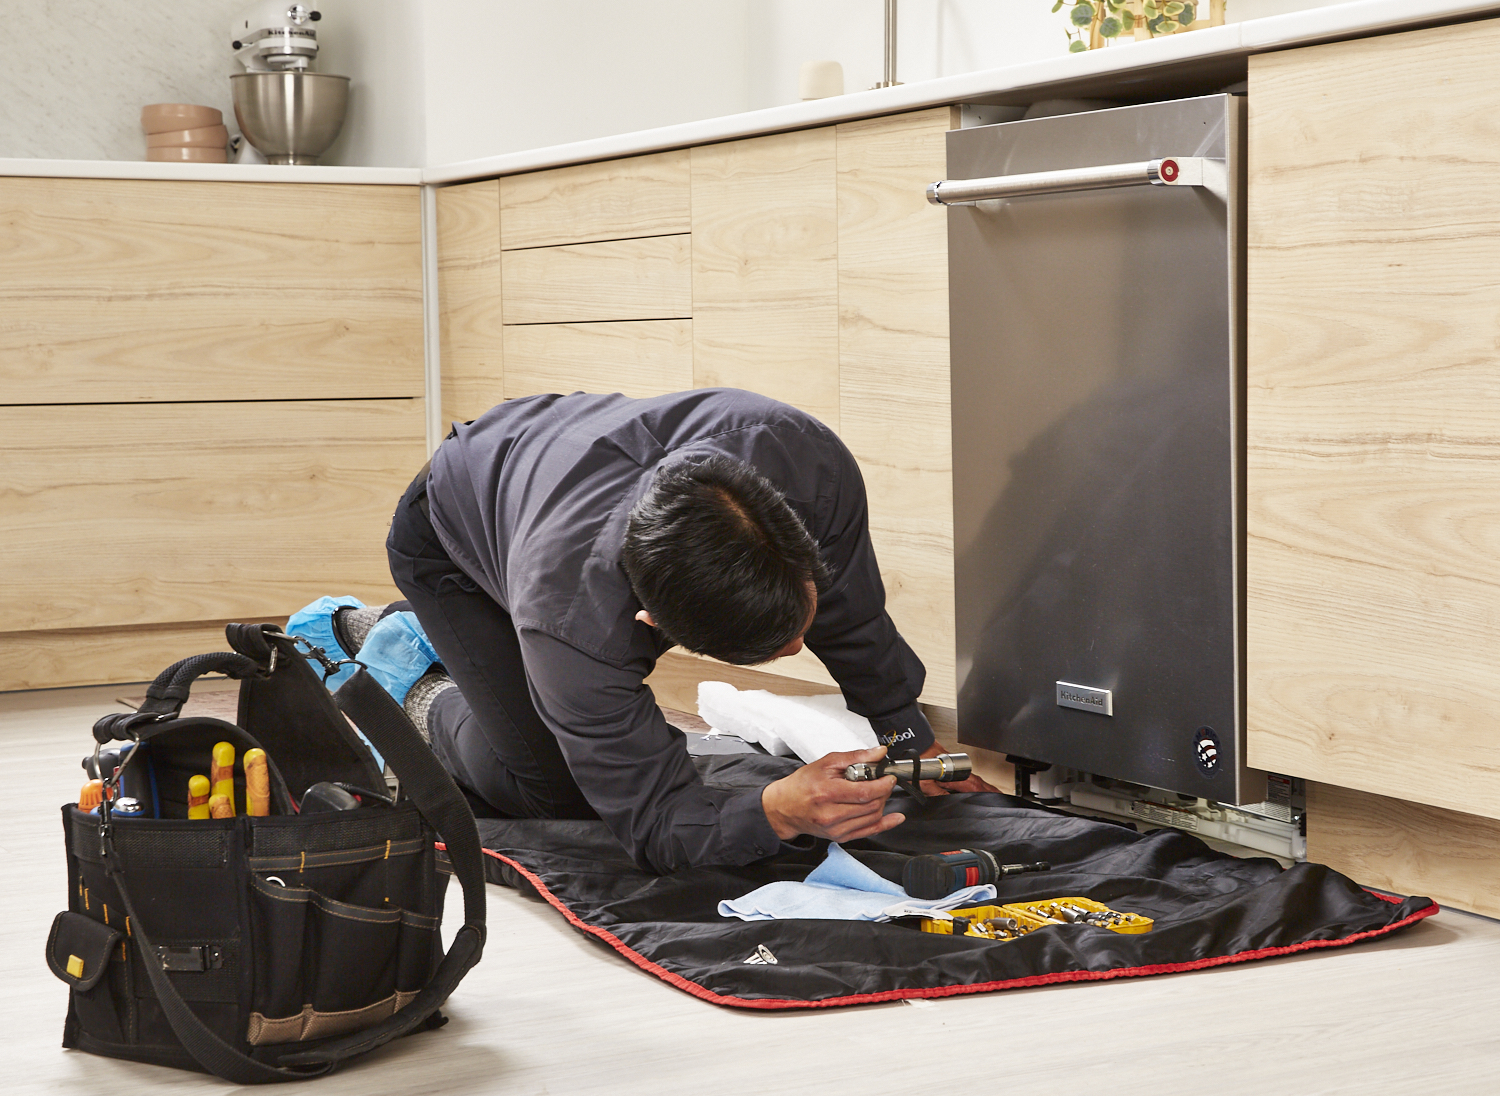
Image Source: theappliancepros.ca
Getting Ready for the Job
Taking out a dishwasher needs some prep work. You must make sure everything is safe before you start. This means turning off power and water. It also means having the right tools ready. Doing these things first makes the work go smoother and helps prevent accidents. Safety comes first in all appliance removal steps.
Safety First
Safety is the most important thing. Working with water and electricity can be risky. Always turn off the power to the dishwasher before you touch any wires. Always turn off the water before you touch any pipes. This stops shocks and leaks. Wear safety glasses to protect your eyes. Use gloves to protect your hands. Move slowly and carefully. Don’t rush.
Tools Needed to Remove Dishwasher
You will need some basic tools to take out your KitchenAid dishwasher. Make sure you have these items ready before you begin. Having the right tools makes the job easier and safer.
- Adjustable wrench: For loosening nuts on water pipes.
- Pipe wrench (optional): Might be needed for stubborn nuts.
- Screwdriver (Phillips and flathead): For removing screws, like the mounting bracket screws and kickplate screws.
- Nut driver or socket set: Sometimes screws have hex heads instead of Phillips or flathead.
- Pliers: For holding things or pulling gently.
- Utility knife or scissors: To cut zip ties or tape.
- Towels and a bucket: To catch any water that might spill during the water line disconnect or drain hose removal.
- Work light or flashlight: Under the sink or behind the dishwasher area can be dark.
- Voltage tester (non-contact is best): To check if the power is really off after electrical hookup disconnection.
- Safety glasses: To protect your eyes.
- Gloves: To protect your hands.
- Dolly or appliance mover (optional): If the floor is soft or you need help moving the heavy unit after pulling out dishwasher.
Steps for Removing Your KitchenAid Dishwasher
Let’s go through the appliance removal steps one by one. Follow these steps carefully to disconnect dishwasher from its home under the counter.
Step 1: Turn Off Power
This is very important for safety. You must stop electricity from going to the dishwasher.
Find the main power switch for your house or apartment. This is usually in a box on the wall. It might be in the basement, garage, or a utility closet.
Open the box. You will see many switches, called circuit breakers or fuses.
Each switch or fuse is marked. Look for the one that says “Dishwasher,” “Kitchen,” or the like. If they are not marked, you might need to turn off the main switch for the whole house, but this is less ideal if you need lights to work.
Flip the switch to the “Off” position. If you have fuses, unscrew the correct fuse.
To be extra sure, use a voltage tester at the dishwasher’s power connection point (usually in a box near the floor behind the kickplate, but only check after the main steps of removing the kickplate and accessing the wiring are done safely). For now, turning off the breaker is step one. You have started the electrical hookup disconnection process at the source. This is the first part of how to disconnect dishwasher safely.
Step 2: Turn Off Water Supply
Next, stop the water. Water comes to the dishwasher through a pipe. You must turn off the water source for this pipe.
Look under your kitchen sink. You should see pipes there. One pipe goes from under the sink area to the dishwasher.
Follow this pipe. You should find a small valve on the pipe. It might have a handle you turn or a small knob.
Turn the handle or knob until the water is off. Usually, turning clockwise (to the right) turns water off. Turn it tight, but do not force it too much.
If you cannot find a valve under the sink, you might need to turn off the main water supply for your whole house. This main valve is often in the basement, garage, or outside.
Turning off the water supply stops water from flowing to the dishwasher. This is the water line disconnect step at the source. Have a towel ready, just in case.
Step 3: Removing Kickplate
The kickplate is a panel at the very bottom front of the dishwasher. It covers wires and pipes. You need to take it off to get to the parts you must disconnect.
Look at the kickplate. You will see screws holding it in place. There are usually two to four screws along the bottom edge.
Use your screwdriver to take out these screws. Keep the screws in a safe place, like a small cup or bag. You might need them if you install a new dishwasher later.
Once the screws are out, the kickplate should come off. It might just lift away or need a gentle pull. Put the kickplate aside. You have finished removing kickplate. Now you can see the water pipe, drain hose, and electrical box.
Step 4: Water Line Disconnect at Dishwasher
Now you will disconnect the water pipe from the dishwasher itself. This is part of the water line disconnect process.
You should see the water pipe connected to a valve or fitting on the bottom front of the dishwasher, in the area where you removed the kickplate. It’s usually a small pipe made of copper or braided metal.
Have your towels and bucket ready. Even if you turned off the water, some water might still be in the pipe.
Use your adjustable wrench to loosen the large nut that holds the water pipe onto the dishwasher fitting.
Turn the nut counter-clockwise (to the left). It might be tight at first.
As you loosen the nut, water might drip out. Let it drip into the bucket or soak it up with towels.
Keep loosening the nut until the pipe is free from the dishwasher.
Carefully move the end of the pipe out of the way. Make sure it won’t drip water everywhere. You have completed the water line disconnect from the appliance.
Step 5: Drain Hose Removal
The drain hose carries dirty water out of the dishwasher. It usually connects to a pipe under your kitchen sink or to a special drain fitting.
The drain hose is a flexible rubber or plastic hose. Follow it from the dishwasher. It will go through a hole in the cabinet wall to under the sink.
Go under the sink. Find where the drain hose connects. It might be attached to the garbage disposal or a standpipe (a vertical pipe).
There might be a clamp holding the hose on. It could be a spring clamp you squeeze with pliers or a screw clamp you loosen with a screwdriver.
Loosen or remove the clamp.
Gently twist and pull the drain hose off the fitting.
More water will likely come out now, as dirty water sits in the hose and the dishwasher’s pump area. Have your bucket and towels ready again.
Once the hose is free under the sink, you need to pull it back through the cabinet hole from the front of the dishwasher.
Go back to the front of the dishwasher. Gently pull the drain hose through the hole in the cabinet wall. Be careful not to snag it.
The drain hose removal is now done from both ends.
Step 6: Electrical Hookup Disconnection
Now you need to safely disconnect the electrical wires. You turned off the power at the breaker, but you must disconnect the wires at the dishwasher.
Look in the area where you removed the kickplate. You should see a small metal box. This is the electrical box for the dishwasher.
There is usually a cover on this box. It’s held on by one or two screws.
Use your screwdriver to remove the screw(s) and take off the cover.
Inside the box, you will see wires. There should be three wires: a black one (hot), a white one (neutral), and a green or bare copper one (ground). These wires from the house connect to wires from the dishwasher using plastic connectors, often called wire nuts.
Before you touch anything, use your voltage tester to touch the black and white wires inside the box where they connect to the house wires. If the tester lights up or beeps, the power is not off. Go back and find the correct breaker. Do not continue until the tester shows no power.
Once you are sure there is no power, twist off the plastic wire nuts that connect the house wires to the dishwasher wires. Turn them counter-clockwise.
Separate the wires.
The house wires might be secured with a clamp where they enter the electrical box. You might need to loosen a screw on this clamp to free the house wires.
Carefully tuck the house wires back through the hole they came from, or secure them safely out of the way. Make sure the bare ends don’t touch anything metal.
You have now completed the electrical hookup disconnection at the dishwasher. The dishwasher is now free from its power source.
Step 7: Removing Mounting Bracket Screws
Dishwashers are held in place by screws. These screws stop the dishwasher from tipping forward when you open the door and pull out the racks. They are mounting bracket screws.
Open the dishwasher door all the way.
Look up at the top edge of the dishwasher, just under the counter. You should see two brackets, one on the left and one on the right.
These brackets are attached to the underside of the kitchen counter or to the sides of the cabinets.
You will see screws going through holes in these brackets into the counter or cabinets. These are the mounting bracket screws.
Use your screwdriver to remove these screws. Keep the screws in a safe place with the kickplate screws.
If your counter is granite or stone, the brackets might be attached to the sides of the cabinets, not the counter underside. Look on the left and right walls of the dishwasher opening, about halfway up. You will find the brackets and screws there.
Remove these mounting bracket screws. Once these screws are out, the dishwasher is no longer physically attached to the counter or cabinets.
Step 8: Pulling Out Dishwasher
All connections are now free: power, water, and drain. The mounting screws are out. The dishwasher is ready to be moved. This is the step for pulling out dishwasher.
Close the dishwasher door.
Get a good grip on the sides of the dishwasher.
Gently pull the dishwasher straight out from under the counter.
The front legs might catch on the floor. You might need to tilt the dishwasher back slightly to help the front legs clear the opening. Or you might need to adjust the front legs (they screw up or down) to make them shorter.
Pull slowly and carefully. Watch the water pipe and drain hose. Make sure they don’t snag on anything as you pull the dishwasher out.
If the dishwasher feels stuck, do not force it. Double-check that you removed all the mounting bracket screws and that the water pipe and drain hose are completely free and not caught.
You might need a second person to help guide the hoses from behind the cabinets while you pull from the front.
Keep pulling until the dishwasher is fully out from under the counter and is in front of the cabinet opening.
You have successfully completed pulling out dishwasher from its space. This is a major step in the appliance removal steps.
Cleaning Up and Checking
Once the dishwasher is out, there will likely be some water on the floor from the pipes and hoses. Clean it up with towels.
Look into the space where the dishwasher was. Clean any dirt or debris. This space is often dusty or has spilled food particles.
Check the connections you disconnected (water pipe, drain hose, electrical wires) to make sure they are secure and won’t cause any problems. Cap the house wires with wire nuts for safety if they are not going to be connected to a new appliance right away. Place a towel or bucket under the water pipe just in case of drips.
Appliance Removal Steps Overview
Let’s quickly look back at the main appliance removal steps:
1. Turn off electrical power at the breaker (electrical hookup disconnection).
2. Turn off water supply at the valve (water line disconnect).
3. Remove the bottom kickplate (removing kickplate).
4. Disconnect the water line at the dishwasher (water line disconnect).
5. Disconnect the drain hose from the drain connection and pull it through (drain hose removal).
6. Disconnect the electrical wires in the junction box (electrical hookup disconnection).
7. Remove the mounting bracket screws holding the dishwasher in place (mounting bracket screws).
8. Gently pull the dishwasher out from the cabinet (pulling out dishwasher).
This list covers how to disconnect dishwasher completely and remove it.
Related: Dishwasher Installation Steps (Briefly)
Removing a dishwasher is often the first part of replacing it with a new one. The dishwasher installation steps are basically the reverse of the removal steps, plus making the new connections correctly.
To install a new one:
1. Prepare the new dishwasher.
2. Carefully push the new dishwasher mostly into the opening.
3. Make the electrical connection (reversing electrical hookup disconnection).
4. Connect the water line (reversing water line disconnect).
5. Connect the drain hose (reversing drain hose removal).
6. Gently push the dishwasher fully into place.
7. Install the mounting bracket screws (reversing removing mounting bracket screws).
8. Re-install the kickplate (reversing removing kickplate).
9. Turn on the water supply.
10. Turn on the electrical power.
11. Test the new dishwasher.
This shows how the process of pulling out dishwasher is linked to putting a new one in.
More Details on Tricky Parts
Sometimes, parts of the job are harder than they seem.
Stubborn Water Line Disconnect
If the nut on the water pipe is very tight or old, it can be hard to loosen. Make sure you are turning the wrench the correct way (counter-clockwise). Use some force, but be careful not to bend or break the pipe. If it’s really stuck, a pipe wrench might give you more grip. Make sure your adjustable wrench is tight on the nut so it doesn’t slip and strip the edges of the nut. Having a good wrench helps with the water line disconnect.
Drain Hose Removal Issues
The drain hose can be stuck onto the connection point, especially if it’s been there a long time. Twisting it gently while pulling can help. If there is a clamp, make sure it is loose enough. Be careful not to rip the hose or break the fitting it’s attached to. Pulling the hose through the cabinet hole might require patience. It can get caught on insulation or wood edges.
Electrical Hookup Disconnection Safety
Rechecking power with a voltage tester is a step you should not skip. Even if you think the breaker is off, it’s best to be sure. Working with live wires is very dangerous. Take your time removing the wire nuts and separating the wires. Make sure the bare ends of the house wires are not touching anything metal or each other after the electrical hookup disconnection.
Finding Mounting Bracket Screws
Sometimes the mounting brackets are hard to see. Use your work light to look closely under the counter or on the cabinet sides. Dust or grime can hide them. KitchenAid dishwashers almost always have these brackets. They must be removed before pulling out dishwasher. Finding all the mounting bracket screws is key.
Pulling Out Dishwasher When It’s Stuck
If the dishwasher does not slide out easily after you’ve done all the steps, check these things:
* Are the front legs screwed down too far? They might be digging into the floor. Try lifting the front gently or screwing the legs up.
* Are the water pipe or drain hose snagged behind the cabinets?
* Did you really get all the mounting bracket screws? Look again.
* Is there old flooring or glue holding it? Sometimes old flooring was laid around the dishwasher, trapping it. You might need to carefully cut the flooring around the edges of the dishwasher opening.
* Is the counter edge very low? The top of the dishwasher might be rubbing. Tilting helps here.
Don’t use too much force. Forcing it can damage the floor, the cabinets, or the dishwasher itself if you plan to reuse it.
Preparing for a New Dishwasher
If you are removing the old KitchenAid to put in a new one, doing a good job on the removal helps the installation.
Clean the floor and cabinet space thoroughly.
Check the water supply valve to make sure it works and doesn’t leak.
Check the electrical box and wires for any damage.
Make sure the drain connection under the sink is clear.
Having a clean and ready space makes the new dishwasher installation steps much simpler. You’ve already learned the reverse process by mastering the appliance removal steps.
Final Checks
Before you finish the job and dispose of the old dishwasher:
* Double-check that the water supply valve is off and not dripping.
* Double-check that the electrical breaker for the dishwasher is off.
* Make sure the house wires are safe and not exposed if you aren’t connecting a new appliance right away. Put wire nuts on the ends.
* Clean up all water spills.
* Gather all the removed screws and the kickplate.
* Plan how you will move the old dishwasher out of your way and how you will dispose of it (check local rules for appliance disposal).
Removing your KitchenAid dishwasher step-by-step is a detailed process. By following these instructions, focusing on safety, and using the right tools, you can successfully disconnect dishwasher components and complete the pulling out dishwasher process yourself. Remember the importance of water line disconnect, drain hose removal, electrical hookup disconnection, removing kickplate, and finding all the mounting bracket screws. These are the core appliance removal steps.
Frequently Asked Questions
Q: How long does it take to remove a KitchenAid dishwasher?
A: For most people doing it for the first time, it might take 1 to 3 hours. If you have done it before, it could be faster. Problems like stuck parts can make it take longer.
Q: What do I do with the old dishwasher?
A: You need to dispose of it properly. Many cities or waste services have special rules for large appliances. Some scrap metal places might take it. If you bought a new dishwasher, the store delivering it might take the old one away for a fee. Do not just put it on the curb.
Q: Can I use these steps to install a new dishwasher?
A: Yes, the installation steps are mostly the reverse of the removal steps. Connect power, water, and drain lines, then push it in and secure it. You will use the same points for the water line disconnect, drain hose removal, electrical hookup disconnection, and mounting bracket screws, but you will be connecting instead of disconnecting. The kickplate also goes back on.
Q: What if I turn off the breaker and there is still power?
A: This is dangerous. It means you turned off the wrong breaker, or there is a wiring problem. Do not touch any wires. Go back to the breaker box and find the correct one. If you cannot find the right breaker or are unsure, call a qualified electrician for help. Safety first.
Q: Is there always a water shut-off valve under the sink?
A: Not always, especially in older homes. If you cannot find a valve under the sink connected to the dishwasher pipe, you will have to turn off the main water supply for your whole house.
Q: What kind of electrical connection does a KitchenAid dishwasher have?
A: Most dishwashers connect directly to your house wiring inside a junction box, using wire nuts. Some older ones might have a power cord that plugs into an outlet, usually under the sink. If yours has a cord, just unplug it after making sure the outlet is dead using your tester. The steps for electrical hookup disconnection depend on if it’s hardwired or plugged in, but turning off power at the source is always the first step.
Q: Do all dishwashers use the same mounting method?
A: Most use mounting brackets at the top or sides, similar to what’s described for mounting bracket screws. The exact shape and location of the brackets can be different between brands and models. Always look carefully for how your specific dishwasher is secured.
Q: How much does a dishwasher weigh?
A: Dishwashers are heavy, usually between 60 and 100 pounds. Pulling out dishwasher might require some effort, or help from another person, especially if you need to lift it slightly to clear the floor or frame. Using a dolly can make moving it easier once it’s out.
By following these steps and safety tips, you can confidently remove your KitchenAid dishwasher. Remember to take your time and double-check your work at each stage, especially when dealing with water and electricity.