Yes, you can paint laminate kitchen cabinets! It’s a great way to give your kitchen a fresh new look without spending a lot of money. The basic steps are to clean them really well, put on a special primer that sticks to the smooth surface, and then paint them with a good, tough paint. It takes time and careful work, but it’s a job many people can do themselves. This guide will walk you through how to paint laminate kitchen cabinets, step by step.
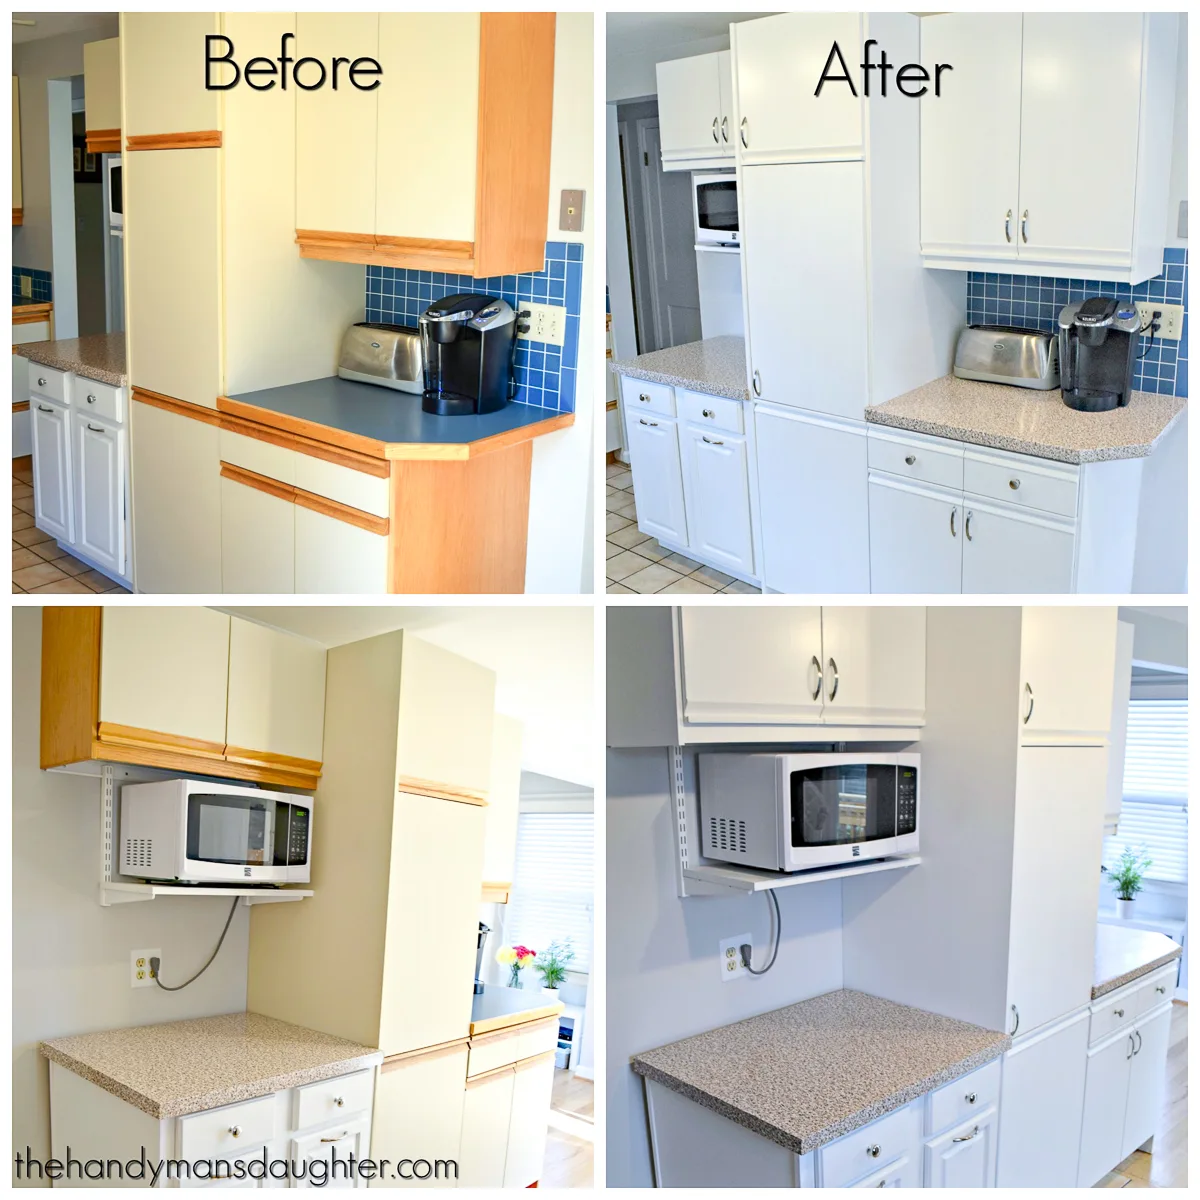
Image Source: www.thehandymansdaughter.com
Getting Started: Why Paint Laminate?
Laminate cabinets can start to look old or worn. Maybe the color is wrong for you now. Replacing cabinets costs a lot. Painting them is a much cheaper choice. It can make your kitchen feel totally new. This project is popular for DIY paint kitchen cabinets because it gives a big change for a small cost.
What You Need: Tools and Stuff
Before you start, get everything ready. Having all your tools and supplies close by makes the job easier.
Things to Gather
- Safety glasses
- Work gloves
- Mask or respirator (for dust and paint fumes)
- Drop cloths or old sheets (to cover floors and counters)
- Painter’s tape (blue tape)
- Screwdriver (to take off doors and hardware)
- Plastic bags or small containers (to keep screws organized)
- Cleaning supplies (degreaser, sponge, bucket)
- Fine-grit sandpaper (around 180-220 grit)
- Sanding sponge (good for curved parts)
- Tack cloth or vacuum cleaner with brush tool
- High-quality primer for laminate cabinets (sticks to smooth surfaces)
- Best paint for laminate cabinets (look for durable paint for kitchen cabinets)
- Paint brushes (good quality angle brush for cutting in)
- Paint rollers (small foam rollers or microfiber rollers for smooth finish)
- Paint trays
- Stir sticks
- Small touch-up brush
Choosing the Right Products
Choosing the right paint and primer is super important when you paint laminate kitchen cabinets. Laminate is smooth. Paint needs something to grab onto.
- Primer: You need a primer made for smooth, non-porous surfaces. Look for primers labeled “bonding primer” or “primer for slick surfaces.” Some are shellac-based, some are water-based or oil-based. Ask at the paint store if you are not sure. A good primer for laminate cabinets is the key to paint sticking well.
- Paint: You need a durable paint for kitchen cabinets. Cabinets get touched a lot. They need to be easy to clean and resist bumps and scratches. Look for acrylic or alkyd-based paints made for cabinets or trim. Water-based acrylic-alkyds offer good durability and easier cleanup than oil-based paints. Semi-gloss or satin finishes are often used because they are durable and easy to wipe clean. Flat paint is not a good choice for cabinets.
How to Prepare Laminate Cabinets for Painting
Good prep work is the most important part. Skipping steps here means your paint job might not last. This is the part that takes the most time and effort.
Step 1: Empty the Cabinets
Take everything out of your cabinets. This includes shelves. Put the stuff somewhere safe away from where you will be working.
Step 2: Remove Doors and Hardware
This step makes painting much easier and gives a better finish. You can paint everything flat, which helps stop drips.
- Use your screwdriver to take off the doors.
- Take off all hinges, handles, and knobs from the doors and cabinet frames.
- Keep track of everything! Put screws and hinges for each door in a small bag. Label the bag with the door number. Number the doors and the spot on the cabinet frame where they go. This helps you put everything back in the right place later. You can use a pencil to lightly number the back of the doors and inside the cabinet frame.
Step 3: Clean Everything Very Well
Laminate cabinets in a kitchen collect grease and grime over time. Paint will not stick to dirt or grease.
- Use a strong kitchen degreaser.
- Mix the degreaser with water if the directions say to.
- Wipe down every part you plan to paint: the cabinet boxes, the doors, the drawer fronts, and the shelves you want to paint.
- Get into corners and edges.
- Rinse the cabinets with clean water and a clean sponge or cloth.
- Let everything dry completely. Use a fan if needed to help them dry fast. Make sure there is no greasy feel left. Clean again if needed.
Step 4: Light Sanding Laminate Cabinets Before Painting
Even if your primer says “no sanding needed,” a light sanding helps the primer stick even better. This step smooths out any small bumps and gives the surface a little “tooth” for the primer to grab onto.
- Use fine-grit sandpaper (180 or 220 grit).
- Lightly rub all the surfaces you will paint. You are not trying to sand off the laminate layer. You just want to dull the shine.
- Go over flat areas with sandpaper or a sanding block.
- Use a sanding sponge for edges and curved parts.
- Do not sand too hard, or you might damage the laminate.
- After sanding, you will see a dull surface instead of a shiny one.
Step 5: Clean Off Dust
Sanding makes dust. You must remove all dust before priming. Primer and paint will not stick to dust.
- Use a tack cloth to wipe down all surfaces. A tack cloth is a sticky cloth that picks up dust well.
- You can also use a vacuum cleaner with a brush attachment to get most of the dust.
- Wipe again with a slightly damp cloth, then follow with a dry cloth, or use a tack cloth again once the damp wipe is dry.
- Make sure there is no dust left anywhere.
Step 6: Tape Off Areas
Use painter’s tape to protect surfaces you do not want to paint.
- Tape off the inside of the cabinets if you are not painting the inside.
- Tape around the edges where the cabinet frames meet walls or the ceiling.
- Tape around the inside edges of the door openings on the cabinet frames.
Applying the Primer
Now the real work starts! Priming is crucial. It is the layer that makes the paint stick to the laminate.
Applying Primer
- Stir the primer well. Do not shake it, as this can cause bubbles.
- Use a brush for corners, edges, and detailed areas.
- Use a small roller for flat surfaces (doors, drawer fronts, cabinet frames). A foam roller gives a very smooth finish.
- Apply a thin, even coat of primer. Do not put it on too thick, or it will run and drip.
- Make sure to cover all the areas you plan to paint.
- Check for drips or runs and smooth them out right away.
Drying Time for Primer
- Let the primer dry completely. Check the primer can for how long this takes. It might be a few hours.
- Sometimes, applying a second coat of primer is a good idea, especially if the first coat looks thin or uneven, or if your laminate was very dark and you are painting a light color.
- If you apply a second coat, wait for the first coat to dry fully first.
Light Sanding After Priming (Optional but Recommended)
Once the primer is fully dry, a very light sand can make the surface even smoother for the paint.
- Use very fine sandpaper (220-320 grit) or a fine sanding sponge.
- Rub gently over all the primed surfaces. This knocks down any tiny bumps or brush strokes from the primer.
- Do not sand through the primer layer!
- Clean off all the dust made by sanding using a tack cloth.
Painting the Cabinets
After the primer is dry and sanded smooth (and cleaned!), you are ready to paint. This is where your new color comes to life.
Choosing Paint Colors for Kitchen Cabinets
Think about the look you want. Light colors can make a kitchen feel bigger and brighter. White, light gray, or light blues are popular choices. Dark colors like navy or charcoal gray can give a modern or dramatic look. Consider your wall color, countertops, and floor.
Applying the Paint
- Stir your paint well. Again, do not shake it.
- Apply the first coat of your chosen paint color.
- Use a good quality brush for corners and edges.
- Use a small roller for flat areas. Roll smoothly and evenly.
- Try to apply paint in the direction of the wood grain if your laminate has one.
- Paint the back sides of the doors first, let them dry, then paint the front sides. This helps prevent messing up the finish on the front.
- For the cabinet boxes, start with the inside edges of the frame, then paint the flat front surfaces.
- Check for drips or runs and fix them immediately while the paint is wet.
Drying Time Between Coats
- Let the first coat of paint dry completely. The paint can will tell you how long. It’s usually a few hours.
- Do not rush this step! Painting over wet or mostly dry paint can ruin the finish.
- Most cabinet projects need at least two coats of paint for full color and durability. Some colors might need three coats.
- Apply the second coat the same way you applied the first. Use thin, even layers.
Steps to Paint Laminate Cabinets Summary
Here’s a quick look at the main steps to paint laminate cabinets:
- Take everything out.
- Remove doors and hardware, label everything.
- Clean all surfaces really well with degreaser.
- Lightly sand everything to dull the shine.
- Clean off all sanding dust.
- Tape off areas you don’t want painted.
- Apply a special bonding primer. Let it dry.
- (Optional) Apply a second coat of primer. Let it dry.
- (Optional) Lightly sand primer layer and clean dust.
- Apply the first thin coat of durable cabinet paint. Let it dry completely.
- Apply the second coat of paint. Let it dry completely.
- (If needed) Apply a third coat. Let it dry.
- Let the paint cure (harden) fully before putting doors back on.
- Reattach hardware and doors.
Curing Time: The Wait is Important
Your paint feels dry to the touch pretty quickly. But it is not fully hard or “cured” for much longer. This curing process makes the paint strong and durable.
- Check the paint can for the full cure time. It can take several days, maybe even a few weeks, for the paint to get its full hardness.
- During the curing time, be very gentle with your painted cabinets. Avoid bumping them or scratching them.
- Wait until the paint is fully cured or at least very hard before putting the doors and hardware back on. Putting them back too early can cause the paint to stick or chip around hinges and handles.
Putting It All Back Together
Once the paint is fully cured, it is time to reassemble.
- Use your labels to put the right doors back in the right spots.
- Reattach the hinges to the doors, then attach the doors back onto the cabinet frames. Having a helper is useful here.
- Put the handles and knobs back on the doors and drawers.
- Gently close and open the doors to make sure everything fits. Adjust hinges if needed.
- Carefully put your items back into the cabinets.
Refinishing Laminate Cabinets: More Than Just Painting
Sometimes, painting is part of a larger refinishing laminate cabinets project. Refinishing might also include replacing hardware, adding soft-close hinges, or even adding trim to the doors to make them look more like wood cabinets. Painting is a big step in giving old laminate cabinets a new life.
Taking Care of Your Painted Cabinets
Painted cabinets need gentle care, especially in the first few weeks after painting.
- Clean them with a soft cloth and mild soap and water. Avoid harsh cleaners or scrub brushes, especially at first.
- Wipe up spills quickly.
- Touch up small chips or scratches as they happen to keep the finish looking nice. Keep a little leftover paint for this.
Common Questions People Ask
Here are answers to some questions people often have about painting laminate cabinets.
Can you paint over laminate cabinets?
Yes, absolutely! With the right preparation and primer, paint sticks well to laminate.
What is the best paint for laminate cabinets?
A durable acrylic or alkyd-based paint designed for cabinets or trim is best. Look for paints that are tough and easy to clean, usually with a satin or semi-gloss finish.
Do you need to sand laminate cabinets before painting?
A light sanding is recommended, even if the primer says it isn’t needed. It helps the primer stick better by giving the smooth surface some grip. You don’t need to sand through the laminate, just dull the shine.
What kind of primer do I need for laminate cabinets?
You need a bonding primer. This is a special primer made to stick to very smooth surfaces like laminate, plastic, or metal.
How long does painting laminate cabinets take?
The process itself takes several days, mostly due to drying and curing times between steps and coats. Preparation is often the most time-consuming part. The actual painting only takes a few hours per coat, but the waiting makes the total time longer. Plan for at least a long weekend, and then a week or two of gentle use while the paint fully hardens.
Will the paint chip easily off laminate?
If you prepare the surface correctly and use the right bonding primer and durable paint, the paint should stick very well and be quite resistant to chipping. Skipping steps like cleaning or using the wrong primer is what causes chipping problems.
Can I paint the inside of my laminate cabinets?
Yes, you can paint the inside boxes of the cabinets using the same steps. Many people only paint the cabinet frames and the outside of the doors and drawer fronts.
What are popular paint colors for kitchen cabinets?
Popular choices include white, off-white, light gray, navy blue, dark green, and charcoal gray. The best color depends on your kitchen style and the other colors in the room.
Table of Steps and Wait Times
Here is a general idea of the steps and how long things take. Remember, actual times vary based on paint products and conditions like temperature and humidity. Always check the product labels.
| Step | Action | Minimum Wait Time Before Next Step | Notes |
|---|---|---|---|
| 1. Empty Cabinets & Remove Hardware | Take off doors, hardware, label parts | None (Prep Step) | Keep parts organized |
| 2. Clean Cabinets | Wash with degreaser, rinse, dry | Several hours | Must be completely dry & grease-free |
| 3. Light Sanding | Use fine grit paper to dull shine | None (Prep Step) | Don’t sand through laminate |
| 4. Clean Dust | Wipe with tack cloth or vacuum | None (Prep Step) | Must remove all dust |
| 5. Tape Off Areas | Use painter’s tape | None (Prep Step) | Protect surfaces you don’t want painted |
| 6. Apply Primer (Coat 1) | Brush/roll thin, even layer | Check can (e.g., 2-4 hours) | Use bonding primer for laminate |
| 7. Apply Primer (Coat 2) | Brush/roll thin, even layer (if needed) | Check can (e.g., 2-4 hours after coat 1) | Wait for coat 1 to dry first |
| 8. Light Sand Primer & Clean Dust | Use very fine grit paper, clean dust | Check can (e.g., 12-24 hours after last primer coat) | Makes surface smooth for paint |
| 9. Apply Paint (Coat 1) | Brush/roll thin, even layer | Check can (e.g., 4-8 hours) | Paint backs of doors first, then fronts |
| 10. Apply Paint (Coat 2) | Brush/roll thin, even layer | Check can (e.g., 4-8 hours after coat 1) | Most projects need 2 coats |
| 11. Apply Paint (Coat 3) | Brush/roll thin, even layer (if needed) | Check can (e.g., 4-8 hours after coat 2) | Some colors need 3 coats |
| 12. Wait for Initial Drying | Paint is dry to touch | Check can (e.g., 24-72 hours after last paint coat) | Can handle gently, but no reassembly yet |
| 13. Wait for Full Curing | Paint hardens completely | Check can (e.g., 7-30 days) | Be very gentle during this time |
| 14. Reattach Hardware and Doors | Put everything back | After paint is hard/cured | Use your labels |
Fixing Mistakes
Even with care, mistakes can happen.
- Drips or runs: Wipe them away immediately with your brush or roller while the paint is wet. If they dry, you’ll need to let the paint cure, lightly sand the drip smooth, re-prime the small area, and touch up the paint.
- Dust or lint in paint: If you see a piece of dust or lint, you can try to carefully pick it out with tweezers while the paint is wet. If it dries in the paint, let the paint cure, lightly sand the spot smooth, and touch up the paint. Proper cleaning before painting helps prevent this.
- Paint not sticking: If paint peels or scrapes off easily, you likely did not prepare the surface or use the correct primer. You will need to sand the paint off in that area, clean well, apply the correct bonding primer, and repaint. This is why prep is so important!
Final Thoughts
Painting laminate kitchen cabinets is a big project, but it is very rewarding. It takes time and careful work, especially the preparation steps. By following these steps – cleaning, sanding lightly, using a good bonding primer, and applying durable paint – you can give your old laminate cabinets a beautiful, long-lasting new finish. It’s a great way to update your kitchen look yourself and save money. Good luck with your DIY paint kitchen cabinets project!