Measuring for new kitchen countertops is a big step. Doing it right is key. It saves time and money. Getting the size wrong means problems. New tops might not fit. Or they might be too small. This guide helps you measure well. You will learn simple steps. You will get accurate countertop measurements. This means your new tops fit just right.
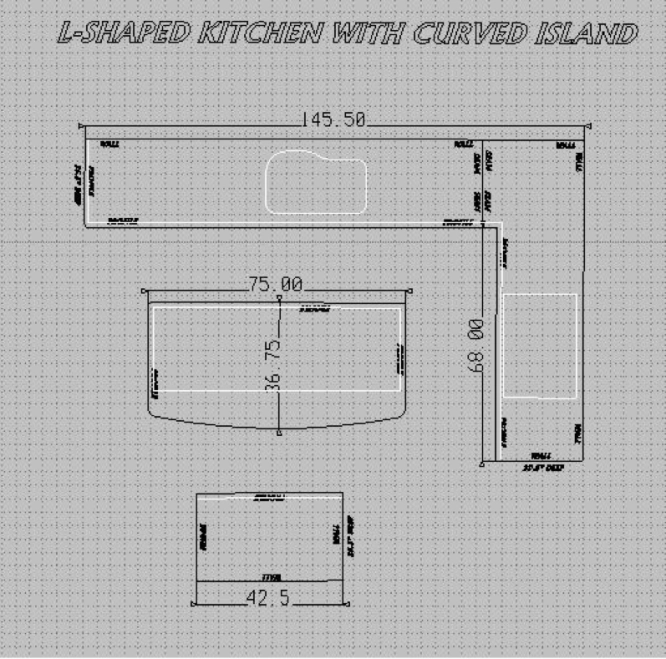
Image Source: www.archcitygranite.com
Getting Ready to Measure
Good prep makes measuring easy. Clear everything off your old countertops. Empty the cabinets below too. This gives you room to work. You need a clear space.
What You Need
You need a few simple things. These are the tools for measuring countertops.
* A good tape measure. A long one is best. One that locks helps.
* A pencil.
* Paper or graph paper.
* A level. A long one is useful.
* A straight edge. A long ruler or a piece of wood works.
* Maybe a helper. An extra pair of hands is good.
* A camera on your phone is helpful.
Using the right tools helps get the job done.
Check Your Cabinets
Look at your kitchen cabinets. This is how to measure kitchen cabinets for countertops in a way. You are not measuring the cabinets themselves. You are checking the tops of them. The new countertop sits on the cabinets.
* Are the cabinet tops level? Use your level to check.
* Are the cabinets straight? Look along the front edge.
* Are they square? Use a square tool if you have one.
* Note any spots that are not level. Or not straight. Tell your countertop maker about these.
Checking the cabinets first is important. It helps make sure the new countertop sits flat.
Drawing Your Layout
Before measuring, draw a simple picture. Draw a picture of your kitchen layout. It does not need to be perfect art. It just needs to show the shape of your counters.
* Draw the shape from above. Like looking down.
* Show all walls that meet the counters.
* Show where the sink is.
* Show where the stove is.
* Show any openings, like dishwashers.
* Show islands or peninsulas.
This drawing is your countertop measurement diagram. You will write your measurements on this drawing. This helps keep everything clear. It makes it easy to see where each number goes.
Measuring the Lengths
Now you measure the main lengths. Measure each section of countertop.
* Start at one end of a counter run.
* Go to the other end.
* Measure along the back wall first.
* Measure from the wall to the corner. Or to the end.
* Write this number on your diagram.
Measure in Two Spots
This is very important. Do not just measure once along the wall. Measure the length in two spots.
* Measure along the back wall where the countertop touches it.
* Measure along the front edge of the cabinets.
Walls are often not straight. Cabinets might not be perfectly straight either. Measuring in two places shows this.
* If the back measure is 100 inches.
* And the front measure is 101 inches.
* The space gets wider by 1 inch.
* Write both numbers on your diagram.
Measuring like this gives your countertop maker better info. It helps them cut the new top to fit the real space. This is part of getting accurate countertop measurements.
Corners
Corners need careful measuring.
* For an inside corner (like where two walls meet):
* Measure from the wall into the corner. Do this on both sides leading into the corner.
* Imagine the corner of the new countertop. It will fit into this space.
* Mark where the edge of the new countertop will meet. Usually, this is 25 inches out from the wall on standard counters.
* Measure from the wall into this point. Do it on both sides.
* Measure from the corner point out along the front edge. Measure to the end of that cabinet run.
* For an outside corner (like on a peninsula):
* Measure each edge that forms the corner.
* Measure from the corner point out to the end.
* Measure from the corner point back along the side edge.
Draw corner details clearly on your diagram. Show how the pieces meet. This helps avoid mistakes. Getting these corner measurements right is key.
Measuring the Depth
Next, measure how deep the countertops need to be.
* Most kitchen countertops are about 25 inches deep.
* This includes a small overhang past the cabinet fronts.
* Measure from the back wall to the front edge of your cabinets.
* Add the overhang amount you want.
* Standard overhang is about 1 to 1.5 inches.
* So, wall to cabinet front + overhang = total depth.
Measure the depth in a few spots along each counter section. Walls are not always straight. They might push in or curve out.
* Measure depth at the left end.
* Measure depth in the middle.
* Measure depth at the right end.
Write all these depth numbers on your diagram. Note if the depth changes. For example, “Depth: 24.5 in (left), 25 in (middle), 25.2 in (right)”. This helps the fabricator make the counter fit snug against a wavy wall.
Standard Overhang
Most base cabinets are 24 inches deep. A standard countertop is 25 inches deep. This leaves 1 inch of overhang past the cabinet door/drawer fronts. This overhang protects the cabinet fronts. It also gives space for your fingers to open doors and drawers.
You can choose a different overhang. Just make sure it is noted clearly.
Dealing with Walls That Are Not Straight
Some kitchens have old walls. These walls might not be straight or square. Measuring irregular kitchen walls takes extra care.
Using Measurements
If the wall is just a little wavy, measuring depth at different spots works. As explained before, measure the depth from the wall to the cabinet front often. Write down all these numbers. The countertop maker can shape the back edge of the new counter to match the wall curve.
Making a Template
For very wavy or angled walls, you might need a template. This is how to draw a kitchen countertop template in this case.
* You use thin material. Like thin plywood, hardboard, or even thick paper.
* You lay the material on top of your cabinets.
* You trace the exact shape of the wall onto the material.
* You trace the front edge of the cabinets too, adding the overhang.
* You carefully cut out this shape.
* This template shows the exact size and shape needed.
Making a template takes more work. But it is the best way for tricky walls or strange angles. Your countertop maker can use this template to cut the new counter perfectly.
Measuring for Islands and Peninsulas
Measuring a kitchen island for a countertop is similar but different. Islands are free-standing. Peninsulas are attached on one end.
Islands
- Measure the length of the island cabinet base.
- Measure the width (depth) of the island cabinet base.
- Decide how much overhang you want on each side.
- For seating, you might want more overhang on one side. 10-15 inches is common for seating.
- Add the overhang amounts to the cabinet base size.
- Total Length = Cabinet Length + Overhang (left) + Overhang (right)
- Total Width = Cabinet Width + Overhang (front) + Overhang (back)
Measure the cabinet base in a few spots. Just like measuring against a wall. Cabinets can be out of square.
* Measure length at the front and back of the island base.
* Measure width (depth) at the left and right ends of the island base.
Write these numbers and the desired overhangs on your diagram.
Peninsulas
- Measure the length from the wall (or end cabinet) out to the end of the peninsula cabinet.
- Measure the width (depth) of the peninsula cabinet base.
- Decide overhang amounts.
- Overhang on the long open side (usually for seating).
- Small overhang on the ends (if not hitting a wall).
- Total Length = Cabinet Length (from wall) + Overhang (at the end)
- Total Width = Cabinet Width + Overhang (front) + Overhang (back)
Measure the cabinet base length and width in a couple of spots too. Note if they are not square.
Marking Sink and Appliance Spots
You need to show where sinks and appliances go. This is measuring sink cutout kitchen countertop.
* Your countertop will need holes cut for the sink and stove/cooktop.
* You need the exact model number or template for your sink and stove.
* Usually, the countertop maker does the actual cutting.
* But you must show where the center of these items will be.
* Measure from the back wall to the center line of the sink/stove.
* Measure from the side wall (or corner) to the center line of the sink/stove.
Draw the sink and stove location on your diagram. Write down the measurements to their center points.
Example: “Sink center: 15 inches from side wall, 10 inches from back wall.”
Also, note the size of the sink/stove opening needed. This info comes with the appliance or sink. Or look it up online using the model number.
Other Cutouts
Think about other things too.
* Faucets: Note if you need extra holes near the sink.
* Pop-up outlets: Note their location.
* Vent hoods: If a vent goes down into a cooktop, note its location.
Mark all cutouts clearly on your diagram. Provide details or templates for them.
Getting Accurate Measurements: Top Tips
Here are more countertop measuring tips. They help you get it right.
* Measure Twice (or Three Times!): Never rely on just one measurement. Measure the same section again. Did you get the same number? If not, measure a third time. This is the easiest way of getting accurate countertop measurements.
* Get Help: Have someone hold the end of the tape measure. They can also write numbers down. This makes it easier and more accurate.
* Use Clear Labels: Label every measurement on your diagram. Write “Back Left Wall,” “Front Right Cabinet Edge,” “Sink Center from Wall,” etc.
* Note Special Details: Are there rounded corners? A strange angle? Write it down. Draw it carefully.
* Double-Check Cabinet Squareness: Use a large square tool or the 3-4-5 method to check if corners are 90 degrees.
* From the corner, measure 3 feet along one cabinet edge. Make a mark.
* Measure 4 feet along the other cabinet edge. Make a mark.
* Measure the distance between the two marks. If the corner is square, the distance should be exactly 5 feet.
* If it is not 5 feet, the corner is not square. Note this on your diagram.
* Consider the Thickness of the Old Countertop: If you are leaving the old counter on while measuring (not recommended, but sometimes necessary), remember the new one will sit lower. It is best to measure with old counters removed.
* Account for Overhang: Always add the overhang past the cabinet front into your total depth measurement.
Making a Detailed Diagram
Your diagram is super important. Make it neat and easy to read.
* Use graph paper if you have it. It helps keep lines straight and to scale.
* Draw walls and cabinet lines clearly.
* Write measurements on the lines they belong to.
* Add notes for anything special (wavy wall, non-square corner, etc.).
* Show where appliances and sinks go. Measure to their center points from two sides.
A good diagram stops confusion. It helps the countertop maker understand your space exactly. This drawing is your visual how to measure for kitchen countertops guide for them.
Calculating Linear Feet
Countertops are often priced by the linear foot. This is a way to calculate linear feet countertops. It measures the length of the edge that runs along the front of the cabinets.
- Go back to your diagram.
- Look at each section of countertop that will be installed.
- Add up the lengths of the front edge of each section.
- Include the front edge of islands and peninsulas.
- Do not include the edges that go against a wall or into a corner where another counter meets it.
Example:
* Section 1: 60 inches long (front edge)
* Section 2: 96 inches long (front edge, connects to section 1 at a corner)
* Section 3 (Island): 72 inches long (front edge)
* Total Inches = 60 + 96 + 72 = 228 inches
To get linear feet:
* There are 12 inches in 1 foot.
* Divide the total inches by 12.
* 228 inches / 12 inches/foot = 19 linear feet.
Sometimes pricing is based just on the total length of the pieces laid out. But often, it is the ‘linear feet’ you see from the front view in the kitchen. Confirm with your supplier how they calculate it.
Templates vs. Measurements
Sometimes, measuring tape and a diagram are enough. For simple, straight kitchens, this might work fine. This is when you are getting accurate countertop measurements using just numbers.
But for complex shapes, many angles, or very wavy walls, a template is better. This is how to draw a kitchen countertop template using material.
* Materials: Thin plywood, particle board, or plastic sheeting.
* Trace the exact shape needed for the new countertop.
* Trace the back wall edge precisely.
* Trace the front overhang edge.
* Mark where the sink and stove cutouts go on the template.
* Mark corners clearly.
A template takes more effort to make. But it removes guesswork for complex jobs. Your countertop maker will tell you if they need a template. For many materials like granite or quartz, the fabricator prefers to make their own template after they confirm your initial measurements. This is an added safety step they take.
When to Hire a Pro
Measuring for countertops can be tricky. Especially in older homes. Or kitchens with odd shapes.
* If your walls are very uneven.
* If you have many angles or curves.
* If you are nervous about making a mistake.
It might be better to hire a professional. Most countertop companies offer measuring services. Yes, it costs more. But it guarantees the measurements are right. If they measure, they are responsible if the counter does not fit. If you measure, you are responsible.
For simple, straight kitchen layouts, DIY measuring is often fine. Just follow these steps carefully. Measure everything twice. Make a clear diagram.
Steps for Measuring – A Quick Look
Here is a summary of the steps to measure for kitchen countertops:
- Get Tools Ready: Tape measure, pencil, paper, level, helper.
- Clear the Space: Remove everything from old counters.
- Check Cabinets: Look for level and straightness. Note issues.
- Draw a Diagram: Sketch your kitchen layout from above. Include walls, sink, stove, island.
- Measure Lengths:
- Measure along the back wall.
- Measure along the front edge of cabinets.
- Measure each section.
- Measure corners carefully.
- Write all numbers on your diagram.
- Measure Depth:
- Measure from the wall to the front of cabinets.
- Do this in a few spots.
- Add your desired overhang (usually 1-1.5 inches).
- Write numbers on your diagram.
- Measure Islands/Peninsulas: Measure cabinet base size. Add overhangs needed on each side.
- Mark Cutouts: Measure from two walls to the center point of sink and stove locations. Note size of needed holes.
- Check for Irregularities: Note wavy walls or non-square corners. Consider a template if needed.
- Double Check Everything: Measure all lengths and depths again. Make sure numbers match.
- Finalize Diagram: Make sure your drawing is clear. All measurements are labeled. Notes are added.
Following these countertop measuring tips helps you get accurate numbers. Accurate numbers mean a better fit for your new countertops.
Grasping Common Issues
Even with care, you might find problems.
* Walls Not Square: This is common. Your multiple depth measurements handle this. The fabricator can “scribe” or shape the back edge to match the wall.
* Cabinets Not Level: Note this clearly. Small differences can be fixed during install. Big differences might need cabinet work first.
* Corners Not 90 Degrees: Use the 3-4-5 method. If a corner is not square, the countertop pieces meeting there will need special cuts. Your measurements showing this are vital.
* Appliances Stick Out: Measure how far the fridge or stove sticks out. Make sure new counters will clear them.
Knowing about these issues helps you look for them while measuring.
Beyond the Numbers
Measuring is mostly about numbers. But some things are about the overall plan.
* Seams: Where will the new countertop pieces join? Talk to your supplier about this. Seam placement is important for looks and strength. Your drawing helps plan this.
* Edge Style: The edge shape (round, straight, etc.) does not change the measurement size. But pick this out beforehand.
* Backsplash: Will you have a separate backsplash? Or one made of the same counter material? This does not affect the counter size. But it is part of the overall look.
Getting accurate countertop measurements is the main goal of this process. The numbers drive everything else.
Preparing for Installation
Once you have your measurements, you give them to the countertop company.
* They will use your numbers to give you a price.
* For most stone or quartz counters, they will then come to your home.
* They will do their own measurements. Or make a template. This confirms your numbers.
* Then they make your new countertops.
This is why your initial measurements are so important. They start the process. They help get the quote right. And they guide the professional measurers.
FAQs
Here are some common questions people ask about measuring for countertops.
Q: Do I measure my old countertops or the cabinets?
A: Measure the cabinets. The new countertop sits on top of them. Measure from the back wall to the front of the cabinets. Add the overhang you want. Measure the length along the front of the cabinets (and at the back wall too).
Q: How much overhang should a countertop have?
A: A standard overhang is about 1 to 1.5 inches past the face of the cabinet doors or drawers. This gives you finger room and protects the cabinets. For islands with seating, the overhang is usually 10 to 15 inches.
Q: What is a linear foot when measuring countertops?
A: A linear foot is a unit of length. It is used to price countertops. You find the total linear feet by adding up the length of all the pieces of countertop measured along their front edge. One linear foot is 12 inches long.
Q: Do I need to measure for the sink and stove cutouts?
A: Yes, you need to show where they go. Measure from the back wall and from one side wall to the center point of where the sink or stove will be. Write these center point measurements on your diagram. You also need the size needed for the hole. This comes with the sink or stove.
Q: My kitchen walls are not straight. What do I do?
A: Measure the depth from the wall to the cabinet front in many places along the wall. Write down all these different depth numbers. The countertop maker can shape the back edge to fit the wavy wall. For very wavy walls, a template made from thin material might be needed.
Q: What is a countertop template used for?
A: A template is a tracing of the exact shape needed for the new countertop. It is used for complex shapes, angles, or very uneven walls. It helps the fabricator cut the counter to fit perfectly.
Q: Can I measure myself or should I hire a pro?
A: For simple, straight kitchens, you can often measure yourself if you follow steps carefully and double-check. For complex shapes, wavy walls, or if you are not confident, hiring a professional to measure is safer. They are responsible for fit if they measure.
Measuring accurately for kitchen countertops is a skill you can learn. Take your time. Use the right tools. Draw a clear diagram. Measure everything at least twice. These simple steps help make sure your new countertops fit perfectly. You will have a great looking kitchen when the job is done right.