Image Source: i.ytimg.com
DIY Guide: How To Install Kitchen Sink Strainer On Cast Iron
Installing a new kitchen sink strainer in a cast iron sink is a job many homeowners can do themselves. You do not need to be a professional plumber to replace this part. This guide will walk you through each step, making it easy to follow. Replacing the strainer can fix leaks and make your sink work better. Let’s get started on replacing your old sink drain part.
Getting Ready for the Job
Before you begin, it is important to have everything you need. This makes the job go smoothly. Gather your tools and the new parts. Make sure you have enough light under the sink.
Tools You Will Need
You need certain tools to do this job right. Having them ready saves time.
- Pipe wrench or basin wrench: These help you loosen or tighten nuts under the sink.
- Adjustable wrench: Useful for different size nuts.
- Putty knife or scraper: To clean old sealant.
- Screwdriver (flathead): Maybe needed for some types of strainers.
- Bucket or towels: To catch any water drips.
- Safety glasses: Protect your eyes.
- Gloves: Keep your hands clean.
Materials You Will Need
You also need new parts and sealing stuff.
- New kitchen sink strainer: Make sure it fits your sink hole size. Most are 3.5 inches wide.
- Plumber’s putty: This is key for sealing the top part of the strainer. It stops water leaks.
- Rubber gasket and paper gasket (often come with the new strainer): These seal the bottom part.
- Silicone sealant (optional): Some people use this instead of or with plumber’s putty for extra sealing.
- Thread sealant or pipe dope (optional): For connecting the tailpiece.
Safety First
Doing work under a sink can be tricky. Always think about safety.
- Turn off the water: Find the shut-off valves under the sink. Turn them completely off. Test the faucet to be sure.
- Wear safety glasses: Stuff can fall from under the sink.
- Work in a well-lit area: Use a flashlight if needed.
- Be careful with tools: Don’t rush.
Removing the Old Strainer
You must take out the old sink part before putting in the new one. This step is often the hardest part. Old parts can be stuck on tight.
Clearing the Area Under the Sink
First, empty the cabinet under your sink. Take everything out. This gives you room to work. Put down towels or a bucket. This will catch any water left in the drain pipes.
Taking Apart the Old Drain Pipes
Look at the pipes under the sink. You will see how the sink strainer connects to the drain pipe in the wall or floor. There is usually a large nut or joint holding the tailpiece (the pipe straight down from the strainer) to the rest of the drain system.
- Use your pipe wrench or adjustable wrench.
- Loosen the nuts connecting the pipe from the strainer to the drain trap (the U-shaped pipe).
- Keep your bucket ready. Some water will likely spill out.
- Carefully pull the pieces of pipe apart. Set them aside.
Loosening the Old Sink Strainer Nut
Now look right under the sink drain hole. You will see the bottom of the old strainer. There’s a large nut holding it against the sink. This is the lock nut.
- This nut is often very tight or rusted.
- Use a large pipe wrench or a basin wrench. A basin wrench is good because it can reach up into tight spots behind the sink basin.
- Turn the wrench to loosen the big nut. Turn it the correct way (usually counter-clockwise).
- It might take a lot of force. You might need a helper to hold the strainer from the top so it doesn’t spin.
- Keep turning until the nut is very loose.
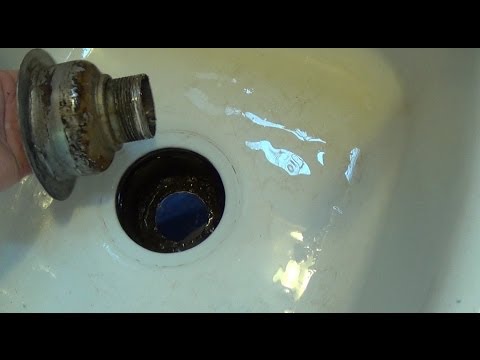
Removing Old Sink Strainer
Once the big nut is loose, the old strainer can come out.
- Under the sink, remove the loose nut and any washers or gaskets below it.
- Go back up to the sink basin.
- Lift the old strainer part out of the drain hole.
- It might be stuck a little. You might need to push it up from underneath or gently pry it from the top with a putty knife. Be careful not to scratch the sink.
- Now the old strainer is out. Good job!
Cleaning the Sink Drain Opening
The area where the old strainer sat needs to be clean. This is very important for the new seal to work.
- Use a putty knife or scraper.
- Scrape away all the old plumber’s putty or silicone sealant.
- Clean the edge of the drain hole on the top side of the sink.
- Clean the area on the bottom side of the sink too.
- Wipe everything clean with a rag. Make sure it is dry. A clean surface helps the new plumber’s putty or silicone sealant stick well and create a good seal. Cast iron sinks can have a rough surface, so cleaning well is key.
Choosing the Right Sink Strainer
Not all sink strainers are the same. You need one that fits your sink and works for you.
Types of Strainers
The most common type is the basket strainer.
- Basket Strainer: This type has a cup or basket you can lift out. It catches food bits. It usually has a stopper function too, so you can fill the sink with water. This is the standard for kitchen sinks. Installing a basket strainer is a common DIY job.
- Bar Strainer: Used in bar sinks, often smaller.
- Disposal Flange: If you have a garbage disposal, you need a specific flange that connects to it, not a standard strainer. This guide focuses on standard strainers.
Strainer Material and Finish
Strainers come in different materials.
- Stainless Steel: Very common, lasts long, easy to clean.
- Brass: Can be different colors, strong.
- Plastic: Less common for the main part, might not last as long.
Choose one that matches your sink and faucet if you want. Stainless steel is a safe choice for a cast iron sink drain area.
Making Sure it Fits
Sink drain holes in kitchens are usually 3.5 inches wide. Measure your sink hole if you are not sure. The new strainer should fit snugly in this hole. The parts that go under the sink must also fit the space and connect to your existing drain pipes. Check the length of the tailpiece.
Installing the New Sink Strainer
This is where you put the new parts in. Take your time and follow each step carefully. This is key to prevent leaks. This involves the sink flange replacement and the rest of the kitchen sink drain assembly.
Applying Plumber’s Putty
Plumber’s putty creates a waterproof seal between the top of the strainer and the sink.
- Take a lump of plumber’s putty from the container.
- Roll it into a rope shape. Make the rope about half an inch thick. It should be long enough to go all the way around the drain hole.
- Place the putty rope around the lip of the sink drain hole on the top side of the sink. Make a complete circle.
Placing the Sink Flange
The sink flange is the metal ring part of the strainer that you see from inside the sink.
- Take the new sink flange.
- Push it down into the drain hole on top of the plumber’s putty rope.
- Push down firmly. This squeezes the putty.
- Excess putty will squeeze out around the edge. That is okay.
Assembling Parts Under the Sink
Now go under the sink. You will build the drain assembly from the bottom up.
- First, you will see the bottom of the strainer pushed through the sink hole.
- Get the paper friction washer (it looks like cardboard). Slide it onto the bottom of the strainer tube. Push it up against the underside of the cast iron sink drain.
- Next, get the rubber gasket. This is a very important seal. Slide it onto the strainer tube below the paper washer. The rubber gasket should sit right against the paper washer. Make sure it sits flat. This rubber gasket provides the main seal under the sink.
Tightening the Lock Nut
The lock nut holds everything together from the bottom.
- Slide the lock nut onto the strainer tube below the rubber gasket.
- Start threading the lock nut onto the strainer tube by hand. Turn it clockwise. Make sure it is not cross-threaded (going on crooked).
- Once you cannot turn it by hand anymore, use your pipe wrench or basin wrench.
- Hold the strainer in the sink from the top so it does not spin. You might need a helper for this.
- Tighten the lock nut firmly. This pulls the strainer flange down and squeezes the plumber’s putty on top and the rubber gasket underneath.
- Tighten it until it is snug and feels secure. Do not overtighten, especially on older or thinner cast iron, but it needs to be tight enough to create a good seal. A good way to check is to tighten until the strainer on top stops moving when you try to turn it.
Cleaning Excess Putty
Go back up to the sink.
- Wipe away the plumber’s putty that squeezed out around the edge of the sink flange.
- A putty knife can help scrape off most of it.
- Wipe it clean with a rag. This makes the installation look neat.
Connecting the Tailpiece
Now you connect the rest of the drain pipe (the tailpiece) to the bottom of the new strainer.
- Take the tailpiece that came with the new strainer or the old one if it fits.
- There is usually a nut and a plastic or rubber washer (called a slip joint washer) that connect the tailpiece to the strainer.
- Slide the nut and washer onto the tailpiece.
- Push the tailpiece onto the bottom of the strainer tube.
- Slide the nut up and tighten it onto the strainer tube connection.
- Tighten this nut with your adjustable wrench or pliers. It needs to be snug to prevent leaks, but do not crush the plastic washer by overtightening.
Putting the Rest of the Drain Assembly Back
Connect the tailpiece to the trap (the U-shaped pipe) and then to the rest of the drain pipe system.
- Slide the nuts and washers onto the ends of the pipes you disconnected earlier.
- Connect the tailpiece to the trap.
- Connect the trap to the drain pipe coming from the wall or floor.
- Hand tighten all the slip nuts first.
- Then use your wrench to gently snug them up. Again, do not overtighten, especially on plastic pipes.
Considering Silicone Sealant
Some people prefer silicone sealant over plumber’s putty, especially with heavy cast iron sinks or undermount sink strainer installations where the seal is critical and hard to access later.
Using Silicone Instead of Putty
- Clean the sink drain hole area very well.
- Apply a bead of 100% silicone sealant around the lip of the drain hole on the top side of the sink. Make sure the bead is complete and even.
- Push the sink flange into the sealant.
- Underneath, use the paper washer, rubber gasket, and lock nut as usual.
- Tighten the lock nut firmly.
- Wipe away excess silicone.
- Important: Silicone needs time to cure (dry). Do not use the sink or run water for at least 24 hours, or as long as the silicone product says. Plumber’s putty does not need curing time.
Using Silicone with Putty
Some people use both for extra security, especially for a cast iron sink drain which is heavy.
- Apply plumber’s putty around the drain hole on top.
- Add a thin bead of silicone sealant over the putty before pushing the flange in.
- Or, use putty on top and a thin bead of silicone under the sink where the rubber gasket sits against the cast iron.
- Using both makes the seal very strong but also harder to remove in the future.
Working with an Undermount Sink Strainer
Installing an undermount sink strainer can be a little different. The sink is installed under the countertop, so the strainer sits against the underside of the stone or solid surface.
- The process is similar: clean the hole, apply sealant (putty or silicone) to the underside of the sink flange lip.
- Push the flange up through the hole from below the countertop.
- From the top, place a ring or washer that comes with the strainer, then the large lock nut.
- Tighten the lock nut from the top using a special tool that often comes with undermount strainers or a large socket wrench.
- This pulls the flange up tightly against the underside of the countertop, squeezing the sealant.
- Then, go under the sink and install the rubber gasket and bottom lock nut onto the part of the strainer hanging down. This second lock nut is usually smaller and secures the rubber gasket.
- Connect the tailpiece as usual.
- Undermount installations are critical for sealing well, as leaks can damage the countertop. Silicone is often preferred here due to its strong, permanent seal.
Finishing Up and Testing
You are almost done! Now check your work.
Testing for Leaks
- Once all pipes are connected and nuts are snug, turn the water supply back on slowly.
- Run some water into the sink. Let it drain.
- Look carefully under the sink. Check all the connections you tightened. Look for any drips or wet spots, especially around the lock nut and where the tailpiece connects to the strainer.
- Fill the sink with water up to the top edge of the strainer. Let it sit for a few minutes.
- Look under the sink again. Check the seal right under the cast iron sink drain hole.
- Pull the basket strainer stopper out and let all the water drain at once. This creates pressure in the pipes. Watch for leaks.
- If you see a leak, try gently tightening the nut at that spot. Do not overtighten too much. If it still leaks, you might need to take that joint apart and put it back together, making sure the washer is seated correctly.
- If the leak is around the main lock nut of the strainer, you might need to tighten it more or, in a bad case, redo the installation with more or better sealant.
Cleaning Up
- Wipe away any spilled water.
- Clean up any excess plumber’s putty or silicone sealant.
- Put your tools away.
- Put everything back under the sink.
What If Things Go Wrong?
Sometimes, things do not go perfectly the first time. Do not worry.
Leaks Continue
- Double-check which connection is leaking.
- Is it the main lock nut holding the strainer? You might need to tighten it more. If using putty, check if enough was used or if the surface was clean. If using silicone, did it have enough time to cure?
- Is it a pipe connection below the strainer? Take it apart, check the washer inside, make sure it’s facing the right way, and re-tighten carefully.
- Sometimes old pipes or traps are cracked and leak when moved. You might need to replace more parts of the drain assembly.
Strainer Spins When Tightening
- This means you need someone to hold the strainer in the sink from the top.
- Push down firmly on the strainer from above while tightening the lock nut underneath. This helps it grab onto the sink and stops it from spinning.
Nut Won’t Tighten
- Make sure you are turning it the right way (clockwise).
- Check if the threads on the strainer or the nut are damaged. If they are, you need new parts.
- Sometimes cheap strainers have bad threads.
Keeping Your New Strainer Working Well
Once your new strainer is in, a little care keeps it working.
- Use the basket strainer regularly to catch food waste. Empty it into the trash, not down the drain. This prevents clogs in your cast iron sink drain pipes.
- Clean the strainer and the sink area often.
- Avoid pouring harsh chemicals down the drain, as they can damage pipes or the strainer seals over time.
- Check under the sink every few months to make sure there are no slow leaks you did not notice.
Comprehending Kitchen Sink Drain Assemblies
Let’s quickly look at the different parts that make up the kitchen sink drain assembly. Knowing the names helps when buying parts or fixing leaks.
- Sink Flange: The top metal ring visible in the sink. This is the start of the assembly.
- Strainer Body: The part that goes through the sink hole. It has threads on the outside.
- Plumber’s Putty or Silicone: The sealing material used between the flange and the sink on top.
- Paper Friction Washer: Goes under the sink, helps the rubber gasket sit flat.
- Rubber Gasket: The main waterproof seal under the sink. It presses against the bottom of the sink drain hole.
- Lock Nut: The large nut that screws onto the strainer body from below, holding everything tightly to the sink. This is crucial for the seal.
- Tailpiece: The straight pipe that connects the strainer body to the trap.
- Slip Joint Nut and Washer: Nuts and conical washers that create seals at the pipe connections below the strainer.
- Trap (P-trap or S-trap): The U or S shaped pipe that holds a little water to block sewer gases.
- Drain Pipe: Connects the trap to the main drain system in your house.
The whole system, from the sink opening down to where it meets the house drain, is the kitchen sink drain assembly. Each part needs to be connected correctly for the cast iron sink drain to work without leaks. The basket strainer installation involves putting the top part (flange and strainer body) into the sink, sealing it, and securing it from below with the lock nut and rubber gasket. Then, the pipes connect to it.
FAQ – Common Questions
How much plumber’s putty do I need?
You need enough to roll a rope about half an inch thick that goes all the way around the drain hole lip. A small tub is usually more than enough for one sink.
Can I use silicone sealant instead of plumber’s putty?
Yes, you can. Silicone creates a more permanent seal. Plumber’s putty is easier to remove later if you need to replace the strainer again. If you use silicone, make sure it is 100% silicone sealant made for plumbing and allow enough time for it to dry before using the sink.
What kind of wrench is best for the lock nut?
A basin wrench is often the easiest tool for reaching the lock nut up under the sink. A large pipe wrench can also work if there is enough space to turn it. For tightening the smaller slip nuts on the pipes, an adjustable wrench or channel lock pliers are good.
My old strainer nut is stuck. What can I do?
Old nuts on a cast iron sink drain can be very hard to loosen.
* Make sure you are turning the wrench the right way (counter-clockwise).
* Try spraying a penetrating oil (like WD-40 or a similar product) onto the threads of the nut. Let it sit for 10-15 minutes.
* Use a lot of force, but be careful not to damage the pipe or the sink.
* Sometimes, you might need to use a small hacksaw or reciprocating saw to cut the old lock nut off. Be very careful not to cut the sink itself. This is a last resort.
Do I need thread sealant on the pipe connections?
For the slip joint connections below the strainer, the seal comes from the compression of the nut and washer. Thread sealant or pipe dope is not usually needed on these slip nuts. It is sometimes used on the threaded connection between the strainer body and the lock nut, but the rubber gasket is the main seal there. Using enough plumber’s putty or silicone on top and properly seating the rubber gasket below the cast iron sink drain are the most important steps for preventing leaks at the sink opening itself.
How long does this job take?
If things go well and the old strainer is not too hard to remove, it might take 1-2 hours. If the old strainer is very stuck or you run into unexpected issues like needing new pipes, it could take longer.
Can I do this myself if my sink is cast iron?
Yes, you absolutely can install a kitchen sink strainer on cast iron. The process is the same as with other sink materials. The main difference is that cast iron sinks are very heavy, so you must be careful not to drop tools on them. The surface around the drain might also be slightly rough, making thorough cleaning for a good seal extra important. Make sure you have the right tools, especially a good wrench for the lock nut.
Wrapping Up
You have learned how to install a new kitchen sink strainer in your cast iron sink. It takes patience and the right steps. You started by getting tools and materials. You learned how to remove the old strainer and clean the drain opening. Then, you went through the steps for installing the new one, using plumber’s putty or silicone, placing the rubber gasket, and tightening the lock nut. You also learned about the whole kitchen sink drain assembly and how to test for leaks.
Replacing your sink strainer is a good DIY project. It saves money you would pay a plumber. Plus, fixing something in your home feels good. Remember to go slowly, follow the steps, and do not be afraid to check your work for leaks. Your cast iron sink drain will be working like new!