Painting kitchen cabinets that are laminate is a great way to update your kitchen without spending a lot of money. Can you paint laminate cabinets? Yes, you absolutely can. The best way to do it involves careful cleaning, light surface prep, using a special sticky primer made for smooth surfaces, and finishing with tough paint. This process helps paint stick well and last a long time on the smooth laminate surface.
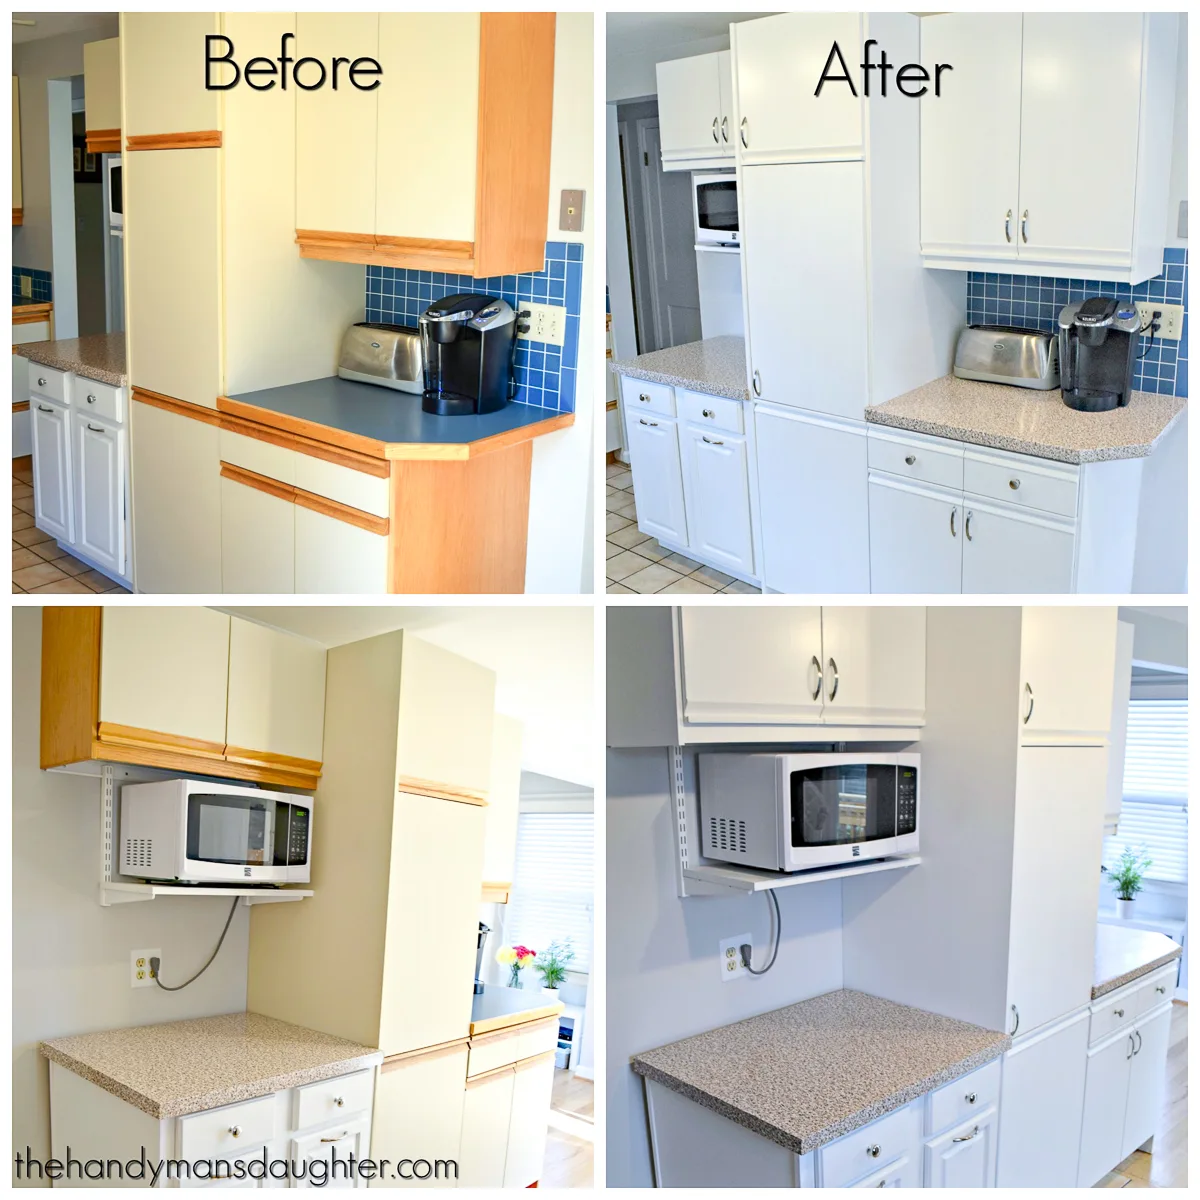
Image Source: www.thehandymansdaughter.com
Deciphering the Challenge: Painting Laminate
Laminate cabinets look nice. But their smooth, hard surface makes painting tricky. Regular paint does not stick well to it. It can peel or scratch off easily. This is why you need special steps and products. You need to make the surface ready for paint. You need a primer that really grabs on. Then you need strong paint.
Why Update Laminate Cabinets?
Kitchen cabinets are a big part of your kitchen’s look. Old laminate cabinets can make a kitchen feel old or worn out. Painting them gives them a fresh, new look. It costs less than buying new cabinets. It is a good DIY project if you have time and patience.
Necessary Tools and Items
Gathering everything before you start makes the job easier. Here is what you will need:
- Screwdriver (for taking off doors and hardware)
- Labeled bags or containers (to keep screws organized)
- Drop cloths or plastic sheeting (to protect floors and counters)
- Painter’s tape
- Cleaning supplies (like TSP cleaner or a good degreaser)
- Clean cloths or sponges
- Rubber gloves
- Safety glasses
- Sandpaper (fine-grit, like 220 or 320) or a deglosser liquid
- Sanding block (optional)
- Tack cloth or vacuum with brush attachment (for dust)
- Primer for laminate cabinets (an adhesion primer for laminate is best)
- Paint brushes (good quality angled brush for details)
- Paint rollers (small foam rollers give a smooth finish)
- Paint tray
- Best paint for laminate cabinets (durable paint for kitchen cabinets like acrylic or enamel)
- Optional: Clear topcoat for extra protection
- Optional: Small sawhorse or drying racks for doors
Step by Step Painting Laminate Cabinets
Painting laminate kitchen cabinets takes several steps. Do not rush any step. Each one is important for a good finish that lasts. Follow these steps carefully to get the best results.
Step 1: Taking Everything Apart
This is where you begin. Do not try to paint cabinets with the doors on. You need to take them off.
- Empty all the cabinets and drawers. Take everything out.
- Use a screwdriver. Take off all cabinet doors.
- Take off all drawer fronts. Some drawers are one piece. Others have a front that screws off.
- Remove all hardware. This means knobs, pulls, and hinges.
- Keep track of everything. Put screws and hinges from each door or drawer into a small bag. Label the bag with where it came from. This helps you put it back right. You can number the doors and label the bags with the same number. For example, Door #1 screws go in Bag #1.
- Remove any shelves that can be taken out.
Step 2: Cleaning Every Surface Well
This step is super important. Grease and dirt stop paint from sticking. Laminate in kitchens often has a lot of grease.
- Put on rubber gloves and safety glasses.
- Mix your cleaner. TSP (Trisodium Phosphate) is strong and works great on grease. Or use a kitchen degreaser spray. Follow the product directions.
- Dip a clean cloth or sponge into the cleaner.
- Wash every part you plan to paint. This includes the cabinet boxes fixed to the wall, the inside edges of the frames, the doors, and the drawer fronts.
- Scrub well, especially near the stove or oven. Grease hides there.
- Rinse with a clean cloth and fresh water. Make sure all cleaner is gone.
- Let everything dry completely. Use a fan to speed this up if needed. Surfaces must be bone dry before the next step.
Step 3: Preparing the Surface (Sanding or Deglossing)
The smooth surface needs help gripping the paint. You can do this by making it a little rough or by using a chemical deglosser. This is a key part of how to prep laminate cabinets.
Option A: Light Sanding Laminate Cabinets
You are not trying to sand off the laminate layer. You just want to scratch the surface a little. This gives the primer something to stick to.
- Use fine-grit sandpaper. 220-grit or 320-grit is good.
- Wrap the sandpaper around a sanding block or use a random orbital sander on a very low setting with fine paper.
- Gently rub every surface you cleaned. Do not press hard. You just want to dull the shine. It should look less glossy, but the color of the laminate should still be there.
- Get into corners and edges by hand.
- After sanding, you will have dust. Wipe it all off with a tack cloth. Or use a vacuum with a brush tool to suck up the dust. Make sure all dust is gone. Dust stops paint from sticking.
Option B: Using Deglossing Liquid
A liquid deglosser does the same job as sanding but with chemicals. It dulls the shiny surface. This is often called deglossing laminate cabinets.
- Read the instructions on the deglosser product carefully. Use it in a place with fresh air. Open windows. Wear gloves and glasses.
- Apply the liquid with a clean cloth. Wipe it over all the laminate surfaces.
- The liquid works fast to dull the shine.
- You usually wipe it on and let it sit for a short time, then wipe off any extra, or just let it dry. Follow the product label.
- This method creates dust like sanding, but the surface is still ready for primer because the chemical changes the surface slightly. It’s less messy in terms of fine dust particles floating around.
Choose one method: sanding laminate cabinets or deglossing laminate cabinets. Both work to help the primer stick.
Step 4: Applying the Adhesion Primer
This is the most critical step for painting melamine cabinets or laminate. You cannot use standard wall primer. You need a special primer that sticks to slick surfaces. This is your adhesion primer for laminate. It acts like glue between the laminate and the paint.
- Choose the right primer. Look for primers labeled for use on laminate, melamine, tile, glass, or slick surfaces. Shellac-based or high-quality bonding primers are often recommended. A good
primer for laminate cabinetsis key. - Mix the primer well. Stir it according to the can. Do not shake vigorously, or you will get bubbles.
- Use a good brush for edges and details. Use a small foam roller for flat areas like the middle of doors. Foam rollers give a smoother finish than fuzzy rollers.
- Apply a thin, even coat of primer to all surfaces: the cabinet frames, doors, and drawer fronts. Do not put too much on. Too much primer can drip or take too long to dry.
- Work in sections. Paint cabinet frames fixed to the wall first. Then paint the doors and drawer fronts that you laid flat.
- Let the first coat of primer dry completely. Check the can for drying times. It might take a few hours or overnight. It must feel dry to the touch and not sticky.
- Lightly sand the dried primer coat with very fine sandpaper (like 320 or 400 grit). This smooths out any brush strokes or roller texture.
- Wipe away all dust with a tack cloth.
- Apply a second thin coat of primer. This second coat helps cover better and makes the surface even smoother for the paint.
- Let the second coat dry fully.
Getting the primer right is half the battle when you paint laminate kitchen cabinets.
Step 5: Painting with the Best Paint
Now for the color! The paint you use also matters. You need a durable paint for kitchen cabinets. Kitchens are busy places. Cabinets get touched a lot. They need tough paint.
- Choose the
best paint for laminate cabinets. Acrylic enamel paints are a popular choice. They dry hard and are easy to clean. Look for paints made for cabinets or trim. These are usually more durable than standard wall paint. - Consider the finish. Satin or semi-gloss finishes are common for cabinets. They are easier to clean than matte paint. Semi-gloss is the most durable but shows imperfections more. Satin is a good balance.
- Mix the paint well. Stir it.
- Apply the first coat of paint. Use a brush for corners and details. Use a clean foam roller for flat areas.
- Keep the coats thin and even. Avoid drips and heavy spots.
- Paint the cabinet frames first. Then paint the doors and drawers you have laid flat. Painting doors flat helps avoid drips. Paint one side, let it dry completely, then flip and paint the other side.
- Let the first coat of paint dry fully. Check the can for drying times. This might take several hours.
- Once the first coat is dry, you might see some brush or roller marks. You can lightly sand again with very fine sandpaper (400+ grit) to smooth these out.
- Wipe away all dust with a tack cloth.
- Apply the second coat of paint. Two thin coats are always better than one thick coat for durability and appearance.
- Let the second coat dry fully.
- Depending on the color change or the paint quality, you might need a third coat. Always apply thin coats and let each one dry completely.
- Give the paint plenty of time to dry and harden before going to the next step. This is called ‘curing’. The paint feels dry quickly, but it needs several days or even weeks to get its full hardness. It’s okay to handle them gently after 24 hours, but be careful.
Step 6: Adding a Topcoat (Optional but Recommended)
For extra protection and durability, especially in a busy kitchen, add a clear topcoat.
- Choose a clear topcoat. A water-based polycrylic or a clear acrylic topcoat works well over acrylic paint. Make sure it is non-yellowing.
- Mix the topcoat gently.
- Apply a thin, even coat using a clean brush or foam roller.
- Work carefully to avoid bubbles. Do not overwork the product.
- Let the first coat dry fully according to the product instructions.
- Apply a second thin coat for more durability.
- Let the topcoat dry and cure fully. This curing time is very important. Do not put the cabinets back together too soon.
Time for Drying and Curing
Be patient! This is one of the hardest parts.
- Primer: Usually dry to touch in 1-2 hours, ready for a second coat in 2-4 hours, ready for paint in 4-24 hours.
- Paint: Usually dry to touch in 1-4 hours, ready for a second coat in 4-6 hours or more.
- Topcoat: Usually dry to touch in 2-4 hours, ready for a second coat in 3-5 hours.
- Curing: This is the time it takes for the paint and topcoat to reach maximum hardness. This can take several days to 2-3 weeks. Be gentle with the cabinets during this time.
Step 7: Putting Everything Back
Once everything is fully dry and cured (wait as long as you can, ideally a week or two before being rough), it’s time to reassemble.
- Bring the cabinet doors and drawer fronts back.
- Use your labeled bags of hardware. Find the screws and hinges for each door.
- Reattach the hinges to the doors.
- Attach the doors back onto the cabinet frames. Line them up carefully.
- Reattach the drawer fronts.
- Install new knobs or pulls if you bought them. Or put the old ones back on.
- Put shelves back in.
- Put your kitchen items back into the cabinets. Be gentle at first.
Congratulations! You have completed the step by step painting laminate cabinets process.
Choosing the Right Products
Picking the correct products is vital for painting laminate cabinets.
Adhesion Primer for Laminate
Do not skip this! This is the glue. Look for:
- Purpose: Says it works on slick surfaces, laminate, melamine, tile, or glass.
- Type: Bonding primer, shellac-based primer (smelly but works great), or a high-quality water-based acrylic bonding primer.
- Color: Often comes in white or gray. Tinting the primer closer to your final paint color can help with coverage, especially if going from dark to light.
Good brands known for strong adhesion primers include Zinsser B-I-N (shellac), Zinsser 1-2-3 Plus, Kilz Adhesion, and Benjamin Moore STIX. This primer for laminate cabinets is the secret weapon.
Best Paint for Laminate Cabinets
You need paint that is tough and cleans well.
- Type: Acrylic enamel, Urethane Modified Acrylic, or Alkyd (oil-based – harder to clean up but very durable). Water-based acrylic enamels are popular because they are durable and easy to clean with water.
- Features: Look for paint labeled as “cabinet paint,” “trim paint,” or paint offering high durability and washability. This makes it
durable paint for kitchen cabinets. - Finish: Satin, Semi-Gloss.
Brands like Benjamin Moore Advance, Sherwin-Williams Emerald Urethane Trim Enamel, Behr Alkyd Enamel, or specific cabinet painting kits offer suitable options.
Topcoat Options
If using a topcoat for extra protection:
- Type: Water-based Polycrylic or Clear Acrylic. Make sure it is compatible with your paint.
- Finish: Usually comes in Satin, Semi-Gloss, or Gloss. Match it to your paint finish or choose one you like.
Varathane or Minwax Polycrylics are common.
Painting Melamine Cabinets
What about painting melamine cabinets? Melamine is very similar to laminate. It is also a hard, smooth surface. The process for painting melamine is exactly the same as painting laminate. You need the same careful cleaning, surface prep (light sanding or deglossing), a strong adhesion primer for laminate (which also works on melamine), and a durable cabinet paint. All the steps listed above apply to melamine too.
Tips for a Smooth Finish
Getting a factory-smooth finish is hard, but you can get close.
- Use Good Tools: High-quality brushes and foam rollers make a big difference. Cheap ones leave marks or bubbles.
- Thin Coats: Always apply thin layers of primer, paint, and topcoat. Thick coats drip and take forever to dry.
- Sand Between Coats: Lightly sanding between primer coats and paint coats smooths out texture and helps the next layer stick better. Use very fine sandpaper (320 grit or higher).
- Keep it Clean: Dust is the enemy of a smooth finish. Wipe everything down carefully before each coat.
- Control the Environment: Paint in a space that is not too hot, cold, or humid. Avoid painting outside where bugs and dust can land on wet paint.
- Consider a Sprayer: If you want the smoothest finish possible, a paint sprayer is the way to go. But they cost money, take practice, and need extra setup (like covering everything nearby).
Troubleshooting Common Problems
- Paint Peeling: This usually means the surface was not prepped right or you did not use the correct
adhesion primer for laminate. The paint did not stick to the laminate. Fix it by sanding off the peeling paint, cleaning again, and applying the correct bonding primer before repainting. - Brush Strokes or Roller Marks: Too-thick paint, cheap tools, or not sanding between coats can cause this. Sand the dried coat smooth, clean, and apply a thinner coat using a better technique or tool.
- Drips: Too much paint on the brush or roller, or applying coats too thickly. Catch drips quickly while the paint is wet. If they dry, you will need to sand them smooth before applying the next coat.
- Paint Taking Forever to Dry: This can happen if coats are too thick, the room is too cold or humid, or you are painting over a product that was not fully cured. Ensure good airflow. Wait longer between coats.
Weighing the Cost
Painting laminate cabinets is much cheaper than buying new ones.
- New laminate cabinets: Can cost thousands of dollars ($2,000 – $5,000+ for a small kitchen).
- Painting supplies: Can cost a few hundred dollars ($100 – $400, depending on the size of your kitchen and product quality). This includes cleaner, sandpaper, tape, primer, paint, brushes, rollers, etc.
The cost difference is big. It makes painting a very appealing option if your cabinet boxes and doors are in good physical shape.
How Long Does It Take?
Painting kitchen cabinets is not a one-day job. It takes several days, even a week or two, depending on drying times and how much time you have each day.
- Prep (taking off doors, cleaning, sanding/deglossing): 1-2 days.
- Priming (2 coats, drying time between): 1-2 days.
- Painting (2-3 coats, drying time between): 2-3 days.
- Optional Topcoat (1-2 coats, drying time between): 1-2 days.
- Curing Time (before heavy use): 7-21 days.
So, the active painting part might take about a week. But you cannot really use your kitchen cabinets normally for another 1-2 weeks while they cure. Plan for this downtime.
Considering Different Applications
How you apply the paint matters.
- Brush: Good for cutting in edges and corners. Can leave brush marks if not careful or if paint is too thick. Use a high-quality angled brush.
- Roller: Best for flat areas. Use a small foam roller for the smoothest finish on flat door panels. Avoid fuzzy rollers which leave texture. Rollers can sometimes create tiny bubbles. Pop them quickly or gently smooth them out before paint dries.
- Sprayer: Provides the smoothest, most professional finish. Requires thinning the paint and primer, lots of masking to protect surfaces from overspray, and cleanup of the sprayer. If you have many cabinets and want a perfect look, this is the best method, but it requires more skill and equipment.
For most DIYers, a combination of a good brush for edges and a foam roller for flat areas is a good balance of effort and finish quality.
The Final Look
Once your paint laminate kitchen cabinets project is complete and the paint has cured, step back and enjoy your “new” kitchen! Painting laminate is a budget-friendly way to make a big change in the look of your kitchen. The key is the prep work and using the right products, especially the adhesion primer for laminate and durable paint for kitchen cabinets.
Frequently Asked Questions
Q: Can I skip sanding or deglossing?
A: No. Skipping this step is likely to result in the paint not sticking well and peeling later. The surface needs to be prepared for the primer to grab on.
Q: How important is the special primer?
A: It is very important. Standard primers are made for porous surfaces like drywall or wood. Laminate is not porous. A special adhesion primer for laminate is designed to stick to smooth surfaces. Using the wrong primer is the main reason paint fails on laminate.
Q: Can I paint over laminate that is already peeling?
A: You must remove any peeling laminate or paint first. Sand the area smooth and level with the surrounding surface. Then clean and prime the entire area as usual. Painting over a bad surface will lead to problems later.
Q: What if I make a mistake?
A: If paint or primer drips or goes where it shouldn’t while wet, wipe it quickly with a damp cloth. If it dries, you will need to sand it smooth and repaint that section.
Q: Is this project good for beginners?
A: It is possible for beginners, but it requires patience, attention to detail, and following directions closely. The most important part is the preparation and using the correct primer and paint. Rushing or skipping steps will lead to poor results.
Q: How long will the paint last?
A: If done correctly with proper prep, adhesion primer for laminate, and durable paint for kitchen cabinets, the finish can last many years. How well you treated the surface and the quality of products used affect how long it lasts. It will be durable enough for normal kitchen use.
This in-depth guide shows that you can successfully paint laminate kitchen cabinets. It takes work and patience, but the result is a fresh, updated kitchen look for much less money than replacing the cabinets. Get the right supplies, follow the steps, and you can give your old laminate cabinets new life.