Yes, you absolutely can refinish kitchen cabinets! It’s a popular and effective way to update your kitchen’s look without the hefty cost of a full remodel. Refinishing can revive old, tired cabinets, giving them a fresh new appearance that perfectly suits your style. This comprehensive guide will walk you through everything you need to know about cabinet refinishing, from whether it’s the right choice for you to the steps involved in a successful cabinet makeover.
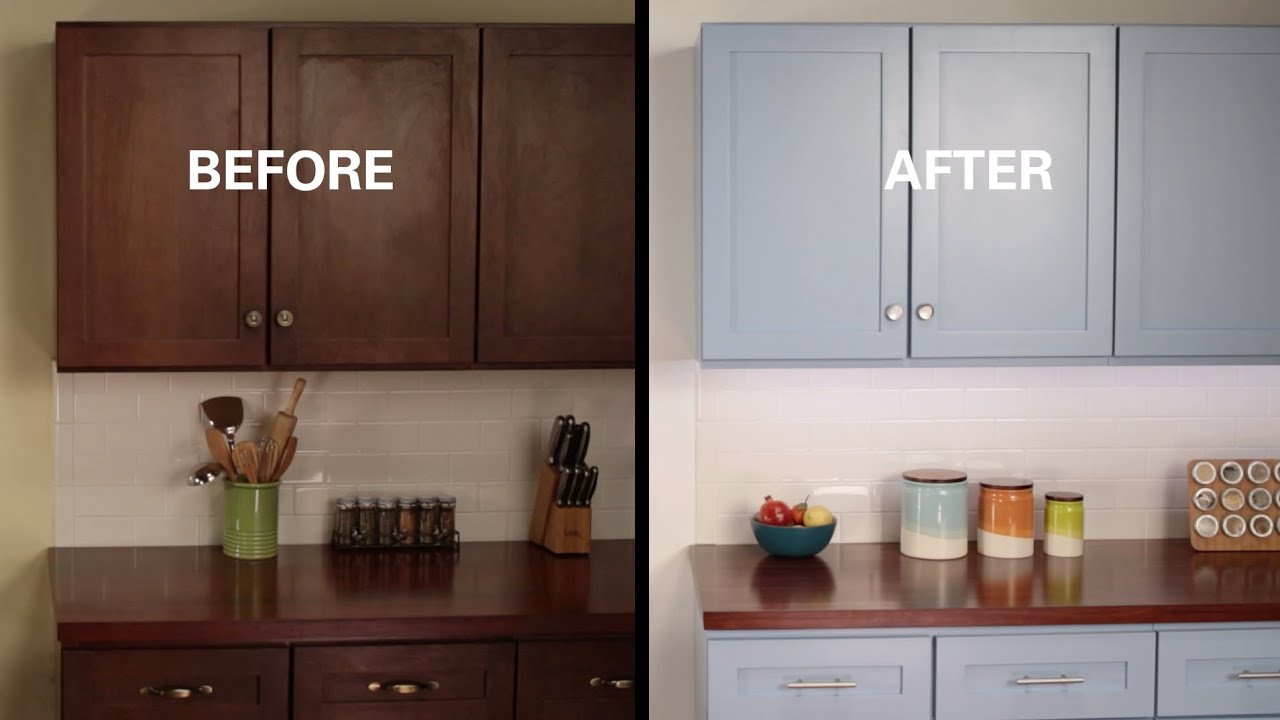
Image Source: i.ytimg.com
Why Refinish Your Kitchen Cabinets?
Updating your kitchen cabinets can have a dramatic impact on your home’s overall aesthetic. If your current cabinets are structurally sound but lack visual appeal, refinishing offers a fantastic solution. It’s a project that can breathe new life into your kitchen, making it feel more modern, inviting, and reflective of your personal taste.
The Benefits of Cabinet Refinishing
- Cost-Effective: Compared to replacing cabinets entirely, refinishing is significantly cheaper. This makes it an accessible option for many homeowners looking to update their kitchens on a budget.
- Customization: Refinishing allows you to choose exactly the color or stain you want. You can opt for classic white, a bold contemporary hue, or a rich wood stain to match your decor.
- Durability: When done correctly with quality materials, refinished cabinets can be just as durable, if not more so, than their original finish.
- Environmental Friendliness: By refinishing, you’re reusing existing materials, which is a more sustainable choice than manufacturing and installing entirely new cabinets.
- Increased Home Value: A refreshed kitchen can boost your home’s market value. Well-maintained and stylish cabinets are a significant selling point.
When Refinishing is the Best Option
Refinishing is ideal when your cabinets are:
- Structurally Sound: The cabinet boxes and doors should be in good condition, with no major damage like rot, warping, or severe water damage.
- Dated but Functional: If the cabinet style is outdated but the construction is solid, refinishing is a great way to modernize them.
- Budget-Conscious: When a full kitchen renovation isn’t feasible, refinishing provides a significant visual upgrade for a fraction of the cost.
Deciding Between Refinishing Options: Staining vs. Painting
The two primary methods for refinishing kitchen cabinets are staining and painting. Each offers a distinct look and requires different approaches.
Cabinet Staining: Bringing Out the Natural Beauty
Cabinet staining involves applying a translucent color to the wood, allowing the natural grain and texture to show through. This is a great option if you have solid wood cabinets with a beautiful grain pattern you want to highlight.
Pros of Staining:
- Highlights Wood Grain: Creates a warm, natural, and sophisticated look.
- Rich Depth of Color: Stains can achieve deep, luxurious tones.
- Often Simpler Application: Can be less prone to drips and streaks than paint if done carefully.
Cons of Staining:
- Requires Solid Wood: Not suitable for laminate, veneer, or MDF cabinets unless you’re painting them.
- Grain Imperfections: Any imperfections in the wood grain will be visible.
- Limited Color Palette: Primarily shades of brown and wood tones, though some custom colors are available.
Cabinet Painting: A World of Color Possibilities
Cabinet painting completely covers the wood surface with an opaque color. This is the most popular choice for cabinet refinishing due to the vast array of color options and its ability to transform the look of any cabinet material.
Pros of Painting:
- Vast Color Selection: You can match any color imaginable to complement your kitchen decor.
- Hides Imperfections: Can effectively cover minor surface flaws.
- Modern Aesthetic: White, gray, and navy blue cabinets are very trendy.
- Works on Various Materials: Suitable for wood, laminate, and even some previously finished surfaces.
Cons of Painting:
- Can Show Brush/Roller Marks: Requires careful application to achieve a smooth finish.
- Prone to Chipping: If not properly prepped and sealed, paint can chip over time, especially on high-traffic areas.
- More Labor Intensive: Often requires more steps for proper adhesion and a smooth finish.
The Cabinet Refinishing Process: A Step-by-Step Guide
Whether you choose to stain or paint, the preparation steps are largely the same and are crucial for a lasting, professional-looking result.
Step 1: Planning Your Cabinet Makeover
Before you pick up a paintbrush or stain, take time to plan.
Material Assessment
- Cabinet Material: Identify if your cabinets are solid wood, veneer, laminate, or MDF. This will influence your finishing choice and preparation methods. Solid wood is ideal for staining. Laminates and veneers are best painted.
- Existing Finish: Note the current finish. Is it a varnish, lacquer, or paint? This will determine the type of stripper or degreaser you might need.
Color and Finish Selection
- Mood Board: Create a mood board with paint chips, stain samples, and inspiration photos.
- Test Samples: Always test your chosen paint or stain on a hidden area of a cabinet door or a scrap piece of wood to ensure you like the color and how it looks on your specific cabinet material.
Tools and Supplies Checklist
Here’s a general list of what you might need:
- Screwdriver set
- Drop cloths or plastic sheeting
- Painter’s tape
- Degreaser or TSP substitute
- Sandpaper (various grits: 120, 180, 220)
- Sanding block or electric sander (orbital or detail sander)
- Tack cloths
- Wood filler (if needed)
- Primer (if painting)
- Paint or stain
- Brushes (high-quality synthetic for paint, natural bristle for stain)
- Foam rollers (low-nap for smooth finishes)
- Polyurethane or clear topcoat
- Cabinet hardware (knobs, pulls)
Step 2: Disassembly and Cleaning
This is where the physical work begins.
Removing Cabinet Doors and Drawers
- Label Everything: Use painter’s tape and a pen to label each door and drawer with its corresponding location (e.g., “Upper Left,” “Drawer 2”). This is crucial for reassembly.
- Remove Hardware: Unscrew hinges, knobs, and drawer pulls. Store them in labeled bags.
- Take Pictures: Before disassembly, take clear photos of how everything is assembled. This can be a lifesaver during reassembly.
Thorough Cleaning
- Degrease: Kitchen cabinets accumulate grease and grime. Use a strong degreaser or a TSP (trisodium phosphate) substitute mixed with water to thoroughly clean all surfaces. A good degreasing solution is essential for paint or stain to adhere properly.
- Rinse: Wipe down all surfaces with a clean, damp cloth to remove any residue from the cleaner.
- Dry: Ensure all cabinet surfaces are completely dry before proceeding.
Step 3: Preparation – The Key to a Lasting Finish
This is the most critical phase for DIY cabinet refinishing. Skipping or rushing these steps will lead to a poor, short-lived finish.
Degreasing and Cleaning (Reiteration for Emphasis)
We’ve already covered this, but it’s worth repeating: a spotless surface is paramount. Any remaining grease or dirt will prevent adhesion.
Repairing Imperfections
- Fill Holes and Cracks: Use wood filler to patch any dents, holes, or cracks. Let it dry completely according to the product instructions.
- Sand Filler: Once dry, sand the filled areas smooth, flush with the surrounding surface.
Sanding for Adhesion
- For Staining: If you’re staining solid wood, you’ll need to sand down to bare wood. Start with a coarser grit (around 120) to remove the old finish, then move to a finer grit (180-220) to create a smooth surface.
- For Painting: If painting, you don’t necessarily need to remove all the old finish unless it’s peeling or damaged. Lightly scuff-sand the surface with 180-220 grit sandpaper to create a “tooth” for the primer and paint to adhere to. If there’s a glossy finish, this step is non-negotiable.
- Sanding Technique: Always sand in the direction of the wood grain. For cabinet doors, using a sanding block or an orbital sander with a dust collection system is recommended.
- Cleaning After Sanding: After sanding, use a vacuum with a brush attachment to remove most of the dust. Then, wipe down all surfaces with a tack cloth to pick up any remaining fine dust particles.
Priming (Essential for Painting)
- Choose the Right Primer: Select a high-quality adhesion-promoting primer. For cabinets, oil-based or shellac-based primers are often recommended as they offer excellent adhesion and stain-blocking properties, especially if you’re painting over a dark wood or a previous stain. Water-based acrylic enamel primers can also work well.
- Application: Apply a thin, even coat of primer. Avoid thick applications that can cause drips.
- Drying and Light Sanding: Let the primer dry completely. Once dry, lightly sand the surface with a fine-grit sandpaper (220 grit) and wipe with a tack cloth. This ensures a smooth surface for the paint.
Step 4: Applying the Finish – Stain or Paint
Now for the transformation!
Cabinet Staining Process
- Stain Application: Apply the wood stain using a high-quality brush or a lint-free cloth. Work in small sections, applying the stain evenly and in the direction of the wood grain.
- Wipe Off Excess: After a few minutes (check the stain manufacturer’s instructions for recommended dwell time), wipe off the excess stain with a clean, lint-free cloth, again moving with the grain. The longer you leave the stain on, the darker the color will be.
- Multiple Coats: For a deeper color, apply additional coats, allowing each to dry thoroughly between applications.
- Drying Time: Ensure the stain is completely dry according to the manufacturer’s instructions before applying a topcoat. This can take 24-72 hours.
Cabinet Painting Process
- Paint Application: Apply the first coat of paint. Use a high-quality synthetic brush for edges and details and a foam roller for flat surfaces. Apply thin, even coats.
- Between Coats: Allow each coat to dry thoroughly according to the manufacturer’s instructions. Lightly sand the surface with 220-grit sandpaper between coats and wipe with a tack cloth to ensure a smooth finish and good adhesion.
- Multiple Coats: Most cabinet jobs require at least two to three coats of paint for full coverage and durability.
- Topcoat/Sealer: After the final coat of paint has dried, apply a protective topcoat. A water-based polyurethane or a durable enamel topcoat will protect the paint from wear and tear. Apply 2-3 thin coats, allowing drying time and light sanding between each.
Step 5: Reassembly and Finishing Touches
The final stretch of your cabinet restoration.
Reattaching Hardware
- Install Hinges: Reattach the hinges to the cabinet doors and frames.
- Attach New Hardware: If you’re doing a cabinet hardware replacement, now is the time to install your new knobs or pulls. Ensure you use the correct drill bit size for pilot holes to avoid splitting the wood.
Rehanging Doors and Reinserting Drawers
- Careful Alignment: Carefully rehang the doors and reinsert the drawers, referring to your photos if needed.
- Adjust Hinges: Adjust the hinges as necessary to ensure doors hang straight and close properly.
Cabinet Renewal: The Final Look
Step back and admire your work! Your kitchen cabinets have undergone a complete cabinet renewal, transforming the entire feel of your kitchen.
The Cabinet Refinishing Cost: What to Expect
The cabinet refinishing cost can vary significantly based on several factors:
- DIY vs. Professional: Doing it yourself will significantly reduce labor costs, but you’ll need to account for the cost of materials and your time.
- Size of Kitchen: More cabinets mean more materials and time.
- Type of Finish: Stains can sometimes be more expensive than basic paint colors.
- Quality of Materials: Using high-quality paints, primers, and topcoats will result in a more durable and professional finish.
- Cabinet Condition: If cabinets require extensive repairs or stripping, the cost will increase.
DIY Cabinet Refinishing Cost Breakdown
| Item | Estimated Cost Range |
|---|---|
| Sandpaper | $10 – $30 |
| Degreaser/Cleaner | $10 – $25 |
| Wood Filler | $5 – $15 |
| Painter’s Tape | $5 – $15 |
| Primer | $20 – $50 |
| Paint/Stain | $50 – $150+ |
| Brushes/Rollers | $20 – $60 |
| Polyurethane/Topcoat | $25 – $75 |
| Tack Cloths | $5 – $10 |
| Total (approx.) | $150 – $430+ |
Note: This is a general estimate and can fluctuate based on the number of cabinets and brands chosen.
Professional Cabinet Refinishing Cost
Hiring a professional for cabinet refinishing typically costs between $2,000 to $8,000 or more, depending on the factors mentioned above. While more expensive, professionals offer expertise, faster turnaround times, and a guaranteed quality finish, which can be worth the investment for some homeowners.
Refinishing Cabinet Doors: Special Considerations
Refinishing cabinet doors is often the most visible part of the process. Here are some tips specifically for doors:
- Flat Surface Work: Whenever possible, lay doors flat on a protected surface (like sawhorses with cardboard) for application. This minimizes drips and ensures a more even finish.
- Edge and Side Work: Use a good quality brush for edges and the back of the doors.
- Drying Racks: Consider investing in or making drying racks to allow doors to dry without sticking to the surface.
- Ventilation: Ensure good ventilation when working with stains and paints, especially in enclosed spaces where doors are drying.
Frequently Asked Questions (FAQ)
Q1: How long does it take to refinish kitchen cabinets?
A1: For a DIY project, it can take anywhere from a weekend to several weeks, depending on the size of your kitchen, your experience level, and how much time you can dedicate each day. Professional refinishing typically takes 1-2 weeks.
Q2: Can I refinish laminate or veneer cabinets?
A2: Yes, you can refinish laminate and veneer cabinets, but you must paint them. Staining requires bare wood. For laminate and veneer, thorough cleaning, light sanding to scuff the surface, a good adhesion-promoting primer, and then multiple coats of quality paint are essential.
Q3: Do I need to remove my cabinets from the walls to refinish them?
A3: It’s highly recommended to remove the cabinet doors, drawer fronts, and drawer boxes. However, the cabinet boxes (the frames attached to the wall) can often be painted or stained in place, though it requires meticulous masking to protect your countertops and appliances.
Q4: What is the best way to clean cabinets before refinishing?
A4: A degreaser or TSP substitute is the most effective. Follow up with a clean, damp cloth to rinse and then ensure they are completely dry.
Q5: Can I stain over existing stained cabinets?
A5: Yes, if the existing stain is in good condition and you’re applying a darker stain. You’ll need to clean, lightly sand the surface to remove any old topcoat or sheen, and then apply your new stain. For lighter stains over darker ones, you’d need to strip or sand down to bare wood.
Q6: How do I prevent brush marks when painting cabinets?
A6: Use high-quality brushes and rollers. Apply thin, even coats. Work in a well-lit area, and consider using a sprayer for the smoothest finish. Sanding lightly between coats also helps smooth out imperfections.
Q7: Is refinishing cabinets worth the effort?
A7: For most homeowners looking for a budget-friendly update that significantly improves the kitchen’s appearance, the answer is a resounding yes. The effort is rewarded with a fresh, customized look.
Conclusion
Refinishing your kitchen cabinets is a rewarding project that can dramatically transform your kitchen’s aesthetic. By carefully planning, thoroughly preparing, and diligently applying your chosen finish, you can achieve professional-looking results and enjoy a renewed kitchen for years to come. Whether you opt for the natural beauty of cabinet staining or the versatile color options of cabinet painting, the cabinet makeover will undoubtedly be a highlight of your home improvement journey. Remember, attention to detail in every step, from cleaning to the final cabinet hardware replacement, is what sets a good refinishing job apart from a great one.