Image Source: i.ytimg.com
How To Disassemble Moen Kitchen Faucet for Repair
Can I disassemble my Moen kitchen faucet myself for repair? Yes, you can disassemble most Moen kitchen faucets yourself for repair with the right tools and guidance. This guide provides a comprehensive walkthrough to help you tackle common issues like leaks or low water pressure, often related to a faulty Moen faucet cartridge replacement.
Moen is a trusted brand for kitchen fixtures, known for their durability and innovative designs. However, like any mechanical device, faucets can experience wear and tear, leading to issues such as leaks, drips, or reduced water flow. Fortunately, many of these problems can be resolved with a bit of DIY effort, starting with the proper disassembly of your Moen kitchen faucet. This Moen faucet disassembly guide will walk you through the process step-by-step, ensuring you can effectively perform Moen faucet repair and Moen faucet maintenance.
Essential Tools for Moen Faucet Disassembly
Before you begin, gather the necessary tools. Having these readily available will make the process smoother and prevent damage to your faucet.
- Adjustable Wrench: This is crucial for loosening and tightening various nuts and components.
- Phillips Head Screwdriver: Many internal parts are secured with Phillips head screws.
- Flathead Screwdriver: Useful for prying off decorative caps or gently separating components.
- Allen Wrench Set (Hex Keys): Moen faucets often use small Allen screws to secure handles.
- Plumber’s Grease (Silicone-based): Essential for lubricating O-rings and cartridges to ensure smooth operation and prevent future leaks.
- Clean Rags or Towels: To wipe away water and debris, and to protect your sink basin.
- Bucket or Bowl: To catch any residual water when disconnecting supply lines.
- Safety Glasses: Protect your eyes from any potential water spray or debris.
- Penetrating Oil (Optional): If parts are stubborn or corroded, a small amount can help loosen them.
Preparing for Disassembly
Safety and preparation are key to a successful Moen faucet repair.
Shutting Off the Water Supply
This is the most critical first step. Failure to do so will result in a flood.
- Locate the Shut-Off Valves: Look under your sink for two small valves, usually connected to the hot and cold water supply lines that run to your faucet.
- Turn Off the Valves: Turn each valve clockwise until it is completely closed. For most standard valves, a quarter or half turn is sufficient.
- Test the Water: Turn on your faucet to ensure the water is completely shut off. No water should come out. If it does, double-check the valves or you may need to shut off the main water supply to your house.
Protecting Your Sink and Drain
Preventing loss of small parts is vital.
- Place a Rag in the Sink: Lay a clean rag or towel in the bottom of your sink. This will catch any dropped screws or small parts and prevent them from going down the drain.
- Close the Drain Stopper: Ensure your sink drain is closed or plugged to avoid losing any components down the drain.
Disassembling a Moen Single Handle Faucet
Most common kitchen faucet issues involve the cartridge, especially in a Moen single handle faucet. This guide focuses on this popular type.
Removing the Handle
The handle is typically the first component to remove.
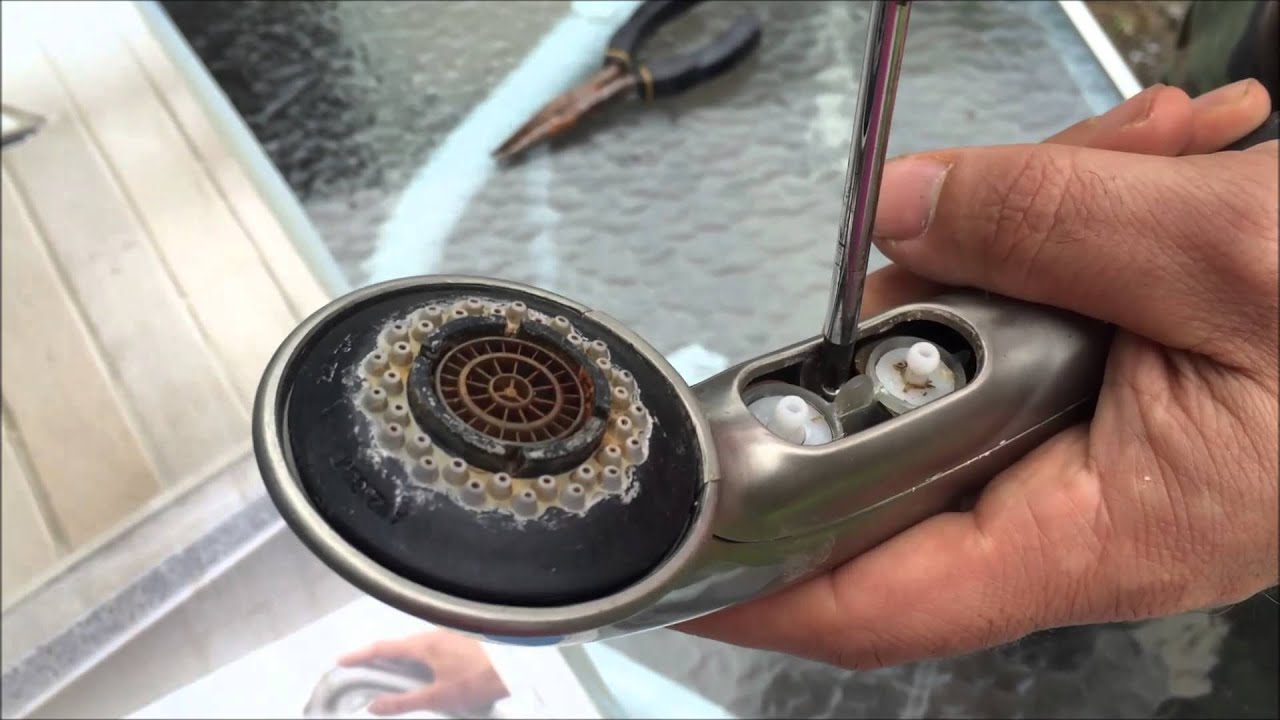
- Locate the Set Screw: On most Moen single-handle faucets, the handle is secured by a small set screw. This screw is often hidden behind a decorative cap or plug.
- Pry Off the Decorative Cap: Use a small flathead screwdriver or a utility knife to gently pry off the decorative cap. These caps usually pop off easily. You might see a small “H” or “C” indicating hot and cold, or it might be a plain cap.
- Loosen the Set Screw: Once the cap is removed, you’ll see the set screw. Use the appropriate-sized Allen wrench to loosen and remove this screw.
- Lift Off the Handle: With the set screw removed, the handle should lift straight up and off the faucet body. If it’s stuck, a gentle wiggle might be needed. Avoid excessive force, as this could damage the faucet.
Removing the Escutcheon and Handle Adapter
Beneath the handle, you’ll find more components that need removal.
- Unscrew the Escutcheon Cap/Dome: After the handle is off, you’ll likely see a decorative dome or cap that unscrews. This is often threaded onto the faucet body. Use your adjustable wrench or gloved hands to unscrew it counter-clockwise.
- Remove the Handle Adapter (if applicable): Some models have a plastic or metal adapter that sits between the handle and the main faucet body. This may also be threaded or held in place by screws. Inspect carefully and remove as needed.
Accessing the Cartridge Retaining Nut
This is where you get close to the core of the faucet.
- Identify the Retaining Nut: You’ll see a large brass or metal nut around the valve stem. This is the retaining nut that holds the Moen faucet cartridge in place.
- Loosen the Retaining Nut: Use your adjustable wrench to loosen this nut by turning it counter-clockwise. It might be snug, so apply firm but controlled pressure.
Removing the Moen Faucet Cartridge
The cartridge is the heart of your faucet’s operation and a common culprit for Moen faucet leak repair.
- Pull Out the Cartridge: Once the retaining nut is removed, the cartridge should be accessible. There might be a clip holding it in place; if so, carefully remove it with needle-nose pliers or a small screwdriver. Gently pull the cartridge straight up and out of the faucet body.
- Use a Cartridge Puller (if necessary): Sometimes, the cartridge can be difficult to remove due to mineral buildup or age. Moen often sells a specialized cartridge puller tool that can make this process much easier and prevent damage to the faucet body. If the cartridge doesn’t budge, this tool is highly recommended.
Inspecting and Replacing Parts
With the cartridge out, you can inspect it and other components.
- Examine the Cartridge: Look for cracks, wear, or mineral buildup on the old cartridge. If it appears damaged or worn, it’s time for a Moen faucet cartridge replacement.
- Check O-Rings and Seals: While the cartridge is out, inspect the O-rings and seals within the faucet body. These can also wear out and cause leaks. It’s good practice to replace these as well during Moen faucet maintenance.
- Identify Moen Faucet Parts: Knowing the specific model of your faucet can help you find the exact Moen kitchen faucet parts needed for replacement. Moen provides model numbers on their website, and often on the faucet itself or its original packaging.
Reassembling Your Moen Faucet
Reassembly is the reverse of disassembly.
- Install New O-Rings/Seals: If you are replacing O-rings, lubricate them with plumber’s grease and carefully place them in their correct positions within the faucet body.
- Insert the New Cartridge: Ensure the new Moen faucet cartridge is oriented correctly. Most cartridges have notches or tabs that align with slots in the faucet body. Push it firmly into place.
- Replace the Retaining Nut: Screw the retaining nut back onto the faucet body, hand-tightening it first, then using the wrench to snug it up. Do not overtighten.
- Reinstall the Handle Adapter and Escutcheon: Screw back on the escutcheon cap or dome and any handle adapters.
- Attach the Handle: Slide the handle back onto the valve stem, ensuring it’s in the desired position.
- Tighten the Set Screw: Reinsert and tighten the set screw that secures the handle.
- Replace the Decorative Cap: Snap the decorative cap back into place.
Testing for Leaks and Proper Function
After reassembly, it’s time to test your work.
- Turn the Water Supply Back On: Slowly turn the shut-off valves under the sink back on.
- Check for Leaks: Inspect all connections and around the faucet base for any signs of dripping.
- Test Faucet Operation: Turn the faucet on and off, checking for smooth handle operation, proper hot and cold water mixing, and good water flow. Cycle the water on and off several times.
Common Moen Faucet Troubleshooting Scenarios
When performing Moen faucet maintenance, you might encounter specific issues.
Leaky Faucet After Repair
- Issue: The faucet still drips or leaks after replacing the cartridge.
- Possible Causes: The new cartridge might be faulty, the retaining nut is not tight enough, or there’s debris preventing a good seal.
- Solution: Disassemble again, inspect the new cartridge for damage, ensure the retaining nut is snug, and clean the faucet body thoroughly before reinserting the cartridge.
Low Water Pressure
- Issue: Water flow is reduced from the spout.
- Possible Causes: This is often due to a clogged aerator. It can also be caused by issues within the cartridge or mineral buildup in the supply lines.
- Solution:
- Clean the Aerator: Unscrew the aerator at the tip of the spout. Disassemble it, rinse all parts, and soak them in vinegar to remove mineral deposits. Reassemble and screw it back on.
- Check Cartridge: If the aerator isn’t the problem, the Moen faucet cartridge replacement might be needed if it’s clogged internally.
- Inspect Supply Lines: Ensure the flexible supply lines under the sink are not kinked.
Handle is Stiff or Difficult to Move
- Issue: The handle is hard to turn or feels gritty.
- Possible Causes: Lack of lubrication on the cartridge and O-rings, or mineral buildup.
- Solution: Ensure all O-rings and the cartridge are properly lubricated with plumber’s grease during reassembly. If it persists, a new cartridge might be necessary.
Advanced Moen Faucet Removal and Installation
If your faucet is old, severely corroded, or you’re upgrading, you might need to perform a complete Moen faucet removal.
Removing the Entire Faucet Assembly
This involves disconnecting the water supply and mounting hardware.
- Turn Off Water and Drain Lines: As before, shut off water supply and open faucet to drain residual water. You may want to disconnect the supply lines from the shut-off valves and let them drain into a bucket.
- Disconnect Supply Lines from Faucet: Under the sink, locate where the flexible supply lines connect to the faucet shanks. Use your adjustable wrench to disconnect them.
- Remove Mounting Hardware: Underneath the sink, you’ll find nuts or screws securing the faucet to the sink or countertop. These can be tricky to reach. Use a basin wrench if necessary.
- Lift Faucet from Sink: Once all connections and mounting hardware are removed, gently lift the entire faucet assembly up and out from the top of the sink.
Installing a New Moen Faucet
Moen faucet installation follows a similar process in reverse.
- Prepare the New Faucet: Follow the manufacturer’s instructions for the new faucet. This usually involves attaching supply lines and any mounting hardware.
- Position the Faucet: Place the new faucet onto the sink or countertop, ensuring alignment.
- Secure Mounting Hardware: From underneath the sink, tighten the mounting nuts or screws to secure the faucet.
- Connect Water Supply Lines: Connect the flexible supply lines to the corresponding hot and cold water shut-off valves.
- Turn on Water and Test: Slowly turn the water supply back on and thoroughly check for leaks. Test the faucet’s operation.
Moen Faucet Maintenance Schedule
Regular Moen faucet maintenance can prevent many common issues.
- Monthly: Wipe down the faucet with a soft cloth and mild soap to prevent water spots and mineral buildup. Check for any early signs of leaks.
- Quarterly: Clean the aerator by unscrewing it and rinsing it. Soak it in vinegar if you notice reduced water flow.
- Annually: Check the handle for smooth operation. If it feels stiff, consider lubricating the cartridge assembly (after turning off the water, of course) or plan for a Moen faucet cartridge replacement.
Frequently Asked Questions (FAQ)
Q1: What is the most common reason for a Moen faucet to leak?
A1: The most common reason for a Moen faucet to leak is a worn-out or damaged Moen faucet cartridge. Mineral deposits and regular use can degrade the rubber seals within the cartridge, leading to drips.
Q2: How do I know if I need a new Moen faucet cartridge?
A2: If your faucet drips from the spout when turned off, has low water pressure that isn’t resolved by cleaning the aerator, or the handle is very stiff or difficult to move, it’s highly likely that you need a Moen faucet cartridge replacement.
Q3: Can I buy Moen faucet parts at any hardware store?
A3: While some common parts might be available, it’s best to identify your specific Moen faucet model. Moen’s website has a detailed product catalog where you can find the correct Moen kitchen faucet parts, including the specific cartridge number. You can then purchase these from authorized Moen dealers or large home improvement stores.
Q4: What if my Moen faucet is very old? Is it still possible to find parts?
A4: Moen has a reputation for supporting their products. For older models, you might need to do a bit more research using their website’s parts finder or contacting their customer support. They often have replacement parts available for many years, even for discontinued lines.
Q5: Do I need a special tool for Moen faucet removal?
A5: For basic Moen faucet disassembly like handle and cartridge removal, standard tools are usually sufficient. However, for complete Moen faucet removal, a basin wrench can be extremely helpful for reaching mounting nuts in tight spaces under the sink. A cartridge puller is also a highly recommended tool for easier Moen faucet cartridge replacement, especially for older or stubborn cartridges.
By following this detailed Moen faucet disassembly guide, you can confidently address common issues, perform essential Moen faucet maintenance, and keep your kitchen faucet in excellent working order. Remember to work carefully, have patience, and always prioritize safety by shutting off the water supply before beginning any repair.