Can you grout a kitchen backsplash yourself? Yes, absolutely! With the right tools and a bit of patience, anyone can achieve a professional-looking grout finish for their DIY backsplash. This guide will walk you through every step, from choosing your grout to the final wipe-down, ensuring your kitchen tiles shine.
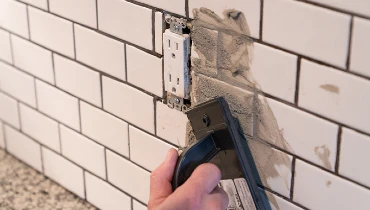
Image Source: www.mrhandyman.com
Laying the Groundwork: What You Need
Before you can start the exciting part – the grout application – you need to ensure your tiles are perfectly set. This means having the right tile installation tools and ensuring your tile adhesive has cured properly. The tiles should be firmly in place, with consistent spacing between them. This spacing is where your grout will live, creating a clean, finished look.
Essential Grout Kit Components
Gathering the right supplies is key to a smooth and successful grouting process. Here’s a breakdown of what you’ll need:
- Grout: The star of the show! Choose your grout color carefully. It can dramatically alter the final look of your backsplash.
- Grout Float: This is your primary tool for spreading grout. It has a sturdy rubber base that helps push the grout into the tile joints.
- Sponge for Grout: You’ll need a specific grout sponge. These are dense and absorbent, perfect for cleaning excess grout without pulling it out of the joints. Have a couple on hand.
- Buckets: At least two. One for mixing grout, and one for rinsing your sponge. Clean water is crucial.
- Mixing Stick or Paddle: For thoroughly mixing the grout to the correct consistency.
- Trowel or Putty Knife: For scooping grout from the bag and initially applying it.
- Gloves: To protect your hands from the cementitious grout.
- Safety Glasses: To protect your eyes from flying grout particles.
- Rags or Old Towels: For initial wipe-downs and drying.
- Painter’s Tape: To protect adjacent surfaces like countertops or walls from grout splashes.
- Grout Sealant: Applied after the grout has cured, this protects against stains and moisture.
Choosing Your Grout Color
The grout color is a significant design decision. It can either blend in with your tiles, making them appear as a solid surface, or it can contrast sharply, highlighting the individual tiles and their patterns.
- Matching Grout: A grout color that closely matches your tile color creates a seamless, modern look. This can make a small kitchen feel more spacious.
- Contrasting Grout: A darker grout with lighter tiles, or vice versa, can add definition and a graphic quality to your backsplash. This is great for highlighting subway tiles or intricate patterns.
- Neutral Grout: Whites, grays, and beiges are versatile and work with almost any tile color. They offer a clean, classic look.
Pro Tip: Always test a small amount of grout on a scrap piece of tile before committing to your entire backsplash. This helps you see how the color will appear once dry.
Preparing for Grout Application
Proper preparation prevents headaches later. This means cleaning up any lingering tile adhesive and ensuring the tile edges are free of debris.
Cleaning the Tiles and Joints
Before mixing your grout, thoroughly clean the tiles and especially the grout lines.
- Remove Excess Adhesive: Any tile adhesive that has squeezed through the gaps between tiles needs to be carefully removed. Use a putty knife or utility knife. If the adhesive is dry and hard, you might need a chisel, but be very gentle to avoid damaging the tiles.
- Dust and Debris: Vacuum or brush away any dust, dirt, or small particles from the tile surfaces and within the grout lines. Grout won’t adhere well to a dirty surface.
- Dampen the Tiles (Optional): For some types of grout, especially in very hot or dry conditions, lightly misting the tiles and joints with water can prevent the grout from drying too quickly. Use a spray bottle. Don’t saturate them, just a light mist.
Protecting Surrounding Surfaces
Use painter’s tape to shield countertops, cabinet edges, and walls from accidental grout smears. This simple step saves a lot of cleaning later.
Mixing the Grout: The Perfect Consistency
This is where the magic happens. Getting the grout consistency right is crucial for easy application and a durable finish.
Grout Mix Ratios
Always follow the manufacturer’s instructions on the grout packaging. They will specify the water-to-grout ratio.
- Measure Water: Pour the recommended amount of clean water into your mixing bucket.
- Add Grout Powder: Gradually add the grout powder to the water while mixing.
- Mix Thoroughly: Use your mixing stick or a drill with a paddle attachment. Mix until you achieve a smooth, lump-free consistency. The ideal consistency is often described as similar to peanut butter or thick cake batter. It should be spreadable but not runny.
- Let it Slake: Most grouts require a “slaking” period. This means letting the mixed grout sit for 5-10 minutes to allow the chemicals to fully react. After slaking, give it another brief mix.
Table 1: Grout Consistency Guide
| Description | Appearance | How to Test |
|---|---|---|
| Too Dry/Crumbly | Looks like dry powder, won’t hold together | Add a tiny bit more water, mix well. |
| Too Wet/Runny | Drips easily, like thin soup | Add a little more grout powder, mix well. |
| Just Right | Holds its shape, like thick peanut butter | Scoop with your trowel; it should slide off slowly but hold its form. It should not be sticky or watery. |
| Ideal for Spread | Smooth, pliable, spreads easily without sagging | A dollop on a flat surface should hold its shape and not spread outwards excessively. |
Important: Do not add extra water beyond the recommended ratio to make the grout easier to spread. This weakens the grout and can lead to cracking or discoloration.
The Grout Application Process
Now for the main event! Using your grout float and a patient hand, you’ll fill those grout lines.
Filling the Joints
- Scoop and Spread: Using your trowel or a scoop, place a generous amount of grout onto the grout float.
- Apply with the Float: Hold the grout float at a 45-degree angle to the tile surface. Spread the grout across the tiles, pressing firmly to push it deep into all the grout lines.
- Work in Sections: Don’t try to grout the entire backsplash at once. Work in manageable sections, typically 2-3 square feet at a time. This allows you to clean off excess grout before it starts to dry.
- Diagonal Strokes: Move the grout float diagonally across the tiles. This helps to push the grout into the joints and minimize the amount of grout left on the tile surface.
- Remove Excess: After filling a section, hold the grout float at a steeper angle (almost 90 degrees) and sweep it diagonally across the tiles again. This removes the bulk of the excess grout from the tile faces, leaving it only in the joints.
Ensuring Full Joints
As you work, check that all grout lines are completely filled. If you see any low spots or gaps, apply more grout to those areas. You want the grout to be level with the tile surface, or slightly below, depending on the tile edge and your desired look.
Initial Cleaning: The First Wipe
This is a critical step. You need to remove the excess grout from the tile faces without removing the grout from the grout lines.
Timing is Key
You want to start the cleaning process when the grout has begun to set but is not yet hard. This usually takes about 15-30 minutes after application, depending on the humidity and temperature. The grout should be firm to the touch, not soft or sticky.
Using the Sponge for Grout
- Dampen the Sponge: Dip your sponge for grout into a bucket of clean water and wring it out thoroughly. The sponge should be damp, not soaking wet. Too much water will wash the grout out of the joints.
- Gentle Wipes: Make light, diagonal passes across the tiles with the sponge. The goal is to remove the film of grout from the tile surface.
- Rinse Frequently: Rinse your sponge very frequently in the second bucket of clean water. Squeeze out as much dirty water as possible before dipping it back into the clean rinse water. This is crucial for preventing grout haze.
- Turn the Sponge: As you clean, use different sides of the sponge and rotate it to expose a clean surface.
- Shape the Joints: With the final passes, you can gently shape the grout lines, ensuring they are smooth and consistent.
Mistake to Avoid: Don’t use too much water on your sponge, and don’t scrub hard. Both will pull grout out of the joints and create a weak spot.
The Second and Final Cleaning: Tackling Grout Haze
After the initial cleaning, a thin film of grout residue, known as grout haze, will likely remain on the tiles. This needs to be removed once the grout has hardened slightly more.
Timing the Haze Removal
This usually happens 1-2 hours after the initial cleaning, or as recommended by your grout manufacturer. The grout should be firm and set, but the haze should still be somewhat pliable.
Cleaning Grout Haze Effectively
- Fresh Water and Sponge: Get a fresh bucket of clean water and a clean sponge for grout. Wring it out well.
- Gentle Buffing: Use light, circular motions to buff away the haze. Again, rinsing the sponge frequently is essential.
- Dry Cloths: Have clean, dry microfiber cloths or soft rags ready. After sponging, buff the tiles dry with the cloths to remove any remaining moisture and haze.
- Stubborn Haze: If some haze is particularly stubborn, you might need to use a grout haze cleaner specifically designed for this purpose. Always follow the product’s instructions and test in an inconspicuous area first.
Pro Tip: If you let the grout haze dry completely hard, it becomes much more difficult to remove.
Curing and Sealing
Your beautiful backsplash is almost complete! Now it’s time for the grout to cure and then be protected.
Grout Curing Time
Grout needs time to cure fully and reach its maximum strength. This can take anywhere from 24 to 72 hours, or even longer, depending on the grout type and environmental conditions.
- Avoid Moisture: Keep the area dry during the curing period. Don’t splash water on the tiles or use harsh cleaning chemicals.
- Gentle Cleaning: You can do very light dusting, but avoid any scrubbing.
Applying Grout Sealant
Once the grout has fully cured, applying a grout sealant is highly recommended, especially for kitchen backsplashes.
- Why Seal? Sealant protects the porous grout from stains (like grease, sauces, and coffee) and moisture, making it easier to clean and prolonging its life.
- Application: Use a small brush or applicator to apply the sealant directly to the grout lines. Wipe off any excess sealant from the tile surface immediately with a clean, dry cloth.
- Frequency: Sealant typically needs to be reapplied every 1-2 years, depending on wear and tear.
Table 2: Grout Curing and Sealing Schedule
| Stage | Action | Timeframe |
|---|---|---|
| Grout Mixing | Mix grout according to manufacturer instructions. | As needed for application. |
| Grout Application | Apply grout using a grout float, filling all joints. | Work in sections. |
| Initial Cleaning | Remove excess grout with a damp sponge, rinse frequently. | 15-30 minutes after application. |
| Haze Removal | Buff away grout haze with a damp sponge and dry cloths. | 1-2 hours after initial cleaning (or as grout sets). |
| Curing | Allow grout to cure fully without moisture or harsh cleaning. | 24-72 hours (or as per manufacturer). |
| Sealing | Apply grout sealant to protect the grout from stains and moisture. | After full grout curing. |
| Maintenance | Reapply sealant as needed (typically every 1-2 years). | Periodically. |
Troubleshooting Common Grout Issues
Even with the best intentions, you might encounter a few bumps along the way. Here are some common problems and how to fix them.
Crumbling Grout
If your grout crumbles after drying, it likely means it was mixed too dry, or not enough water was used.
- Fix: Carefully remove the crumbling grout with a utility knife or grout saw. Clean the joint, re-wet it slightly, and re-grout the section following the correct mixing and application procedures.
Grout Shrinkage
Grout can sometimes shrink slightly as it dries, leaving small gaps along the edges of the tiles.
- Fix: This is often cosmetic. If it bothers you, you can carefully re-grout the affected areas, ensuring the grout is pushed firmly into the shrinking gap.
Uneven Grout Lines
Inconsistent spacing between tiles or uneven application can lead to uneven grout lines.
- Fix: For minor inconsistencies, you might be able to carefully scrape away excess grout from the wider lines or add a bit more to the narrower ones before the grout fully cures. For significant issues, you might need to remove and re-grout sections.
Persistent Grout Haze
If, after multiple attempts, you still have grout haze, it might be a sign that it dried too hard.
- Fix: Try a commercial grout haze remover. Always follow the product instructions and ventilate the area well.
Frequently Asked Questions (FAQ)
What is the best type of grout for a kitchen backsplash?
For most kitchen backsplashes, sanded grout is recommended for joints 1/8 inch or wider, and unsanded grout is best for narrower joints (less than 1/8 inch). Epoxy grout is also an option for its durability and stain resistance, but it’s trickier to work with.
Can I grout over old grout?
Generally, it’s not recommended to grout over old grout. Old grout may be damaged, discolored, or not adhere well to new grout, leading to premature failure. It’s best to remove the old grout first.
How long does grout take to dry before I can use the backsplash?
While grout starts to set within minutes, it needs to cure fully before it can withstand normal use. Most manufacturers recommend waiting at least 24 hours, but sometimes up to 72 hours, before exposing the backsplash to water or heavy cleaning. Always check the grout manufacturer’s specific instructions.
Do I need to seal grout?
Yes, sealing grout is highly recommended for kitchen backsplashes. It makes the grout more resistant to stains from cooking oils, sauces, and other common kitchen spills, and it also helps prevent moisture absorption.
How do I clean grout lines after they are sealed?
Once sealed, cleaning grout lines is much easier. Use pH-neutral cleaners and a soft brush or sponge. Avoid abrasive cleaners or harsh chemicals, as they can degrade the sealant over time.
Conclusion
Grouting your kitchen backsplash is a rewarding DIY project that can significantly upgrade the look of your kitchen. By carefully following these steps, choosing the right materials, and paying attention to detail during the grout application and cleaning phases, you can achieve a professional-looking finish that you’ll be proud of for years to come. Remember to always read and follow the specific instructions provided by your chosen tile adhesive and grout manufacturers. Happy grouting!