Image Source: i.ytimg.com
How To Plumb A Double Kitchen Sink: Step-by-Step
Can I plumb a double kitchen sink myself? Yes, with the right tools and a bit of patience, you can successfully plumb a double kitchen sink. This guide will walk you through the process of connecting your double sink plumbing, ensuring proper drainage and function.
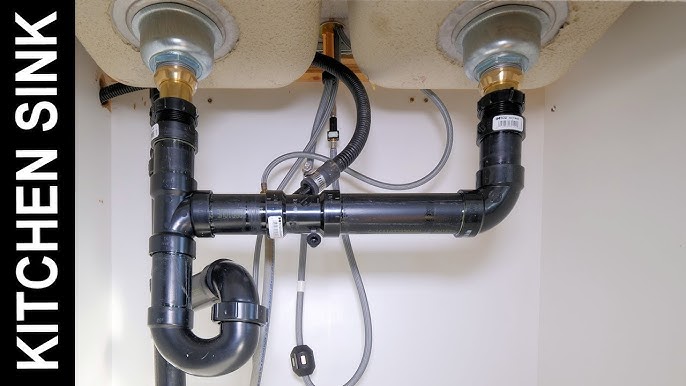
A double kitchen sink offers more workspace and convenience, but it requires a slightly more complex plumbing setup than a single basin. The key to a successful installation lies in correctly connecting the two sink drains to the main drainpipe. This involves using specific fittings like a double sink drain connector, sink tailpieces, and the ubiquitous P-trap to prevent sewer gases from entering your home.
This comprehensive guide will cover everything you need to know, from gathering your materials to the final leak check. We’ll explore the role of the sink trap, the correct way to install a P-trap, how to connect sink drains seamlessly, and the importance of the right drain pipe size. We’ll also touch upon integrating a garbage disposal plumbing setup and connecting a dishwasher drain hookup, as well as a sink overflow connection.
Gathering Your Plumbing Supplies
Before you begin, it’s crucial to have all the necessary tools and materials at hand. This will save you time and prevent frustration midway through the project.
Essential Tools:
- Adjustable Wrenches (2): For tightening and loosening pipe fittings.
- Pipe Wrench: For gripping and turning pipes, especially those that are stubborn.
- Plumber’s Putty or Silicone Sealant: To create a watertight seal around drain flanges.
- Hacksaw or PVC Pipe Cutter: For cutting plastic drain pipes to the correct length.
- Measuring Tape: For accurate pipe measurement.
- Bucket: To catch any residual water in the pipes.
- Teflon Tape (Pipe Thread Sealant Tape): To ensure threaded connections are watertight.
- Safety Glasses: To protect your eyes from debris.
- Work Gloves: For better grip and protection.
- Rags or Towels: For cleaning up spills.
Key Plumbing Components:
- Sink Tailpieces (2): These are the short pieces of pipe that connect directly to the sink drain flanges.
- Double Sink Drain Connector (or Sink Tee): This fitting connects the two sink tailpieces to a single outlet.
- Sink Trap (P-trap) (1 or 2, depending on your setup): This U-shaped fitting holds water to block sewer gases. For a double sink, you’ll typically have one P-trap serving both sides, connected via the double sink drain connector.
- Sanitary Tee or Wye Fitting: This connects the P-trap to your main drainpipe.
- Drain Pipes: PVC or ABS pipes of the appropriate drain pipe size (usually 1-1/2 inches for kitchen sinks).
- Couplings and Elbows: As needed to connect pipes and change direction.
- Slip-Joint Nuts and Washers: For assembling the drain pipes and trap.
- Drain Flanges (2): The metal or plastic rings that fit into the sink drain holes.
Prepping the Sink and Drain Holes
- Clean the Sink Drains: Ensure the drain openings in your double kitchen sink are clean and free of any old plumber’s putty or debris. This is crucial for a good seal.
- Apply Plumber’s Putty/Sealant: Roll a rope of plumber’s putty about the thickness of a pencil and place it around the underside of each drain flange. If your sink is stainless steel and you’re using a specific gasket, follow the manufacturer’s instructions, which may not require putty.
- Install Drain Flanges: Press each drain flange firmly into the sink drain holes from the top.
- Secure from Below: From beneath the sink, place a rubber gasket (usually supplied with the flange), a washer, and then a locknut onto the threaded portion of the drain flange. Tighten the locknut securely using an adjustable wrench. As you tighten, excess plumber’s putty will squeeze out.
- Remove Excess Putty: Wipe away the excess plumber’s putty from around the drain flange inside the sink.
Connecting the Sink Tailpieces
The sink tailpieces are the first horizontal pipes that connect to the drain flanges.
- Measure and Cut: Measure the distance from the bottom of the drain flange to where the double sink drain connector will be. Cut your sink tailpieces to the appropriate length using a hacksaw or PVC cutter. Ensure your cuts are straight.
- Assemble Tailpieces: Slide a slip-joint nut and a washer onto each sink tailpiece. Then, insert the tailpiece into the bottom of the drain flange. The flange’s threads will engage with the tailpiece.
- Hand-Tighten: Hand-tighten the slip-joint nuts onto the tailpieces.
Installing the Double Sink Drain Connector
This is where the two drains converge.
- Position the Connector: Take your double sink drain connector. It typically has two inlets and one outlet. Position it so the inlets align with the tailpieces you’ve installed.
- Connect to Tailpieces: Slide the slip-joint nuts and washers onto the threaded ends of the double sink drain connector.
- Tighten Fittings: Hand-tighten the slip-joint nuts. Then, use an adjustable wrench to snug them up. Avoid overtightening, which can crack plastic fittings.
Routing and Installing the Sink Trap (P-trap)
The sink trap is essential for preventing sewer gases from entering your kitchen. For a double sink, this is usually a single P-trap assembly connected to the outlet of the double sink drain connector.
- Assemble the P-trap: A typical P-trap consists of a curved section (the trap arm) and a vertical section. Connect these parts using slip-joint nuts and washers. Hand-tighten them first.
- Connect to the Drain Connector: Connect the P-trap’s inlet to the outlet of the double sink drain connector. Again, use a slip-joint nut and washer.
- Connect to the Main Drain: You’ll need to connect the P-trap’s trap arm to your main drainpipe. This usually involves a sanitary tee or a Wye fitting already installed in the main drain. If there isn’t a fitting, you might need to cut into the main drainpipe to install one.
- Consider Drain Pipe Size: Ensure the drain pipe size of your P-trap and connecting pipes matches your main drainpipe, typically 1-1/2 inches for kitchen sinks. Using a smaller pipe size can lead to clogs.
- Dry Fit and Adjust: Before permanently tightening, dry-fit all the pieces to ensure they align correctly. You might need to adjust the position of the P-trap or use different elbows to achieve a proper fit without putting stress on the pipes.
- Tighten All Connections: Once you’re satisfied with the alignment, tighten all slip-joint nuts firmly with an adjustable wrench.
Connecting to the Main Drainpipe
This is the final step in connecting your double sink drains.
- Locate the Main Drain: Identify the main drainpipe under your sink. This is usually a larger diameter pipe, often 2 or 3 inches.
- Install a Sanitary Tee or Wye: If you don’t already have one, cut a section out of your main drainpipe and install a sanitary tee or a Wye fitting. These fittings have a side outlet designed to accept your P-trap’s trap arm.
- Connect the Trap Arm: Slide a slip-joint nut and washer onto the end of the P-trap’s trap arm. Insert the trap arm into the outlet of the sanitary tee or Wye fitting.
- Tighten: Hand-tighten the slip-joint nut, then snug it with an adjustable wrench.
Integrating a Garbage Disposal Plumbing
If you plan to install a garbage disposal, the plumbing becomes a bit more intricate.
- Disposal Inlet: Garbage disposals typically have a larger inlet for the disposal’s own drain.
- Connecting the Disposal: The double sink drain connector often has a side outlet specifically designed for a garbage disposal. You’ll attach a specialized fitting to this outlet that then connects to the disposal.
- One Drain to Disposal: In a double sink setup with a disposal, one sink drain will typically feed directly into the disposal unit, and the other sink drain will feed into the disposal’s secondary inlet.
- Disposal Outlet: The disposal then has a single outlet that connects to the P-trap assembly, just like a regular drain would.
Dishwasher Drain Hookup
Most dishwashers require a connection to the sink drain system.
- High Loop: Before connecting, it’s crucial to create a “high loop” in the dishwasher drain hose. This means routing the hose up as high as possible under the counter before it connects to the drain system. This prevents dirty sink water from flowing back into the dishwasher.
- Connection Point: The dishwasher drain hose usually connects to a fitting on the garbage disposal (if you have one) or to a special inlet on one of the sink tailpieces or the double sink drain connector. You’ll need a barbed fitting and a hose clamp for this connection.
- Secure Connection: Ensure the hose is securely clamped to prevent leaks.
Sink Overflow Connection
Many sinks come with overflow outlets to prevent water from spilling over.
- Overflow Pipe: If your sink has overflow holes, you’ll need to connect an overflow pipe to each. This pipe typically attaches to the overflow opening from the inside of the sink.
- Connecting to Drain: The overflow pipe then runs down and connects to one of the sink tailpieces or the double sink drain connector, usually via a threaded inlet. This connection is critical for proper drainage and preventing overflows.
Testing for Leaks
This is the most important step after completing the plumbing.
- Fill the Sinks: Fill both basins of the double kitchen sink with water. Plug the drains.
- Release the Water: Remove the plugs and allow the water to drain.
- Inspect All Connections: Carefully inspect every joint, nut, and connection point for any drips or leaks. Pay close attention to the drain flanges, tailpieces, the double sink drain connector, the P-trap, and the connection to the main drain.
- Tighten as Needed: If you find a leak, try tightening the offending slip-joint nut a quarter-turn at a time.
- Re-test: If tightening doesn’t stop the leak, you may need to disassemble the connection, check the washers, and reapply Teflon tape or plumber’s putty if necessary.
Important Considerations for Your Kitchen Sink Plumbing
- Venting: Proper venting is crucial for any drainage system. Without adequate ventilation, the water in your P-traps can be siphoned out, allowing sewer gases into your home. Most modern plumbing systems have vents built into the walls. If you’re unsure, consult a professional.
- Slope: Drain pipes should have a slight downward slope (typically 1/4 inch per foot) towards the main drain to ensure water flows away properly and doesn’t pool.
- Materials: While PVC is common and easy to work with, ensure you’re using the correct type of PVC cement for your application. ABS is also used in some areas.
- Building Codes: Always check your local building codes. They dictate specific requirements for plumbing installations, including materials and methods.
Frequently Asked Questions About Double Sink Plumbing
Q: How do I prevent leaks when connecting sink drains?
A: Use Teflon tape on all threaded metal connections. Ensure all slip-joint nuts are properly tightened with washers in place. For drain flanges, use plumber’s putty or silicone sealant as recommended by the manufacturer.
Q: What is the correct drain pipe size for a kitchen sink?
A: The standard drain pipe size for kitchen sinks, including double sinks, is 1-1/2 inches in diameter.
Q: Can I use two P-traps for a double sink?
A: While technically possible, it’s generally not recommended or necessary. A single P-trap connected to a double sink drain connector is the standard and most efficient method. Using two traps can sometimes impede drainage.
Q: My sink is draining slowly. What could be the problem?
A: Slow drainage can be caused by a partial clog in the sink tailpiece, the double sink drain connector, the P-trap, or the main drainpipe. It could also be an issue with venting.
Q: How tight should I make the slip-joint nuts?
A: Hand-tighten them firmly, then use an adjustable wrench to give them about a quarter to a half turn more. Overtightening can crack plastic fittings.
By following these steps, you can confidently plumb your double kitchen sink, ensuring a functional and leak-free system for years to come. Remember, if you encounter any difficulties or are unsure about any part of the process, it’s always best to consult a qualified plumber.