Image Source: shop.moen.com
Fix Your Moen Kitchen Faucet: Easy Step-by-Step Repair Guide
Can you fix a leaky Moen kitchen faucet? Yes, absolutely! Most common Moen faucet problems, like drips and leaks, are surprisingly straightforward to repair with basic tools and a little patience. This guide will walk you through how to troubleshoot and fix your Moen kitchen faucet, saving you time and money.
A dripping faucet is not only annoying, but it also wastes water and increases your utility bills. Fortunately, if you have a Moen kitchen faucet, many common issues can be addressed with simple DIY fixes. This comprehensive guide will empower you to tackle your Moen faucet repair with confidence. We’ll cover everything from identifying the source of the problem to replacing worn-out parts.
Identifying the Problem: What’s Wrong with Your Moen Faucet?
Before you grab your tools, it’s essential to pinpoint the exact issue. The most frequent culprits for a malfunctioning Moen faucet are leaks and drips. Let’s break down how to diagnose these common problems:
Moen Faucet Dripping
If your Moen faucet is dripping, it usually means a part inside is worn out. The most common reason for a Moen faucet dripping is a faulty cartridge. This is a cylindrical valve that controls water flow and temperature. Over time, the seals within the cartridge can degrade, allowing water to seep through.
- Observation: Notice where the drip is coming from. Is it from the spout itself? Or around the handle?
- Spout Drips: A drip from the spout often points to an issue with the cartridge or the seals within the faucet body.
- Handle Leaks: Leaks around the handle can indicate worn O-rings, packing nuts, or a problem with the cartridge as well.
Moen Faucet Leak
A Moen faucet leak can manifest in several ways:
- Under the Sink: Leaks under the sink usually involve the supply lines, the connections to the faucet, or the drain. These are often due to loose fittings or damaged seals.
- Around the Base: A leak around the base of the faucet, where it meets the sink, might be caused by a loose mounting nut or a damaged seal between the faucet and the sink.
- From the Spout or Handle: As mentioned, this typically signifies internal component wear.
Essential Tools and Moen Faucet Parts
To successfully perform Moen faucet repair, you’ll need a few basic tools. Having the right Moen faucet parts on hand is also crucial for a smooth repair.
What Tools Do I Need?
- Adjustable Wrench: For loosening and tightening nuts and fittings.
- Phillips and Flathead Screwdrivers: Various sizes will be helpful.
- Allen Wrenches (Hex Keys): Many Moen faucets use these for handle screws.
- Pliers (Needle-nose and standard): Useful for gripping small parts.
- Utility Knife or Small Pry Bar: For carefully removing decorative caps.
- Bucket and Towels: To catch any residual water and clean up spills.
- Plumber’s Grease or Silicone Grease: To lubricate O-rings and cartridges.
- Penetrating Oil (Optional): For stubborn, corroded parts.
What Moen Faucet Parts Might I Need?
The specific parts you’ll need depend on the problem, but here are the most common replacements:
- Moen Faucet Cartridge: This is the most common replacement part for drips and leaks. Moen uses several types of cartridges (e.g., 1200 series, 1222 series). It’s vital to identify your faucet model to get the correct cartridge.
- O-rings: These rubber rings create seals between different parts of the faucet. They can dry out and crack over time.
- Seats and Springs: Found in older compression-style faucets, these can wear out and cause drips.
- Aerator: The small screen at the end of the spout that controls water flow. It can become clogged with mineral deposits.
- Handle Repair Kit: If your handle is loose or wobbly, a specific kit for your faucet model might be necessary.
Step-by-Step Moen Faucet Repair Guide
Let’s get down to fixing your Moen kitchen faucet. We’ll cover the most common repairs: replacing the cartridge and fixing handle issues.
Replacing the Moen Faucet Cartridge (The Most Common Fix)
A leaky or dripping Moen faucet often means it’s time for a Moen faucet cartridge replacement. This is a critical component, and replacing it can solve many water flow and leak issues.
h4: Step 1: Turn Off the Water Supply
This is the most important first step. Locate the hot and cold water shut-off valves under your sink. Turn them clockwise until they are completely closed. Turn on the faucet to drain any remaining water in the lines and confirm that the water is indeed off.
h4: Step 2: Remove the Faucet Handle
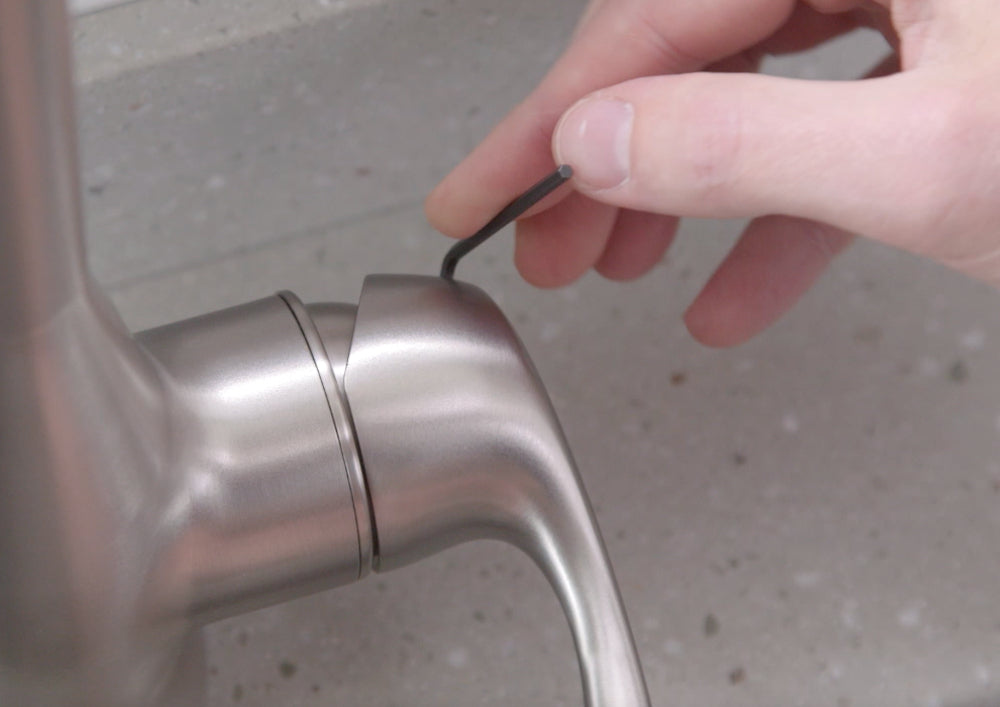
Moen faucet handles typically have a decorative cap that hides a screw.
- Locate the Cap: Look for a small cap on the front or side of the handle. It might be marked with a red (hot) or blue (cold) indicator.
- Pry Off the Cap: Use a small flathead screwdriver or a utility knife to carefully pry off this cap. Be gentle to avoid scratching the finish.
- Remove the Screw: Underneath the cap, you’ll find a screw. This is often an Allen screw, so you’ll need the correct size Allen wrench. Turn the screw counter-clockwise to remove it.
- Pull Off the Handle: Once the screw is removed, the handle should lift straight up and off the faucet stem. If it’s stuck, gently rock it side to side or use a handle puller tool if you have one.
h4: Step 3: Remove the Cartridge Retaining Clip or Nut
Different Moen faucet models secure their cartridges differently.
- Clip Style: Many Moen cartridges are held in place by a small metal clip. You’ll see this clip at the base of the cartridge. Use needle-nose pliers to pull this clip straight out. It might be stiff, so a bit of wiggling is normal.
- Nut Style: Some older Moen faucets use a large retaining nut that screws onto the faucet body to hold the cartridge in place. Use your adjustable wrench to turn this nut counter-clockwise to loosen and remove it.
h4: Step 4: Pull Out the Old Cartridge
With the retaining clip or nut removed, the cartridge is ready to come out.
- Grasp the Cartridge: You should see the top of the cartridge. It has notches or a stem that you can grip.
- Use Pliers or a Cartridge Puller: If the cartridge is stuck, you might need pliers to carefully grip and pull it straight out. For stubborn cartridges, a Moen-specific cartridge puller tool is highly recommended. These tools engage with the cartridge and provide leverage to extract it without damaging the faucet body.
- Note the Orientation: Pay attention to how the old cartridge is oriented before you remove it. This will help you install the new one correctly.
h4: Step 5: Install the New Moen Faucet Cartridge
This is where your new Moen faucet parts come into play.
- Lubricate: Apply a thin layer of plumber’s grease to the O-rings on the new cartridge. This helps it slide in smoothly and creates a better seal.
- Align and Insert: Carefully align the new cartridge with the opening in the faucet body, ensuring it’s in the same orientation as the old one. Push it firmly into place. You should feel it seat properly.
- Replace the Clip or Nut:
- If you removed a clip, slide it back into its slot until it clicks into place.
- If you removed a nut, screw it back on by hand, then tighten it gently with your wrench. Don’t overtighten, as this can damage the new cartridge or faucet body.
h4: Step 6: Reattach the Faucet Handle
Reverse the steps you took to remove the handle.
- Place Handle: Slide the handle back onto the faucet stem, ensuring it’s properly aligned.
- Insert and Tighten Screw: Reinsert the retaining screw and tighten it with your Allen wrench.
- Replace Cap: Snap the decorative cap back into place.
h4: Step 7: Turn Water Back On and Test
Slowly turn the water supply valves back on. Check for any leaks around the handle or spout. Turn the faucet on and test both hot and cold water. Ensure smooth operation and no drips. If there’s still a drip, you might need to slightly tighten the retaining nut (if applicable) or double-check that the cartridge is seated correctly.
Fixing a Moen Faucet Handle Repair or Loose Handle
Sometimes, the issue isn’t a drip but a loose or wobbly Moen faucet handle. This often means the internal components that connect the handle to the cartridge stem are worn or loose.
h4: Step 1: Turn Off Water Supply
As always, start by shutting off the hot and cold water valves under the sink and draining the faucet.
h4: Step 2: Access the Handle Mechanism
Follow the same steps as for cartridge replacement to remove the decorative cap and handle screw. Once the handle is off, you might see a decorative escutcheon or bonnet nut.
- Remove Escutcheon/Bonnet Nut: If there’s a decorative cover or a large nut around the cartridge stem, unscrew it by hand or with your adjustable wrench. Be gentle with decorative finishes.
h4: Step 3: Inspect Internal Components
With the handle and any covering parts removed, you can see the top of the cartridge and the stem.
- Check the Stem: Ensure the stem that connects to the handle is firmly seated in the cartridge.
- Look for Loose Parts: Examine the area where the handle attaches to the stem. Sometimes, a set screw on the handle itself can loosen, or the stem connection might be worn.
- O-rings: Check the O-rings around the cartridge body. Damaged or missing O-rings can cause leaks around the handle. If they look worn, replace them.
h4: Step 4: Tighten or Replace Worn Parts
* Tighten Set Screw: If your handle has a small set screw that attaches it to the stem, ensure it’s tight.
* Replace O-rings: If O-rings are the culprit, lubricate and replace them.
* Cartridge Issue: If the stem connection within the cartridge seems worn or damaged, you might need to replace the entire Moen faucet cartridge, as described in the previous section.
h4: Step 5: Reassemble the Faucet
Reverse the disassembly process. Reinstall any nuts or escutcheons, reattach the handle, tighten the screw, and snap the decorative cap back on.
h4: Step 6: Test the Faucet
Turn the water back on and test the handle’s stability and operation.
Troubleshooting Other Moen Kitchen Faucet Issues
Beyond drips and handle problems, what other issues might you encounter when troubleshooting Moen kitchen faucet?
Moen Faucet Leak Under the Sink
Leaks originating from under the sink typically involve the water supply lines or the faucet’s mounting.
h5: Supply Line Leaks
* Check Connections: Ensure the nuts connecting the supply lines to the shut-off valves and the faucet are snug. Tighten them slightly with a wrench if loose.
* Inspect Lines: Look for cracks or damage to the supply lines themselves. If damaged, replace the entire line. Make sure to turn off the water supply before doing so!
h5: Faucet Base Leaks
* Tighten Mounting Nuts: Under the sink, there are nuts that secure the faucet to the countertop or sink. These can loosen over time. Try tightening them with a basin wrench or your adjustable wrench.
* Replace Seal: If tightening doesn’t help, the seal between the faucet base and the sink might be compromised. You may need to remove the faucet entirely to clean the area and apply new plumber’s putty or sealant.
Replacing a Moen Faucet Aerator
A clogged aerator can cause weak water flow or a spray that isn’t straight. This is a simple Moen faucet maintenance task.
h5: Step 1: Unscrew the Aerator
The aerator is the small cap at the very end of the spout. You can usually unscrew it by hand, turning it counter-clockwise. If it’s stuck, use pliers with a cloth to protect the finish.
h5: Step 2: Clean or Replace
* Clean: Rinse the aerator under running water. Use a small brush (like an old toothbrush) to scrub away mineral deposits. You can soak it in a 50/50 solution of white vinegar and water for a few hours to dissolve tough buildup.
* Replace: If cleaning doesn’t help, or if the aerator is damaged, it’s time to replace it. Take the old one to a hardware store to ensure you get the correct size and thread.
h5: Step 3: Screw on the Aerator
Screw the clean or new aerator back onto the spout, hand-tight. Turn on the water to test.
Moen Faucet Maintenance Tips
Regular Moen faucet maintenance can prevent many common issues and extend the life of your faucet.
- Clean Regularly: Wipe down your faucet with a soft, damp cloth to remove soap scum and mineral deposits. Avoid abrasive cleaners that can damage the finish.
- Address Leaks Promptly: Don’t ignore small drips. The sooner you address them, the less water you waste and the less likely a minor issue will become a major repair.
- Know Your Model: Keep a record of your Moen faucet model number. This will make it much easier to find the correct Moen faucet parts when you need them. Look for a label on the underside of the spout or in your faucet’s documentation.
- Use Protective Gear: When working on your faucet, consider wearing safety glasses to protect your eyes from debris or water splashes.
Frequently Asked Questions About Moen Faucet Repair
Here are some common questions people have when dealing with Moen kitchen faucet issues.
Q1: How do I identify my Moen faucet model?
A1: Check for a label on the underside of the spout, near the base, or on the back of the faucet body. You can also look at your original purchase receipt or the faucet’s manual if you still have it. Moen’s website also has a faucet identifier tool based on visual characteristics.
Q2: Can I use a universal cartridge, or do I need a specific Moen faucet cartridge?
A2: It is highly recommended to use a specific Moen faucet cartridge designed for your faucet model. While some generic cartridges might appear similar, they often don’t fit perfectly or have the same internal mechanisms, which can lead to leaks or improper function.
Q3: My faucet is old. Is Moen faucet repair still possible?
A3: Yes, Moen products are generally well-built and repairable. Many older Moen faucets use cartridges or parts that are still available. If a specific part is discontinued, there might be a compatible replacement or a complete repair kit for updating older mechanisms.
Q4: How often should I replace the Moen faucet cartridge?
A4: There’s no set schedule. Cartridges typically last for many years. You should consider replacing it when you experience drips, leaks, or difficulty controlling water temperature or flow, which are common signs of wear.
Q5: What’s the difference between a cartridge and a valve stem in a faucet?
A5: In many modern Moen faucets, the cartridge is the primary valve mechanism that controls both water flow and temperature. Older faucets might have separate valve stems and seats. For most Moen kitchen faucets, you’ll be dealing with a cartridge replacement.
By following these steps and tips, you can confidently tackle most Moen faucet repair jobs. Remember to work patiently, gather the right Moen faucet parts, and don’t hesitate to consult your faucet’s specific manual or Moen’s online resources if you get stuck. Happy fixing!