Here’s your in-depth blog post on removing lower kitchen cabinets without damage:
Can you remove lower kitchen cabinets without causing damage to your walls or cabinets? Yes, absolutely! With the right tools, preparation, and a careful approach, you can successfully remove lower kitchen cabinets without harming your kitchen’s finishes. This guide will walk you through the entire process, from initial preparations to the final removal, ensuring a smooth and damage-free experience. Whether you’re renovating, replacing, or just need to access plumbing, this information is key to a successful cabinet removal project.
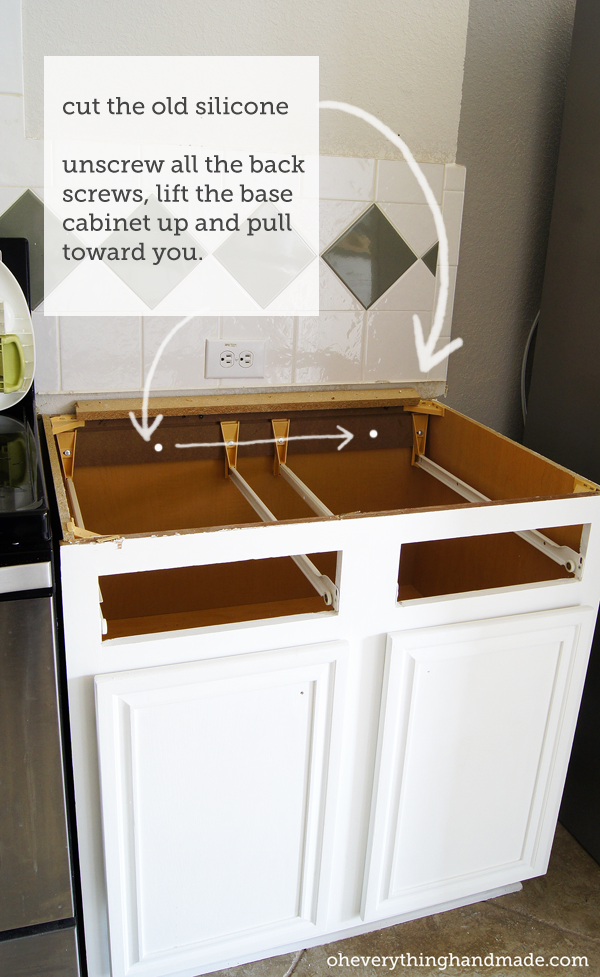
Image Source: www.oheverythinghandmade.com
Preparing for Cabinet Removal
Before you dive into the actual cabinet removal, thorough preparation is paramount to prevent damage. This phase involves gathering your tools, protecting your work area, and carefully planning your steps. Rushing this stage is a common mistake that leads to nicks, scratches, and potentially larger issues.
Essential Tools and Materials
Having the right equipment makes the job much easier and significantly reduces the risk of damage. Here’s a checklist of what you’ll likely need for cabinet removal:
- Screwdrivers: Phillips head and flathead screwdrivers in various sizes. A cordless drill with screwdriver bits will speed things up considerably.
- Pry Bar: A slim, flat pry bar is ideal for gently levering components apart. Avoid large, heavy-duty pry bars that can easily gouフェc material.
- Putty Knife or Scraper: Useful for gently prying apart glued joints or removing stubborn caulk.
- Utility Knife: For scoring caulk lines around the cabinets.
- Safety Glasses: Protect your eyes from dust and debris.
- Work Gloves: Protect your hands.
- Drop Cloths or Tarps: To protect your flooring from scratches and dust.
- Painter’s Tape: To mask off areas and prevent accidental scratches on walls.
- Stud Finder: To locate wall studs for securing the cabinets.
- Reciprocating Saw (Optional): For stubborn screws or if you anticipate cutting through fasteners. Use with caution!
- Bucket or Container: To hold removed screws and hardware, preventing them from getting lost.
- Helper: An extra set of hands is invaluable for stability and maneuvering larger cabinets.
Protecting Your Kitchen Environment
Protecting your surrounding kitchen elements is as crucial as protecting the cabinets themselves.
- Flooring: Lay down thick drop cloths or tarps, especially around the base cabinets. Secure them with painter’s tape to prevent slipping.
- Countertops: If the countertops are staying, cover them with drop cloths to protect them from falling tools or debris. If the countertops are also being removed, proceed with caution to avoid damaging them or the cabinets.
- Walls: Apply painter’s tape along the edges where the cabinets meet the walls. This creates a buffer and helps prevent paint from peeling or the drywall from being gouged.
- Appliances: Ensure appliances are moved or adequately protected if they are close to the work area.
Turning Off Utilities
This is a critical safety step, especially if you’re unsure about the plumbing or electrical connections within your cabinet space.
- Water: Locate the shut-off valve for your kitchen sink and turn it off. Open the faucet to relieve any pressure in the lines. You might also want to shut off the main water supply to the house for absolute certainty, especially if dealing with older plumbing.
- Electricity: If there are any outlets or lights within or near the cabinets (e.g., under-cabinet lighting, outlets in a pantry cabinet), turn off the corresponding circuit breaker in your home’s electrical panel. Test the power to ensure it’s off before proceeding.
Dismantling the Countertop
Often, the countertop is secured to the base cabinets, and its removal is a necessary first step in the cabinet removal process. The method for removing a countertop depends heavily on its material and how it was installed.
Common Countertop Materials and Removal
- Laminate Countertops: Usually attached with screws from underneath the cabinet frame. There might also be a bead of caulk or adhesive along the backsplash or edges.
- Granite, Quartz, or Solid Surface Countertops: These are typically heavy and secured with adhesive, often silicone or epoxy, along the top edge of the cabinets. They might also have clips or screws from underneath.
Steps for Countertop Removal:
- Score Caulk Lines: Use a sharp utility knife to carefully cut through any caulk or adhesive sealing the countertop to the backsplash or adjacent walls. Take your time to avoid scratching the wall finish.
- Locate Fasteners: Look underneath the cabinet overhang. You’ll often find screws or clips that attach the countertop to the cabinet boxes. Remove these carefully.
- Break Adhesive Bonds: For glued countertops, you may need to gently pry upwards. Start at a corner or edge. Use your putty knife or a thin pry bar to carefully break the adhesive seal. Work your way around, gently rocking the countertop.
- Get Help: Countertops, especially solid surface ones, are heavy. Always have at least one helper to lift and maneuver them safely to prevent dropping or damaging them, your cabinets, or yourself.
- Address Backsplashes: If you have a separate backsplash, it might be adhered to the wall or screwed in from behind. Deal with this after the main countertop is removed.
Table 1: Countertop Removal Considerations
| Countertop Material | Typical Fastening Method | Key Removal Steps | Damage Prevention Tip |
|---|---|---|---|
| Laminate | Screws from underneath, caulk | Remove screws, score caulk, lift gently. | Use a flat pry bar to avoid puncturing laminate surface. |
| Granite/Quartz | Adhesive, clips, screws | Score caulk, remove clips/screws, gently pry with a wide putty knife/pry bar. | Work slowly to break adhesive bond without stress cracks. |
| Solid Surface | Adhesive, screws | Score caulk, remove screws, use thin pry bar to gently work along the adhesive seam. | Support the entire length when lifting. |
Disassembling Base Cabinets
Now that the countertop is removed, you can focus on the disassembling base cabinets. This usually involves removing screws that attach the cabinets to each other and to the wall.
Identifying Attachment Points
Base cabinets are typically secured in a few key places:
- Cabinet to Cabinet: Adjacent cabinets are often screwed together through their face frames.
- Cabinet to Wall: Cabinets are usually secured to wall studs through the back or through the top of the face frame.
- Cabinet to Floor: While less common, some cabinets might have slight anchoring to the floor, though this is rare and usually not the primary attachment method.
Step-by-Step Removal Process
- Remove Cabinet Doors and Drawers: Open each cabinet door and drawer. Remove any visible screws holding the hinges to the cabinet frame. For drawers, there might be clips or screws on the drawer slides. Carefully lift drawers out. Keep all hardware organized, perhaps in labeled bags for each cabinet. This is the first step in cabinet hardware removal.
- Remove Shelves and Dividers: If your cabinets have adjustable shelves or fixed dividers, remove them to lighten the cabinets and improve access to mounting screws.
-
Locate and Remove Screws:
- Face Frame Screws: Look for screws that join adjacent cabinet boxes together, usually where the face frames meet. Remove these.
- Wall Mounting Screws: This is where your stud finder is useful. Open the cabinet doors and look inside the back of the cabinet, or sometimes through the front face frame, for screws that go into the wall studs. These are often long screws. Carefully remove them with your drill or screwdriver. You may need to remove the cabinet backing removal panel if it’s screwed or stapled on to get better access to wall mounting screws, especially in older installations.
- Kick Plate Screws: Some cabinets have a removable kick plate at the bottom. Check if this plate is screwed on from the front or sides. Removing it might reveal additional mounting screws or make it easier to access the cabinet base.
-
Gently Pry Away from the Wall: Once all visible screws are removed, the cabinet should be loose. However, old adhesive, paint, or caulk might still be holding it in place. Use a putty knife or a slim pry bar inserted between the cabinet and the wall to gently break any remaining seals. Work slowly and carefully to avoid damaging the drywall. This is where wall damage prevention becomes critical. If you notice the paint starting to peel, stop and score the paint line with a utility knife.
-
Wiggle and Lift: Gently rock the cabinet side to side. With a helper, you can now carefully lift the cabinet base away from the wall and the adjacent cabinet.
-
Repeat for Each Cabinet: Follow these steps for each lower cabinet you need to remove. If you are removing multiple units, it’s often easier to remove them one by one.
Special Considerations for Pantry Cabinets
If you’re dealing with pantry cabinet removal, the process is similar, but pantry cabinets can be deeper and taller, requiring more careful handling.
- Secured to Multiple Walls: Some pantries are secured to two or even three walls. Ensure you locate and remove all mounting screws.
- Weight: Empty pantries can still be heavy. Always have help for lifting.
- Internal Fixtures: Remove any shelves, rods, or organizers inside the pantry before attempting to move it.
Removing Kitchen Units Safely and Efficiently
When dealing with multiple removing kitchen units, especially in a larger kitchen, efficiency and safety are key. This section focuses on managing the process for a full kitchen cabinet removal.
Working in Sections
It’s usually best to tackle the removal in sections. For example, clear out one bank of cabinets completely before moving to the next. This keeps your workspace organized and reduces the risk of tripping over removed components.
Labeling and Organization
As you remove cabinet doors, drawers, shelves, and hardware, label each component clearly. Use painter’s tape and a marker. For example, label a door “Upper Left Door – Sink Base.” This is invaluable if you plan to reinstall the cabinets later or sell them. It also helps immensely if you’re doing a full kitchen renovation and need to keep track of what goes where.
Managing Waste and Salvage
Decide in advance what you will do with the old cabinets.
- Donation: If the cabinets are in good condition, consider donating them to a local Habitat for Humanity ReStore or other salvage organizations.
- Resale: You might be able to sell them privately.
- Disposal: If they are beyond repair or reuse, plan for proper disposal. Check local regulations for construction debris.
Handling Stubborn Attachments
Sometimes, screws can strip, or components can be unusually well-adhered.
- Stripped Screws: Use a rubber band between the screwdriver and the screw head for better grip, or use a screw extractor kit.
- Adhesive: If cabinets are heavily glued, you might need to use a sharper scraper or even a thin reciprocating saw blade held at an angle to cut through the adhesive from behind or the side, being extremely careful not to cut into the wall.
Dealing with Cabinet Backing Removal
The cabinet backing removal is often necessary to access mounting screws or to detach cabinets that are glued or sealed to the wall.
- Types of Backing: Cabinet backs can be thin hardboard, plywood, or sometimes integrated into the cabinet structure.
- Attachment: Backs are typically attached with staples, small nails, or screws.
- Removal Process:
- Locate Fasteners: Look for the edges of the backing panel. You’ll likely see staples or small nails along the cabinet frame.
- Use a Pry Bar or Scraper: For staples, use a staple remover or the flat end of a putty knife to lift them. For nails, use a small pry bar.
- Cut if Necessary: If the backing is glued or very difficult to remove, you might need to cut it out using a utility knife or a drywall saw. Be mindful of what’s behind the backing – wires, pipes, or wall studs.
- Careful Removal: Once fasteners are removed, the backing panel should lift away. If it’s painted or caulked to the wall, you may need to score along the edges with a utility knife.
Preventing Wall Damage During Cabinet Removal
The primary goal is wall damage prevention. Even with careful work, minor cosmetic damage can occur. Here’s how to minimize it:
- Score Paint Lines: Before prying, always run a utility knife along the seam where the cabinet meets the wall. This cuts through any dried paint or caulk that could pull off drywall paper.
- Use the Right Tools: A slim putty knife or a thin, flat pry bar is better than a wide, heavy-duty one. It allows for more precise prying and less force on any single point.
- Protect the Wall: If possible, insert a thin piece of cardboard or a plastic shim between the pry bar and the wall when you apply leverage.
- Work Slowly and Incrementally: Don’t try to rip the cabinet away in one go. Apply gentle, steady pressure. Move the pry bar around the edges to release the cabinet gradually.
- Know When to Stop: If you encounter unexpected resistance, stop and reassess. There might be hidden screws or a more robust adhesive.
- Address Loose Drywall Paper: If a small amount of drywall paper does peel away, you can often repair it later by applying a light coat of joint compound, sanding smooth, and repainting.
Post-Removal Considerations
Once the lower kitchen cabinets are removed, your work isn’t quite done.
Cleaning the Work Area
- Remove all drop cloths and debris.
- Vacuum or sweep thoroughly to pick up dust and small fragments.
- Wipe down any surfaces that may have become dusty.
Inspecting for Damage and Making Repairs
- Carefully inspect the walls for any dings, dents, or scraped paint.
- Minor wall damage can often be repaired with spackling paste or joint compound, followed by sanding and repainting.
- Check the floor for any scratches or gouges and repair them as needed.
Preparing for Base Cabinet Installation (If Applicable)
If you are replacing the cabinets, the exposed wall and floor will need to be ready for the new base cabinet installation.
- Wall Surface: Ensure the wall is clean, dry, and smooth. You might need to touch up paint or repair drywall imperfections.
- Electrical and Plumbing: Verify that any electrical outlets or plumbing connections are in the correct position for the new cabinets. Make adjustments if necessary.
- Floor: Ensure the subfloor is clean and sound.
Frequently Asked Questions (FAQ)
Q1: How much time does it typically take to remove lower kitchen cabinets?
A1: Removing a single lower cabinet might take 1-2 hours for an experienced DIYer. For an entire kitchen of lower cabinets, it could take anywhere from a full day to a weekend, depending on the size of the kitchen, the complexity of the installation, and your experience level.
Q2: Can I remove kitchen cabinets myself without a helper?
A2: While technically possible for very small kitchens, it is highly recommended to have at least one helper. Cabinets, especially when attached to countertops, can be heavy and awkward to maneuver. A helper provides stability, assists with lifting, and helps prevent damage to the cabinets, walls, and yourself.
Q3: What if my cabinets are painted directly to the wall?
A3: If your cabinets have been painted over and are essentially adhered to the wall by layers of paint, you will need to score the paint line very thoroughly with a sharp utility knife. You may also need to use a wider putty knife or a thin pry bar to break the paint seal carefully. Be prepared for some minor paint touch-up on the wall afterward.
Q4: Do I need to remove the cabinet backing for cabinet removal?
A4: It is often necessary or highly beneficial to remove the cabinet backing. The backing can obscure mounting screws that attach the cabinet to wall studs, and removing it provides better access to these screws and allows you to see if the cabinet is also adhered to the wall.
Q5: What’s the difference between cabinet removal and kitchen cabinet demolition?
A5: Cabinet removal is typically a careful process focused on salvaging the cabinets and minimizing damage to the surrounding areas. Kitchen cabinet demolition, on the other hand, implies a more aggressive approach where the goal is to break apart and remove the cabinets quickly, often with less regard for preserving their condition or the integrity of the walls. This guide focuses on careful cabinet removal.
By following these detailed steps and prioritizing careful execution, you can confidently proceed with removing your lower kitchen cabinets without causing undue damage.