Image Source: i.ytimg.com
How To Change KitchenAid Refrigerator Water Filter Easily
So, how do you change the water filter on a KitchenAid refrigerator? It’s a straightforward process! Most KitchenAid refrigerators have their water filter located either inside the refrigerator compartment, usually in the upper right corner, or in the base grille at the bottom front. You’ll typically just need to twist out the old filter and twist in the new one.
Keeping your KitchenAid refrigerator’s water filter fresh is vital for clean, great-tasting water and ice. Over time, these filters work hard to remove impurities like sediment, chlorine, and other contaminants. When they get clogged, they can slow down water flow, affect taste, and even harbor bacteria. Fortunately, KitchenAid refrigerator water filter replacement is a task that most homeowners can handle themselves with a few simple steps. This comprehensive guide will walk you through how to change refrigerator water filter on your KitchenAid appliance, ensuring you get it right every time. We’ll cover everything from finding the filter’s location to the proper KitchenAid fridge water filter installation.
Why Replace Your KitchenAid Refrigerator Water Filter?
Think of your refrigerator’s water filter as a tiny guardian for your hydration. It’s constantly working to purify the water that flows through it to your dispenser and ice maker. As it does its job, it captures microscopic particles. These include:
- Sediment: Dirt, rust, and sand can make their way into municipal water supplies.
- Chlorine: Used to disinfect water, chlorine can leave an unpleasant taste and smell.
- Lead and Mercury: These heavy metals can leach from plumbing and are harmful to health.
- Pesticides and Herbicides: Chemicals from agricultural runoff can contaminate water sources.
- Volatile Organic Compounds (VOCs): These chemicals can come from industrial processes and consumer products.
When the filter becomes saturated with these impurities, its effectiveness diminishes. This is why regular water filter change refrigerator is crucial.
Signs It’s Time for a New Filter:
- Slow Water Dispensing: If the water flow from your dispenser has noticeably slowed down, the filter is likely clogged.
- Cloudy or Discolored Water: This is a clear indicator that the filter is no longer effectively removing particles.
- Unpleasant Taste or Odor: If your water starts tasting or smelling “off,” the filter needs replacing.
- Indicator Light: Many KitchenAid refrigerators have a filter indicator light that will turn red or yellow when it’s time to replace the filter. Refer to your owner’s manual for specifics about your model.
- Regular Schedule: Even if you don’t notice these signs, it’s recommended to replace your KitchenAid refrigerator water filter every six months. Water quality can change, and filters have a finite lifespan.
Pinpointing Your KitchenAid Refrigerator Water Filter Location
The first step in replacing refrigerator water filter is knowing where to find it. KitchenAid, like many appliance manufacturers, offers various models with different filter placements. The two most common locations for a KitchenAid refrigerator water filter location are:
1. Inside the Refrigerator Compartment
This is perhaps the most common placement. You’ll typically find the filter:
- Upper Right Corner: Open the refrigerator door and look towards the back, usually in the upper right corner. You might see a small compartment or cover housing the filter.
- Behind the Crisper Drawers: In some models, the filter might be tucked away behind one of the crisper drawers. You may need to slide the drawer out to access it.
- In the Recess of the Top Shelf: Some designs place the filter in a recessed area at the back of the top shelf.
2. In the Base Grille
On some French door and side-by-side models, the filter is located at the bottom front of the refrigerator.
- Lower Front Panel: Look for a removable grille or panel at the very bottom of the refrigerator, usually on the right side. You’ll likely need to gently pull or push this panel to release it.
Important Tip: Always consult your specific KitchenAid refrigerator’s owner’s manual. It will provide precise details and diagrams for your model’s KitchenAid refrigerator water filter location. You can usually find your model number on a sticker inside the refrigerator compartment, often on the side wall or near the crisper drawers.
Preparing for KitchenAid Fridge Water Filter Installation
Before you start installing new refrigerator water filter, a little preparation goes a long way to ensure a smooth and clean process.
What You’ll Need:
- New KitchenAid Refrigerator Water Filter: Ensure you have the correct replacement filter for your specific KitchenAid refrigerator model. Using the wrong filter can lead to leaks or improper filtration. You can usually find the filter part number in your owner’s manual or by searching online with your refrigerator’s model number.
- A Clean Towel or Paper Towels: To catch any drips and to wipe up spilled water.
- A Bucket or Bowl (Optional): If you’re concerned about larger spills, especially when accessing the filter from the base grille.
Steps to Take Before You Begin:
- Shut Off Water Supply (Optional but Recommended): While most filter changes don’t require this, if you’re unsure or want to prevent any potential water leaks, you can turn off the water supply valve to the refrigerator. This is typically located behind the refrigerator or in a nearby cabinet. If you’re not comfortable doing this, proceeding cautiously should be fine, as the water flow is usually minimal when the filter is being removed.
- Gather Your Supplies: Have your new filter and towels ready.
- Clear the Area: Make sure you have enough space to work comfortably. If the filter is inside the fridge, remove any items from the shelf or compartment where the filter is located.
Step-by-Step Guide: KitchenAid Water Filter Change Instructions
Now that you’ve located your filter and prepared, let’s get to the core of how to change water filter on KitchenAid refrigerator. The process will vary slightly depending on the filter’s location.
Scenario 1: Filter Located Inside the Refrigerator Compartment
This is generally the simplest method.
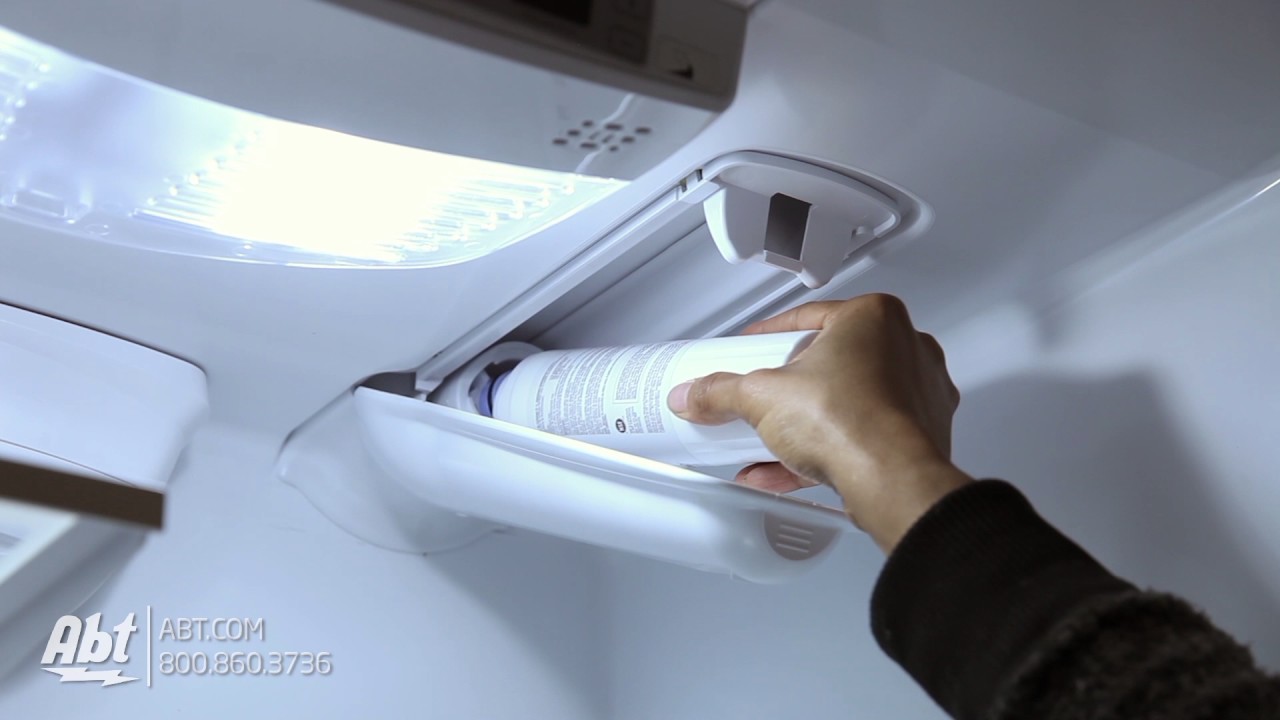
Step 1: Locate the Filter Housing
As mentioned, look in the upper right corner of the refrigerator compartment, or as indicated in your manual. You’ll see the filter cap or the filter itself.
Step 2: Remove the Old Filter
- Twist and Pull: Most filters are designed to be removed with a simple quarter-turn counter-clockwise twist. Grip the filter firmly (or the cap covering it) and turn it counter-clockwise until it stops.
- Pull Straight Out: Once unlocked, gently pull the filter straight out. Be prepared for a small amount of water to drip out. This is why having towels handy is important.
Step 3: Prepare the New Filter
- Remove Packaging: Take the new KitchenAid refrigerator water filter replacement out of its packaging.
- Remove Protective Cap: Most new filters come with a protective cap over the nozzle. Remove this cap before installation.
Step 4: Install the New Filter
- Align the Filter: Look for alignment marks or grooves on the filter and the housing. These will help you orient the new filter correctly.
- Push and Twist: Insert the new filter into the housing. Push it in firmly until it feels seated. Then, twist it clockwise a quarter-turn until it locks into place. You should feel or hear a click.
- Ensure a Tight Fit: Make sure the filter is snug. A loose filter can cause leaks.
Step 5: Flush the New Filter
This is a crucial step after KitchenAid fridge water filter installation to remove any air trapped in the system and to flush out loose carbon particles.
- Dispense Water: Place a large container or pitcher under the water dispenser.
- Run Water: Dispense at least 2-3 gallons of water. The water may initially appear cloudy or sputter – this is normal. Continue dispensing until the water runs clear and smooth.
- Discard Initial Water: Do not drink the first few gallons of water dispensed. Discard it.
- Discard Ice: If you have an ice maker, discard the first few batches of ice.
Step 6: Reset the Filter Indicator Light (If Applicable)
Many KitchenAid refrigerators have a filter status indicator light. You’ll need to reset this to let the refrigerator know you’ve replaced the filter. The method varies by model, but common ways include:
- Pressing and Holding a Button: Often, you’ll need to press and hold a specific button (like “Filter Reset,” “Ice Type,” or “Water”) for 3-5 seconds.
- Through the Control Panel Menu: Some newer models allow you to reset the filter status through the refrigerator’s digital control panel.
Refer to your owner’s manual for the exact reset procedure for your model.
Scenario 2: Filter Located in the Base Grille
This method requires a bit more maneuvering.
Step 1: Locate the Base Grille
Find the removable grille at the bottom front of your refrigerator.
Step 2: Remove the Base Grille
- Gently Pull or Push: Most grilles are held in place by clips. You might need to gently pull downwards or push inwards on the sides or bottom of the grille to release it. Some models have a small tab you press.
- Support the Grille: Be ready to catch the grille as it detaches so it doesn’t fall.
Step 3: Identify the Filter Housing
Once the grille is off, you’ll see the filter housing, usually mounted vertically on the right side.
Step 4: Remove the Old Filter
- Twist and Pull: Similar to the interior filter, grip the filter or its cap and twist it counter-clockwise about a quarter turn until it stops.
- Pull Straight Out: Gently pull the filter straight out of the housing. Have your towels ready for any drips.
Step 5: Prepare and Install the New Filter
- Prepare New Filter: Remove the new filter from its packaging and take off the protective cap from the nozzle.
- Align and Insert: Align the new filter with the housing, paying attention to any guide tabs. Push it firmly into the housing.
- Twist to Lock: Twist the filter clockwise about a quarter turn until it locks into place. Ensure it feels secure.
Step 6: Replace the Base Grille
Align the grille with its mounting clips and gently push it back into place until it snaps securely.
Step 7: Flush the New Filter
Follow the same flushing procedure as described in Scenario 1, dispensing 2-3 gallons of water and discarding the first batches of ice.
Step 8: Reset the Filter Indicator Light
Again, consult your owner’s manual to reset the filter indicator light for your specific model.
Choosing the Right KitchenAid Refrigerator Water Filter
Using the correct filter is paramount for optimal performance and to prevent damage.
- Model Number is Key: Always use the KitchenAid refrigerator water filter replacement that is specifically designed for your refrigerator model. You can find this information in your owner’s manual or by checking the label on your old filter.
- Genuine vs. Aftermarket: While aftermarket filters can be cheaper, genuine KitchenAid filters are engineered to meet the brand’s specific standards. They often offer superior filtration and a more reliable fit. For the best results, consider genuine parts.
- Filter Lifespan: Most KitchenAid filters are rated to last for approximately six months or for a certain gallon capacity (e.g., 300-500 gallons). However, this can vary depending on your water usage and local water quality.
Common KitchenAid Filter Part Numbers (Examples – Always Verify for Your Model):
| Filter Type | Common Part Number |
|---|---|
| Interior Filter | W10295370 |
| Interior Filter | W10413645 |
| Exterior Inline Filter | W10413645A |
| Base Grille Filter | W10717116 |
| Base Grille Filter | W10843847 |
Disclaimer: This table is for illustrative purposes only. Always confirm the correct part number for your specific KitchenAid refrigerator model.
Troubleshooting Common Issues During Filter Replacement
Even with clear instructions, sometimes hiccups occur. Here are solutions to common problems:
- Filter Won’t Twist Out/In:
- Check Alignment: Ensure you are twisting in the correct direction (usually counter-clockwise to remove, clockwise to install).
- Push Firmly: Sometimes you need to push the filter inwards slightly while twisting to disengage or engage the locking mechanism.
- Debris: Check the housing for any debris that might be obstructing the filter.
- Wrong Filter: Double-check that you have the correct replacement filter for your model.
- Leaking After Installation:
- Not Fully Seated: The most common cause is the filter not being pushed in all the way before twisting, or not being twisted enough to lock. Remove the filter and reinstall, ensuring a snug fit.
- O-Rings Damaged: The rubber O-rings on the filter are crucial for a watertight seal. Ensure they are intact and properly positioned on the new filter.
- Cracked Housing: Inspect the filter housing for any cracks or damage. If the housing is damaged, you may need to call a technician.
- No Water Dispensing After Replacement:
- Air in Lines: This is usually due to trapped air. Continue flushing the system by dispensing water for longer periods.
- Filter Not Properly Installed: Recheck the filter installation.
- Water Supply Off: If you turned off the water supply valve, ensure it’s turned back on.
- Clogged Line: Less likely, but possible if there was an issue before the filter change.
Maintaining Your Water Filtration System
Once you’ve successfully completed the KitchenAid refrigerator water filter installation, remember these tips for ongoing maintenance:
- Adhere to the Replacement Schedule: Mark your calendar or set a reminder for your next water filter change refrigerator. Replacing it every six months (or as recommended by the manufacturer) is key.
- Monitor Water Quality: Pay attention to the taste and flow of your water. If you notice changes before the scheduled replacement time, change the filter sooner.
- Keep a Spare Filter: Having a spare KitchenAid refrigerator water filter replacement on hand ensures you’re ready when it’s time to change it.
Frequently Asked Questions (FAQ) about KitchenAid Refrigerator Water Filters
Here are answers to some common questions about replacing refrigerator water filter on KitchenAid appliances.
Q1: How often should I replace my KitchenAid refrigerator water filter?
A1: Generally, you should replace your KitchenAid refrigerator water filter every six months. However, this can depend on your household’s water consumption and the quality of your local water supply. Some manufacturers recommend replacing it sooner if you notice a change in water taste, odor, or flow rate.
Q2: Can I use a generic or aftermarket water filter in my KitchenAid refrigerator?
A2: While generic or aftermarket filters might fit, it’s generally recommended to use genuine KitchenAid filters. Genuine filters are designed and tested specifically for your refrigerator model, ensuring optimal performance, proper fit, and effective filtration. Using an incorrect filter could lead to leaks or reduced efficiency.
Q3: My KitchenAid refrigerator’s water filter indicator light is still on after replacing the filter. What should I do?
A3: If the indicator light remains on, you likely need to reset it. The method for resetting the light varies by KitchenAid refrigerator model. Typically, it involves pressing and holding a specific button (like “Filter Reset,” “Water,” or “Ice Type”) on the control panel for several seconds. Consult your owner’s manual for the precise reset instructions for your model. If resetting doesn’t work, ensure the new filter is correctly installed.
Q4: Why is the water dispensing slowly after I replaced the filter?
A4: A common reason for slow water dispensing after a filter change is air trapped in the water lines or the new filter. This is usually resolved by flushing the system. Dispense at least 2-3 gallons of water through the dispenser. The water might sputter or appear cloudy initially, but it should clear up. Also, ensure the new filter is fully seated and locked into place, as a partially installed filter can restrict flow.
Q5: Where can I find the model number of my KitchenAid refrigerator to buy the correct filter?
A5: The model number of your KitchenAid refrigerator is typically found on a sticker inside the refrigerator compartment. Look on the side walls, the back wall, or near the crisper drawers. It’s often a white or silver sticker with detailed information about your appliance, including the model number.
Q6: Is it necessary to turn off the water supply before changing the filter?
A6: It’s not always strictly necessary, as the water flow to the filter is usually minimal when it’s being removed. However, to prevent any accidental spills and ensure a clean process, it’s a good practice to turn off the water supply valve to the refrigerator before beginning the KitchenAid water filter change instructions. If you’re not comfortable locating or turning off the valve, proceed with caution and have plenty of towels ready.
By following these detailed refrigerator filter replacement guide steps, you can confidently perform KitchenAid refrigerator water filter replacement and enjoy clean, fresh water and ice from your appliance. Regular maintenance ensures your refrigerator functions at its best, providing you and your family with pure hydration.