Can you make bread with a KitchenAid mixer? Absolutely! Your KitchenAid mixer is a fantastic tool for making bread, turning a potentially laborious task into a simple and enjoyable process. This guide will walk you through everything you need to know to create delicious homemade bread, from basic recipes to tips and tricks. We’ll explore how to knead bread with your KitchenAid, compare it to bread machines, and even touch upon using the best KitchenAid bread attachment for your needs. Whether you’re a beginner looking for an easy bread recipe mixer or an experienced baker ready to tackle sourdough, this guide has you covered.
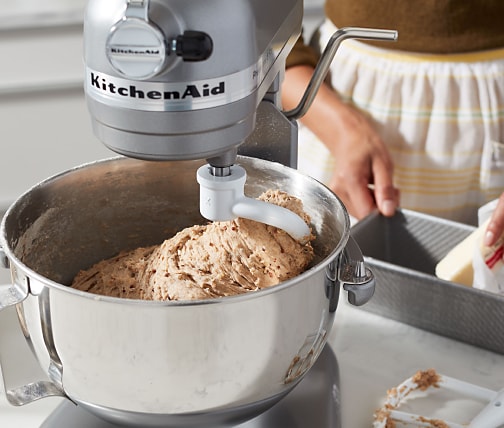
Image Source: www.kitchenaid.com
Why Use a KitchenAid Mixer for Bread?
Making bread from scratch used to mean hours of kneading by hand. While that can be a rewarding experience, it’s not always practical. Your KitchenAid stand mixer takes the hard work out of bread making. It’s designed to handle tough doughs and mix them thoroughly, developing the gluten structure that gives bread its characteristic chew and rise. This means more consistent results and less physical effort for you. It’s a true game-changer for any home baker.
The Magic of Gluten Development
Gluten is a protein network that forms when flour is mixed with water and worked. This network traps the gases produced by yeast during fermentation, allowing the bread to rise and creating its texture. Kneading is the process of developing this gluten network.
- Hand Kneading: Requires physical exertion and technique to stretch and fold the dough repeatedly.
- KitchenAid Mixer: The powerful motor and the KitchenAid dough hook bread attachment do the heavy lifting, effectively stretching and folding the dough for you. This ensures even gluten development without arm fatigue.
Convenience and Consistency
With a KitchenAid, you can achieve professional-quality bread with remarkable ease. It’s perfect for those days when you want homemade bread but don’t have the time or energy for extensive manual labor. The mixer provides consistent kneading, which translates to more predictable and delicious bread every time. This is particularly helpful when trying out a new Kitchenaid bread recipe.
Essential KitchenAid Mixer Components for Bread Making
To successfully make bread with your KitchenAid, you’ll need a few key parts.
The Stand Mixer Body
This is the powerhouse, housing the motor and controls. Different models have varying wattage, but most KitchenAid mixers are more than capable of handling bread dough.
The Bowl
The sturdy stainless steel bowl that comes with your mixer is perfect for holding and mixing your dough.
The Dough Hook
This is the star player for bread making. The KitchenAid dough hook bread attachment is specifically designed to mimic the action of kneading by hand. It efficiently works the dough, developing gluten and incorporating ingredients.
The Mixer Speed Settings
Understanding your mixer’s speed settings is crucial. For most bread doughs:
- Speed 1 or 2: Typically used for initial mixing and incorporation of ingredients.
- Speed 2 or 4: Ideal for kneading the dough. Avoid higher speeds, as they can overheat the motor or overwork the dough.
A Basic KitchenAid Bread Recipe
This is an excellent starting point for anyone new to using their KitchenAid for baking. It’s an easy bread recipe mixer friendly recipe that produces a lovely, soft loaf.
Ingredients:
- 3 cups all-purpose flour, plus more for dusting
- 1 teaspoon salt
- 1 teaspoon active dry yeast
- 1 tablespoon sugar
- 1 ¼ cups warm water (105-115°F)
- 2 tablespoons olive oil or melted butter, plus more for greasing
Instructions:
- Activate the Yeast: In a small bowl, combine the warm water, sugar, and yeast. Stir gently and let it sit for 5-10 minutes until it becomes foamy. This shows the yeast is active.
- Combine Dry Ingredients: In the bowl of your KitchenAid mixer, whisk together the flour and salt.
- Add Wet Ingredients: Pour the activated yeast mixture and olive oil (or melted butter) into the flour mixture.
- Mix the Dough: Attach the dough hook to your mixer. Start mixing on low speed (Speed 1) until the ingredients just come together to form a shaggy dough.
- Knead the Dough: Gradually increase the speed to Speed 2. Let the mixer knead the dough for 5-7 minutes. The dough should become smooth, elastic, and pull away from the sides of the bowl. If it’s too sticky, add a tablespoon of flour at a time. If it’s too dry, add a teaspoon of water at a time.
- First Rise (Proofing): Lightly grease a clean bowl with olive oil. Shape the dough into a ball and place it in the greased bowl, turning to coat. Cover the bowl with plastic wrap or a damp kitchen towel. Let it rise in a warm place for 1-1.5 hours, or until doubled in size.
- Shape the Loaf: Gently punch down the risen dough to release the air. Turn the dough out onto a lightly floured surface. Shape it into your desired loaf pan size or a round boule.
- Second Rise: Place the shaped dough into a greased loaf pan or onto a baking sheet lined with parchment paper. Cover loosely with plastic wrap or a clean kitchen towel. Let it rise again in a warm place for 45-60 minutes, or until it has visibly puffed up.
- Bake: Preheat your oven to 375°F (190°C). Bake for 30-40 minutes, or until the crust is golden brown and the internal temperature of the bread reaches 200-210°F (93-99°C) on an instant-read thermometer.
- Cool: Remove the bread from the pan and let it cool completely on a wire rack before slicing.
Mastering the Kneading Process with Your KitchenAid
Knowing how to knead bread with KitchenAid effectively is key to achieving a good crumb and texture.
The Role of the Dough Hook
The Kitchenaid dough hook bread attachment is designed with a spiral shape that mimics the pushing, folding, and stretching motion of hand kneading. It works the dough in the bowl, building the gluten structure.
What to Look For in Kneaded Dough
- Smoothness: The dough should transition from a sticky, shaggy mass to a smooth, pliable ball.
- Elasticity: When you gently stretch a piece of dough, it should thin out into a translucent “windowpane” without tearing easily. This indicates well-developed gluten.
- Pulling Away: During kneading, the dough will gradually pull away from the sides of the bowl and gather around the dough hook.
Troubleshooting Kneading
- Dough Too Sticky: If the dough consistently sticks to the bottom and sides of the bowl even after a few minutes of kneading, add flour 1 tablespoon at a time. Be patient; sometimes it just needs a little more flour to form properly.
- Dough Too Dry/Stiff: If the dough appears too stiff, breaks apart easily, or doesn’t come together, add water 1 teaspoon at a time.
- Over-Kneading: While less common with stand mixers, you can technically over-knead. If the dough becomes overly elastic and springs back aggressively when poked, or if it starts to tear apart, it might be over-kneaded. Stop kneading immediately. For most bread recipes, 5-7 minutes on Speed 2 is sufficient.
Exploring Other Bread Attachments for Your KitchenAid
While the dough hook is essential, KitchenAid offers other attachments that can enhance your bread-making experience.
The Flat Beater and Wire Whip
- Flat Beater: Can be used for initial mixing of ingredients, especially in recipes with fats and sugars, like cakes or cookies. For bread, it’s mainly used for the very first stage before switching to the dough hook.
- Wire Whip: Primarily used for whipping cream, eggs, or making light batters. It’s not suitable for bread dough.
The Best KitchenAid Bread Attachment?
For most standard bread making, the dough hook is indeed the best KitchenAid bread attachment. It’s specifically engineered for the task. However, for some specialized bread types or for very large batches, other attachments might play a supporting role.
Bread Machine vs. KitchenAid: A Comparison
It’s natural to wonder about the difference between a bread machine and using your KitchenAid mixer. Both produce bread, but they offer different experiences and results.
| Feature | Bread Machine | KitchenAid Mixer |
|---|---|---|
| Process | Fully automated (mix, knead, rise, bake) | Manual control over each step (mix, knead, rise, bake) |
| Effort | Minimal, add ingredients and press start. | Requires active involvement in mixing, kneading, shaping. |
| Customization | Limited (often pre-set cycles, sometimes custom). | Complete control over ingredients, rising, baking. |
| Crust | Usually softer, uniform. | Can achieve a varied and crispier crust. |
| Shape | Typically a single loaf shape determined by the pan. | Can shape into loaves, rolls, baguettes, etc. |
| Versatility | Primarily for bread. | Multi-functional for baking, mixing, and more. |
| Time | Set it and forget it (longer cycle times). | More hands-on time, but potentially faster for some steps. |
A bread machine is fantastic for convenience and hands-off baking. A KitchenAid, however, gives you the artisanal control and flexibility to experiment with different doughs and shapes. If you enjoy the process of baking and want to master different bread types, your KitchenAid is invaluable.
Beyond the Basic: Exploring Different Bread Recipes
Once you’ve mastered the basic loaf, your KitchenAid can help you make a wide variety of breads.
Whole Wheat Bread Recipe Mixer Friendly
Whole wheat bread recipe mixer baking is simple with your KitchenAid. Whole wheat flour can be denser and absorb more liquid, so you might need slight adjustments.
Ingredients:
- 2 cups warm water
- 2 ¼ teaspoons active dry yeast
- 2 tablespoons honey or maple syrup
- 3 cups whole wheat flour
- 2 cups all-purpose flour (you can adjust this ratio for more or less whole wheat)
- 1 ½ teaspoons salt
- 2 tablespoons olive oil or melted butter, plus more for greasing
Instructions:
- In your mixer bowl, combine warm water, yeast, and honey. Let it bloom for 5-10 minutes.
- Add whole wheat flour, all-purpose flour, salt, and olive oil.
- Attach the dough hook and knead on Speed 2 for 7-10 minutes. Whole wheat dough can be stickier; add a tablespoon of flour if needed.
- Follow the same rising, shaping, and baking instructions as the basic recipe.
Sourdough Bread KitchenAid Method
Using your KitchenAid for sourdough bread KitchenAid baking is a brilliant way to handle the often-stiff sourdough starter and dough.
Key Differences for Sourdough:
- Starter: You’ll need an active sourdough starter, which is a fermented mixture of flour and water.
- Hydration: Sourdough recipes can have a wide range of hydration levels, affecting dough consistency.
- Kneading Time: Sourdough often benefits from a longer, more gentle kneading process, sometimes with periods of rest (autolyse) incorporated.
General KitchenAid Sourdough Process:
- Mix Starter and Water: Combine your active starter and water in the mixer bowl.
- Add Flour and Salt: Add your flours and salt.
- Initial Mix: Use the dough hook on low speed to combine everything into a shaggy dough.
- Autolyse (Optional but Recommended): Let the dough rest in the bowl for 20-30 minutes without mixing. This allows the flour to hydrate and gluten development to begin naturally.
- Knead: Knead on Speed 2 for 5-10 minutes. Sourdough dough can be wetter and stickier. You’re looking for a smooth, elastic dough that passes the windowpane test. You might need to add a touch more flour or water to achieve the right consistency.
- Bulk Fermentation: This is the primary rise for sourdough, where you’ll perform a series of “stretch and folds” at intervals. While you can do these by hand, some bakers use the mixer on a very low speed for short bursts (e.g., 1 minute on Speed 1) to simulate stretches and folds, though this requires careful monitoring.
- Shaping and Proofing: Shape your dough and let it proof, usually in a banneton or bowl, in the refrigerator overnight or at room temperature for several hours.
- Baking: Bake in a preheated oven, often in a Dutch oven for the best crust.
Tips for Perfect Bread with Your KitchenAid
- Room Temperature Ingredients: For most standard breads, using ingredients at room temperature (especially eggs and butter, if your recipe calls for them) helps everything mix and emulsify better.
- Measure Flour Correctly: Spoon flour into your measuring cup and level it off with a straight edge. Don’t scoop directly from the bag, as this can compact the flour and lead to a dry dough.
- Don’t Over-Flour: Resist the urge to add too much extra flour if the dough seems a bit sticky. Let the mixer work its magic for the designated kneading time.
- Clean Your Mixer: After kneading sticky dough, remove the dough hook and clean the inside of the bowl and the hook thoroughly. This prevents dried-on dough from becoming a problem.
- Experiment with Add-ins: Once you’re comfortable, try adding seeds, nuts, herbs, or cheese to your dough during the last minute of kneading.
- Proofing Environment: Find a warm, draft-free spot for your dough to rise. An oven with just the light on is often perfect.
Frequently Asked Questions (FAQ)
Q1: Can I make no-knead bread using my KitchenAid mixer?
Yes, while the term “no-knead” usually implies minimal handling, you can use your KitchenAid mixer to incorporate ingredients for a no-knead style bread. The mixer can help combine the flour, water, yeast, and salt into a shaggy dough, and then you would allow it to rise with minimal intervention, or perhaps a few short bursts of mixing during the initial rise. The key to no-knead is the long fermentation time, which develops the gluten structure without extensive kneading.
Q2: What is the difference between a bread machine and a KitchenAid for making bread?
As detailed in our comparison table, a bread machine automates the entire bread-making process, from mixing to baking, requiring minimal user input. A KitchenAid mixer, on the other hand, handles the kneading and mixing, but you are responsible for all other steps like proofing, shaping, and baking, offering more control and versatility.
Q3: Is there a specific “best” KitchenAid bread attachment?
For the vast majority of bread making, the standard dough hook is considered the best KitchenAid bread attachment. It’s specifically designed to efficiently develop gluten and knead dough.
Q4: Can I use my KitchenAid for sourdough bread?
Absolutely! Your KitchenAid is excellent for making sourdough bread KitchenAid methods, particularly for mixing and kneading the often-sticky sourdough starter and dough.
Q5: How long should I knead bread dough in my KitchenAid?
For most standard bread recipes, knead the dough using the KitchenAid dough hook bread attachment on Speed 2 for approximately 5-7 minutes, or until the dough is smooth, elastic, and pulls away from the sides of the bowl. Some denser doughs like whole wheat might benefit from an extra minute or two.
Q6: What speed should I use for kneading bread with my KitchenAid?
The recommended speed for kneading bread with your KitchenAid is typically Speed 2. Avoid using higher speeds, as they can overheat the mixer’s motor or overwork the dough, negatively impacting the final product.
Q7: Can I make no-knead bread in my KitchenAid?
Yes, you can use your KitchenAid mixer to combine the initial ingredients for no knead bread Kitchenaid styles. The mixer can help bring the dough together before you let it undergo its long, slow rise without further manipulation, or with minimal intervention.
Q8: What is a good easy bread recipe for my mixer?
The basic white bread recipe provided in this guide is a fantastic easy bread recipe mixer option for beginners. It’s simple, uses common ingredients, and showcases how effective the KitchenAid is for bread making.
Q9: I want to make whole wheat bread. Can my KitchenAid handle it?
Certainly! Your KitchenAid is well-equipped for making whole wheat bread recipe mixer loaves. You might find whole wheat dough a bit stickier, so be prepared to adjust with a tablespoon of flour if necessary, and knead for a minute or two longer to develop the gluten properly.
Conclusion
Your KitchenAid stand mixer is more than just a kitchen appliance; it’s your partner in creating beautiful, delicious homemade bread. From a simple white loaf to hearty whole wheat or tangy sourdough, the Kitchenaid bread recipe possibilities are endless. By mastering the use of your Kitchenaid dough hook bread, understanding the kneading process, and following these tips, you’ll be baking loaves that rival any bakery. Enjoy the process, experiment with flavors, and savor the incredible aroma and taste of bread made with love and your trusty KitchenAid!