Sure, here’s a blog post on how to attach a kitchen island to the floor securely, with a focus on readability and SEO:
Can you attach a kitchen island to the floor? Absolutely! Anchoring your kitchen island to the floor is crucial for safety and stability, especially in busy households. It prevents tipping, sliding, and potential injuries, ensuring your island remains a safe and functional part of your kitchen. This guide will walk you through the entire process, from preparation to the final securing.
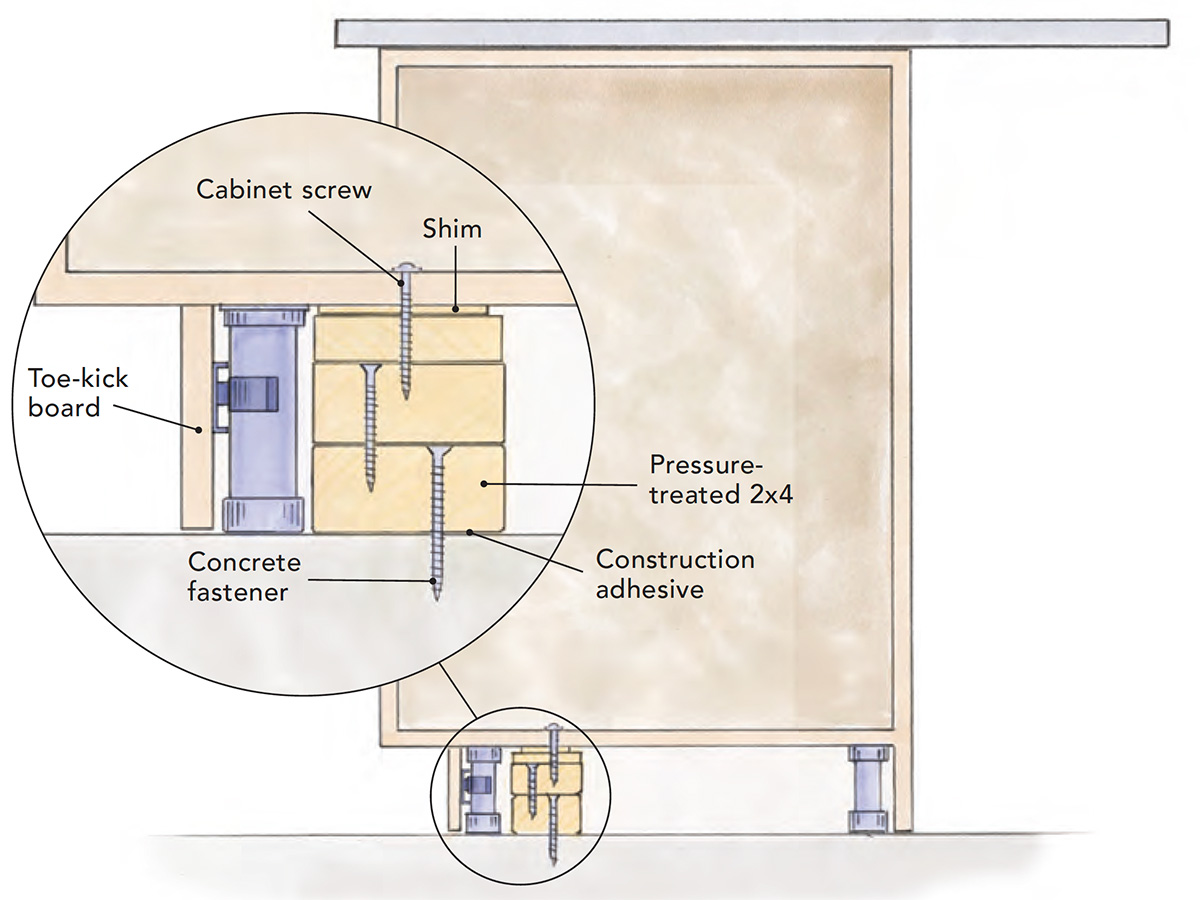
Image Source: images.finehomebuilding.com
Why Securing Your Kitchen Island Matters
A freestanding kitchen island, while offering flexibility, can become a hazard if not properly secured. Imagine an active kitchen with kids running around or someone bumping into the island. Without a secure attachment, it can tip over, causing damage or injury. For a truly secure kitchen island, floor anchoring is a non-negotiable step. It’s about making your kitchen safer and your island a permanent, stable fixture.
Enhancing Stability and Safety
The primary reason to anchor island to floor is safety. It stops the island from moving unexpectedly, which is especially important if you have children or pets. A wobbling or sliding island is a recipe for accidents.
Preventing Damage
Beyond personal safety, a secure island prevents damage to your flooring and the island itself. If an island shifts, it can scratch or goude your beautiful floors. It also protects the island’s structure from undue stress.
Improving Functionality
A stable island makes working in the kitchen much easier. You won’t have to deal with a rocking countertop when chopping vegetables or a sliding prep surface. It creates a solid workspace for all your culinary adventures.
Preparing for Kitchen Island Floor Anchoring
Before you can attach island base to the floor, careful preparation is key. This involves gathering your tools and materials, and crucially, knowing what’s beneath your floor.
Gathering Your Tools and Materials
You’ll need a few essential items to screw kitchen island into place effectively.
- Drill: A cordless drill is a must. Make sure it has good battery life.
- Drill Bits: Various sizes will be needed for pilot holes and securing screws.
- Screws: Choose screws specifically designed for wood or flooring. Consider length based on your island’s base and your subfloor thickness.
- Stud Finder: Essential for locating floor joists.
- Level: To ensure your island is perfectly positioned.
- Measuring Tape: For accurate placement.
- Pencil or Marker: To mark drilling points.
- Safety Glasses: Always protect your eyes when drilling.
- Gloves: For a better grip and to protect your hands.
- Island Mounting Hardware: Specific brackets or plates designed for this purpose. These are often L-shaped or flat metal plates.
- Wood Shims (Optional): If your floor is uneven, shims can help level the island.
Inspecting Your Flooring and Subfloor
This is a critical step that many overlook. You need to know what you’re drilling into.
- Examine Your Finished Floor: Is it hardwood, tile, laminate, or vinyl? You need to be careful not to damage it.
- Identify the Subfloor: The subfloor is the layer directly beneath your finished floor. It’s usually plywood or oriented strand board (OSB). This is what you’ll be screwing into.
- Check for Obstructions: Before drilling, it’s wise to check for any wires or pipes that might be running underneath. While a stud finder can help locate joists, it won’t detect all utilities. If you’re unsure, consider consulting a professional.
Choosing the Right Method for Attaching Your Island
There are several effective ways to attach freestanding island units securely. The best method depends on your island’s construction and your floor type.
Using L-Brackets
L-brackets are a common and reliable method for kitchen island floor anchoring. They are strong metal brackets shaped like an “L”.
- Placement: Position the island where you want it.
- Securing the Bracket to the Island: Attach one side of the L-bracket to the base of the kitchen island, usually into the thicker wood components of the island’s frame. Use shorter screws that won’t go all the way through the island’s base.
- Securing the Bracket to the Floor: Once the bracket is firmly attached to the island, use longer screws to attach the other side of the bracket to the floor. Ensure these screws go deep enough to catch the floor joists for maximum strength.
Using Flat Mounting Plates
Flat mounting plates are similar to L-brackets but lie flush against the floor and the island’s base.
- Attachment to Island: Screw the plate to the island’s base first, ensuring it’s flush and secure.
- Floor Attachment: Position the island, mark where the plate meets the floor, and then screw the plate firmly into the subfloor and joists.
Directly Screwing Through the Base (Use with Caution)
In some cases, if the island’s base is very sturdy and you have direct access to floor joists, you might be able to screw directly through the island’s base into the subfloor.
- Pilot Holes: Always drill pilot holes first to prevent wood splitting.
- Screw Length: Use screws long enough to go through the island’s base, the subfloor, and well into the floor joists.
Step-by-Step Installation Guide
This guide outlines the typical process for kitchen island installation where you screw kitchen island to the floor.
Step 1: Position and Level the Island
- Place the Island: Carefully move the kitchen island into its final desired location.
- Check Alignment: Use your level to ensure the island is perfectly level in all directions. If it’s not, use wood shims under the base until it is level.
- Mark Placement: Once level, lightly mark the outline of the island on the floor with your pencil or marker. This helps you put it back in the exact same spot if you need to move it.
Step 2: Locate Floor Joists
This is arguably the most critical step for fixing island to subfloor securely.
- Use the Stud Finder: Run your stud finder over the floor within the marked area of your island. Mark the center of each joist you locate.
- Confirm Joist Location: It’s a good practice to confirm joist locations by gently tapping or using a thin nail to poke through the subfloor at your marked spots. You should feel resistance when you hit a joist. Be very careful not to damage your finished floor during this step.
Step 3: Prepare the Island Base for Attachment
The goal here is to reinforce kitchen island base for a strong connection.
- Access the Base: You might need to temporarily remove a kickplate or skirting from the island’s base to gain access to the inner frame where you’ll attach brackets or screws.
- Identify Attachment Points: Determine the best places on the island’s base to attach your mounting hardware. Look for solid wood framing, not just thin panels.
Step 4: Attach Mounting Hardware to the Island
This step involves connecting your chosen island mounting hardware to the island itself.
- L-Brackets or Plates: Position your L-brackets or flat plates on the inside or underside of the island’s base frame. Ensure they are flush and will align with the floor joists.
- Drill Pilot Holes: Drill pilot holes into the island’s base frame where the screws will go.
- Secure Hardware: Use appropriate screws (shorter ones are usually best here) to firmly attach the brackets or plates to the island. Make sure they are snug and don’t wobble.
Step 5: Secure the Island to the Floor
Now comes the moment of truth – anchor island to floor!
- Align Hardware with Joists: Carefully slide the island back into its exact position, aligning the attached brackets or plates with the floor joists you marked.
- Drill Pilot Holes in Subfloor: Through the pilot holes in your brackets/plates, drill pilot holes into the subfloor and into the center of the floor joists. Ensure your drill bit is the correct size for your screws.
- Insert and Tighten Screws: Use long, strong screws to attach the brackets/plates firmly to the floor joists. Drive them in until they are tight, but be careful not to overtighten, which can strip the wood.
- Repeat for All Attachment Points: Continue this process for all brackets or plates, ensuring the island is securely fastened to multiple joists.
Step 6: Final Checks and Finishing Touches
- Test for Stability: Gently push and pull on the island. It should not move at all.
- Re-check Level: Use your level one last time to confirm the island is still perfectly level.
- Replace Kickplates: Reattach any kickplates or skirting you removed earlier.
- Clean Up: Remove any pencil marks and clean up your work area.
Specialized Considerations for Different Flooring Types
While the core principles remain the same, adapting to different floor types is crucial for a successful kitchen island installation.
Hardwood Floors
Hardwood floors are beautiful but can be prone to scratching.
- Protecting the Surface: Before positioning the island, lay down a protective sheet or old blankets to prevent scratches.
- Screw Choice: Use screws that are long enough to pass through the hardwood and into the subfloor, but not so long that they poke out the bottom. Consider specialized screws designed for hardwood installations.
- Pilot Holes: Always drill pilot holes. For very hard woods, a slightly larger pilot hole might be needed to prevent splitting.
Tile Floors
Tile requires extra care, as cracking is a significant risk.
- Locate Grout Lines: Try to position your attachment points so the screws go into the subfloor between tiles, or if possible, directly into the subfloor through the grout lines.
- Drilling Through Tile: If you must drill through a tile (which is best avoided if possible), use a tile-specific drill bit and drill very slowly with minimal pressure to prevent cracking. Once through the tile, you can use a standard bit for the subfloor.
- Grout Sealant: After installation, you might need to touch up grout around the base if any was disturbed.
Laminate or Vinyl Floors
These often have a softer subfloor or underlayment.
- Subfloor Integrity: Ensure the subfloor beneath is solid. Laminate and vinyl offer little structural support themselves.
- Screw Length: Be mindful of screw length to avoid coming through the finished surface, especially if there’s a thick underlayment.
Reinforcing Your Kitchen Island Base
Sometimes, the island’s existing base might need a little extra support for a truly robust secure kitchen island.
Adding Support Blocks
If the internal framing of your island base seems flimsy, you can add extra wood blocks.
- Placement: Screw these blocks into the existing frame where your brackets will attach.
- Material: Use sturdy lumber, like 2x4s or 2x6s, cut to size.
- Securing: Use wood glue and screws to firmly attach these blocks to the island’s base frame. This provides a more substantial anchor point.
Using Heavy-Duty Island Mounting Hardware
For larger, heavier islands, consider using industrial-strength island mounting hardware. These are often thicker gauge metal and designed for greater load-bearing capacity.
Frequently Asked Questions (FAQ)
Q1: Do I need to anchor my kitchen island if it’s heavy?
Yes, even heavy islands benefit from anchoring. Weight alone doesn’t prevent tipping or sliding, especially during seismic activity or if someone leans heavily on it. Anchoring ensures stability and safety.
Q2: Can I attach my kitchen island to a concrete floor?
Yes, you can attach a kitchen island to a concrete floor. You will need a hammer drill and masonry drill bits, along with concrete screws (like Tapcon screws) or anchor bolts. Follow the manufacturer’s instructions for concrete anchoring.
Q3: What if I can’t find floor joists?
If you cannot locate floor joists in the desired island position, you may need to install blocking between existing joists to create new anchor points. Alternatively, consider using heavy-duty, wide-base mounting plates that distribute weight over a larger area of the subfloor, but this is less secure than anchoring to joists.
Q4: How many screws do I need to anchor my island?
The number of screws depends on the size and weight of your island and the type of mounting hardware used. Generally, you’ll want to anchor to at least two floor joists, using two to three screws per bracket or mounting plate. More attachment points mean greater stability.
Q5: Is it okay to screw directly through my finished floor?
No, you should never screw directly through your finished floor without first drilling pilot holes and ensuring you are hitting a structural element like a floor joist. Doing so will damage your flooring and likely won’t provide a secure attachment. Always use appropriate mounting hardware and methods.
Q6: What are the consequences of not securing a kitchen island?
Not securing a kitchen island can lead to tipping, sliding, damage to the island and flooring, and potential injuries from falls or the island collapsing. It compromises the safety and functionality of your kitchen.
By following these steps, you can ensure your kitchen island is a safe, stable, and beautiful addition to your home. Happy installing!