Wondering how to remove kitchen backsplash tile? You can remove kitchen backsplash tile by gathering the right tools, protecting your workspace, and using a methodical approach to detach the tiles and any adhesive. This comprehensive guide will walk you through the entire process of kitchen backsplash removal, ensuring a smooth and successful DIY project. Whether you’re planning a full kitchen renovation backsplash or simply want to update your look with a backsplash replacement tips, learning how to remove old backsplash is a valuable skill. We’ll cover everything from initial preparation to the final clean-up, making DIY backsplash removal achievable for everyone.
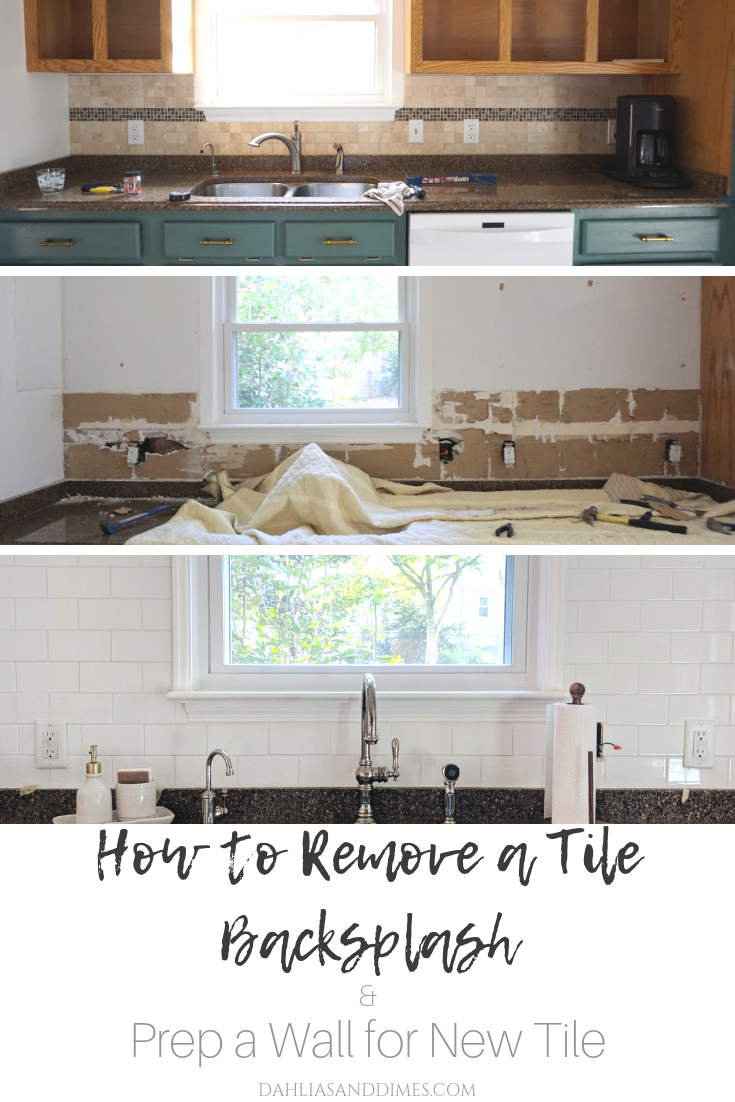
Image Source: forresterhome.com
Preparing for Your Tile Backsplash Demo
Before you begin any tile backsplash demo, proper preparation is key to a safe and efficient job. Rushing this stage can lead to unnecessary damage to your walls or injuries.
Gathering Your Essential Tools
Having the right tools at your disposal makes the process of wall tile removal kitchen much easier. Think of this as your toolkit for taking down that old backsplash.
- Safety Gear:
- Safety Glasses: Crucial for protecting your eyes from flying debris.
- Work Gloves: To protect your hands from sharp edges and splinters.
- Dust Mask or Respirator: Especially important if the old grout or adhesive contains silica.
- Closed-Toe Shoes: To protect your feet from dropped items.
- Demolition Tools:
- Putty Knife or Scraper: For initial grout scraping and prying.
- Hammer: For tapping tools and breaking stubborn tiles.
- Pry Bar: A larger tool for leveraging tiles off the wall.
- Utility Knife: For scoring grout lines and cutting caulk.
- Tile Chisel or Cold Chisel: For more aggressive tile removal.
- Oscillating Multi-Tool (Optional but Recommended): With a scraping or demolition blade, this can be a game-changer for backsplash tile scraping.
- Heat Gun or Hair Dryer (Optional): Can help soften stubborn adhesive.
- Protection and Cleaning Supplies:
- Drop Cloths or Plastic Sheeting: To protect countertops, floors, and appliances.
- Painter’s Tape: To secure drop cloths and mark off areas.
- Screwdriver: To remove any outlet covers.
- Vacuum Cleaner (with hose attachment): For cleaning up dust and debris.
- Trash Bags or Container: For disposal of removed tiles and debris.
- Bucket and Sponges: For wiping down surfaces.
Protecting Your Workspace
Your kitchen is a busy place, and protecting it from the mess of kitchen backsplash removal is vital. This step prevents damage to surrounding areas and makes clean-up much simpler.
- Clear the Countertops: Remove everything from your countertops, including small appliances, canisters, and decorative items.
- Cover Countertops and Appliances: Lay down thick drop cloths or plastic sheeting over your countertops, sink, stove, and any other appliances you can’t move. Secure the edges with painter’s tape to prevent shifting.
- Protect the Floor: Extend drop cloths or plastic sheeting onto the floor in front of the backsplash area, and for at least a few feet around it. This will catch falling debris.
- Turn Off Power: If your backsplash is near electrical outlets or switches, it’s a wise safety precaution to turn off the power to that circuit at your breaker box. Then, remove the outlet and switch covers. You can tape over the openings to prevent dust from getting inside.
The Step-by-Step Process for Kitchen Backsplash Removal
Now that you’re prepared, let’s get into the actual tile backsplash demo. This process focuses on efficiency and minimizing damage to your walls.
Step 1: Grout Removal Backsplash
The first physical step in kitchen backsplash removal is to tackle the grout. Removing the grout is essential because it allows you to get your tools underneath the tiles to pry them off.
- Score the Grout Lines: Use a utility knife or a grout saw to carefully score along the grout lines between the tiles. This score line will help guide your grout removal tool and prevent accidental damage to the drywall or adjacent tiles if you’re only replacing a section.
- Use a Grout Removal Tool:
- Manual Grout Saw: These have small, sharp teeth and are good for smaller areas or for those who want to take their time. Saw back and forth along the grout lines.
- Oscillating Multi-Tool with Grout Blade: This is by far the most efficient method. Fit the tool with a grout removal blade and set it to a low-to-medium speed. Gently run the blade along the grout lines, allowing the tool to do the work. Be careful not to push too hard, which could damage the wall behind the tile.
- Small Chisel and Hammer: For very stubborn grout, you can carefully use a small chisel and a hammer to chip away at it. This method requires precision to avoid damaging the wall.
Table: Grout Removal Methods
| Method | Pros | Cons | Best For |
|---|---|---|---|
| Manual Grout Saw | Controlled, less dust, low cost | Slow, tiring for large areas | Small projects, delicate areas, beginners |
| Oscillating Multi-Tool | Fast, efficient, less effort | Requires power, can be noisy, potential wall damage if misused | Medium to large projects, experienced DIYers |
| Chisel and Hammer | Effective for very hard grout, no power needed | High risk of wall damage, dusty, slow | Isolated stubborn grout sections, experienced users |
Step 2: Loosening and Removing Individual Tiles
Once the grout is removed, you can start prying the tiles off the wall. This is where you’ll really get into the tile backsplash demo.
- Start with a Corner or Edge Tile: It’s usually easiest to start with a tile on an edge or in a corner.
- Insert Your Prying Tool: Gently insert the thin edge of a putty knife or a flat-head screwdriver between the tile and the wall.
- Pry Gently: Apply steady pressure to pry the tile away from the wall. Work your way around the edges of the tile, trying to get your tool underneath it. You might need to tap the handle of your putty knife with a hammer to help it get under the tile.
- Use a Pry Bar for Stubborn Tiles: If a tile is particularly stubborn, you may need to switch to a pry bar. Be careful not to apply too much force in one spot, as this can gouder the drywall. You might need to chip away a bit more grout to get the pry bar in.
- Dealing with Tile Adhesive Removal: Older backsplashes might be held on with very strong adhesive. If you’re struggling, try a heat gun or hairdryer on a medium setting. Heat the adhesive for a minute or two, then try prying the tile again. The heat can soften the adhesive, making backsplash adhesive removal easier.
- Oscillating Tool for Tile Removal: For tougher jobs or if you have multiple layers of tile, an oscillating tool with a scraper attachment can be very effective. Position the blade behind the tile and gently scrape to loosen it from the wall.
Step 3: Tackling Multiple Layers or Difficult Adhesives
Sometimes you’ll encounter a backsplash that’s not as straightforward. This section covers how to deal with those trickier situations during your kitchen backsplash removal.
- Multiple Tile Layers: If you’re dealing with a tile-over-tile situation, the process can be more challenging. You might need to focus on breaking the tiles themselves rather than just prying them off. A small hammer and chisel can be useful here. Chip away at the tiles, breaking them into smaller pieces.
- Heavy-Duty Mastic or Thin-Set: Some backsplashes are installed with very strong adhesives like thin-set mortar. If this is the case, you may need to use a wider scraper, a chisel, or even a small sledgehammer with a block of wood to protect the wall as you break the tiles. The goal is to break the bond between the tile and the wall.
- Backsplash Tile Scraping: Even after removing most of the tiles, you’ll likely have bits of adhesive or thin-set remaining on the wall. Use your putty knife, scraper, or the oscillating tool to scrape away as much of this residue as possible. This is a crucial step for proper backsplash adhesive removal and preparing the wall for its next life.
Step 4: Cleaning and Preparing the Wall for the Next Steps
Once all the tiles are off, the real work of kitchen backsplash removal cleanup begins. A clean wall is essential for any new backsplash installation.
- Sweep and Vacuum: Thoroughly sweep up all large debris. Then, use a vacuum cleaner with a brush attachment to get into corners and along baseboards to remove all the fine dust and small fragments.
- Scrape Remaining Adhesive: Use your putty knife or scraper to remove any remaining chunks of adhesive, mortar, or grout. For particularly stubborn spots, you might need to use a wider scraping tool or even a sanding block, but be gentle to avoid gouging the drywall.
- Wipe Down the Wall: Dampen a sponge or cloth with water and wipe down the entire backsplash area to remove any remaining dust. For tougher adhesive residue, a mild degreaser or a solution of warm water and a few drops of dish soap can be effective.
- Inspect the Drywall: Carefully inspect the drywall for any significant damage. Small nicks and gouges are common, but if you have larger holes or areas where the paper facing has been torn off, you may need to repair them with joint compound before proceeding with your new backsplash.
Frequently Asked Questions About Kitchen Backsplash Removal
- Q: How long does it usually take to remove a kitchen backsplash?
A: The time it takes can vary greatly depending on the size of the backsplash, the type of tile, the adhesive used, and your experience level. A small backsplash might take 2-4 hours, while a larger one could take a full day or more. - Q: Can I remove just a few tiles, or do I need to remove the whole backsplash?
A: You can certainly remove just a few tiles if you’re looking to replace a damaged section or repair something. However, if the tiles are very old or the grout is difficult to work with, removing the entire backsplash might be easier and lead to a more consistent result. - Q: What should I do if I find mold behind the backsplash?
A: If you discover mold, it’s important to address it promptly. Wear appropriate protective gear (gloves, mask, eye protection) and clean the affected area with a bleach solution (1 part bleach to 10 parts water) or a commercial mold remover. Ensure the area is thoroughly dried. If the mold is extensive or you suspect it’s in the wall cavity, you may need to consult a professional. - Q: Do I need to repair the drywall after removing the backsplash?
A: In most cases, yes. Drywall inevitably sustains some damage during tile backsplash demo, such as small holes, gouges, or torn paper. These imperfections need to be patched and smoothed before you can install a new backsplash.
Final Thoughts on Your Backsplash Replacement Tips
Successfully removing your old kitchen backsplash is a significant step towards achieving your desired kitchen update. By following these detailed steps and using the right tools, you can confidently tackle this project. Remember to prioritize safety, protect your workspace, and be patient. This process is a fundamental part of any kitchen renovation backsplash or a simple refresh, and mastering DIY backsplash removal will give you a great sense of accomplishment. With a clean and prepared wall, you’re ready for whatever comes next in your kitchen makeover, whether it’s new tiles, paint, or another exciting material.