Image Source: i.ytimg.com
How To Change KitchenAid Refrigerator Water Filter
Yes, you can change the water filter in your KitchenAid refrigerator yourself. It’s a straightforward process that usually takes just a few minutes. This guide will walk you through everything you need to know about KitchenAid refrigerator water filter replacement, from finding the filter to installing a new one and even resetting your indicator light.
Locating Your KitchenAid Refrigerator Water Filter
Before you can start replacing KitchenAid fridge water filter, you first need to know where is KitchenAid refrigerator water filter. Most KitchenAid refrigerators house their water filters in one of a few common locations. Knowing the specific model of your KitchenAid refrigerator is key to pinpointing the exact spot.
Common KitchenAid Refrigerator Water Filter Locations:
- Inside the Refrigerator Compartment:
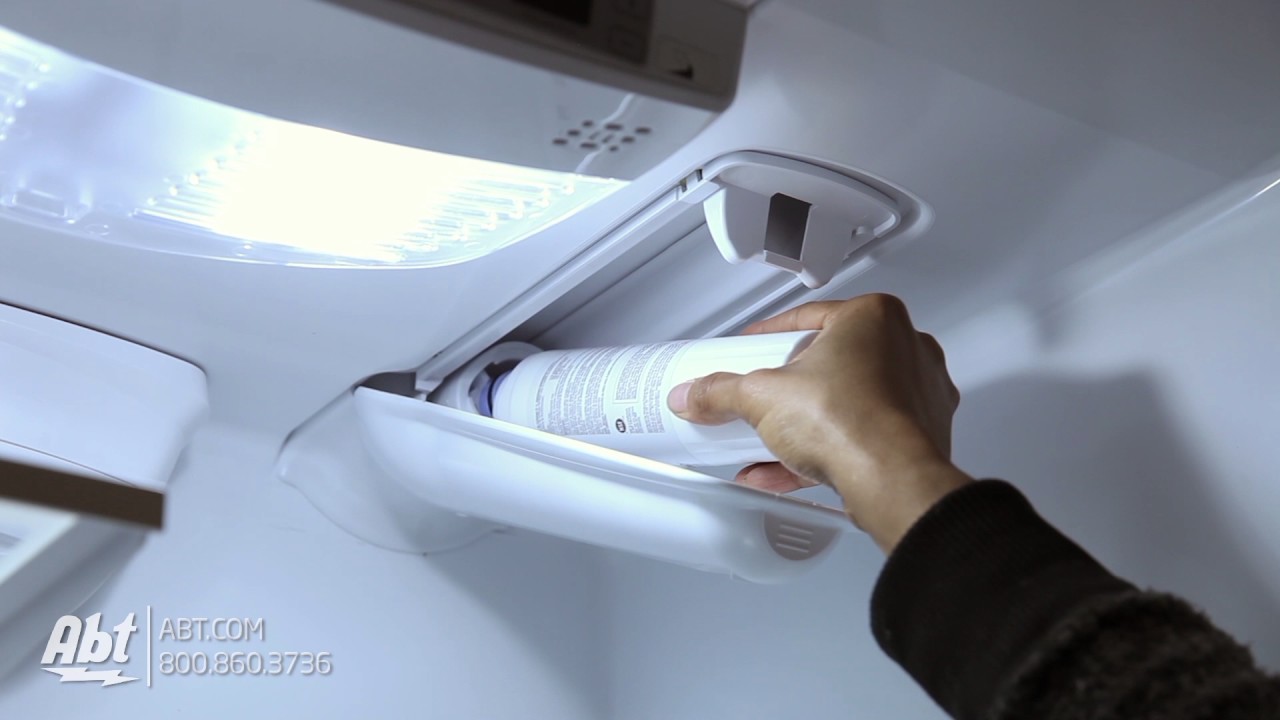
- Upper Right Corner: Many models have the filter located in a housing unit at the top right interior of the refrigerator. You might see a small push-button or a twist-off cap.
- Behind the Crisper Drawers: Some refrigerators place the filter cartridge behind or just above the crisper drawers, often in a discreet compartment.
- In the Base Grill:
- Lower Front Panel: A significant number of KitchenAid refrigerators have their water filters housed in the base grill at the bottom front of the appliance. This often involves a filter cap or a compartment that you can access by gently pulling or unscrewing it.
- In the Door Bin:
- While less common, some side-by-side or French door models might feature the filter cartridge in one of the upper door bins.
To confirm the KitchenAid refrigerator water filter location for your specific appliance, consult your owner’s manual. This will provide the most accurate information for your model.
Why Regular KitchenAid Refrigerator Water Filter Replacement is Important
Your KitchenAid refrigerator water filter is more than just a replacement part; it’s a crucial component for maintaining the quality and safety of your drinking water and ice. Over time, these filters become saturated with the contaminants they are designed to remove, leading to several issues.
Benefits of Timely Filter Replacement:
- Improved Water Quality: Filters remove chlorine, sediment, lead, mercury, and other impurities that can affect the taste and smell of your water.
- Healthier Ice: The ice produced by your refrigerator will also be free from these contaminants.
- Appliance Longevity: A clogged filter can restrict water flow, putting a strain on your refrigerator’s water system and potentially leading to premature wear and tear.
- Preventing Clogging: A new KitchenAid refrigerator water filter cartridge ensures optimal water flow to your dispenser and ice maker.
- Taste and Odor Reduction: This is often the most noticeable benefit, with cleaner water tasting and smelling much better.
Choosing the Right KitchenAid Refrigerator Water Filter
Using the correct KitchenAid refrigerator water filter cartridge is essential for proper function and to avoid potential problems. While aftermarket filters might seem appealing due to cost, sticking with genuine KitchenAid filters or highly reputable compatible brands is generally recommended.
What to Look For:
- Model Number Compatibility: The most important factor is ensuring the filter is designed for your specific KitchenAid refrigerator model. You can usually find this information on the old filter itself, in your owner’s manual, or by searching online with your refrigerator’s model number.
- NSF Certification: Look for filters certified by NSF International. This certification ensures the filter meets strict standards for reducing specific contaminants. Common certifications include NSF/ANSI Standard 42 (for aesthetic effects like taste and odor) and NSF/ANSI Standard 53 (for health effects like lead and cysts).
- Filter Type: KitchenAid uses various filter types, often denoted by numbers (e.g., EDRXWB, WRX120, K filters). Make sure you match the type to your refrigerator.
Common KitchenAid Refrigerator Water Filter Issues (And How the Right Filter Prevents Them):
- Slow Water Dispensing: A clogged or expired filter restricts water flow.
- Cloudy Ice: The filter may not be effectively removing impurities.
- Unpleasant Taste or Odor: The filter is saturated and no longer removing chlorine or other volatile organic compounds.
- Leaking: An incompatible or improperly installed filter can cause leaks.
- Damage to the Refrigerator’s Water System: Using incorrect filters could potentially harm internal components.
Step-by-Step Guide: How To Change Water Filter In Kitchenaid Refrigerator
Changing your water filter is a relatively simple DIY task. Follow these KitchenAid refrigerator water filter change steps carefully to ensure a successful replacement.
What You’ll Need:
- New KitchenAid refrigerator water filter cartridge
- A clean cloth or towel
- A bowl or shallow pan (optional, to catch any drips)
The Process:
Step 1: Prepare Your Workspace
- Clear the area around the filter housing. If the filter is inside the refrigerator, remove any items that might be in the way.
- Have your new filter readily accessible.
Step 2: Turn Off the Water Supply (Optional but Recommended)
- While not always strictly necessary for filter replacement, turning off the water supply to the refrigerator can prevent accidental spills. Locate the shut-off valve, usually behind the refrigerator or under the sink connected to the refrigerator’s water line. Turn the valve clockwise to shut off the water.
Step 3: Remove the Old KitchenAid Refrigerator Water Filter Cartridge
This is where the KitchenAid refrigerator water filter location knowledge comes in handy. The removal method varies slightly by model:
- Push-Button Release:
- Locate the button near the filter housing.
- Press the button firmly. This will release the filter.
- Grasp the old filter and pull it straight out. It might require a gentle wiggle.
- Twist and Pull:
- For filters located in a housing, you’ll typically need to twist the filter counter-clockwise a quarter turn.
- Once it’s loose, pull the filter straight out.
- Unscrewing a Cap:
- Some filters are hidden behind a plastic cap in the base grill or interior.
- Gently unscrew this cap (it might be a quarter or half turn).
- Once the cap is off, you might need to push a release button or simply pull the filter out.
Important Tip: Have a towel or shallow pan ready to catch any residual water that may drip out from the housing.
Step 4: Prepare the New KitchenAid Refrigerator Water Filter
- Unpack your new KitchenAid refrigerator water filter cartridge.
- Remove the protective cap from the end of the new filter.
- Some manufacturers recommend running a small amount of water through the new filter before installation to flush out any loose carbon particles. You can do this by holding the filter over a sink and letting a small stream of water pass through it for a few seconds.
Step 5: Install the New KitchenAid Refrigerator Water Filter
This is the how to install new KitchenAid water filter part. The installation is generally the reverse of removal.
- For Push-Button Release:
- Align the new filter with the housing.
- Push the new filter straight in until it clicks into place. You should feel it seat firmly.
- For Twist and Pull:
- Align the new filter with the housing.
- Push the filter in and twist it clockwise a quarter turn until it locks. You should feel it secure.
- For Base Grill Filters:
- Align the new filter with the opening.
- Push it in and twist the retaining cap back on clockwise until it’s snug.
Step 6: Flush the New Filter
After KitchenAid fridge water filter installation, it’s crucial to flush the system. This removes any air trapped in the lines and any loose carbon particles from the new filter.
- Dispense at least a gallon of water through the dispenser. This typically takes about 5-10 minutes. The water may appear cloudy or discolored initially; this is normal and will clear up as you continue flushing.
- Discard the first few batches of ice as well.
Step 7: Turn the Water Supply Back On (If You Turned It Off)
- If you shut off the water supply, turn the valve counter-clockwise to restore water flow to the refrigerator.
- Check for any leaks around the filter housing.
Step 8: Reset Your Filter Indicator Light
Most KitchenAid refrigerators have a filter indicator light or message that reminds you when it’s time to change the filter. You’ll need to reset this. The exact procedure for the KitchenAid water filter reset varies by model.
Common KitchenAid Water Filter Reset Methods:
- Button Combination:
- Look for buttons like “Filter,” “Water,” “Ice,” “Mode,” or “Options.”
- You might need to press and hold one or two buttons simultaneously for a specified duration (often 3-5 seconds).
- Common combinations include holding “Filter Reset” or holding “Water” and “Ice” together.
- Specific Control Panel Menu:
- Some newer models might have a filter reset option within their digital control panel menu. Navigate through settings or options to find it.
- Consult Your Manual:
- Again, your owner’s manual is the definitive source for the KitchenAid water filter reset for your specific model.
Example Reset Sequence (Check Your Manual for Accuracy):
For many models, you can reset the filter indicator by pressing and holding the “Water” dispenser pad for approximately 3 to 5 seconds. Other models might require pressing and holding a dedicated “Filter Reset” button. Some newer models may have a reset option accessible through the touchscreen display.
Troubleshooting Common KitchenAid Refrigerator Water Filter Issues
Even with careful installation, you might encounter a few hiccups. Here are solutions to some common common KitchenAid refrigerator water filter issues:
| Problem | Possible Cause | Solution |
|---|---|---|
| Slow Water Dispensing | Filter not fully seated; Filter clogged; Air in line | Ensure filter is properly installed; Replace filter if old; Flush system thoroughly to remove air. |
| Water Leaking | Filter not properly seated; O-rings damaged/missing; Incorrect filter type used | Remove and reinstall filter, ensuring it locks; Inspect O-rings and replace if damaged; Use the correct filter model. |
| Cloudy Water/Ice | Air trapped in the filter/lines; New filter still flushing | Flush the system for a longer period (up to 10-15 minutes); Allow more time for new filter to clear. |
| No Water Dispensing | Water supply shut off; Filter completely blocked; Filter not installed correctly | Check water shut-off valve; Ensure filter is correctly seated and not overtightened; Remove and re-install filter. |
| Filter Indicator Light Still On | Reset procedure not performed correctly; Faulty indicator | Repeat the KitchenAid water filter reset procedure exactly as per the manual; Contact service if the issue persists. |
When to Replace Your KitchenAid Refrigerator Water Filter
KitchenAid typically recommends replacing the water filter every six months, or sooner if you notice a decline in water quality or flow rate. The filter indicator light is also a good reminder. Don’t wait until the water flow is significantly reduced, as this indicates the filter is already heavily burdened.
Signs It’s Time for a New Filter:
- Six months have passed since the last replacement.
- The water dispenser flow rate has noticeably decreased.
- The water or ice tastes or smells different (e.g., like chlorine).
- The filter indicator light on your refrigerator control panel illuminates or flashes.
Frequently Asked Questions (FAQ)
Q1: How often should I replace my KitchenAid refrigerator water filter?
A1: KitchenAid generally recommends replacing the water filter every six months. However, this can vary depending on your water quality and usage. Always check your refrigerator’s manual for the most accurate recommendation.
Q2: Can I use a generic water filter instead of a genuine KitchenAid one?
A2: While generic or compatible filters are available, using a genuine KitchenAid filter or a highly reputable compatible brand is recommended to ensure proper fit and performance. Using an incorrect filter could lead to leaks or damage to your refrigerator’s water system.
Q3: My new filter is installed, but the water still tastes bad. What should I do?
A3: Ensure you have properly flushed the new filter by dispensing at least a gallon of water. If the taste persists after thorough flushing, the filter may be faulty, or you might be experiencing other water quality issues. Try re-installing the filter or consult your owner’s manual for further troubleshooting.
Q4: The filter indicator light is still on after replacing the filter. How do I fix this?
A4: You likely need to perform the KitchenAid water filter reset procedure. The exact steps vary by model, but typically involve pressing and holding specific buttons for several seconds. Refer to your owner’s manual for the correct reset sequence for your refrigerator.
Q5: Where is the water filter typically located in a KitchenAid refrigerator?
A5: The most common locations for the KitchenAid refrigerator water filter location are inside the refrigerator compartment (often the upper right corner) or in the base grill at the bottom front of the appliance. Always consult your owner’s manual to confirm for your specific model.
By following these detailed steps for KitchenAid refrigerator water filter replacement, you can ensure you always have access to fresh, clean water and ice. Remember to consult your appliance’s manual for model-specific instructions.