Can I replace my kitchen faucet myself? Yes, you absolutely can! But to do it right, you need to measure your current faucet accurately. This guide will walk you through everything you need to know to ensure your new faucet fits perfectly. What is faucet hole spacing? It’s the distance between the pre-drilled holes in your sink or countertop where the faucet mounts. Getting this measurement right is crucial for a successful faucet installation.
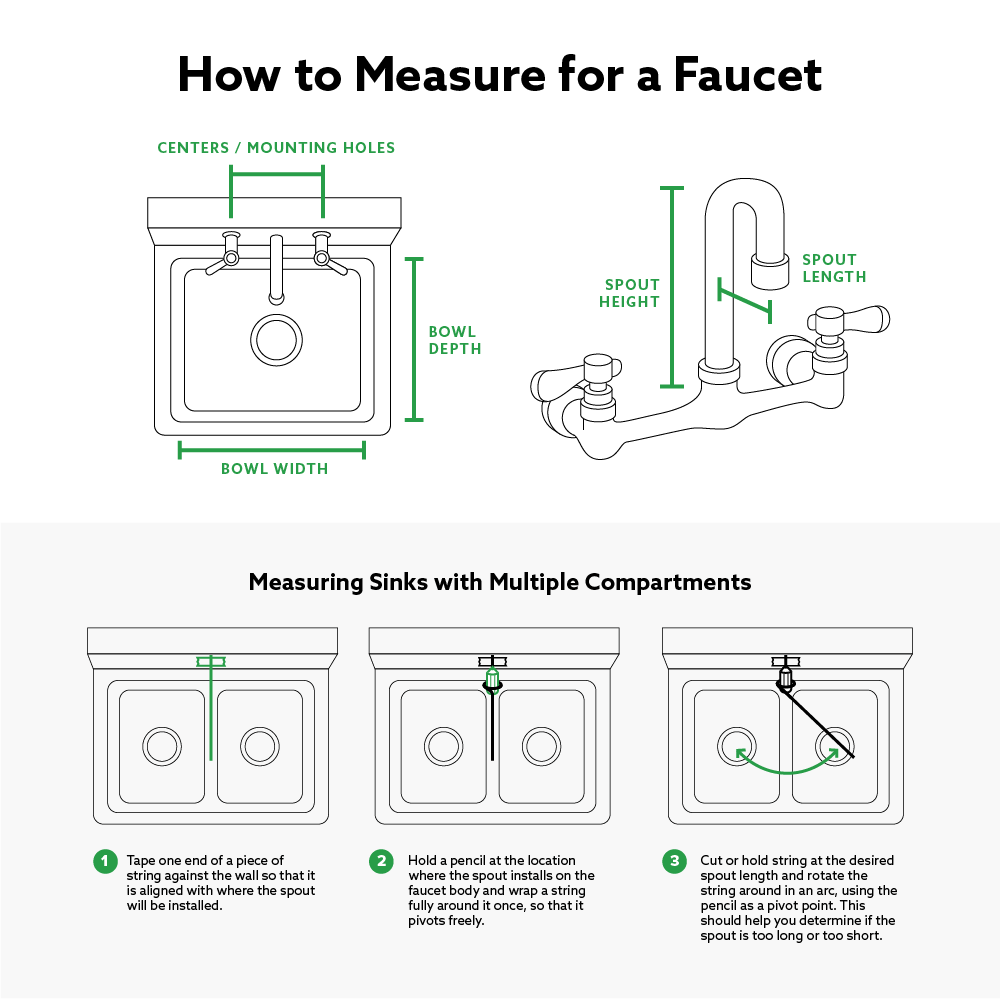
Image Source: lirp.cdn-website.com
Why Accurate Measurements Matter
Choosing a new kitchen faucet might seem like a simple upgrade, but it involves more than just picking a style you like. If your measurements are off, you could end up with a faucet that doesn’t fit your sink, looks awkward, or requires costly modifications to your existing setup. Knowing your measurements ensures a smooth faucet installation, saves you time, and prevents frustration. It also helps you choose the right sink compatibility, making sure your new fixture works harmoniously with your existing sink.
Essential Measurements to Take
Before you even think about browsing for new faucets, grab your tape measure and let’s get down to business. We’ll cover the key dimensions you need to know.
1. Faucet Hole Spacing: The Foundation of Fit
This is perhaps the most critical measurement. Your sink or countertop will have pre-drilled holes to accommodate your faucet. The number and spacing of these holes dictate the type of faucet you can install.
How to Measure Faucet Hole Spacing:
- Identify the Holes: Look at your current faucet setup. Most kitchen faucets are mounted through one, two, three, or four holes.
- Center-to-Center Measurement:
- For single-hole faucets: You only need to know that there’s one hole. Most single-hole faucets are designed to fit a standard hole size.
- For widespread faucets (3 or 4 holes): Measure from the center of the faucet hole to the center of the adjacent hole. For example, if you have a faucet with a faucet body, soap dispenser, and sprayer, you’ll measure from the center of the faucet hole to the center of the sprayer hole, and then from the center of the sprayer hole to the center of the soap dispenser hole (if applicable). The most common configuration is 8 inches center-to-center.
- For centerset faucets (3 holes): The faucet, handles, and sometimes a sprayer are all mounted on a single base plate. The standard spacing for a centerset faucet is 4 inches. You measure from the center of the faucet hole to the center of the handle hole.
- Count the Holes: Simply count how many holes are available in your sink or countertop.
Table: Common Faucet Hole Configurations
| Number of Holes | Common Faucet Type | Typical Spacing | Description |
|---|---|---|---|
| 1 | Single Hole | N/A | Faucet, handle, and spout are all in one unit. Requires one hole. |
| 3 | Centerset | 4 inches | Faucet and handles are grouped together. Usually has two handles and a spout, all attached to a single base. Requires three holes. |
| 3 or 4 | Widespread | 8 inches | Faucet, handles, and accessories (like sprayer or soap dispenser) are separate. Requires multiple holes spaced apart. Typically 8″ apart. |
| 4 | Four-Hole | Varies | Often includes a faucet, handles, and a side spray or soap dispenser. Spacing can vary, so precise measurement is vital. |
Important Note: If you have a granite or solid surface countertop, there might be extra holes that were plugged or are unused. Make sure you are measuring the holes that are currently in use by your existing faucet or that are intended for faucet installation.
2. Spout Reach: How Far It Extends
The spout reach refers to the distance from the center of the faucet body to the tip of the spout. This measurement tells you how far the water will project over your sink.
How to Measure Spout Reach:
- Position: Ensure the faucet is in its neutral, straight-ahead position.
- Measure: Place the end of your tape measure at the center of the faucet’s base where it meets the sink or countertop.
- Extend: Run the tape measure straight out to the very tip of the spout where the water comes out.
- Record: Note this measurement.
Considerations for Spout Reach:
- Sink Size: A longer spout reach is generally better for larger, deeper sinks, ensuring water reaches the center of the basin.
- Sink Configuration: If you have a double-basin sink, a longer reach might be necessary to comfortably use both basins.
- Clearance: Make sure the spout reach won’t interfere with anything behind or around your sink, like a backsplash or windowsill.
3. Spout Height: The Clearance Underneath
The spout height is the distance from the mounting surface (sink or countertop) to the highest point of the faucet spout. This is important for fitting larger items under the faucet.
How to Measure Spout Height:
- Position: Again, ensure the faucet is in its neutral position.
- Measure: Place the end of your tape measure on the mounting surface directly below the highest point of the spout.
- Extend Upwards: Measure straight up to the highest point of the spout.
- Record: Write down this measurement.
Considerations for Spout Height:
- Cabinet Clearance: If your sink is under upper cabinets or a shelf, you need to ensure the spout height allows the faucet to operate freely without hitting anything.
- Large Items: Do you often wash large pots, pans, or baking sheets? A higher spout provides more clearance for these items.
- Aesthetics: The visual proportion of the spout height to your sink and kitchen can also be a factor.
4. Handle Type and Number: Operation and Placement
The handle type and number of handles directly relate to the number of holes required and how you’ll operate the faucet.
Identifying Handle Types:
- Single Handle: This type of faucet has one lever that controls both water temperature and flow. It typically requires a single hole or can be mounted on a base plate covering additional holes.
- Two Handles: These faucets have separate handles for hot and cold water. This configuration requires at least two holes, often with a third hole for the spout (centerset) or separate holes for each component (widespread).
- Cross Handles: A classic style with four points of contact for turning, offering a vintage look.
- Lever Handles: Modern and ergonomic, easy to operate with a simple push or pull.
How to Note Handle Information:
- Count the Handles: Are there one or two?
- Handle Style: Are they levers, knobs, or cross-handles?
- Handle Placement: For two-handle faucets, are they close together (centerset) or spaced apart (widespread)? This reinforces the faucet hole spacing measurement.
5. Sink Compatibility: Matching Faucet to Sink
While you’re measuring your faucet, you also need to consider your sink. Sink compatibility is about ensuring your chosen faucet works with the size, material, and mounting style of your sink.
What to Check on Your Sink:
- Number of Holes: As discussed earlier, this is paramount.
- Hole Size: While less common to need a precise measurement, ensure the existing holes are standard sizes (usually 1 1/4 inches for most faucets). If you’re unsure, you might need to consult your sink’s manual or manufacturer.
- Sink Type:
- Top-mount (Drop-in): The sink rim sits on top of the countertop. Most faucets work well with these.
- Undermount: The sink is mounted from underneath the countertop. Ensure the faucet can be mounted securely on the countertop or sink deck, and check for any clearance issues with the sink basin itself.
- Wall-mount: The faucet is installed directly onto the wall above the sink. This requires different measurements and considerations, focusing on the valve placement behind the wall.
- Sink Material: Stainless steel, granite composite, fireclay, and cast iron sinks are common. The material generally doesn’t affect faucet mounting, but it might influence how you handle the installation or the type of finish that looks best.
Beyond the Basics: Other Important Considerations
While hole spacing, reach, and height are the primary measurements, a few other factors will influence your faucet choice and installation.
Water Supply Lines: Connecting to the Source
Your new faucet will come with water supply lines that connect to the shut-off valves under your sink.
What to Check Regarding Supply Lines:
- Existing Line Length: Measure the length of your current supply lines from the shut-off valve to the faucet connection. While most new faucets come with integrated or included supply lines, it’s good to know if you’ll need extensions or if your existing ones are a suitable length for the new faucet’s positioning.
- Connection Type: Most modern faucets use flexible braided stainless steel supply lines. The connection to the faucet is typically a standard fitting (often 3/8-inch compression). The connection to the shut-off valve will usually be the same. If you have older plumbing, you might encounter different thread types, so it’s wise to check.
- Shut-off Valve Condition: Are your existing shut-off valves working correctly? If they are old or leaky, it’s a good idea to replace them during the faucet installation.
Cartridge Type: The Heart of the Faucet
The cartridge type is the internal mechanism that controls water flow and temperature. While you don’t typically measure this, knowing what you have can be helpful for future repairs or understanding your faucet’s operation.
Common Cartridge Types:
- Ball Cartridges: Older style, often found in single-handle faucets. Uses a metal or plastic ball with ports to control flow.
- Cartridge (Ceramic Disc): The most common and durable type today. Uses two ceramic discs that rotate against each other to control water. Very reliable.
- Compression Cartridges: Typically found in older two-handle faucets. Uses rubber washers and a stem to control flow.
Why it Matters (Indirectly): If you’re simply replacing a faucet and your existing cartridge is known to be problematic, looking up the specific type of your current faucet can help you find a compatible replacement cartridge if you only want to fix, not replace, the entire unit. For a new faucet, the manufacturer will specify the cartridge type.
Flow Rate and Aerator Size: Water Efficiency
The flow rate, measured in gallons per minute (GPM), indicates how much water the faucet uses. The aerator size is the small component at the tip of the spout that mixes air with water, creating a smoother stream and affecting the flow rate.
Understanding Flow Rate:
- Standard Flow Rate: Most faucets have a standard flow rate of 2.2 GPM.
- Water-Saving Flow Rate: Many modern faucets are designed to be water-efficient, with flow rates around 1.5 GPM or even lower.
Aerator Size:
- Standard Aerator: Most faucet aerators have a standard threading, usually 55/64-inch fine thread or 15/16-inch coarse thread for male threads, and 55/64-inch for female threads.
- Importance: If you want to increase or decrease the flow rate (e.g., if your water pressure is too high or too low), you might need to replace the aerator. Knowing the existing size helps you buy a compatible replacement.
Putting It All Together: Choosing Your New Faucet
Once you have all your measurements and have assessed your current setup, you’re ready to shop for a new faucet.
Matching Measurements to Faucet Specifications
When looking at new faucets, always check the product specifications. They will clearly list:
- Number of Holes Required: Make sure this matches your sink.
- Spout Height: Ensure it fits your clearance needs.
- Spout Reach: Verify it’s appropriate for your sink basin.
- Handle Type: Confirm it aligns with your preferred operation.
Common Scenarios and Solutions
- Scenario 1: My sink has three holes, 4 inches apart.
- Solution: You can install a centerset faucet. You could also get a widespread faucet with a 4-inch centerset base plate, or if the holes are truly separate and you want a widespread, you’ll need to confirm the exact spacing.
- Scenario 2: My sink has only one hole, but I want a faucet with a side sprayer.
- Solution: You’ll need to purchase a faucet that comes with a base plate (deck plate) that covers the extra hole and has the sprayer integrated or mounted onto it. Alternatively, you can get a 3-hole faucet and cover the unused holes with blanking plates or a specialized sink plate if available.
- Scenario 3: My sink has four holes, 8 inches apart, and I want a pull-down faucet.
- Solution: Many pull-down faucets are designed for single-hole installations but come with an optional deck plate to cover existing holes. You’ll need to ensure the deck plate is wide enough to cover your 8-inch spacing, or look for a faucet specifically designed for 4-hole installations with a wider configuration. Some pull-down faucets can also be installed as part of a widespread system if the holes for the spout and handles are adequately spaced.
Preparing for Faucet Installation
Having the right measurements is only the first step. Proper preparation ensures a smooth faucet installation.
Tools You’ll Likely Need:
- Adjustable wrenches
- Basin wrench (essential for tight spaces under the sink)
- Plumber’s putty or silicone sealant
- Screwdriver set
- Bucket and towels (for catching any residual water)
- Safety glasses
Before You Start:
- Turn Off the Water: Locate the shut-off valves under the sink (usually one for hot, one for cold) and turn them clockwise until they are fully closed.
- Relieve Pressure: Turn on the old faucet to drain any remaining water in the lines.
- Clear the Area: Remove everything from under the sink to give yourself plenty of room to work.
Frequently Asked Questions (FAQ)
Q: What if my sink holes don’t match any standard faucet configurations?
A: If your sink has an unusual hole pattern, you might need to consider a faucet designed for single-hole installation with a wide deck plate, or explore custom solutions. Some manufacturers offer adapter plates for less common layouts.
Q: Can I drill new holes in my countertop for a different faucet configuration?
A: Yes, but this depends heavily on your countertop material. Granite, quartz, and solid surface countertops can be drilled, but it requires specialized tools and expertise. Porcelain or ceramic sinks are very difficult and risky to drill. Always consult a professional if you’re considering drilling new holes.
Q: How do I measure the diameter of the faucet hole?
A: While not always necessary, you can use a caliper for precise measurement. Most standard faucet holes are 1 1/4 inches in diameter. If your existing holes are unusually large or small, it might limit your faucet options.
Q: What does “faucet clearance” mean?
A: Faucet clearance refers to the space available around and above the faucet, typically considering the spout height and reach relative to your sink, backsplash, and overhead cabinets or shelves.
By carefully taking these measurements, you set yourself up for success in choosing and installing a new kitchen faucet that looks great and functions perfectly in your space. Happy upgrading!