Can you paint a kitchen table? Yes, you absolutely can paint a kitchen table! Painting a kitchen table is a fantastic way to refresh its look, protect it, and give your kitchen a whole new vibe. This guide will walk you through how to paint a kitchen table for a beautiful and durable finish, effectively turning it into a stunning kitchen table makeover. We’ll cover everything from choosing the best paint for kitchen table surfaces to the final protective coat. Get ready to refinish kitchen table like a pro!
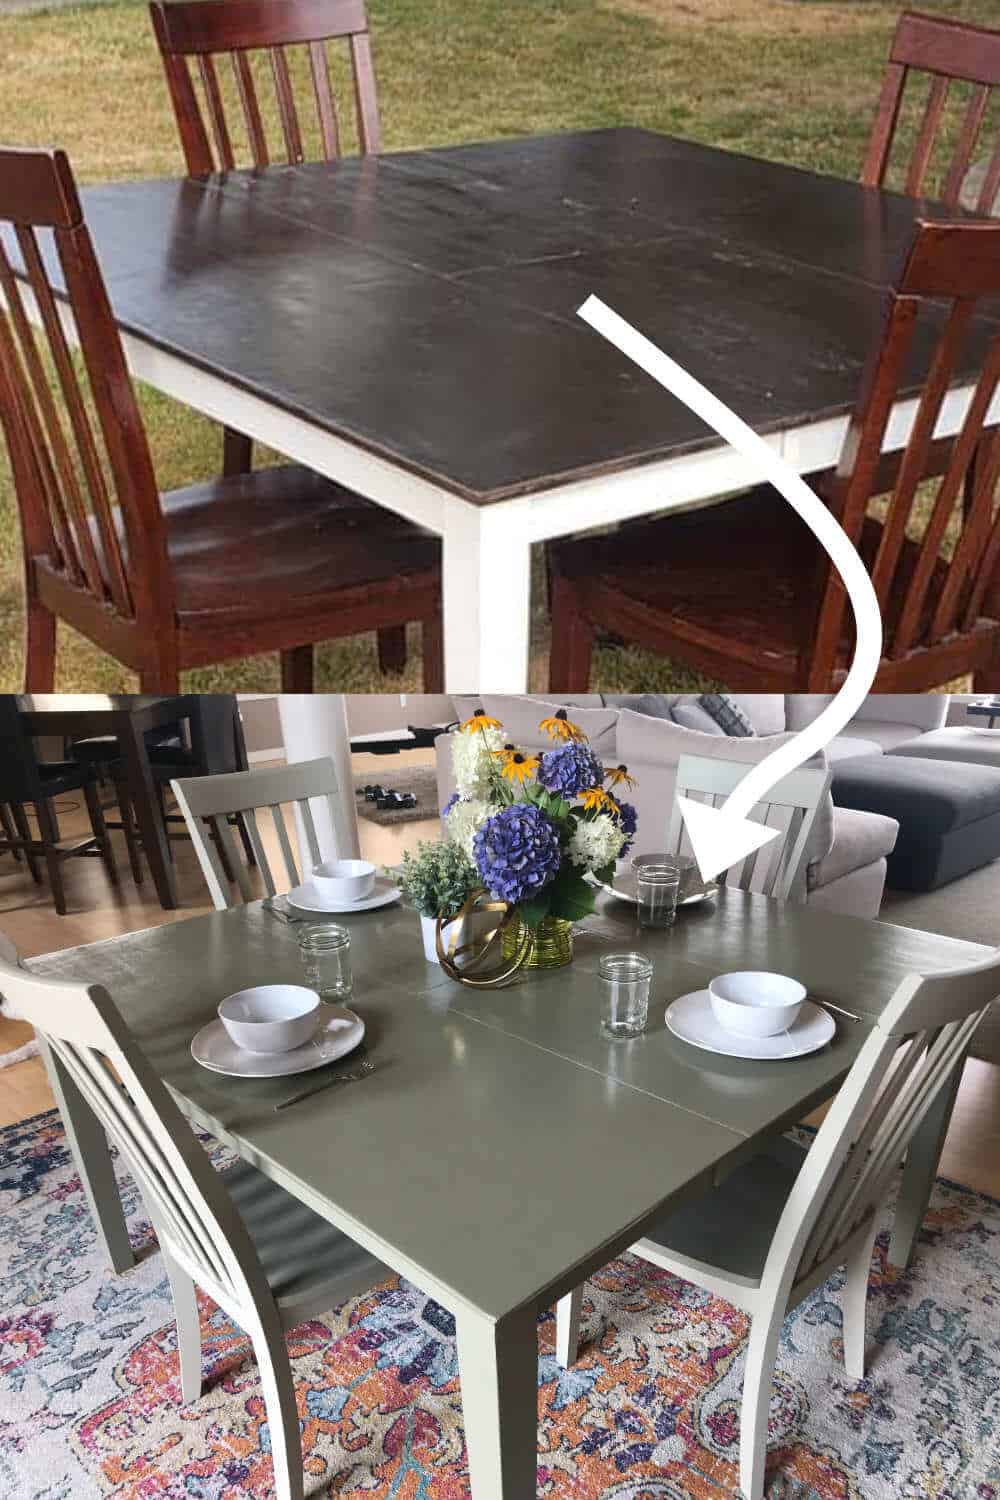
Image Source: sunshineandrainydays.com
Why Paint Your Kitchen Table?
Your kitchen table is often the heart of the home. It’s where meals are shared, homework is done, and conversations flow. Over time, even the most loved tables can show wear and tear. Scratches, fading, and outdated finishes can make it look tired. Painting offers a brilliant solution, allowing you to:
- Update the Style: Easily change the color to match new kitchen decor or a different aesthetic.
- Cover Imperfections: Hide scratches, water rings, and other blemishes.
- Add Durability: A good paint job can protect the wood from daily use and spills.
- Save Money: It’s far more budget-friendly than buying a new table.
- Express Your Creativity: This is a perfect DIY table paint project to personalize your space.
Fathoming Your Table’s Material
Before you start, take a moment to assess your table’s material. Most kitchen tables are made of wood, but some might have laminate or a veneer top.
- Solid Wood: This is the easiest to paint and offers the most durable finish.
- Veneer: A thin layer of wood glued to a core material. It can be painted, but you need to be careful not to sand through the veneer.
- Laminate/Melamine: These synthetic surfaces require specific primers and paints designed for non-porous materials.
This guide primarily focuses on wood tables, but many principles apply to other materials with the right product choices.
Gathering Your Painting Supplies
Having the right tools makes the job much smoother. Here’s a comprehensive list:
- Paint: Choose a high-quality paint suitable for furniture. Options include:
- Latex Paint: Water-based, easy to clean up, and comes in many finishes. For a kitchen table, a semi-gloss or satin finish is often recommended for durability and washability.
- Chalk Paint: Very popular for a vintage or matte look. It adheres well with minimal prep but usually requires a topcoat for durability. A chalk paint kitchen table can be beautiful.
- Milk Paint: Similar to chalk paint, offering a matte, often chippy finish. Requires a bonding agent for slick surfaces.
- Enamel Paint: Known for its hard, durable finish. Can be oil-based (strong odor, requires mineral spirits for cleanup) or water-based.
- Primer: Essential for adhesion and covering old finishes. Choose a primer appropriate for your table’s material and the type of paint you’re using.
- Sandpaper: Various grits (e.g., 120-grit, 220-grit) for sanding and smoothing.
- Sanding Block or Orbital Sander: For efficient sanding.
- Screwdriver or Wrench: If you need to remove the tabletop.
- Drop Cloth or Plastic Sheeting: To protect your work area.
- Painter’s Tape: For masking off areas you don’t want to paint.
- Cleaning Supplies: Mild soap, water, clean cloths or rags, tack cloths.
- Paint Brushes: High-quality synthetic brushes for water-based paints, natural bristles for oil-based.
- Rollers: Small foam or micro-mini rollers for smooth finishes on larger surfaces.
- Primer Applicators: A separate brush or roller for primer.
- Topcoat/Sealer: Polyurethane (water-based or oil-based), polycrylic, or wax for chalk paint. This is crucial for the durability of painted kitchen tables.
- Safety Gear: Mask (especially for sanding and spraying), gloves, safety glasses.
Step-by-Step Guide to Painting Your Kitchen Table
This detailed process will help you achieve a professional-looking finish, making it a true kitchen table restoration.
Step 1: Preparing Your Work Area
- Choose a well-ventilated space: A garage, basement, or outdoors (weather permitting) is ideal.
- Protect the floor: Lay down a drop cloth or plastic sheeting.
- Disassemble if necessary: If the tabletop detaches from the base, it’s easier to paint them separately. Remove any hardware like screws or metal brackets.
Step 2: Cleaning Your Table
This is a crucial step for good adhesion. How to prep a table for painting starts with a thorough clean.
- Wipe down the entire table: Use a damp cloth with mild soap and water to remove dust, grease, and grime.
- Rinse and dry: Wipe again with a clean, damp cloth to remove soap residue, then dry completely with a soft cloth.
- Degrease: For stubborn grease, use a dedicated degreaser or a solution of one part denatured alcohol to one part water.
Step 3: Sanding for Smoothness and Adhesion
Sanding is key to ensuring your paint sticks well and your finish is smooth.
- Initial Sanding (if needed): If your table has a thick, glossy finish or you’re not using chalk paint, start with a medium-grit sandpaper (around 120-grit). Lightly sand the entire surface to scuff it up. You’re not trying to remove the old finish, just create a surface for the primer to grip.
- Smoothing Sanding: After priming, or if your surface is already smooth, use a fine-grit sandpaper (220-grit) to smooth out any rough spots.
- How to prep a table for painting also means removing old, peeling paint or varnish. If there are any such areas, you’ll need to sand them down to the bare wood.
- Clean off dust: After sanding, use a vacuum with a brush attachment to remove most of the dust. Then, wipe the surface thoroughly with a tack cloth or a slightly damp microfiber cloth. Ensure all dust is gone.
Step 4: Priming the Table
Primer is your best friend for a flawless paint job. It seals the surface, blocks stains, and helps the topcoat adhere better.
- Choose the right primer:
- Water-based primers are good for most projects and clean up easily.
- Oil-based or shellac-based primers are excellent for blocking stains (like tannins from wood) and providing a very strong base, especially on slick surfaces or if you’re unsure of the original finish.
- Apply a thin, even coat: Use a good quality brush or roller. Work in the direction of the wood grain if applicable. Avoid applying too thickly, as it can cause drips.
- Let it dry completely: Follow the manufacturer’s instructions for drying time.
- Lightly sand after priming: Once the primer is dry, use your fine-grit sandpaper (220-grit) to lightly sand any rough spots or imperfections. Wipe clean with a tack cloth.
- Apply a second coat of primer if needed: If the original finish is dark, stained, or you’re using a light color paint, a second coat of primer can ensure better coverage and a more uniform color.
Step 5: Applying Your Paint
Now for the fun part – applying the color!
- Stir the paint well: Don’t shake the can, as this can create air bubbles.
- Apply thin, even coats: This is key to a smooth, durable finish. Too much paint at once will lead to drips and an uneven texture.
- Use the right tools:
- Brushes: Use a good quality angled brush for corners and edges.
- Rollers: A small foam roller works great for smooth surfaces like tabletops.
- Paint in the direction of the grain: For wood surfaces, this creates the most natural look.
- Chalk Paint Technique: If using chalk paint, apply thin coats with a brush, working in different directions for a more textured look if desired. Don’t worry too much about perfect strokes as the matte finish is forgiving.
- Spray Painting a Table: For an ultra-smooth finish, consider spray painting a table. This requires a spray gun or aerosol cans of paint. Practice on scrap material first. Apply multiple thin, even coats, allowing drying time between each. Ensure excellent ventilation and wear a respirator mask.
- Allow adequate drying time between coats: Check the paint can for recommendations. It’s usually at least 2-4 hours for latex paint.
- Lightly sand between coats (optional but recommended): Once the first coat is dry, use very fine-grit sandpaper (320-grit or higher) to gently smooth out any bumps or brush marks. Wipe with a tack cloth before the next coat. This step significantly improves the final smoothness and durability of painted kitchen tables.
- Apply 2-3 coats (or more): Most projects will require at least two coats of paint for full coverage and color depth. A third coat might be necessary depending on the paint color and your desired finish.
Step 6: Applying a Topcoat for Durability
This is arguably the most important step for ensuring your painted table can withstand daily use. The durability of painted kitchen tables relies heavily on the topcoat.
- Choose your topcoat:
- Water-based Polycrylic: Dries clear, non-yellowing, and provides good protection. Great for light-colored paints.
- Water-based Polyurethane: Offers excellent durability and a slight amber tint, which can add warmth to darker colors.
- Oil-based Polyurethane: The most durable option, but it can yellow over time, especially with light colors. It also has stronger fumes and requires mineral spirits for cleanup.
- Wax: Used over chalk paint, it provides a soft sheen and protection. Requires reapplication periodically.
- Apply thin, even coats: Just like with paint, thin coats are best. Use a good quality synthetic brush or a foam applicator.
- Allow proper drying time: Let each coat dry completely before applying the next.
- Sand lightly between coats (optional): For an ultra-smooth finish, lightly sand with very fine-grit sandpaper (320-grit or higher) between coats and wipe with a tack cloth.
- Apply 2-3 coats of topcoat: For a kitchen table that sees a lot of use, three coats are highly recommended for maximum protection against scratches and spills.
Step 7: Reassembling and Enjoying
- Allow the topcoat to cure: While the table will be dry to the touch within hours, it takes several days to fully cure and reach its maximum hardness. Avoid heavy use or placing hot items directly on the surface during this curing period.
- Reattach hardware: Once the paint and topcoat are fully cured, reattach any removed hardware.
- Admire your work! You’ve successfully completed a kitchen table restoration and have a beautifully updated piece of furniture.
Popular Paint Choices and Techniques
Let’s dive a little deeper into specific paint types and techniques for your DIY table paint project.
Chalk Paint Kitchen Table
Chalk paint kitchen table projects are popular for a reason. They offer a beautiful matte finish and often require minimal prep, making the process quicker.
Pros:
* Minimal sanding required (often just cleaning).
* Adheres to most surfaces.
* Beautiful matte, velvety finish.
* Easy to distress for a vintage look.
Cons:
* Requires a topcoat (wax or polycrylic) for durability, especially in a high-traffic area like a kitchen.
* Can be more expensive than latex paint.
* Matte finish can be prone to staining or water marks if not properly sealed.
Application Tips for Chalk Paint:
1. Clean the table thoroughly.
2. Apply chalk paint in thin coats with a brush. Don’t worry about perfection; brush strokes can add character.
3. Allow each coat to dry.
4. Apply 2-3 coats.
5. Once dry, apply a furniture wax or water-based polycrylic topcoat. For high traffic, polycrylic is generally more durable than wax. Apply 2-3 coats of your chosen topcoat.
Spray Painting a Table
Spray painting a table offers the smoothest, most factory-like finish possible.
Pros:
* Extremely smooth, even finish.
* Can cover intricate details easily.
* Faster application for some.
Cons:
* Requires a spray gun or good quality aerosol cans.
* Needs a well-ventilated area and proper respiratory protection.
* Higher risk of drips if not applied correctly.
* Masking needs to be meticulous to avoid overspray.
Application Tips for Spray Painting:
1. Prep the table as usual (clean, sand, prime).
2. Use a high-quality spray primer.
3. Thin your paint to the correct consistency for spraying.
4. Practice on scrap material.
5. Hold the spray gun/can about 10-12 inches from the surface.
6. Use a consistent, sweeping motion. Overlap each pass by about 50%.
7. Apply multiple thin coats rather than one thick one.
8. Allow adequate drying time between coats.
9. Apply a spray-compatible topcoat.
Durability of Painted Kitchen Tables: What to Expect
The durability of painted kitchen tables can be excellent, but it depends on several factors:
- Preparation: Proper cleaning and sanding are paramount.
- Paint Quality: Using high-quality furniture paint designed for durability is essential.
- Primer: A good primer ensures the paint adheres properly.
- Topcoat: This is the most critical factor. A durable topcoat like polyurethane or polycrylic protects the paint from scratches, moisture, and general wear.
- Application: Applying thin, even coats and allowing proper drying/curing time contributes to longevity.
- Care: Treating your painted table with care (using placemats, coasters, and avoiding harsh cleaners) will extend its lifespan.
A well-painted and sealed kitchen table can last for many years, but it might require touch-ups or a new coat of topcoat every few years, depending on use.
Tips for a Perfect Finish
- Work in good lighting: This helps you spot drips or missed spots.
- Use quality brushes and rollers: Cheap tools can leave streaks and fuzz.
- Don’t rush the drying times: Patience is key.
- Clean your brushes and rollers immediately after use: This preserves your tools for future projects.
- Consider the sheen: Satin and semi-gloss finishes are generally more durable and easier to clean than matte finishes for a kitchen table.
- Test your paint color: If possible, paint a small, inconspicuous area or a piece of scrap wood to see how the color looks in your kitchen’s lighting.
Frequently Asked Questions (FAQ)
Q1: Do I need to sand a laminate table before painting?
A1: Yes, but you need to use a specific bonding primer designed for laminate or other slick surfaces. Light sanding with fine-grit sandpaper will help the primer adhere better.
Q2: What is the best type of paint for a kitchen table?
A2: For excellent durability and washability, a high-quality acrylic enamel or a furniture-grade latex paint in a satin or semi-gloss finish is often recommended. For a matte look, chalk paint or mineral paint with a durable topcoat is a good option.
Q3: How many coats of paint do I need?
A3: Typically, 2-3 coats of paint are sufficient for good coverage, but this can vary depending on the paint color, the base color, and the quality of the primer. Always apply thin coats.
Q4: How do I get a smooth finish without brush strokes?
A4: Use high-quality brushes or foam rollers. Apply thin, even coats and avoid overworking the paint. Lightly sanding between coats with very fine-grit sandpaper (320-grit or higher) and wiping with a tack cloth before the next coat will significantly reduce brush strokes. Spray painting also offers the smoothest finish.
Q5: Can I paint over an existing finish without stripping it?
A5: Yes, if the existing finish is in good condition (no peeling or major damage). You will need to clean and then thoroughly sand the surface to create a “tooth” for the primer to adhere to. Then, apply a good quality primer.
Q6: How long does it take for a painted table to cure?
A6: Most paints are dry to the touch within a few hours. However, they take about 3-4 weeks to fully cure and reach their maximum hardness. During this curing period, be gentle with the table.
Q7: What is the difference between polyurethane and polycrylic?
A7: Polyurethane (both oil-based and water-based) is generally more durable and water-resistant. Oil-based polyurethane can yellow over time, while water-based polyurethane stays clear. Polycrylic is water-based and stays clear, making it ideal for light colors, but it’s generally considered slightly less durable than polyurethane.
With these steps and tips, you’re well-equipped to tackle your kitchen table makeover. Whether you’re aiming for a modern look, a vintage charm, or just a fresh new color, painting your kitchen table is a rewarding project that can transform your space. Enjoy your beautifully refinished table!