What is the best KitchenAid refrigerator water filter? The best KitchenAid refrigerator water filter for your needs will depend on your specific refrigerator model and your water quality. Generally, genuine KitchenAid filters or reputable third-party filters designed for your model offer the best performance and compatibility.
Can I install a water filter myself in my KitchenAid refrigerator? Yes, you can easily install a water filter yourself in your KitchenAid refrigerator. Most models have a straightforward process that doesn’t require special tools or technical expertise.
Who should I contact if I have issues with my KitchenAid refrigerator water filter? If you encounter any problems or have questions regarding your KitchenAid refrigerator water filter, you should contact KitchenAid customer support or a qualified appliance technician.
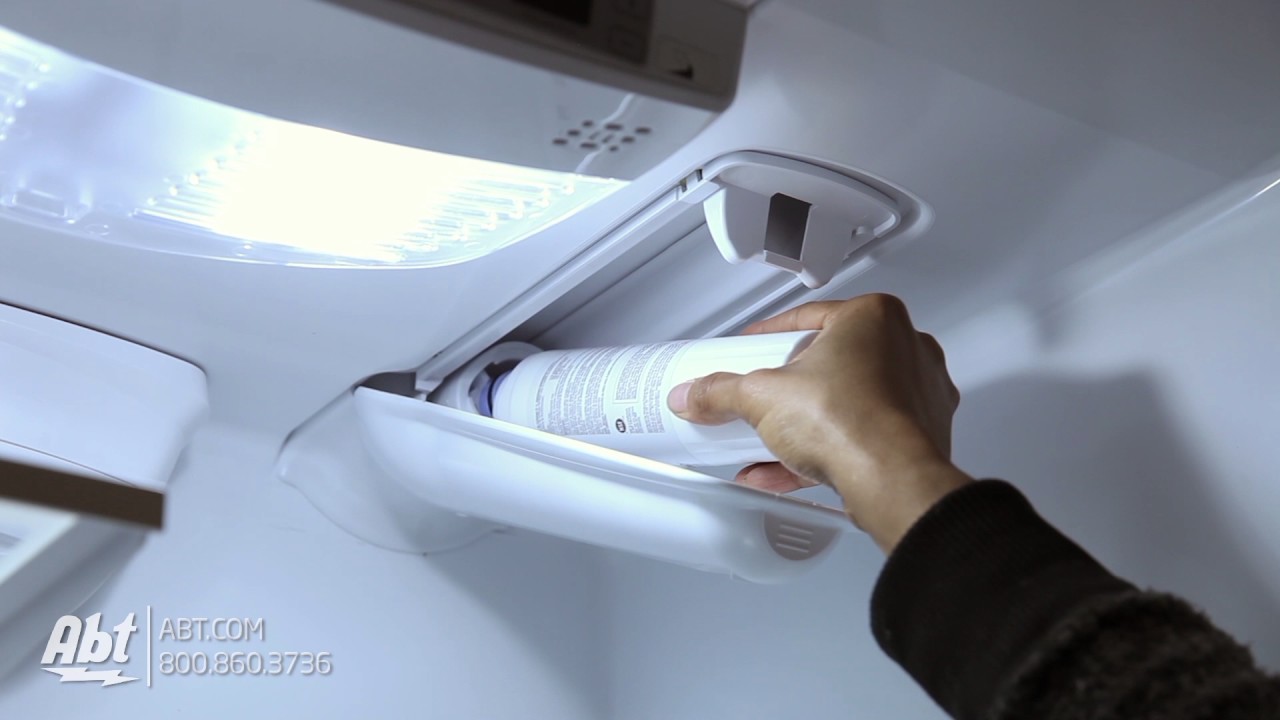
Image Source: i.ytimg.com
Replacing Refrigerator Water Filter KitchenAid: A Step-by-Step Guide
Keeping your KitchenAid refrigerator’s water filter fresh is essential for clean, great-tasting water and ice. Over time, filters become clogged and less effective, impacting both the quality of your drinking water and the performance of your refrigerator’s ice maker and water dispenser. Thankfully, the process of KitchenAid refrigerator filter replacement is quite simple and can be done by anyone with a few minutes and no special tools. This guide will walk you through everything you need to know about how to change water filter KitchenAid fridge, from locating the filter to resetting your indicator light.
Locating Your KitchenAid Refrigerator Water Filter
The first step in any KitchenAid fridge water filter change is finding the filter itself. The kitchenaid water filter location can vary slightly depending on your specific KitchenAid refrigerator model. However, most models place the filter in one of two common areas:
- Inside the refrigerator compartment: This is the most common placement. You’ll typically find the filter compartment in the upper right-hand corner of the refrigerator compartment, near the ceiling or at the top of the crisper drawers. It’s often behind a small cover or grille.
- In the base grille: Some KitchenAid models, particularly those with a “pull-out” or “tilt-out” filter system, house the filter in the grille at the very bottom of the refrigerator, usually on the right side.
Common KitchenAid Refrigerator Water Filter Locations:
- KitchenAid French Door Refrigerator Water Filter: For French door models, the filter is most often found in the upper right-hand corner inside the refrigerator compartment. You might see a small knob or a cover that needs to be turned or pushed to release the filter.
- KitchenAid Side by Side Refrigerator Water Filter: In side-by-side models, the filter is typically located in the upper right-hand corner inside the refrigerator compartment, similar to French door models. Less commonly, it might be in the base grille.
Gathering Your Supplies
Before you begin the KitchenAid refrigerator water filter reset process and the actual replacement, ensure you have the necessary items on hand:
- New Water Filter: Make sure you have the correct replacement filter for your specific KitchenAid refrigerator model. Using the wrong filter can lead to leaks or improper filtration. Check your refrigerator’s manual or the model number on your old filter to confirm.
- Towel or Small Bucket: It’s a good idea to have a towel or a small bucket ready to catch any residual water that might drip when you remove the old filter.
- Replacement Filter Packaging: The new filter’s packaging will often have specific instructions for your model, which can be helpful to review.
Step-by-Step Instructions: How to Install Water Filter KitchenAid Fridge
Now, let’s get to the core of how to install water filter KitchenAid fridge. Follow these steps carefully for a smooth replacement:
Step 1: Prepare for the Change
- Turn Off Water Supply (Optional but Recommended): While not always strictly necessary, shutting off the water supply to your refrigerator can help prevent any accidental leaks. You can usually find the shut-off valve behind the refrigerator or under the sink connected to the water line.
- Dispense Ice and Water: Dispense a few cups of water from the dispenser to relieve pressure in the water line.
Step 2: Remove the Old Water Filter
The method for removing the old filter depends on its location and type.
-
For Filters in the Refrigerator Compartment (Twist-Off):
- Locate the filter compartment, usually in the upper right corner.
- You’ll likely see a knob or a designated area to grip the filter.
- Grasp the filter firmly and turn it counter-clockwise. You may need to push in slightly as you turn.
- Once it’s loose, pull the filter straight out. Be prepared for a small amount of water to drip out.
-
For Filters in the Base Grille (Push-In/Pull-Out):
- Locate the filter housing in the base grille.
- There may be a button to press or a latch to release.
- Some filters simply push in and then pull out. Gently pull the filter straight out from its housing.
Step 3: Prepare the New Water Filter
- Remove Packaging: Take the new water filter out of its protective packaging.
- Remove Protective Cap: Most new filters have a plastic cap on the end. Remove this cap before installation.
- Briefly Run Water Through the New Filter (Optional): Some manufacturers recommend running about a gallon of water through the new filter before installation to flush out any loose carbon particles. You can do this by placing the filter in a sink and letting water run through it. However, for most KitchenAid refrigerator filter replacements, this step isn’t essential.
Step 4: Install the New Water Filter
This is the reverse of the removal process.
-
For Filters in the Refrigerator Compartment (Twist-On):
- Align the new filter with the housing. There will be guide marks or grooves to help you position it correctly.
- Push the filter gently into the housing and turn it clockwise. Continue turning until it locks into place. You might feel a click or resistance when it’s properly seated.
- Ensure it’s snug but don’t overtighten.
-
For Filters in the Base Grille (Push-In):
- Align the new filter with the opening in the housing.
- Push the filter firmly into the housing until it clicks or is securely in place.
Step 5: Flush the New Filter
After installing the new filter, it’s crucial to flush the system to remove any air bubbles and loose carbon particles.
- Dispense Water: Go to your refrigerator’s water dispenser.
- Dispense at Least 1 Gallon: Let the water run for about 3-5 minutes, or until you’ve dispensed approximately one gallon (around 3-4 liters) of water. You’ll notice the water may appear cloudy or discolored initially; this is normal and will clear as you continue flushing.
- Discard First Batches of Ice: If your refrigerator makes ice, discard the first two or three batches of ice to ensure it’s free of any impurities.
Step 6: Reset the Filter Indicator Light
Most KitchenAid refrigerators have a filter indicator light that tells you when it’s time for a replacement. You’ll need to reset this light after changing the filter. The kitchenaid refrigerator water filter reset procedure varies by model, but here are some common methods:
- Press and Hold Button: On the dispenser control panel, there might be a button labeled “Filter,” “Water,” “Reset,” or a combination of these. Press and hold this button for 3-10 seconds until the indicator light changes color or turns off.
- Specific Button Combination: Some models require pressing a specific sequence of buttons. For instance, you might need to press “Ice Type” and “Child Lock” simultaneously for a few seconds.
- Consult Your Manual: The most accurate way to reset your specific model’s indicator light is to refer to your KitchenAid refrigerator owner’s manual. If you don’t have the physical manual, you can usually find it on the KitchenAid website by entering your model number.
Choosing the Best KitchenAid Refrigerator Water Filter
When it comes to best KitchenAid refrigerator water filter options, quality and compatibility are key.
- Genuine KitchenAid Filters: These are designed specifically for your refrigerator and guarantee optimal performance and filtration. They are typically the most reliable choice.
- Reputable Third-Party Filters: Many aftermarket companies produce high-quality filters that are compatible with KitchenAid refrigerators. Look for brands that are well-known for water filtration and clearly state they are designed for your specific KitchenAid model. Always check reviews and ensure they meet NSF certifications for contaminant reduction.
It’s important to be aware of any KitchenAid fridge filter recall information, though significant recalls for water filters are uncommon. If a recall is issued, it will typically be announced by KitchenAid or consumer safety organizations. Always use filters that are certified to reduce specific contaminants if you have concerns about your water quality.
Troubleshooting Common Issues
Even with simple instructions, you might encounter a minor hiccup. Here are some common issues and how to resolve them:
- Water Leaking:
- Cause: The filter may not be seated correctly or the O-rings are damaged.
- Solution: Remove the filter, check the O-rings for damage, ensure the filter is properly aligned, and reinsert it firmly. If the leak persists, the filter may be defective, or there might be an issue with the housing.
- Water Flow is Slow:
- Cause: Air bubbles in the system, or the filter is already becoming clogged.
- Solution: Ensure you’ve flushed the system thoroughly for the recommended amount of time. If the flow remains slow after flushing, the filter might be nearing the end of its lifespan or is faulty.
- Filter Indicator Light Doesn’t Reset:
- Cause: Incorrect button sequence or a malfunction in the refrigerator’s system.
- Solution: Double-check the reset procedure in your owner’s manual. Try pressing and holding the buttons for a slightly longer duration. If it still won’t reset, you may need to contact KitchenAid customer service.
- Cloudy Water After Replacement:
- Cause: Air trapped in the filter and water lines.
- Solution: Continue flushing the system by dispensing water for a longer period. The cloudiness is harmless and will disappear.
When to Replace Your KitchenAid Refrigerator Water Filter
The frequency of KitchenAid refrigerator filter replacement depends on several factors:
- Manufacturer Recommendation: Most KitchenAid refrigerator water filters are recommended to be replaced every six months.
- Water Usage: If your household dispenses a large amount of water and ice daily, you might need to replace the filter sooner.
- Water Quality: Areas with harder water or higher levels of sediment may require more frequent filter changes.
- Filter Indicator Light: The most reliable indicator is your refrigerator’s built-in filter reminder light.
Ignoring a clogged filter can lead to reduced water flow, a decrease in the quality of your water and ice, and potentially strain on your refrigerator’s water system.
Why Replacing Your Water Filter Matters
Beyond just having clean water, regularly replacing refrigerator water filter KitchenAid units offers several benefits:
- Improved Taste and Odor: Filters remove impurities like chlorine, lead, and sediment that can affect the taste and smell of your water and ice.
- Health Benefits: By reducing contaminants, you ensure your family is drinking healthier water.
- Refrigerator Longevity: A clean filter prevents sediment buildup in the water lines and ice maker, reducing the risk of clogs and potential damage to your appliance.
- Optimal Ice Maker Performance: Clear water leads to clear ice cubes and ensures your ice maker functions efficiently.
Frequently Asked Questions (FAQ)
Q1: How often should I replace my KitchenAid refrigerator water filter?
A: It’s generally recommended to replace your KitchenAid refrigerator water filter every six months, or when the filter indicator light on your refrigerator illuminates. However, this can vary based on your water usage and local water quality.
Q2: Can I use a universal water filter in my KitchenAid refrigerator?
A: While universal filters exist, it’s best to use a filter specifically designed for your KitchenAid refrigerator model. Using a non-compatible filter may result in leaks, poor filtration, or damage to your appliance. Always check the filter’s specifications for compatibility.
Q3: My new filter is dripping. What should I do?
A: If your new filter is dripping, ensure it is properly seated and tightened according to the instructions. Check the O-rings on the filter for any damage. If the dripping continues, the filter might be faulty, and you should contact the retailer or manufacturer.
Q4: How do I know which KitchenAid water filter model to buy?
A: The best way to determine the correct filter is to consult your KitchenAid refrigerator’s owner’s manual. You can also find the model number of your current filter by removing it and checking the label, or by looking up your refrigerator’s model number on the KitchenAid website.
Q5: Is it normal for the water to be cloudy after I install a new filter?
A: Yes, it’s normal for the water to appear cloudy or discolored immediately after installing a new filter. This is usually due to trapped air or loose carbon fines. Flush the system by dispensing at least a gallon of water to clear it up.
Q6: Where can I find the model number for my KitchenAid refrigerator to find the right filter?
A: The model number for your KitchenAid refrigerator is typically located on a sticker inside the refrigerator compartment, often on the side wall, behind the crisper drawers, or on the ceiling.
Q7: What contaminants does a KitchenAid refrigerator water filter remove?
A: KitchenAid refrigerator water filters are designed to reduce common impurities such as chlorine, sediment, lead, mercury, and certain volatile organic compounds (VOCs). Specific contaminant reduction depends on the filter model. Always check the filter’s packaging or specifications for details.
By following these detailed steps and tips, you can confidently perform your KitchenAid refrigerator water filter change, ensuring you and your family enjoy pure, refreshing water and ice from your appliance for years to come.