Is your KitchenAid dishwasher not draining? Don’t worry; this guide will walk you through how to drain your KitchenAid dishwasher step-by-step. Often, a dishwasher not draining is due to a simple blockage or a minor issue that you can resolve yourself without calling a repair person.
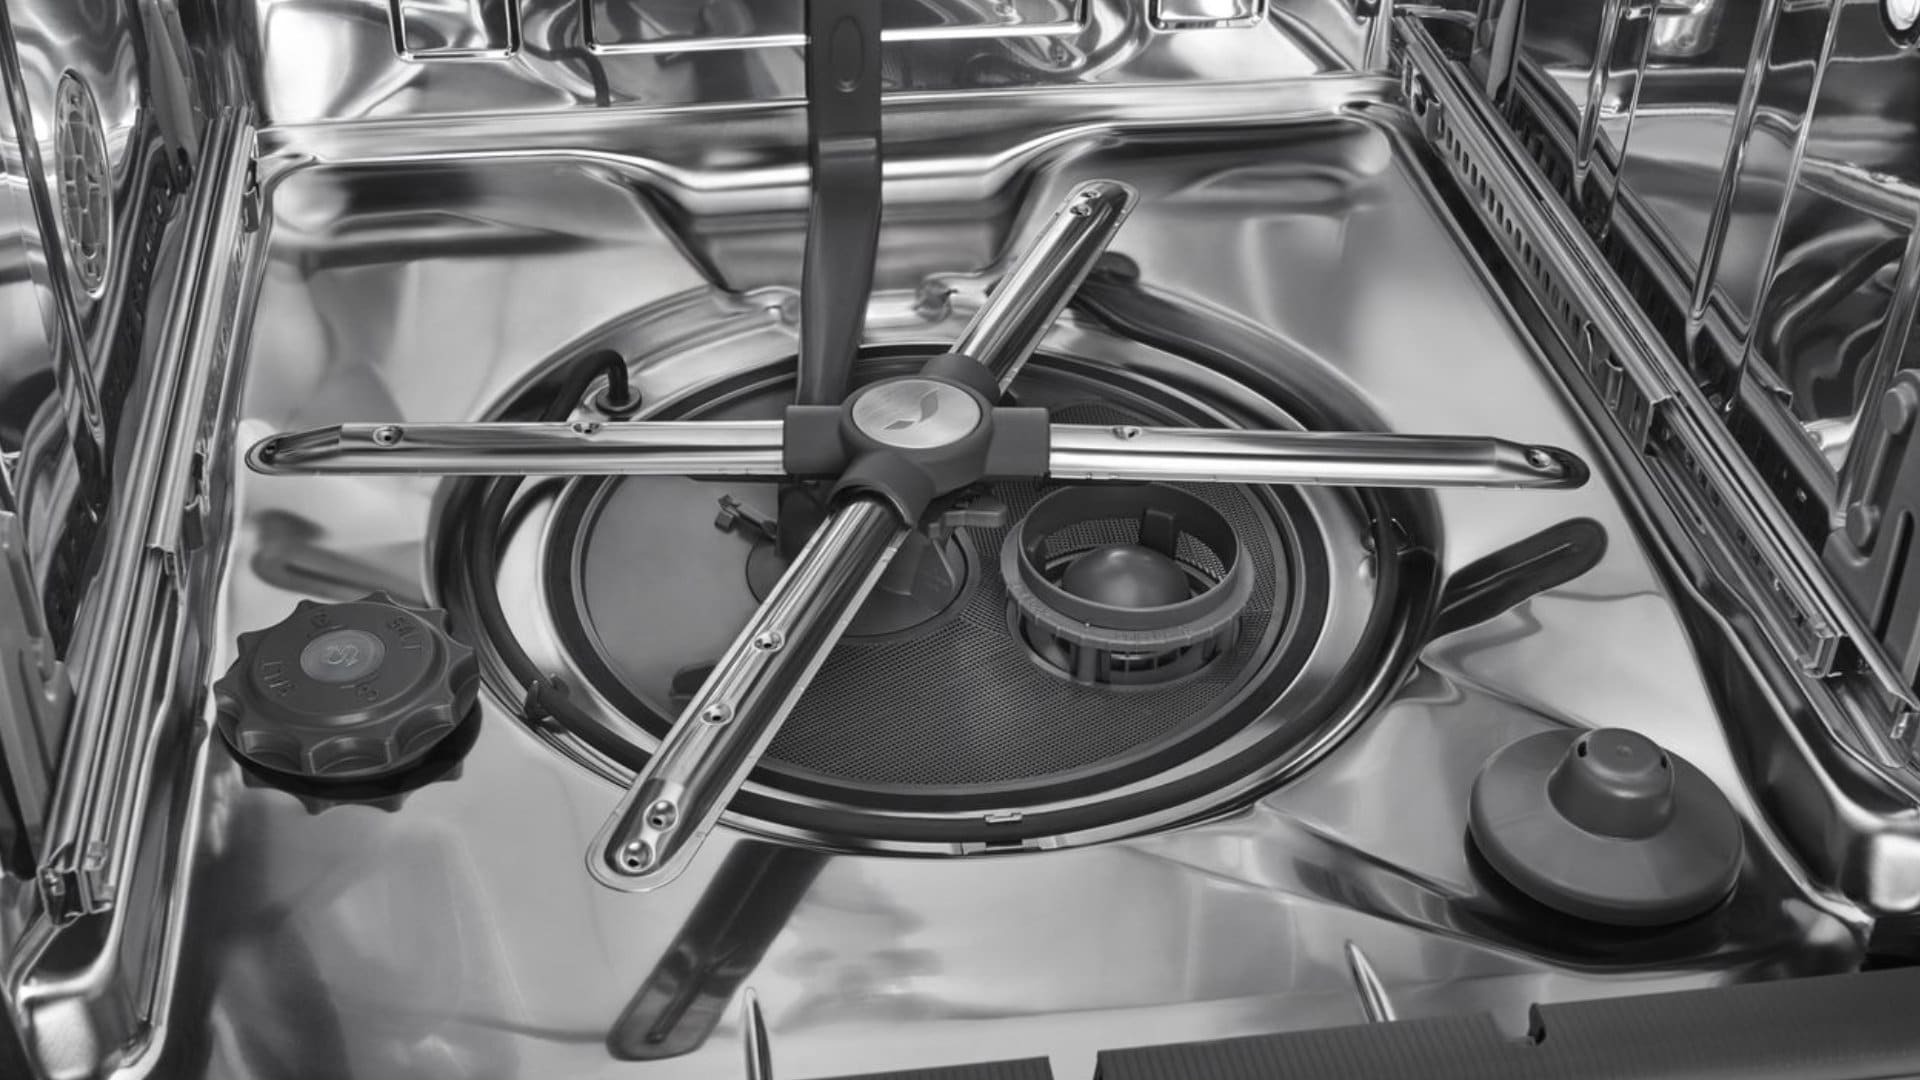
Image Source: flamingoappliance.com
Why Won’t My KitchenAid Dishwasher Drain?
There are several common reasons why your KitchenAid dishwasher might not be draining:
- Clogged Dishwasher Drain: This is the most frequent culprit. Food particles, grease, or other debris can build up over time, blocking the flow of water.
- Blocked Dishwasher Filter: Most dishwashers have a filter designed to catch food debris. If this filter is full or clogged, it can prevent proper drainage.
- Kinked or Blocked Dishwasher Drain Hose: The flexible hose that carries water from the dishwasher to the drain can become kinked, bent, or blocked internally.
- Garbage Disposal Connection Issues: If your dishwasher drains into your kitchen sink’s garbage disposal, a clog or blockage in the disposal itself can stop the dishwasher from draining.
- Faulty Dishwasher Pump: The pump is responsible for pushing water out of the dishwasher. If it’s malfunctioning, it won’t be able to drain the water.
- Check Valve Problems: A small valve that prevents dirty water from flowing back into the dishwasher can get stuck.
- Incorrect Installation or Venting: While less common, improper installation can lead to drainage problems.
Safety First!
Before you start any troubleshooting or draining process, always remember to prioritize safety.
- Disconnect Power: Crucially, turn off the power to your dishwasher at the circuit breaker. This prevents any electrical shocks. Locate your home’s electrical panel and flip the breaker switch labeled “Dishwasher.”
- Wear Gloves: You’ll be dealing with potentially unsanitary water and debris, so wearing rubber gloves is highly recommended.
- Have Towels Ready: Expect some water spillage. Keep plenty of old towels or rags handy to soak up any messes.
Step-by-Step Guide to Draining Your KitchenAid Dishwasher
This guide will help you tackle a dishwasher not draining scenario by manually draining the water.
Step 1: Accessing the Dishwasher Interior
- Open the Dishwasher Door: Carefully open the dishwasher door. You’ll likely see standing water at the bottom.
- Remove Lower Rack: Pull out the lower rack. This gives you better access to the bottom of the dishwasher tub where the drain is located.
Step 2: Manual Draining Methods
There are a few ways to manually drain the water from your KitchenAid dishwasher if it’s not draining on its own.
Method 1: Using a Siphon or Turkey Baster
This method is effective for removing small to moderate amounts of standing water.
- Prepare Your Tools: You’ll need a clean siphon hose (often used for aquariums) or a large turkey baster. You’ll also need a bucket or container to collect the water.
- Insert the Siphon/Baster: Place one end of the siphon hose into the standing water at the bottom of the dishwasher tub. If using a turkey baster, draw water into the baster.
- Transfer Water: Carefully guide the other end of the siphon hose into the bucket, ensuring it’s lower than the water level in the dishwasher. If using a turkey baster, squeeze the water into the bucket.
- Repeat: Continue this process, siphoning or basting the water out until the tub is as dry as possible. This can take some time if there’s a lot of water.
Method 2: Soaking Up Water with Towels
This is a more labor-intensive method but works well if you don’t have a siphon or baster.
- Gather Towels: Have several absorbent towels ready.
- Place Towels: Lay towels in the bottom of the dishwasher tub to absorb the standing water.
- Wring Out Towels: Once a towel is saturated, carefully pick it up and wring it out into a bucket or drain.
- Replace Towels: Continue using fresh, dry towels until most of the water is removed.
Method 3: Draining Through the Drain Hose (Advanced)
This method involves disconnecting the dishwasher drain hose. Only attempt this if you are comfortable with basic plumbing and have disconnected the power.
- Locate the Drain Hose: The dishwasher drain hose typically runs from the back of the dishwasher to the kitchen sink plumbing or garbage disposal. You might need to pull the dishwasher out slightly from under the counter to access it.
- Identify the Connection Point: The hose usually connects to a “Y” fitting or a direct nipple on your garbage disposal or under the sink. There may be a clamp securing it.
- Position a Bucket: Place a shallow bucket or pan directly beneath the connection point.
- Disconnect the Hose: Carefully loosen the clamp (using a screwdriver or pliers) and gently pull the drain hose off its connection. Be prepared for water to flow out immediately.
- Drain into Bucket: Hold the end of the hose over the bucket and allow the water to drain out. You may need to raise and lower the hose to get all the water out.
- Reconnect Hose: Once drained, reattach the hose securely to its connection point and tighten the clamp.
Step 3: Addressing Potential Clogs
Once you’ve drained the water, it’s time to find out why it didn’t drain in the first place. This is where you’ll focus on clearing any dishwasher clogged drain issues.
Clearing the Dishwasher Filter
Your KitchenAid dishwasher has a filter that needs regular cleaning.
- Locate the Filter: The filter is usually found at the bottom of the dishwasher tub, beneath the lower spray arm. It typically consists of a cylindrical mesh filter and sometimes a flat pre-filter.
- Remove the Filter: Most filters can be unscrewed or unclipped. Consult your KitchenAid dishwasher manual if you’re unsure of the exact mechanism.
- Clean the Filter: Rinse the filter thoroughly under running water. Use a soft brush to remove any stubborn food particles or grease.
- Check Filter Housing: While the filter is out, check the housing for any debris that might have bypassed the filter.
- Reinstall the Filter: Make sure the filter is properly seated and secured before running the dishwasher.
Checking the Dishwasher Drain Hose
A kinked or blocked dishwasher drain hose is a common problem.
- Inspect the Hose: Follow the entire length of the drain hose from the dishwasher to its connection point. Look for any sharp bends or kinks that could restrict water flow. Gently straighten any kinks you find.
- Check for Blockages: If you suspect a blockage within the hose, and you’ve already disconnected it (Method 3 above), you can try to blow through it or run water through it. If it remains blocked, you might need to replace the hose.
Inspecting the Garbage Disposal Connection
If your dishwasher drains into a garbage disposal, this is a critical area to check.
- Ensure Disposal is Clear: Run your garbage disposal briefly with cold water to ensure it’s clear of any food debris. A clogged garbage disposal will prevent the dishwasher from draining.
- Check the Knockout Plug: For new installations or if the dishwasher has never drained into the disposal before, there’s a small knockout plug inside the dishwasher inlet on the disposal. This plug must be removed.
- Safety First: Turn off the power to both the dishwasher and the garbage disposal at the circuit breaker.
- Access the Disposal Inlet: You may need to disconnect the dishwasher drain hose from the disposal.
- Locate the Plug: Feel inside the inlet port on the garbage disposal where the dishwasher hose connects. If it feels like a solid obstruction, it’s likely the plug.
- Remove the Plug: Use a screwdriver and hammer to carefully tap the plug inward, pushing it into the garbage disposal. Once it’s inside, you can retrieve it. Never force it; gently tap it.
- Reconnect Hose: Reconnect the dishwasher drain hose and secure it with the clamp.
Examining the Air Gap (if applicable)
Some plumbing codes require an air gap on the dishwasher drain line, usually mounted on your sink or countertop.
- Locate the Air Gap: It looks like a small metal cylinder with two caps.
- Remove the Top Cap: Twist or lift off the decorative top cap.
- Check for Debris: Inside, you’ll see a smaller plastic cap. Remove this to access the drain pathway. Look for any food particles or blockages.
- Clean and Reassemble: Clean out any debris and reassemble the air gap.
Checking the Dishwasher Pump and Check Valve
If the filter, hose, and garbage disposal are all clear, the issue might be with the dishwasher pump or its associated components.
- Dishwasher Pump: The pump is the heart of the drainage system. If it’s failed, it won’t be able to move water. Symptoms of a bad pump can include unusual noises during the drain cycle or no noise at all.
- Check Valve: This valve prevents dirty water from flowing back into the dishwasher. If it’s stuck in the closed position, water won’t be able to exit.
Troubleshooting these components usually requires removing the kick panel at the bottom front of the dishwasher and potentially working with electrical connections. This is a more advanced step and if you are not comfortable, it’s best to call a professional.
Step 4: Testing the Drainage
After performing the cleaning and checks, it’s time to see if you’ve fixed the problem.
- Reconnect Power: Turn the power back on at the circuit breaker.
- Run a Drain Cycle: The easiest way to test is to run a short drain and rinse cycle or the “drain” option if your dishwasher has one.
- Observe: Listen for the dishwasher pump running and watch to see if the water drains completely.
Common KitchenAid Dishwasher Error Codes Related to Drainage
Some KitchenAid dishwashers display error codes when there’s a drainage issue. While specific codes can vary by model, here are some common ones and what they might indicate:
| Error Code Example | Potential Cause | What it Means |
|---|---|---|
| KDTF… / KUDT… (Specific model series) | Not Draining | General drainage problem. |
| F9 E1 / A2 | Drain pump not running or blocked | The pump is not working or water cannot exit. |
| F7 E1 | Drain hose kinked or blocked | Water is unable to flow through the hose. |
| F2 E2 | Drain system error | An issue within the drainage plumbing. |
| F1 E1 | Water level sensor error | The sensor may be affected by standing water. |
Always refer to your specific KitchenAid dishwasher model’s manual for an accurate list of error codes and their meanings.
Preventative Dishwasher Maintenance for Optimal Drainage
Regular maintenance can prevent many common drainage problems and extend the life of your appliance.
Regular Filter Cleaning
- Frequency: Clean your dishwasher filter at least once a month, or more often if you run your dishwasher frequently or tend to have a lot of food debris.
- Benefits: Keeps food particles from reaching the pump and drain hose.
Scraping Plates
- Practice: Scrape large food particles off plates and dishes before loading them into the dishwasher. You don’t need to rinse them thoroughly, just remove the major scraps.
- Benefits: Reduces the amount of debris that can clog the filter and drain system.
Checking the Drain Hose
- Periodically: Every few months, take a quick look at the dishwasher drain hose behind the unit to ensure it’s not kinked or bent.
Running Hot Water Before Starting
- Habit: Before starting a dishwasher cycle, run hot water from your kitchen sink for a minute.
- Benefits: This ensures that hot water is available for the wash cycle and can help clear any minor gunk in the garbage disposal or drainpipe connection.
Using the Right Detergent
- Avoid Over-sudsing: Use only dishwasher detergent specifically designed for dishwashers. Using regular dish soap can create excessive suds that can interfere with drainage and even damage the dishwasher.
When to Call a Professional
While many drainage issues can be resolved with this guide, there are times when professional help is needed.
- Persistent Problems: If you’ve followed all the steps and your dishwasher still isn’t draining, there may be a more significant internal issue.
- Electrical Concerns: If you’re not comfortable working with electrical components or suspect an electrical fault with the dishwasher pump, call a qualified appliance technician.
- Complex Plumbing: If the problem seems to involve your home’s main plumbing or the garbage disposal connection is unusual, a plumber might be needed.
- Internal Component Failure: If you suspect the dishwasher pump itself has failed or another internal component is broken, a technician can diagnose and replace it.
Frequently Asked Questions (FAQ)
Can I leave standing water in my KitchenAid dishwasher for a long time?
It’s best to drain the water as soon as possible. Standing water can lead to odors, mold, and potential damage to internal components over time.
Do I need to disconnect the garbage disposal from the dishwasher to check for clogs?
It depends on the type of clog. If you suspect the clog is within the garbage disposal itself, you might need to disconnect the hose. However, for simple filter or air gap clogs, disconnecting the disposal might not be necessary. Always disconnect power first.
How often should I clean my KitchenAid dishwasher filter?
It’s recommended to clean your dishwasher filter at least once a month. If you notice a decrease in performance or odor, clean it more frequently.
What if my KitchenAid dishwasher is making loud grinding noises when it should be draining?
This often indicates a problem with the dishwasher pump or something lodged in the pump impeller. This is a situation where professional diagnosis is usually required.
My KitchenAid dishwasher is not draining, but the pump is running. What could be wrong?
If the dishwasher pump is running but water isn’t leaving the tub, it strongly suggests a blockage further down the line – likely in the dishwasher drain hose, the air gap, or the garbage disposal connection. Check these components thoroughly.
By following this comprehensive, step-by-step guide, you should be able to effectively drain your KitchenAid dishwasher and diagnose the most common reasons why it might not be draining. Remember to always prioritize safety and consult your appliance manual for model-specific instructions. Regular maintenance will help prevent future drainage headaches.